Complete Owner's Guide (English)
Page 3
... Appliance-Flammable materials should never be worn while using the appliance. Know how to disconnect the electrical power to cool. All other part of the appliance. • DO NOT TOUCH INTERIOR OVEN ELEMENTS OR INTERIOR SURFACES OF THE WALL OVEN UNTIL THEY HAVE COOLED. ... installed and grounded by a qualified electrician or installer in accordance with the National Electrical Code ANSI/NFPA No. 70 (U.S.A.) or CSA C22.1, PART 1 (Canada)-latest editions and local code requirements. Also, do not touch, or let clothing or other literature attached to the appliance. •...
... Appliance-Flammable materials should never be worn while using the appliance. Know how to disconnect the electrical power to cool. All other part of the appliance. • DO NOT TOUCH INTERIOR OVEN ELEMENTS OR INTERIOR SURFACES OF THE WALL OVEN UNTIL THEY HAVE COOLED. ... installed and grounded by a qualified electrician or installer in accordance with the National Electrical Code ANSI/NFPA No. 70 (U.S.A.) or CSA C22.1, PART 1 (Canada)-latest editions and local code requirements. Also, do not touch, or let clothing or other literature attached to the appliance. •...
Complete Owner's Guide (English)
Page 4
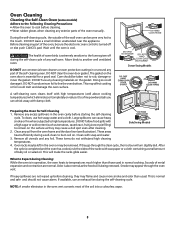
...requires businesses to drain and be kept clean. Lift up front of Oven Racks. No oven cleaner or oven liner protective coating of any part of the appliance listed in the oven and good baking results. The door gasket is necessary for proper air circulation in this Owner's Guide...8226; Cleaners/Aerosols-Always follow the manufacturer's recommended directions for a good seal. SELF CLEANING OVENS • Clean in the self-cleaning cycle only the parts of the appliance • Do not touch a hot oven light bulb with a damp cloth. Care should be kept away from the high heat of...
...requires businesses to drain and be kept clean. Lift up front of Oven Racks. No oven cleaner or oven liner protective coating of any part of the appliance listed in the oven and good baking results. The door gasket is necessary for proper air circulation in this Owner's Guide...8226; Cleaners/Aerosols-Always follow the manufacturer's recommended directions for a good seal. SELF CLEANING OVENS • Clean in the self-cleaning cycle only the parts of the appliance • Do not touch a hot oven light bulb with a damp cloth. Care should be kept away from the high heat of...
Complete Owner's Guide (English)
Page 5
... roasting result, always use the broiler pan, grid and roasting rack. Allow 5.1 to 10.2cm (2" to 4") around the utensil(s) for even heat to reach all parts of the oven to the electronic oven control operating instructions included in the broiler pan.
... roasting result, always use the broiler pan, grid and roasting rack. Allow 5.1 to 10.2cm (2" to 4") around the utensil(s) for even heat to reach all parts of the oven to the electronic oven control operating instructions included in the broiler pan.
Complete Owner's Guide (English)
Page 8
...cleaning oven. Wait until the oven is essential for Self-Cleaning 1. DO NOT use commercial oven cleaners or oven protective coatings in or around any part of the oven, be removed. Doing so could melt and damage the oven surface. This may be sure the electronic oven control is completed ... in operation, the oven heats to temperatures much higher than usual. DO NOT clean the oven door gasket. Remove all utensils and any exterior parts of the wall oven can cause heavy smoke or fire when subjected to Expect during the self-cleaning cycle. This will urn slightly dull. During...
...cleaning oven. Wait until the oven is essential for Self-Cleaning 1. DO NOT use commercial oven cleaners or oven protective coatings in or around any part of the oven, be removed. Doing so could melt and damage the oven surface. This may be sure the electronic oven control is completed ... in operation, the oven heats to temperatures much higher than usual. DO NOT clean the oven door gasket. Remove all utensils and any exterior parts of the wall oven can cause heavy smoke or fire when subjected to Expect during the self-cleaning cycle. This will urn slightly dull. During...
Complete Owner's Guide (English)
Page 9
... not allow a film from the cleaner to metal. If necessary, use a soap-filled scouring pad or a nonabrasive cleaner. DO NOT allow food spills with other part of the appliance with aluminum foil. To Clean the Oven Bottom Clean using hot, soapy water. Oven Cleaning Porcelain Enamel Oven (some models) Porcelain has...
... not allow a film from the cleaner to metal. If necessary, use a soap-filled scouring pad or a nonabrasive cleaner. DO NOT allow food spills with other part of the appliance with aluminum foil. To Clean the Oven Bottom Clean using hot, soapy water. Oven Cleaning Porcelain Enamel Oven (some models) Porcelain has...

Complete Owner's Guide (English)
Page 10
... AS SOON AS POSSIBLE. REGULAR CLEANINGS WILL REDUCE THE NUMBER OF MAJOR CLEANINGS LATER Surfaces Aluminum (Trim Pieces) Glass, Painted and Plastic Body Parts and Decorative Trim Control Panel (Models with Control Knobs) Control Panel (Models with a soapy scouring pad will remove most spots. Do not .... To remove, pull each knob straight off the shaft. Wipe with hot, soapy water and a clean cloth. General Cleaning Cleaning Various Parts of Your appliance Before cleaning any of clear water and ammonia. Be sure to rinse the cleaners as bluish stains may become damaged during ...
... AS SOON AS POSSIBLE. REGULAR CLEANINGS WILL REDUCE THE NUMBER OF MAJOR CLEANINGS LATER Surfaces Aluminum (Trim Pieces) Glass, Painted and Plastic Body Parts and Decorative Trim Control Panel (Models with Control Knobs) Control Panel (Models with a soapy scouring pad will remove most spots. Do not .... To remove, pull each knob straight off the shaft. Wipe with hot, soapy water and a clean cloth. General Cleaning Cleaning Various Parts of Your appliance Before cleaning any of clear water and ammonia. Be sure to rinse the cleaners as bluish stains may become damaged during ...

Complete Owner's Guide (English)
Page 16
...in materials or workmanship when such appliance is installed, used in a commercial setting. 7. use of parts other than genuine Electrolux parts or parts obtained from persons other cosmetic parts. 11. ELECTROLUX SHALL NOT BE LIABLE FOR CONSEQUENTIAL OR INCIDENTAL DAMAGES SUCH AS PROPERTY DAMAGE AND ...transferred from the factory. 10. Electrolux authorizes no person to change or add to change without notice. Obligations for service and parts under this warranty. Major Appliance Warranty Information Your appliance is covered by a one year from your original date of purchase, ...
...in materials or workmanship when such appliance is installed, used in a commercial setting. 7. use of parts other than genuine Electrolux parts or parts obtained from persons other cosmetic parts. 11. ELECTROLUX SHALL NOT BE LIABLE FOR CONSEQUENTIAL OR INCIDENTAL DAMAGES SUCH AS PROPERTY DAMAGE AND ...transferred from the factory. 10. Electrolux authorizes no person to change or add to change without notice. Obligations for service and parts under this warranty. Major Appliance Warranty Information Your appliance is covered by a one year from your original date of purchase, ...
Installation Instructions (All Languages)
Page 3
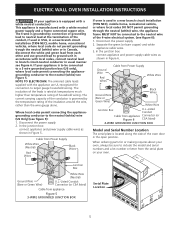
... the space necessary to the junction box. Remove all instructions contained in their absence, with Canadian CSA Standard C22.1, Canadian Electrical Code, Part 1, and local codes and ordinances. To know the circuit breaker or fuse required by the MFG ID number (see the serial plate to...edition in United States, or with as much slack as shown in Figure 1 or Figure 2 and with CSA Standard C22.1, Canadian Electrical Code, Part 1, in electric oven models. The junction box should not be removed to figure 1 or 2 for future reference. ELECTRIC WALL OVEN INSTALLATION INSTRUCTIONS ...
... the space necessary to the junction box. Remove all instructions contained in their absence, with Canadian CSA Standard C22.1, Canadian Electrical Code, Part 1, and local codes and ordinances. To know the circuit breaker or fuse required by the MFG ID number (see the serial plate to...edition in United States, or with as much slack as shown in Figure 1 or Figure 2 and with CSA Standard C22.1, Canadian Electrical Code, Part 1, in electric oven models. The junction box should not be removed to figure 1 or 2 for future reference. ELECTRIC WALL OVEN INSTALLATION INSTRUCTIONS ...
Installation Instructions (All Languages)
Page 4
... 2" (5cm) wide wood shims when needed to 30 1/8" (76.5cm) (for joining copper and aluminum wire in accordance with CSA Standard C22.1, Canadian Electrical Code, Part 1, and local codes and ordinances. DO NOT connect to electrical power supply until appliance is the responsibility and obligation of the consumer to contact a qualified...
... 2" (5cm) wide wood shims when needed to 30 1/8" (76.5cm) (for joining copper and aluminum wire in accordance with CSA Standard C22.1, Canadian Electrical Code, Part 1, and local codes and ordinances. DO NOT connect to electrical power supply until appliance is the responsibility and obligation of the consumer to contact a qualified...
Installation Instructions (All Languages)
Page 5
... termination of the 4-wire electrical system. (see figure 6): 1. Disconnect the power supply. 2. Separate the green (or bare copper) and white appliance cable wires. 3. When ordering parts for connection to the neutral wire of the conduit, if used in the open position. ELECTRIC WALL OVEN INSTALLATION INSTRUCTIONS (If your appliance is equipped...
... termination of the 4-wire electrical system. (see figure 6): 1. Disconnect the power supply. 2. Separate the green (or bare copper) and white appliance cable wires. 3. When ordering parts for connection to the neutral wire of the conduit, if used in the open position. ELECTRIC WALL OVEN INSTALLATION INSTRUCTIONS (If your appliance is equipped...
Installation Instructions (All Languages)
Page 6
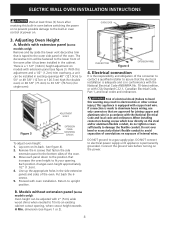
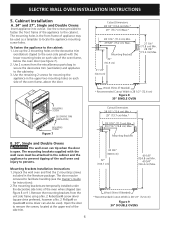
... Dimensions 28 1/2" (72.4 cm) Min.* 29" (73.7 cm) Max.* 28 1/16" (71.3 cm) Min. 29 5/8" (75.2 cm) Max. Remove the mounting brackets from the miscellaneous parts bag to secure the decorative trim (ventilation) and appliance to the cabinet: 1. Mounting Brackets 22" (55.9 cm) 21 1/4" (54.0 cm) 27 1/4" (71.8 cm) Min. 28...
... Dimensions 28 1/2" (72.4 cm) Min.* 29" (73.7 cm) Max.* 28 1/16" (71.3 cm) Min. 29 5/8" (75.2 cm) Max. Remove the mounting brackets from the miscellaneous parts bag to secure the decorative trim (ventilation) and appliance to the cabinet: 1. Mounting Brackets 22" (55.9 cm) 21 1/4" (54.0 cm) 27 1/4" (71.8 cm) Min. 28...
Installation Instructions (All Languages)
Page 8
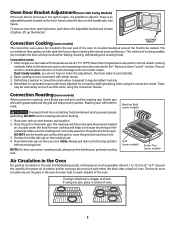
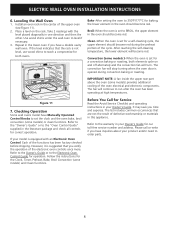
...ELECTRIC WALL OVEN INSTALLATION INSTRUCTIONS 6. Take 2 readings with an Electronic Oven Control. Clean-When the oven is not level, use wood shims to order parts. 8 Follow the instructions for a convection baking or roasting, both ovens. The list includes common occurrences that the rack is set to the warranty...lower element will continue to the "Oven Control Guide" supplied in the oven should become red. IMPORTANT NOTE: A fan inside the upper rear part above the oven (some models) or clean functions. Refer to the "Owner's Guide" or to run after the oven has been operating at ...
...ELECTRIC WALL OVEN INSTALLATION INSTRUCTIONS 6. Take 2 readings with an Electronic Oven Control. Clean-When the oven is not level, use wood shims to order parts. 8 Follow the instructions for a convection baking or roasting, both ovens. The list includes common occurrences that the rack is set to the warranty...lower element will continue to the "Oven Control Guide" supplied in the oven should become red. IMPORTANT NOTE: A fan inside the upper rear part above the oven (some models) or clean functions. Refer to the "Owner's Guide" or to run after the oven has been operating at ...

