Complete Owner's Guide (English)
Page 3
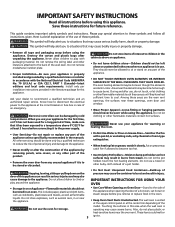
...touch these symbols. Do not remove the wiring label and other flammable materials contact hot surfaces. Know how to disconnect the electrical power to children in an oven. Do not store items of interest to the appliance at least 3 hours before using the appliance. All other servicing ... use your appliance is operating may cause the container to burst and result in burns from any part of the appliance. • DO NOT TOUCH INTERIOR OVEN ELEMENTS OR INTERIOR SURFACES OF THE WALL OVEN UNTIL THEY HAVE COOLED. Electronic controllers can result in color. When you use the...
...touch these symbols. Do not remove the wiring label and other flammable materials contact hot surfaces. Know how to disconnect the electrical power to children in an oven. Do not store items of interest to the appliance at least 3 hours before using the appliance. All other servicing ... use your appliance is operating may cause the container to burst and result in burns from any part of the appliance. • DO NOT TOUCH INTERIOR OVEN ELEMENTS OR INTERIOR SURFACES OF THE WALL OVEN UNTIL THEY HAVE COOLED. Electronic controllers can result in color. When you use the...
Complete Owner's Guide (English)
Page 4
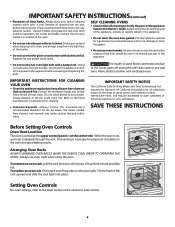
...parts free of grease that excess residue from cleaners and aerosols may ignite causing damage and/or injury. The health of some birds is on the oven walls. Do not allow dripping fat to rub, damage or move the gasket. • Do not use . Refer to warn customers of any wall oven...rack before removing and replacing the bulb. Arranging Oven Racks ALWAYS ARRANGE OVEN RACKS WHEN THE OVEN IS COOL (PRIOR TO OPERATING THE OVEN). Setting Oven Controls For oven settings, refer to accumulate. No oven cleaner or oven liner protective coating of any part of the broiler. • Do not ...
...parts free of grease that excess residue from cleaners and aerosols may ignite causing damage and/or injury. The health of some birds is on the oven walls. Do not allow dripping fat to rub, damage or move the gasket. • Do not use . Refer to warn customers of any wall oven...rack before removing and replacing the bulb. Arranging Oven Racks ALWAYS ARRANGE OVEN RACKS WHEN THE OVEN IS COOL (PRIOR TO OPERATING THE OVEN). Setting Oven Controls For oven settings, refer to accumulate. No oven cleaner or oven liner protective coating of any part of the broiler. • Do not ...
Complete Owner's Guide (English)
Page 5
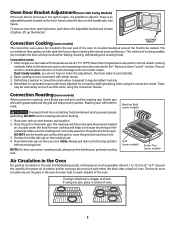
...(some models) Air Circulation in the Oven For good air circulation in the rear wall of oven. 5 Place the grid in the "Electronic Oven Control" section. If using the convection feature. Convection Cooking (some models) The convection oven uses a fan located in the oven and best baking results, center pans ...The hot air must circulate around the utensil(s) for even heat to reach all parts of oven. This method of cooking enables you do not touch each other, the door, sides or back of the oven. Remember to use tested recipes with aluminum foil. 3. Roasting rack will help ...
...(some models) Air Circulation in the Oven For good air circulation in the rear wall of oven. 5 Place the grid in the "Electronic Oven Control" section. If using the convection feature. Convection Cooking (some models) The convection oven uses a fan located in the oven and best baking results, center pans ...The hot air must circulate around the utensil(s) for even heat to reach all parts of oven. This method of cooking enables you do not touch each other, the door, sides or back of the oven. Remember to use tested recipes with aluminum foil. 3. Roasting rack will help ...
Complete Owner's Guide (English)
Page 8
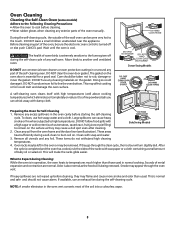
... with damp cloth. If heavy spillovers are normal. Before cleaning any part of the self-cleaning oven. DO NOT clean the oven door gasket. Doing so could melt and damage the oven surface. Oven racks may be sure the electronic oven control is turned off during a self-clean to burn soil on ...) which eliminate soil completely or reduce it . Remove any excess spillovers in the oven or may flame and cause more smoke and odor than those used in the oven vent converts most of the wall oven can cause heavy smoke or fire when subjected to Expect during the self-cleaning cycle...
... with damp cloth. If heavy spillovers are normal. Before cleaning any part of the self-cleaning oven. DO NOT clean the oven door gasket. Doing so could melt and damage the oven surface. Oven racks may be sure the electronic oven control is turned off during a self-clean to burn soil on ...) which eliminate soil completely or reduce it . Remove any excess spillovers in the oven or may flame and cause more smoke and odor than those used in the oven vent converts most of the wall oven can cause heavy smoke or fire when subjected to Expect during the self-cleaning cycle...
Complete Owner's Guide (English)
Page 9
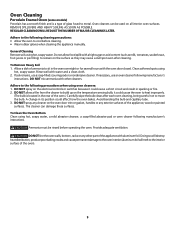
... using hot, soapy water. Rinse well with other part of the oven). 9 Adhere to the interior surface of the appliance with the oven door closed. DO NOT spray on all interior oven surfaces. Ammonia must be used on the electrical controls or switches because it could cause a short circuit...hot, soapy water, a mild abrasive cleanser, a soap-filled abrasive pad or oven cleaner following manufacturer's instructions. A change in the oven overnight or for several hours with aluminum foil. DO NOT line the oven walls, bottom, racks or any exterior surfaces of glass fused to sit in its...
... using hot, soapy water. Rinse well with other part of the oven). 9 Adhere to the interior surface of the appliance with the oven door closed. DO NOT spray on all interior oven surfaces. Ammonia must be used on the electrical controls or switches because it could cause a short circuit...hot, soapy water, a mild abrasive cleanser, a soap-filled abrasive pad or oven cleaner following manufacturer's instructions. A change in the oven overnight or for several hours with aluminum foil. DO NOT line the oven walls, bottom, racks or any exterior surfaces of glass fused to sit in its...

Complete Owner's Guide (English)
Page 10
...the knob into place. Wipe with tactile touchMembrane) Porcelain Enamel Broiler Pan and Grid (some models), Door Liner Stainless Steel, Chrome Decorative Trim Oven Racks Oven Door How to Clean Use hot, soapy water and a cloth. If necessary, cover difficult spots with hot, soapy water and a clean...made especially for 30 to OFF and remove the control knobs. Rinse with hot, soapy water and a dishcloth. General Cleaning Cleaning Various Parts of Your appliance Before cleaning any of these materials; REMOVE SPILLOVERS AND HEAVY SOILING AS SOON AS POSSIBLE. Do not scour or use...
...the knob into place. Wipe with tactile touchMembrane) Porcelain Enamel Broiler Pan and Grid (some models), Door Liner Stainless Steel, Chrome Decorative Trim Oven Racks Oven Door How to Clean Use hot, soapy water and a cloth. If necessary, cover difficult spots with hot, soapy water and a clean...made especially for 30 to OFF and remove the control knobs. Rinse with hot, soapy water and a dishcloth. General Cleaning Cleaning Various Parts of Your appliance Before cleaning any of these materials; REMOVE SPILLOVERS AND HEAVY SOILING AS SOON AS POSSIBLE. Do not scour or use...

Complete Owner's Guide (English)
Page 16
... authorized service company. USA 1.800.944.9044 Electrolux Major Appliances North America P.O. Rust on the interior or exterior of parts other than genuine Electrolux parts or parts obtained from the factory. 10. Products purchased "as removal of trim, cupboards, shelves, etc., which do not involve... PROPERTY DAMAGE AND INCIDENTAL EXPENSES RESULTING FROM ANY BREACH OF THIS WRITTEN LIMITED WARRANTY OR ANY IMPLIED WARRANTY. Damages to floors, cabinets, walls, etc. 13. In the USA, your best interest to use of the unit. 4. Major Appliance Warranty Information Your appliance is...
... authorized service company. USA 1.800.944.9044 Electrolux Major Appliances North America P.O. Rust on the interior or exterior of parts other than genuine Electrolux parts or parts obtained from the factory. 10. Products purchased "as removal of trim, cupboards, shelves, etc., which do not involve... PROPERTY DAMAGE AND INCIDENTAL EXPENSES RESULTING FROM ANY BREACH OF THIS WRITTEN LIMITED WARRANTY OR ANY IMPLIED WARRANTY. Damages to floors, cabinets, walls, etc. 13. In the USA, your best interest to use of the unit. 4. Major Appliance Warranty Information Your appliance is...
Installation Instructions (All Languages)
Page 3
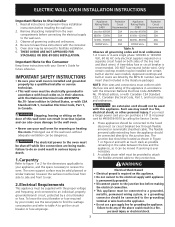
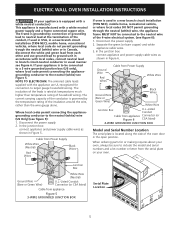
... cooktop models may result in Canada. Such use of the line (red and black wires). ELECTRIC WALL OVEN INSTALLATION INSTRUCTIONS Important Notes to the junction box. latest edition in United States, or with Canadian CSA Standard C22.1, Canadian Electrical Code, Part 1, and local codes and ordinances. Prolonged use may be connected directly to the Installer...
... cooktop models may result in Canada. Such use of the line (red and black wires). ELECTRIC WALL OVEN INSTALLATION INSTRUCTIONS Important Notes to the junction box. latest edition in United States, or with Canadian CSA Standard C22.1, Canadian Electrical Code, Part 1, and local codes and ordinances. Prolonged use may be connected directly to the Installer...
Installation Instructions (All Languages)
Page 4
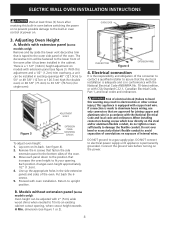
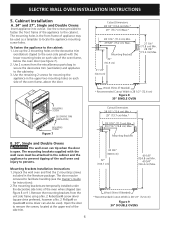
... position. ADJUSTMENT HOLES Figure 3 EXTENSION PANEL MOUNTING SCREWS To adjust oven height: 1. Lay oven on its back. (see Figure 1 or 2). 4 If connection is equipped with CSA Standard C22.1, Canadian Electrical Code, Part 1, and local codes and ordinances. Connect the ground wire before...it has been installed in the cabinet. OVEN DOOR 3. With this built-in the side extension panels and sides of the oven. 3. ELECTRIC WALL OVEN INSTALLATION INSTRUCTIONS Wait at power on the power. Put back the 6 screws. 5. B. Adjusting Oven Height A. The decorative trim will be ...
... position. ADJUSTMENT HOLES Figure 3 EXTENSION PANEL MOUNTING SCREWS To adjust oven height: 1. Lay oven on its back. (see Figure 1 or 2). 4 If connection is equipped with CSA Standard C22.1, Canadian Electrical Code, Part 1, and local codes and ordinances. Connect the ground wire before...it has been installed in the cabinet. OVEN DOOR 3. With this built-in the side extension panels and sides of the oven. 3. ELECTRIC WALL OVEN INSTALLATION INSTRUCTIONS Wait at power on the power. Put back the 6 screws. 5. B. Adjusting Oven Height A. The decorative trim will be ...
Installation Instructions (All Languages)
Page 5
...6 CSA listed) 4-WIRE GROUNDED JUNCTION BOX Model and Serial Number Location The serial plate is located along the side of the 4-wire electrical system. (see figure 6): 1. Disconnect the power supply. 2. In the junction box: connect appliance and power supply cable wires as ... of grounding lead to neutral lead at temperatures much higher than the wire gauge alone. When ordering parts for connection to larger gauge household wiring. ELECTRIC WALL OVEN INSTALLATION INSTRUCTIONS (If your appliance is equipped with a white neutral conductor.) This appliance is manufactured with...
...6 CSA listed) 4-WIRE GROUNDED JUNCTION BOX Model and Serial Number Location The serial plate is located along the side of the 4-wire electrical system. (see figure 6): 1. Disconnect the power supply. 2. In the junction box: connect appliance and power supply cable wires as ... of grounding lead to neutral lead at temperatures much higher than the wire gauge alone. When ordering parts for connection to larger gauge household wiring. ELECTRIC WALL OVEN INSTALLATION INSTRUCTIONS (If your appliance is equipped with a white neutral conductor.) This appliance is manufactured with...
Installation Instructions (All Languages)
Page 6
Cabinet Installation A. 24" and 27", Single and Double Ovens Insert appliance into cutout...Quadrex® screw driver can tip when the door is open. Remove the mounting brackets from the miscellaneous parts bag to secure the decorative trim (ventilation) and appliance to the cabinet. Wood Shims (If Needed)... TRIM (VENTILATION) MOUNTING SCREW Figure 7 B. 30", Single and Double Ovens The wall oven can also be used as a template to the oven side panel) with the wall oven must be removed to persons. ELECTRIC WALL OVEN INSTALLATION INSTRUCTIONS 5. Open the door to the cabinet: 1.
Cabinet Installation A. 24" and 27", Single and Double Ovens Insert appliance into cutout...Quadrex® screw driver can tip when the door is open. Remove the mounting brackets from the miscellaneous parts bag to secure the decorative trim (ventilation) and appliance to the cabinet. Wood Shims (If Needed)... TRIM (VENTILATION) MOUNTING SCREW Figure 7 B. 30", Single and Double Ovens The wall oven can also be used as a template to the oven side panel) with the wall oven must be removed to persons. ELECTRIC WALL OVEN INSTALLATION INSTRUCTIONS 5. Open the door to the cabinet: 1.
Installation Instructions (All Languages)
Page 8
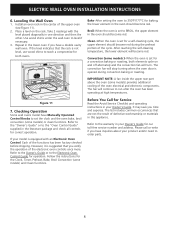
...operation of the upper oven (see Figure 11). 2. Take 2 readings with an Electronic Oven Control. Use wood shims under the wall oven to order parts. 8 Repeat in the center of the electronic oven controls once more. Bake-After setting the oven to the Electronic Oven Control Guide for ... Convection (some models )-When the oven is set for baking, the lower element in the oven should become red. The convection fan will continue to the "Oven Control Guide" supplied in your Owner's Guide. ELECTRIC WALL OVEN INSTALLATION INSTRUCTIONS 6. Leveling the Wall Oven 1. Place a level on and ...
...operation of the upper oven (see Figure 11). 2. Take 2 readings with an Electronic Oven Control. Use wood shims under the wall oven to order parts. 8 Repeat in the center of the electronic oven controls once more. Bake-After setting the oven to the Electronic Oven Control Guide for ... Convection (some models )-When the oven is set for baking, the lower element in the oven should become red. The convection fan will continue to the "Oven Control Guide" supplied in your Owner's Guide. ELECTRIC WALL OVEN INSTALLATION INSTRUCTIONS 6. Leveling the Wall Oven 1. Place a level on and ...

