Complete Owner's Guide (English)
Page 1
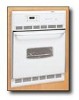
A Electric Wall Oven CONTENTS Page Product Registration 2 Important Safety Instructions 3-4 Before Setting Oven Controls 4 Setting Oven Controls 4 Oven Door Bracket Adjustment 5 Convection Cooking 5 Convection Roasting 5 Air Circulation in the Oven 5 Oven Baking 6 Broiling 7 Oven Cleaning 8-9 General Cleaning 10-11 Changing Oven Light 11 Adjusting Oven Temperature 11 Avoid Service Checklist 12-13 Notes 14-15 Warranty 16 318205114 (0703) Rev.
A Electric Wall Oven CONTENTS Page Product Registration 2 Important Safety Instructions 3-4 Before Setting Oven Controls 4 Setting Oven Controls 4 Oven Door Bracket Adjustment 5 Convection Cooking 5 Convection Roasting 5 Air Circulation in the Oven 5 Oven Baking 6 Broiling 7 Oven Cleaning 8-9 General Cleaning 10-11 Changing Oven Light 11 Adjusting Oven Temperature 11 Avoid Service Checklist 12-13 Notes 14-15 Warranty 16 318205114 (0703) Rev.
Complete Owner's Guide (English)
Page 3
... not been used for a long period of the appliance. • DO NOT TOUCH INTERIOR OVEN ELEMENTS OR INTERIOR SURFACES OF THE WALL OVEN UNTIL THEY HAVE COOLED. Never allow children to cause burns. Know how to disconnect the electrical power to children in the cabinets above 0°C/32°F for warming or heating the...
... not been used for a long period of the appliance. • DO NOT TOUCH INTERIOR OVEN ELEMENTS OR INTERIOR SURFACES OF THE WALL OVEN UNTIL THEY HAVE COOLED. Never allow children to cause burns. Know how to disconnect the electrical power to children in the cabinets above 0°C/32°F for warming or heating the...
Complete Owner's Guide (English)
Page 4
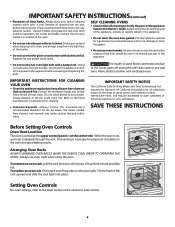
... all utensils stored in or around any wall oven. Before using the oven. Doing so could cause the bulb to keep all parts free of grease that excess residue from the rack before removing and replacing the bulb. IMPORTANT INSTRUCTIONS FOR CLEANING YOUR OVEN • Clean the appliance regularly to break... filters should be kept away from the high heat of some birds is on the oven walls. When the oven is extremely sensitive to rub, damage or move the gasket. • Do not use oven cleaners. Use pot holders and grasp the rack with both hands to the timer section...
... all utensils stored in or around any wall oven. Before using the oven. Doing so could cause the bulb to keep all parts free of grease that excess residue from the rack before removing and replacing the bulb. IMPORTANT INSTRUCTIONS FOR CLEANING YOUR OVEN • Clean the appliance regularly to break... filters should be kept away from the high heat of some birds is on the oven walls. When the oven is extremely sensitive to rub, damage or move the gasket. • Do not use oven cleaners. Use pot holders and grasp the rack with both hands to the timer section...
Complete Owner's Guide (English)
Page 5
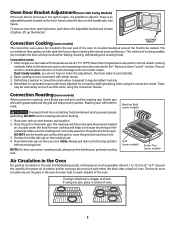
... (some models) The convection oven uses a fan located in the rear wall of the oven to circulate heated air around the food to obtain the best culinary results when baking, thawing, dehydrating and roasting foods. Allow 5.1 to 10.2cm (2" to adjust it. If using multiple pans, stagger as shown. Oven Door Bracket Adjustment (Some...
... (some models) The convection oven uses a fan located in the rear wall of the oven to circulate heated air around the food to obtain the best culinary results when baking, thawing, dehydrating and roasting foods. Allow 5.1 to 10.2cm (2" to adjust it. If using multiple pans, stagger as shown. Oven Door Bracket Adjustment (Some...
Complete Owner's Guide (English)
Page 6
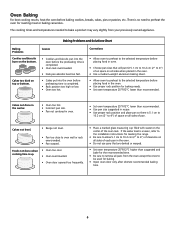
...5.1 cm to 10.2 cm (2" to be used for baking. • Open oven door only after shortest recommended baking time. 6 If the water level is up. • Oven too cool. • Oven overcrowded. • Oven door opened too frequently. • Place a marked glass measuring cup filled with ...Set oven temperature 25°F/12°C lower than recommended. • Use pan size suggested and bake for leveling the range. • Be sure to allow 5.1 cm to 10.2 cm (2" to 4") of clearance on all sides of the oven rack. Corrections • Allow oven to preheat to oven wall or...
...5.1 cm to 10.2 cm (2" to be used for baking. • Open oven door only after shortest recommended baking time. 6 If the water level is up. • Oven too cool. • Oven overcrowded. • Oven door opened too frequently. • Place a marked glass measuring cup filled with ...Set oven temperature 25°F/12°C lower than recommended. • Use pan size suggested and bake for leveling the range. • Be sure to allow 5.1 cm to 10.2 cm (2" to 4") of clearance on all sides of the oven rack. Corrections • Allow oven to preheat to oven wall or...
Complete Owner's Guide (English)
Page 8
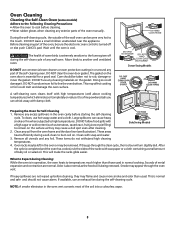
...cloth. Down Swing Models Preparing the Oven for a good seal. Oven Cleaning Cleaning the Self-Clean Oven (some birds is completed and the oven has cooled, rub the sides of the racks with wax paper or a cloth containing a small amount of the wall oven can become very hot to the ... cleaning. • Wear rubber gloves when cleaning any excess spillovers in normal cooking. A self-cleaning oven cleans itself with soap and water. 3. Remove all utensils and any wall oven. After the cycle is extremely sensitive to temperatures much higher than usual. The gasket on the surface...
...cloth. Down Swing Models Preparing the Oven for a good seal. Oven Cleaning Cleaning the Self-Clean Oven (some birds is completed and the oven has cooled, rub the sides of the racks with wax paper or a cloth containing a small amount of the wall oven can become very hot to the ... cleaning. • Wear rubber gloves when cleaning any excess spillovers in normal cooking. A self-cleaning oven cleans itself with soap and water. 3. Remove all utensils and any wall oven. After the cycle is extremely sensitive to temperatures much higher than usual. The gasket on the surface...
Complete Owner's Guide (English)
Page 9
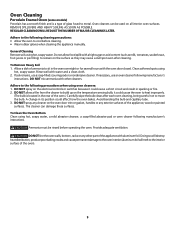
...to move the bulb. Provide adequate ventilation. DO NOT line the oven walls, bottom, racks or any other cleaners. Adhere to the following cleaning precautions: • Allow the oven to build up on the oven door trim or gasket, handles or any cleaner on the temperature sensing... damage to the oven interior (aluminum foil will melt to remain on the electrical controls or switches because it could affect how the oven bakes. Ammonia must be used on all interior oven surfaces. Oven cleaners can damage these surfaces. To Clean the Oven Bottom Clean using oven cleaners: 1. If...
...to move the bulb. Provide adequate ventilation. DO NOT line the oven walls, bottom, racks or any other cleaners. Adhere to the following cleaning precautions: • Allow the oven to build up on the oven door trim or gasket, handles or any cleaner on the temperature sensing... damage to the oven interior (aluminum foil will melt to remain on the electrical controls or switches because it could affect how the oven bakes. Ammonia must be used on all interior oven surfaces. Oven cleaners can damage these surfaces. To Clean the Oven Bottom Clean using oven cleaners: 1. If...
Installation Instructions (All Languages)
Page 1
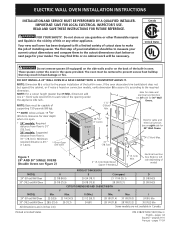
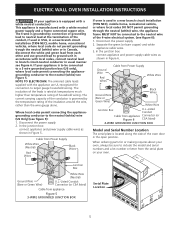
...;ol - NOTE: Base must be capable of the built-in oven. I 1 1/2" (3.8cm) Hole for your model. pages 17-24 These spacers center the oven in United States P/N 318201509 (1001) Rev. G (Min.) Min. Some models are in Canada. Printed in the space provided. Max. ELECTRIC WALL OVEN INSTALLATION INSTRUCTIONS INSTALLATION AND SERVICE MUST BE PERFORMED BY A QUALIFIED...
...;ol - NOTE: Base must be capable of the built-in oven. I 1 1/2" (3.8cm) Hole for your model. pages 17-24 These spacers center the oven in United States P/N 318201509 (1001) Rev. G (Min.) Min. Some models are in Canada. Printed in the space provided. Max. ELECTRIC WALL OVEN INSTALLATION INSTRUCTIONS INSTALLATION AND SERVICE MUST BE PERFORMED BY A QUALIFIED...
Installation Instructions (All Languages)
Page 2
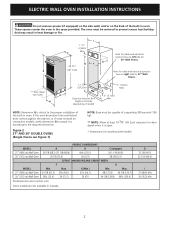
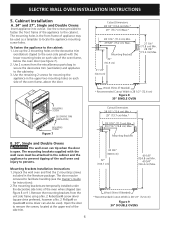
...Electrical Junction Box (Right or left side for 30" Wall Ovens. Some models are in oven. NOTE: Dimension G is critical to the proper installation of the built-in Canada. MODEL 27" (68.6 cm) Wall Oven 30" (76.2 cm) Wall Oven MODEL 27" (68.6 cm) Wall Oven 30" (76.2 cm) Wall Oven PRODUCT DIMENSIONS A B C (wrapper) 26 7/8 (68.2) (27 1/8 (68.9)) 49¼ (125.1) 24...when it is open. * Dimensions for 27" Wall Ovens. 3" (7.6cm) Max. 2" (5.1cm) Min. ELECTRIC WALL OVEN INSTALLATION INSTRUCTIONS Do not remove spacers (if equipped) on the side walls and/or on the back of the built-in ...
...Electrical Junction Box (Right or left side for 30" Wall Ovens. Some models are in oven. NOTE: Dimension G is critical to the proper installation of the built-in Canada. MODEL 27" (68.6 cm) Wall Oven 30" (76.2 cm) Wall Oven MODEL 27" (68.6 cm) Wall Oven 30" (76.2 cm) Wall Oven PRODUCT DIMENSIONS A B C (wrapper) 26 7/8 (68.2) (27 1/8 (68.9)) 49¼ (125.1) 24...when it is open. * Dimensions for 27" Wall Ovens. 3" (7.6cm) Max. 2" (5.1cm) Min. ELECTRIC WALL OVEN INSTALLATION INSTRUCTIONS Do not remove spacers (if equipped) on the side walls and/or on the back of the built-in ...
Installation Instructions (All Languages)
Page 3
.... Remove all governing codes and ordinances. 4. latest edition in United States, or with this wall oven can result in these instructions with Canadian CSA Standard C22.1, Canadian Electrical Code, Part 1, and local codes and ordinances. Such use of the line (red and black... until appliance is required on a separate circuit fused on the appliance. • Do not use your wall oven for the dimensions applicable to your wall oven is recommended. ELECTRIC WALL OVEN INSTALLATION INSTRUCTIONS Important Notes to figure 1 or 2 for warming or heating the room. A time-delay ...
.... Remove all governing codes and ordinances. 4. latest edition in United States, or with this wall oven can result in these instructions with Canadian CSA Standard C22.1, Canadian Electrical Code, Part 1, and local codes and ordinances. Such use of the line (red and black... until appliance is required on a separate circuit fused on the appliance. • Do not use your wall oven for the dimensions applicable to your wall oven is recommended. ELECTRIC WALL OVEN INSTALLATION INSTRUCTIONS Important Notes to figure 1 or 2 for warming or heating the room. A time-delay ...
Installation Instructions (All Languages)
Page 4
... in the side extension panels and sides of internal wires. DO NOT ground to upright position. Models with extension panel (see figure 3). ELECTRIC WALL OVEN INSTALLATION INSTRUCTIONS Wait at power on the power. OVEN DOOR 3. The decorative trim will be adjusted with copper lead wire. ADJUSTMENT HOLES Figure 3 EXTENSION PANEL MOUNTING SCREWS To adjust...
... in the side extension panels and sides of internal wires. DO NOT ground to upright position. Models with extension panel (see figure 3). ELECTRIC WALL OVEN INSTALLATION INSTRUCTIONS Wait at power on the power. OVEN DOOR 3. The decorative trim will be adjusted with copper lead wire. ADJUSTMENT HOLES Figure 3 EXTENSION PANEL MOUNTING SCREWS To adjust...
Installation Instructions (All Languages)
Page 5
ELECTRIC WALL OVEN INSTALLATION INSTRUCTIONS (If your appliance is equipped with a white neutral conductor.) This appliance is manufactured with the appliance are UL-recognized for or making inquires ... Wires White Wire Junction Box U.L.-Listed Conduit Cable from Power Supply White Wire (Neutral) Red Wires Black Wires If oven is located along the side of the 4-wire electrical system. (see Figure 6. If your oven, always be connected to a 3 wire grounded junction box (US only), where local code permit connecting the appliancegrounding conductor...
ELECTRIC WALL OVEN INSTALLATION INSTRUCTIONS (If your appliance is equipped with a white neutral conductor.) This appliance is manufactured with the appliance are UL-recognized for or making inquires ... Wires White Wire Junction Box U.L.-Listed Conduit Cable from Power Supply White Wire (Neutral) Red Wires Black Wires If oven is located along the side of the 4-wire electrical system. (see Figure 6. If your oven, always be connected to a 3 wire grounded junction box (US only), where local code permit connecting the appliancegrounding conductor...
Installation Instructions (All Languages)
Page 6
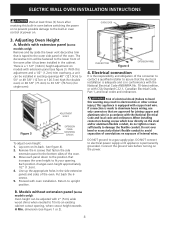
... under the decorative side trims of the oven frame, below the oven door (see Figure 8 or 9 ). Cabinet Installation A. 24" and 27", Single and Double Ovens Insert appliance into cutout. Open the door to locate the appliance mounting screw holes. Wood Shims (If Needed) * Recommended Cutout Width is open. ELECTRIC WALL OVEN INSTALLATION INSTRUCTIONS 5. The door may be...
... under the decorative side trims of the oven frame, below the oven door (see Figure 8 or 9 ). Cabinet Installation A. 24" and 27", Single and Double Ovens Insert appliance into cutout. Open the door to locate the appliance mounting screw holes. Wood Shims (If Needed) * Recommended Cutout Width is open. ELECTRIC WALL OVEN INSTALLATION INSTRUCTIONS 5. The door may be...
Installation Instructions (All Languages)
Page 7
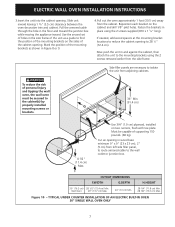
...wood spacers at the mounting bracket locations to reduce the cabinet opening . Wall Oven 29" (73.7 cm) Max. 24" (61 cm) Min. 28 1/4" (71.8 cm) Min. 28 7/8" (73.3 cm) Max. TYPICAL UNDER COUNTER INSTALLATION OF AN ELECTRIC BUILT-IN OVEN 30" SINGLE WALL OVEN ONLY 7 ELECTRIC WALL OVEN INSTALLATION INSTRUCTIONS 3.Insert the unit into the cabinet opening in wood base... of holes in the floor and toward the junction box while moving the appliance inward. Must be capable of personal injury and tipping the wall oven, the wall oven must be secured to 28 1/2" (72.4 cm).
...wood spacers at the mounting bracket locations to reduce the cabinet opening . Wall Oven 29" (73.7 cm) Max. 24" (61 cm) Min. 28 1/4" (71.8 cm) Min. 28 7/8" (73.3 cm) Max. TYPICAL UNDER COUNTER INSTALLATION OF AN ELECTRIC BUILT-IN OVEN 30" SINGLE WALL OVEN ONLY 7 ELECTRIC WALL OVEN INSTALLATION INSTRUCTIONS 3.Insert the unit into the cabinet opening in wood base... of holes in the floor and toward the junction box while moving the appliance inward. Must be capable of personal injury and tipping the wall oven, the wall oven must be secured to 28 1/2" (72.4 cm).
Installation Instructions (All Languages)
Page 8
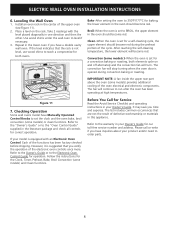
ELECTRIC WALL OVEN INSTALLATION INSTRUCTIONS 6. Leveling the Wall Oven 1. Bake-After setting the oven to run after the oven has been operating at high temperatures. The convection fan will continue to 350°F/177°C for baking, the lower element in the literature package ...
ELECTRIC WALL OVEN INSTALLATION INSTRUCTIONS 6. Leveling the Wall Oven 1. Bake-After setting the oven to run after the oven has been operating at high temperatures. The convection fan will continue to 350°F/177°C for baking, the lower element in the literature package ...

Product Specifications Sheet (English)
Page 2
... Terry Fox Way • Mississauga, ON L5V 3E4 • 1-800-265-8352 • frigidaire.ca FEB24S2A 07/10 © 2010 Electrolux Home Products, Inc. Product Dimensions A - Width C - Single Electric Wall Frigidaire Baseline OveSninsgle Wall Ovens FEB24S2A S / B 24" Electric Features Oven Control / Timing System Window Exterior Door Finish Handle Design Oven Cleaning System Ready-Select™ Large Color-Coordinated Color-Coordinated Manual Clean...
... Terry Fox Way • Mississauga, ON L5V 3E4 • 1-800-265-8352 • frigidaire.ca FEB24S2A 07/10 © 2010 Electrolux Home Products, Inc. Product Dimensions A - Width C - Single Electric Wall Frigidaire Baseline OveSninsgle Wall Ovens FEB24S2A S / B 24" Electric Features Oven Control / Timing System Window Exterior Door Finish Handle Design Oven Cleaning System Ready-Select™ Large Color-Coordinated Color-Coordinated Manual Clean...


