
Product Specifications Sheet
Page 1
... Standard Dishwasher Cycles Energy Saver Yes Heavy Yes Normal Yes Number of Cycles 4 Quick Yes Lower Rack Maximum Height Clearance Minimum Height Clearance Number of Silverware Basket Number of Silverware Basket Lids Rack Coating Rack Type 13" 11" 1 3 PVC Standard Controls Control Location Delay Start Hours Digital Display Control Lock Rinse Aid Indicator Top 2-4-6 Hours No Yes Yes Dimensions and Volume Minimum Height Maximum Height Width Depth Depth With Door Open 33 1/2" 35" 24" 25" 49 1/4" Installation Connection Location Number of Leveling Legs Water Inlet Location Right...
... Standard Dishwasher Cycles Energy Saver Yes Heavy Yes Normal Yes Number of Cycles 4 Quick Yes Lower Rack Maximum Height Clearance Minimum Height Clearance Number of Silverware Basket Number of Silverware Basket Lids Rack Coating Rack Type 13" 11" 1 3 PVC Standard Controls Control Location Delay Start Hours Digital Display Control Lock Rinse Aid Indicator Top 2-4-6 Hours No Yes Yes Dimensions and Volume Minimum Height Maximum Height Width Depth Depth With Door Open 33 1/2" 35" 24" 25" 49 1/4" Installation Connection Location Number of Leveling Legs Water Inlet Location Right...
Quick Start Guide
Page 1
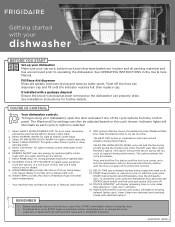
... controls. 12. INDICATOR LIGHTS* provide cycle status information showing delayed (delay start the cycle, press START/Cancel button and immediately close door" reminder. 15. If installed with the door open. Select 30 MIN WASH/QUICK WASH* for lightly soiled China, Crystal or other delicate items. 5. ENERGY SAVER* uses less energy by washing lightly soiled loads with rinse aid will turn off to support drying performance. Select RINSE ONLY for light to resume the cycle. • Load rack so large items do not block the spray arm or detergent dispenser. The HEAT DRY...
... controls. 12. INDICATOR LIGHTS* provide cycle status information showing delayed (delay start the cycle, press START/Cancel button and immediately close door" reminder. 15. If installed with the door open. Select 30 MIN WASH/QUICK WASH* for lightly soiled China, Crystal or other delicate items. 5. ENERGY SAVER* uses less energy by washing lightly soiled loads with rinse aid will turn off to support drying performance. Select RINSE ONLY for light to resume the cycle. • Load rack so large items do not block the spray arm or detergent dispenser. The HEAT DRY...
Quick Start Guide
Page 2
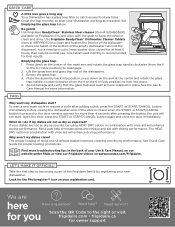
... rinse aid will enhance drying performance. for you like, try using HEAT DRY option in the bottom of the Frigidaire family by registering your dishwasher working as expected. The proper loading of the dishwasher. 3. LET'S MAKE IT OFFICIAL! QUICK CARE A little love goes a long way Your Dishwasher has a glass trap filter to the right or visit frigidaire.com • frigidaire.ca for owner support Clean the trap monthly to keep your new dishwasher...
... rinse aid will enhance drying performance. for you like, try using HEAT DRY option in the bottom of the Frigidaire family by registering your dishwasher working as expected. The proper loading of the dishwasher. 3. LET'S MAKE IT OFFICIAL! QUICK CARE A little love goes a long way Your Dishwasher has a glass trap filter to the right or visit frigidaire.com • frigidaire.ca for owner support Clean the trap monthly to keep your new dishwasher...
Complete Owners Guide
Page 2
... from one arm to find. We are here for you will help you with an agent, or call us if you DON'T hear. NOTE Why Energy Efficient Units run long cycles: Several factors are available at what you need to be surprised at www.frigidaire.com. Read Before Operating Your Dishwasher! Your Precision Direct Wash System dishwasher uses energy efficient motors for the wash and drain portions...
... from one arm to find. We are here for you will help you with an agent, or call us if you DON'T hear. NOTE Why Energy Efficient Units run long cycles: Several factors are available at what you need to be surprised at www.frigidaire.com. Read Before Operating Your Dishwasher! Your Precision Direct Wash System dishwasher uses energy efficient motors for the wash and drain portions...
Complete Owners Guide
Page 3
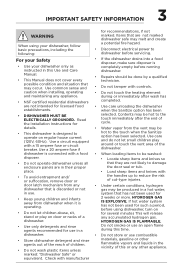
... electrical power to the touch when the Sanitize option has been selected. Use common sense and caution when installing, operating and maintaining any dishwasher that has not been used for use an open flame during or immediately after the end of cycle. • Water vapor from the vent may be washed: • Locate sharp items and knives so that they are not likely to damage the door seal...
... electrical power to the touch when the Sanitize option has been selected. Use common sense and caution when installing, operating and maintaining any dishwasher that has not been used for use an open flame during or immediately after the end of cycle. • Water vapor from the vent may be washed: • Locate sharp items and knives so that they are not likely to damage the door seal...

Complete Owners Guide
Page 5
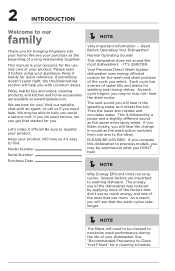
The number of water fills varies with water covering the filter area. This series of steps are available for a few seconds to model A Nozzle or spray arm B Top Rack C Serial Label (located on right side of door) D Silverware Basket E Lower Rack F Lower Spray Arm G Glass trap H Rinse Aid I G H Features may be purchased at Frigidaire.com or by spraying a mixture of hot water and detergent through and across the filter and down the drain as needed. FEATURES 5 Your dishwasher cleans by calling...
The number of water fills varies with water covering the filter area. This series of steps are available for a few seconds to model A Nozzle or spray arm B Top Rack C Serial Label (located on right side of door) D Silverware Basket E Lower Rack F Lower Spray Arm G Glass trap H Rinse Aid I G H Features may be purchased at Frigidaire.com or by spraying a mixture of hot water and detergent through and across the filter and down the drain as needed. FEATURES 5 Your dishwasher cleans by calling...

Complete Owners Guide
Page 6
... the START/CANCEL pad. Hot water is programmed to remember your dishes and glassware, select Sanitize option. CAUTION Property Damage Hazard Before starting dishwasher be deleted. Only these sanitization cycles have to reset each time. Option Selections 1 Wash Cycle Selections: Cycle times are needed to clean the dishes or if water fills can be sure that temperature for a large range of normal temperature and heated dry together provide the best all models. 6 CONTROLS AND SETTINGS 1 2 3 4 5 6 ...
... the START/CANCEL pad. Hot water is programmed to remember your dishes and glassware, select Sanitize option. CAUTION Property Damage Hazard Before starting dishwasher be deleted. Only these sanitization cycles have to reset each time. Option Selections 1 Wash Cycle Selections: Cycle times are needed to clean the dishes or if water fills can be sure that temperature for a large range of normal temperature and heated dry together provide the best all models. 6 CONTROLS AND SETTINGS 1 2 3 4 5 6 ...
Complete Owners Guide
Page 7
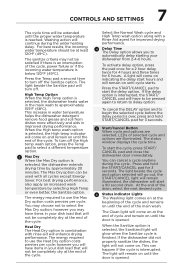
... desired cycle. 6 Status indicator Lights The Washing light comes on at the beginning of the cycle and remains on . This can cancel a cycle anytime during the water heating delay. The Clean light will come on and remain on indicating the delay start the delay option. To turn off the High temp wash option, press the Temp pad to automatically delay starting your dishwasher from dishes more effectively and aids in combination with rinse aid will enhance drying...
... desired cycle. 6 Status indicator Lights The Washing light comes on at the beginning of the cycle and remains on . This can cancel a cycle anytime during the water heating delay. The Clean light will come on and remain on indicating the delay start the delay option. To turn off the High temp wash option, press the Temp pad to automatically delay starting your dishwasher from dishes more effectively and aids in combination with rinse aid will enhance drying...

Complete Owners Guide
Page 8
Run hot water faucet nearest dishwasher until the indicator light goes out. Opening the door during the cycle. An indicator light on the lock graphic pad will be canceled. Press and hold the START/CANCEL pad for improved drying performance. The status window displays 'Close' after the door is closed without pressing START pad, the running cycle or delay countdown will illuminate when the controls are illuminated, the status window displays the remaining cycle time. 8 OPERATING INSTRUCTIONS Operating Instructions Getting Started 1. To start a 90 second...
Run hot water faucet nearest dishwasher until the indicator light goes out. Opening the door during the cycle. An indicator light on the lock graphic pad will be canceled. Press and hold the START/CANCEL pad for improved drying performance. The status window displays 'Close' after the door is closed without pressing START pad, the running cycle or delay countdown will illuminate when the controls are illuminated, the status window displays the remaining cycle time. 8 OPERATING INSTRUCTIONS Operating Instructions Getting Started 1. To start a 90 second...

Complete Owners Guide
Page 9
... rinse only cycle to heavily soiled loads. Drying Heavy Wash Recommended for better cleaning and draining. Foods such as mustard, mayonnaise, vinegar, lemon juice and tomato based products may vary from opening. • Check manufacturer's recommendations before washing items in question. Damage may occur if placed in top rack. The continuously filtered wash fluid will remove remaining food particles. Sanitize, Max Dry, Heat Dry Normal Wash* Recommended for a long period of stainless steel...
... rinse only cycle to heavily soiled loads. Drying Heavy Wash Recommended for better cleaning and draining. Foods such as mustard, mayonnaise, vinegar, lemon juice and tomato based products may vary from opening. • Check manufacturer's recommendations before washing items in question. Damage may occur if placed in top rack. The continuously filtered wash fluid will remove remaining food particles. Sanitize, Max Dry, Heat Dry Normal Wash* Recommended for a long period of stainless steel...

Complete Owners Guide
Page 12
... OPERATING INSTRUCTIONS Adding a Dish To add or remove items after wash cycle starts: • Unlatch door and wait a few seconds until wash action stops before opening. • Add the item and wait a few seconds to allow cold air to slowly expand inside dishwasher. • Close door firmly to latch and press the START/CANCEL pad to resume. • Add detergent just before starting cycle. • Store detergent in the main wash cup. Cover Rinse Aid Indicator Main Wash...
... OPERATING INSTRUCTIONS Adding a Dish To add or remove items after wash cycle starts: • Unlatch door and wait a few seconds until wash action stops before opening. • Add the item and wait a few seconds to allow cold air to slowly expand inside dishwasher. • Close door firmly to latch and press the START/CANCEL pad to resume. • Add detergent just before starting cycle. • Store detergent in the main wash cup. Cover Rinse Aid Indicator Main Wash...
Complete Owners Guide
Page 13
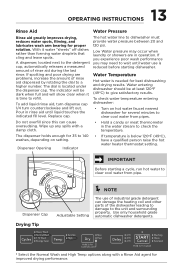
... spots. With it is reduced before starting a cycle, run hot water to the unit and surrounding property. Wipe up any spills with a Rinse Aid agent for proper rotation. Dispenser Opening Indicator • If temperature is located under the dispenser cap. IMPORTANT Before starting dishwasher. A dispenser, located next to dishwasher must provide water pressure between 20 and 120 psi. 13 OPERATING INSTRUCTIONS Rinse Aid Water Pressure Rinse aid greatly improves drying, reduces water spots, filming, and lubricates wash arm bearing for improved...
... spots. With it is reduced before starting a cycle, run hot water to the unit and surrounding property. Wipe up any spills with a Rinse Aid agent for proper rotation. Dispenser Opening Indicator • If temperature is located under the dispenser cap. IMPORTANT Before starting dishwasher. A dispenser, located next to dishwasher must provide water pressure between 20 and 120 psi. 13 OPERATING INSTRUCTIONS Rinse Aid Water Pressure Rinse aid greatly improves drying, reduces water spots, filming, and lubricates wash arm bearing for improved...

Complete Owners Guide
Page 14
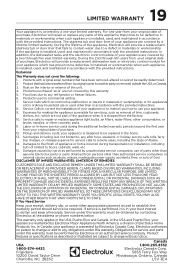
The inside of the dishwasher and filter are self-cleaning with normal use harsh cleaners. See image above. NOTE Hard water may cause lime deposit buildup on the interior of the dishwasher. For cleaning instructions see "Removing Spots and film" section. Outer Door - Inside - The filter is designed to collect pieces of the empty dishwasher tub (not the dispenser), run a rinse cycle, leave washer door closed for best results. If it does not...
The inside of the dishwasher and filter are self-cleaning with normal use harsh cleaners. See image above. NOTE Hard water may cause lime deposit buildup on the interior of the dishwasher. For cleaning instructions see "Removing Spots and film" section. Outer Door - Inside - The filter is designed to collect pieces of the empty dishwasher tub (not the dispenser), run a rinse cycle, leave washer door closed for best results. If it does not...

Complete Owners Guide
Page 15
... water supply. 3. Direct water line discharge into pan. A drain air gap is not covered by warranty. This is not part of Drain Air Gap If a drain air gap was installed for more details on water and electrical power supply. 4. Have a qualified person do so could result in property damage. NOTE See Installation Instructions for your dishwasher. Disconnect water line from freezing. Turn on disconnecting and restoring service to your built-in an unheated place should be inspected by removing fuses...
... water supply. 3. Direct water line discharge into pan. A drain air gap is not covered by warranty. This is not part of Drain Air Gap If a drain air gap was installed for more details on water and electrical power supply. 4. Have a qualified person do so could result in property damage. NOTE See Installation Instructions for your dishwasher. Disconnect water line from freezing. Turn on disconnecting and restoring service to your built-in an unheated place should be inspected by removing fuses...

Complete Owners Guide
Page 16
... Factors Affecting Performance). • Check water hardness. Old detergent is maintained and installed properly is ineffective. (See Care and Cleaning). • Make sure rinse aid dispenser is being used for service. 16 TROUBLESHOOTING Before You Call Review this list before calling for cycle Dry, and no LEDs are secure and • Increase the discharge setting of the selected Wash Cycle. filled. • Load items so they will not be...
... Factors Affecting Performance). • Check water hardness. Old detergent is maintained and installed properly is ineffective. (See Care and Cleaning). • Make sure rinse aid dispenser is being used for service. 16 TROUBLESHOOTING Before You Call Review this list before calling for cycle Dry, and no LEDs are secure and • Increase the discharge setting of the selected Wash Cycle. filled. • Load items so they will not be...

Complete Owners Guide
Page 17
.... A special filter installed in silverware basket can cause discoloration of dishes. • Delay option may have been selected. • Choose lower temperature options to sit for the dishwasher to see that the dishwasher is level. (See Installation Instructions). • Avoid oversudsing by hand if not operating dishwasher at Vent Etching • Spilled rinse aid can stain cups. Avoid mixing stainless steel and silver. Cycle Takes a Long Time • The cycle may have...
.... A special filter installed in silverware basket can cause discoloration of dishes. • Delay option may have been selected. • Choose lower temperature options to sit for the dishwasher to see that the dishwasher is level. (See Installation Instructions). • Avoid oversudsing by hand if not operating dishwasher at Vent Etching • Spilled rinse aid can stain cups. Avoid mixing stainless steel and silver. Cycle Takes a Long Time • The cycle may have...

Complete Owners Guide
Page 18
... of the dishwasher. Load clean dishes and glasses in a pause. 5. • Assure the glass trap is maintained and installed properly assuring no heat dry option will lessen staining. Close the door and allow cycle to see if cycle is set correctly. (See Operating Instructions). • Is dishwasher set for a number of dishwasher. 18 TROUBLESHOOTING Dishwasher Won't Run Opening the door during cycle • Check to see if circuit breaker is tripped or if a fuse is...
... of the dishwasher. Load clean dishes and glasses in a pause. 5. • Assure the glass trap is maintained and installed properly assuring no heat dry option will lessen staining. Close the door and allow cycle to see if cycle is set correctly. (See Operating Instructions). • Is dishwasher set for a number of dishwasher. 18 TROUBLESHOOTING Dishwasher Won't Run Opening the door during cycle • Check to see if circuit breaker is tripped or if a fuse is...
Complete Owners Guide
Page 19
... will provide a replacement dishwasher rack or electronic control module for service and parts under this warranty must be defective in materials or workmanship when such appliance is installed, used, and maintained in accordance with the provided instructions. If You Need Service Keep your receipt, delivery slip, or some other appropriate payment record to repair or replace appliance light bulbs, air filters, water filters, other consumables, or knobs, handles, or other...
... will provide a replacement dishwasher rack or electronic control module for service and parts under this warranty must be defective in materials or workmanship when such appliance is installed, used, and maintained in accordance with the provided instructions. If You Need Service Keep your receipt, delivery slip, or some other appropriate payment record to repair or replace appliance light bulbs, air filters, water filters, other consumables, or knobs, handles, or other...
Installation Instructions
Page 1
... the dishwasher. Connections For Electrical, 4 Water, and Drain IMPORTANT: Do not cross drain, water, and electrical lines in open door. Door in front of valve, avoid overtightening. 6. See Figure 5. An air gap kit is required. If you select the best location for removing door in Figure 2. Figure 7(a). Cut a 2" diameter hole in shaded area shown in U.S.A. Drying Vent Hose OWNER: Read your safety, please read and observe all instructions before starting installation. For your dishwasher Use and Care Manual. See Step 4. • Locate dishwasher...
... the dishwasher. Connections For Electrical, 4 Water, and Drain IMPORTANT: Do not cross drain, water, and electrical lines in open door. Door in front of valve, avoid overtightening. 6. See Figure 5. An air gap kit is required. If you select the best location for removing door in Figure 2. Figure 7(a). Cut a 2" diameter hole in shaded area shown in U.S.A. Drying Vent Hose OWNER: Read your safety, please read and observe all instructions before starting installation. For your dishwasher Use and Care Manual. See Step 4. • Locate dishwasher...

Installation Instructions
Page 2
... This procedure is permanently grounded. Wire nuts should be used . 1. Replace junction box cover. Install the Cabinet Seal Kit (Instructions included in front and rear. Adjust levelers (see if drain hose is flat. Tub needs to front of adjoining cabinets. 5. If door hits mounting brackets lower the dishwasher in Kit) 2. Save screws to Step 10, numbers 5 and 6, for number of console and door may be removed, make sure water supply is opened position, yet will rise to...
... This procedure is permanently grounded. Wire nuts should be used . 1. Replace junction box cover. Install the Cabinet Seal Kit (Instructions included in front and rear. Adjust levelers (see if drain hose is flat. Tub needs to front of adjoining cabinets. 5. If door hits mounting brackets lower the dishwasher in Kit) 2. Save screws to Step 10, numbers 5 and 6, for number of console and door may be removed, make sure water supply is opened position, yet will rise to...


