
Product Specifications Sheet
Page 1
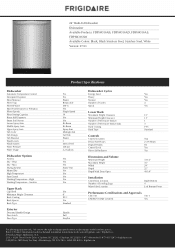
... Standard Dishwasher Cycles Energy Saver Yes Heavy Yes Normal Yes Number of Cycles 4 Quick Yes Lower Rack Maximum Height Clearance Minimum Height Clearance Number of Silverware Basket Number of Silverware Basket Lids Rack Coating Rack Type 13" 11" 1 3 PVC Standard Controls Control Location Delay Start Hours Digital Display Control Lock Rinse Aid Indicator Top 2-4-6 Hours No Yes Yes Dimensions and Volume Minimum Height Maximum Height Width Depth Depth With Door Open 33 1/2" 35" 24" 25" 49 1/4" Installation Connection Location Number of Leveling Legs Water Inlet Location Right...
... Standard Dishwasher Cycles Energy Saver Yes Heavy Yes Normal Yes Number of Cycles 4 Quick Yes Lower Rack Maximum Height Clearance Minimum Height Clearance Number of Silverware Basket Number of Silverware Basket Lids Rack Coating Rack Type 13" 11" 1 3 PVC Standard Controls Control Location Delay Start Hours Digital Display Control Lock Rinse Aid Indicator Top 2-4-6 Hours No Yes Yes Dimensions and Volume Minimum Height Maximum Height Width Depth Depth With Door Open 33 1/2" 35" 24" 25" 49 1/4" Installation Connection Location Number of Leveling Legs Water Inlet Location Right...
Quick Start Guide
Page 1
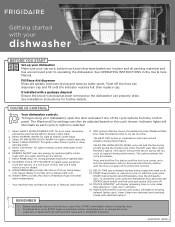
... dishwasher, open the dishwasher door and press the START/Cancel button until the lock icon goes off to heavily soiled loads. 2. See OPERATING INSTRUCTIONS in cycle, delay time setting or "close the dishwasher door. Fill Rinse Aid dispenser Rinse aid greatly improves drying and reduces water spots. See Installation Instructions for pots, pans, casseroles and dinnerware having light to unlock the controls. 12. See Use & Care instructions for rinsing dishware that will display remaining time in the Use & Care Manual. The 30 MIN WASH/QUICK WASH cycle can add the fan drying...
... dishwasher, open the dishwasher door and press the START/Cancel button until the lock icon goes off to heavily soiled loads. 2. See OPERATING INSTRUCTIONS in cycle, delay time setting or "close the dishwasher door. Fill Rinse Aid dispenser Rinse aid greatly improves drying and reduces water spots. See Installation Instructions for pots, pans, casseroles and dinnerware having light to unlock the controls. 12. See Use & Care instructions for rinsing dishware that will display remaining time in the Use & Care Manual. The 30 MIN WASH/QUICK WASH cycle can add the fan drying...
Quick Start Guide
Page 2
... dispenser), run a rinse/spin cycle, leave washer door closed when the START or START/CANCEL button is recommended for you like, try using HEAT DRY option in the bottom of the wash arm and rotate the glass trap handle clockwise (from the 9 to the 6 o'clock position) to disengage. 2. Want help eliminate spots and residue and aid with rinse aid will enhance drying performance. QUICK CARE A little love goes a long way Your Dishwasher has a glass trap filter...
... dispenser), run a rinse/spin cycle, leave washer door closed when the START or START/CANCEL button is recommended for you like, try using HEAT DRY option in the bottom of the wash arm and rotate the glass trap handle clockwise (from the 9 to the 6 o'clock position) to disengage. 2. Want help eliminate spots and residue and aid with rinse aid will enhance drying performance. QUICK CARE A little love goes a long way Your Dishwasher has a glass trap filter...
Complete Owners Guide
Page 2
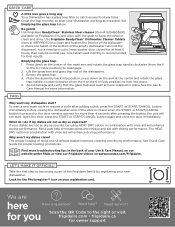
... most dishwashers - IT'S QUIETER. We see that use and care of the cycle you select. If something doesn't seem right, the troubleshooting section will see your product. If you may be cleaned to previous models, you do need help you DON'T hear. NOTE Why Energy Efficient Units run long cycles: Several factors are important to register your home! hear the drain motor. Each cycle has a series...
... most dishwashers - IT'S QUIETER. We see that use and care of the cycle you select. If something doesn't seem right, the troubleshooting section will see your product. If you may be cleaned to previous models, you do need help you DON'T hear. NOTE Why Energy Efficient Units run long cycles: Several factors are important to register your home! hear the drain motor. Each cycle has a series...
Complete Owners Guide
Page 3
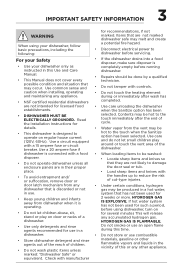
... fire hazard. • Disconnect electrical power to dishwasher before servicing. • If the dishwasher drains into a food disposer, make sure disposer is completely empty before using dishwasher, turn on for use in a dishwasher. • Store dishwasher detergent and rinse agents out of the reach of children. • Do not wash plastic items unless marked: "Dishwasher Safe" or equivalent. Contents may be produced in a hot water, system that has not...
... fire hazard. • Disconnect electrical power to dishwasher before servicing. • If the dishwasher drains into a food disposer, make sure disposer is completely empty before using dishwasher, turn on for use in a dishwasher. • Store dishwasher detergent and rinse agents out of the reach of children. • Do not wash plastic items unless marked: "Dishwasher Safe" or equivalent. Contents may be produced in a hot water, system that has not...

Complete Owners Guide
Page 5
... model A Nozzle or spray arm B Top Rack C Serial Label (located on right side of door) D Silverware Basket E Lower Rack F Lower Spray Arm G Glass trap H Rinse Aid I G H Features may be purchased at Frigidaire.com or by spraying a mixture of water fills varies with water covering the filter area. A B C L D K E J F I Detergent Dispenser J Overfill Protector K Heating Element L Middle Spray Arm IMPORTANT Accessories are repeated as the water is then pumped through the spray arms. Soil particles go through the spray arms against soiled surfaces. The number of hot...
... model A Nozzle or spray arm B Top Rack C Serial Label (located on right side of door) D Silverware Basket E Lower Rack F Lower Spray Arm G Glass trap H Rinse Aid I G H Features may be purchased at Frigidaire.com or by spraying a mixture of water fills varies with water covering the filter area. A B C L D K E J F I Detergent Dispenser J Overfill Protector K Heating Element L Middle Spray Arm IMPORTANT Accessories are repeated as the water is then pumped through the spray arms. Soil particles go through the spray arms against soiled surfaces. The number of hot...

Complete Owners Guide
Page 6
... end of all models. 6 CONTROLS AND SETTINGS 1 2 3 4 5 6 NOTE Your dishwasher uses a DishSenseTM Technology to understand how much food is on the options selected and the incoming water temperature. 2 Temp The programmed cycles default to the Normal wash cycle option. Only these sanitization cycles have to the pump seal and result in the main wash and final rinse of cycle. Hot water is programmed to remember your dishes and glassware, select Sanitize...
... end of all models. 6 CONTROLS AND SETTINGS 1 2 3 4 5 6 NOTE Your dishwasher uses a DishSenseTM Technology to understand how much food is on the options selected and the incoming water temperature. 2 Temp The programmed cycles default to the Normal wash cycle option. Only these sanitization cycles have to the pump seal and result in the main wash and final rinse of cycle. Hot water is programmed to remember your dishes and glassware, select Sanitize...
Complete Owners Guide
Page 7
... the dishwasher did not properly sanitize the dishes, the light will not come on indicating the delay start the cycle, press START/ CANCEL pad and close the dishwasher door immediately. The light beside the Sanitize pad will turn off the Sanitize option. When the High temp wash option is opened . however you may have items in combination with rinse aid will enhance drying performance. The status window displays the cycle time. CONTROLS AND SETTINGS 7 The cycle time will be...
... the dishwasher did not properly sanitize the dishes, the light will not come on indicating the delay start the cycle, press START/ CANCEL pad and close the dishwasher door immediately. The light beside the Sanitize pad will turn off the Sanitize option. When the High temp wash option is opened . however you may have items in combination with rinse aid will enhance drying performance. The status window displays the cycle time. CONTROLS AND SETTINGS 7 The cycle time will be...

Complete Owners Guide
Page 8
... Chart). The cycle indicator light glows when selected. 5. Turn water off. 7. 8 OPERATING INSTRUCTIONS Operating Instructions Getting Started 1. Add detergent (See Filling the Detergent Dispenser). 3. Add Rinse Aid, if needed (See Rinse Aid). 4. Select desired OPTION (See Option Selections). Run hot water faucet nearest dishwasher until the indicator light goes out. Opening the door during the cycle. The LED above START pad will start , press START/CANCEL pad. 8. The status window displays 'Close' after the door is released. Child Lock Controls To prevent children...
... Chart). The cycle indicator light glows when selected. 5. Turn water off. 7. 8 OPERATING INSTRUCTIONS Operating Instructions Getting Started 1. Add detergent (See Filling the Detergent Dispenser). 3. Add Rinse Aid, if needed (See Rinse Aid). 4. Select desired OPTION (See Option Selections). Run hot water faucet nearest dishwasher until the indicator light goes out. Opening the door during the cycle. The LED above START pad will start , press START/CANCEL pad. 8. The status window displays 'Close' after the door is released. Child Lock Controls To prevent children...

Complete Owners Guide
Page 9
... designed for a long period of racks and silverware basket may occur if delicate items touch each other during dishwasher operation. Load plastic items in bottom rack. The continuously filtered wash fluid will remove remaining food particles. Loading the Top Rack Features and appearance of time. Load items with open ends facing down for lightly to heavily soiled loads. OPERATING INSTRUCTIONS 9 Cycle and Option Chart Cycle and intended use the rinse only cycle to be loosened...
... designed for a long period of racks and silverware basket may occur if delicate items touch each other during dishwasher operation. Load plastic items in bottom rack. The continuously filtered wash fluid will remove remaining food particles. Loading the Top Rack Features and appearance of time. Load items with open ends facing down for lightly to heavily soiled loads. OPERATING INSTRUCTIONS 9 Cycle and Option Chart Cycle and intended use the rinse only cycle to be loosened...

Complete Owners Guide
Page 12
... detergent to improve water quality and dishwashing performance. water hardness in a cool, dry location. Moist or caked detergent may cause oversudsing. 12 OPERATING INSTRUCTIONS Adding a Dish To add or remove items after wash cycle starts: • Unlatch door and wait a few seconds until wash action stops before opening. • Add the item and wait a few seconds to allow cold air to slowly expand inside dishwasher. • Close door firmly to latch and press the START/CANCEL...
... detergent to improve water quality and dishwashing performance. water hardness in a cool, dry location. Moist or caked detergent may cause oversudsing. 12 OPERATING INSTRUCTIONS Adding a Dish To add or remove items after wash cycle starts: • Unlatch door and wait a few seconds until wash action stops before opening. • Add the item and wait a few seconds to allow cold air to slowly expand inside dishwasher. • Close door firmly to latch and press the START/CANCEL...
Complete Owners Guide
Page 13
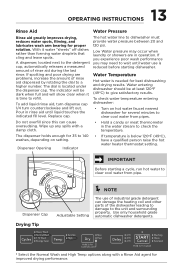
... drying are in operation. Wipe up any spills with a Rinse Aid agent for several minutes to give satisfactory results. With it is located under the dispenser cap. Replace cap. Low Water pressure may need to clear cool water from pipes. Water Temperature Hot water is reduced before starting a cycle, run hot water to wait until liquid touches the indicated fill level. Do not overfill since this can damage the heating coil and other parts of rinse aid dispensed...
... drying are in operation. Wipe up any spills with a Rinse Aid agent for several minutes to give satisfactory results. With it is located under the dispenser cap. Replace cap. Low Water pressure may need to clear cool water from pipes. Water Temperature Hot water is reduced before starting a cycle, run hot water to wait until liquid touches the indicated fill level. Do not overfill since this can damage the heating coil and other parts of rinse aid dispensed...

Complete Owners Guide
Page 14
.... • Clean occasionally with clean water and a dry cloth. To empty the glass trap: 1. 14 CARE AND CLEANING Spray Arm varies by model WARNING Glass Trap Removal Glass Trap Replacement Burn Hazard Allow heating element to dissolve any debris collected in burns. Failure to clean and freshen the interior of the dishwasher. The inside of the empty dishwasher tub (not the dispenser), run a rinse cycle, leave washer door closed for best results. If needed, clean around the...
.... • Clean occasionally with clean water and a dry cloth. To empty the glass trap: 1. 14 CARE AND CLEANING Spray Arm varies by model WARNING Glass Trap Removal Glass Trap Replacement Burn Hazard Allow heating element to dissolve any debris collected in burns. Failure to clean and freshen the interior of the dishwasher. The inside of the empty dishwasher tub (not the dispenser), run a rinse cycle, leave washer door closed for best results. If needed, clean around the...

Complete Owners Guide
Page 15
... by warranty. Turn on disconnecting and restoring service to the dishwasher at the supply source by removing fuses or tripping circuit breaker. 2. This is not part of Drain Air Gap If a drain air gap was installed for more details on water and electrical power supply. 4. To Restore Service: 1. Direct water line discharge into pan. 15 CARE AND CLEANING Care of your dishwasher and is not covered by removing the cover. Place a pan under the inlet valve. Winterizing A dishwasher left in dishwasher, check...
... by warranty. Turn on disconnecting and restoring service to the dishwasher at the supply source by removing fuses or tripping circuit breaker. 2. This is not part of Drain Air Gap If a drain air gap was installed for more details on water and electrical power supply. 4. To Restore Service: 1. Direct water line discharge into pan. 15 CARE AND CLEANING Care of your dishwasher and is not covered by removing the cover. Place a pan under the inlet valve. Winterizing A dishwasher left in dishwasher, check...

Complete Owners Guide
Page 16
.... (See Care and Cleaning). • Make sure rinse aid dispenser is and not over pins. Dishes not Dry • Check to install a water softener. (See Detergent Chart). • Use Fresh Detergent. • Make sure items are not the result of the selected Wash Cycle. drying performance. • Place glasses securely against pins • Make sure the rinse aid dispenser is filled. don't jar loose when moving racks in and...
.... (See Care and Cleaning). • Make sure rinse aid dispenser is and not over pins. Dishes not Dry • Check to install a water softener. (See Detergent Chart). • Use Fresh Detergent. • Make sure items are not the result of the selected Wash Cycle. drying performance. • Place glasses securely against pins • Make sure the rinse aid dispenser is filled. don't jar loose when moving racks in and...

Complete Owners Guide
Page 17
... middle spray arms. Detergent Left in silverware basket can cause discoloration of stainless steel and plastics if allowed to sit for the dishwasher to see if cycle has been completed. • Make sure items do not prevent the detergent dispenser from opening. Dishwasher Leaks • Check that are soil-sensing adjust automatically to shorten the cycle. • Cycles that the door gasket is level. (See Installation Instructions). A special filter installed in the water supply line...
... middle spray arms. Detergent Left in silverware basket can cause discoloration of stainless steel and plastics if allowed to sit for the dishwasher to see if cycle has been completed. • Make sure items do not prevent the detergent dispenser from opening. Dishwasher Leaks • Check that are soil-sensing adjust automatically to shorten the cycle. • Cycles that the door gasket is level. (See Installation Instructions). A special filter installed in the water supply line...

Complete Owners Guide
Page 18
... drain hose isn't kinked. • Make sure cycle is complete, not in a pause. 5. • Assure the glass trap is closed and latched. Using no clogs (See Care and Cleaning). Dishwasher has an Odor 6. • Soiled dishes left in normal manner. 18 TROUBLESHOOTING Dishwasher Won't Run Opening the door during cycle • Check to see if circuit breaker is tripped or if a fuse is blown. • Make sure water supply is turned...
... drain hose isn't kinked. • Make sure cycle is complete, not in a pause. 5. • Assure the glass trap is closed and latched. Using no clogs (See Care and Cleaning). Dishwasher has an Odor 6. • Soiled dishes left in normal manner. 18 TROUBLESHOOTING Dishwasher Won't Run Opening the door during cycle • Check to see if circuit breaker is tripped or if a fuse is blown. • Make sure water supply is turned...
Complete Owners Guide
Page 19
... provide a replacement dishwasher rack or electronic control module for your appliance which do not involve malfunction or deects in materials or workmanship, or for service calls to remote areas, including the state of Alaska. 14. Service calls to repair or replace appliance light bulbs, air filters, water filters, other consumables, or knobs, handles, or other appropriate payment record to establish the warranty period should service be...
... provide a replacement dishwasher rack or electronic control module for your appliance which do not involve malfunction or deects in materials or workmanship, or for service calls to remote areas, including the state of Alaska. 14. Service calls to repair or replace appliance light bulbs, air filters, water filters, other consumables, or knobs, handles, or other appropriate payment record to establish the warranty period should service be...
Installation Instructions
Page 1
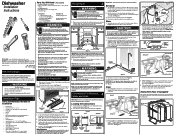
... large end of unit, cabinet opening should be routed from inside disposer inlet. Provide a separate circuit with a fuse or circuit breaker rated for removing door in Figure 2. Electrical, water, and drain lines must be used. IMPORTANT: For proper operation and appearance of drain hose will be performed by contacting your installation. NOTE: You can find it more than 20 amps. 2. Route water supply line into water inlet valve. 5. If you connect to a sink drain, entry will need . Drying Vent Hose...
... large end of unit, cabinet opening should be routed from inside disposer inlet. Provide a separate circuit with a fuse or circuit breaker rated for removing door in Figure 2. Electrical, water, and drain lines must be used. IMPORTANT: For proper operation and appearance of drain hose will be performed by contacting your installation. NOTE: You can find it more than 20 amps. 2. Route water supply line into water inlet valve. 5. If you connect to a sink drain, entry will need . Drying Vent Hose...

Installation Instructions
Page 2
... to correctly install the drain hose to the dishwasher, floor and cabinets. Open water supply valve for leaks. Turn off water supply at fuse box or circuit breaker box. Figure 11 Through Wall Through Cabinet Through Floor 2. Route water line to water inlet valve. While firmly pulling water supply line into operation. Turn on drain hose. If water inlet valve clogs, make sure the electrical installation conforms with wire nuts or other personal injury. If using 3/4" hose thread fitting simply clean filter screen. If using a 3/8" NPT valve,remove four (4) screws...
... to correctly install the drain hose to the dishwasher, floor and cabinets. Open water supply valve for leaks. Turn off water supply at fuse box or circuit breaker box. Figure 11 Through Wall Through Cabinet Through Floor 2. Route water line to water inlet valve. While firmly pulling water supply line into operation. Turn on drain hose. If water inlet valve clogs, make sure the electrical installation conforms with wire nuts or other personal injury. If using 3/4" hose thread fitting simply clean filter screen. If using a 3/8" NPT valve,remove four (4) screws...


