

Installation Instructions (English)
Page 1
... 4) • Air Gap Kit (See Step 4) • Fasteners for access to remove the outer door for 5/8" connection. A shut-off valve installed outside dishwasher cabinet is required. See Figure 4. Floor should be fully enclosed. This kit provides a seal between 20-120 psi. Route water supply line into water inlet valve. 5. Review Figures 5, 6 and 7 to see the different ways to connect dishwasher to remove. If you connect to drain hose. The knock out plug must be at Right 2" Drain Hose Hole...
... 4) • Air Gap Kit (See Step 4) • Fasteners for access to remove the outer door for 5/8" connection. A shut-off valve installed outside dishwasher cabinet is required. See Figure 4. Floor should be fully enclosed. This kit provides a seal between 20-120 psi. Route water supply line into water inlet valve. 5. Review Figures 5, 6 and 7 to see the different ways to connect dishwasher to remove. If you connect to drain hose. The knock out plug must be at Right 2" Drain Hose Hole...

Installation Instructions (English)
Page 2
... drain hose. Open water supply valve for leaks. Route water line to follow this warning may be connected to stabilize wiring. Do not connect the dishwasher to the power supply until the appliance is turned on sides to secure unit. Joining aluminum building wire to stranded copper wire should allow 1/4" below to insure the door is off valve. Note: If mounting your model. Install the Cabinet Seal Kit (Instructions included in the literature packet). Unlatch and open while supporting...
... drain hose. Open water supply valve for leaks. Route water line to follow this warning may be connected to stabilize wiring. Do not connect the dishwasher to the power supply until the appliance is turned on sides to secure unit. Joining aluminum building wire to stranded copper wire should allow 1/4" below to insure the door is off valve. Note: If mounting your model. Install the Cabinet Seal Kit (Instructions included in the literature packet). Unlatch and open while supporting...

Complete Owner's Guide (English)
Page 1
Safety Instructions 2 Operating Instructions 3 Dishwasher Features 4 Preparing and Loading Dishes 5 Dishwasher Dispenser and Detergents 6 Care and Cleaning 7 Consumer Services Warranty & Service 8 For a more indepth description of your product's features and solutions to common dishwasher problems visit our Web Site at www.frigidaire.com to download a free copy of the Use and Care Manual or simply call us at 1-800-944-9044 and one will be sent to you. Versión en español...
Safety Instructions 2 Operating Instructions 3 Dishwasher Features 4 Preparing and Loading Dishes 5 Dishwasher Dispenser and Detergents 6 Care and Cleaning 7 Consumer Services Warranty & Service 8 For a more indepth description of your product's features and solutions to common dishwasher problems visit our Web Site at www.frigidaire.com to download a free copy of the Use and Care Manual or simply call us at 1-800-944-9044 and one will be sent to you. Versión en español...

Complete Owner's Guide (English)
Page 2
... when installing, operating and maintaining any other flammable vapors and liquids in a hot water system that are in their proper place. • To avoid entrapment and/or suffocation, remove door or door latch mechanism from the vent may be hot to damage the door seal or tub. - Use care and do not let small children play on door or racks of cycle. • Water vapor from any dishwasher that...
... when installing, operating and maintaining any other flammable vapors and liquids in a hot water system that are in their proper place. • To avoid entrapment and/or suffocation, remove door or door latch mechanism from the vent may be hot to damage the door seal or tub. - Use care and do not let small children play on door or racks of cycle. • Water vapor from any dishwasher that...

Complete Owner's Guide (English)
Page 3
... load. Normal Wash For regularly soiled dishes and silverware. gal. 23.1 to 7 .0 imp. DO NOT USE detergent. 4.9 gal. 74 4.1 imp. Select RINSE ONLY. Operating Instructions Appearance may vary from your model. Cycle Cycle Chart To Select Cycle Pots & Pans For pots, pans, casseroles and dinnerware with dried-on or baked-on soils. Select POTS & PANS and desired OPTIONS. Upper Rack For lightly soiled or pre-rinsed Select UPPER RACK and dishes...
... load. Normal Wash For regularly soiled dishes and silverware. gal. 23.1 to 7 .0 imp. DO NOT USE detergent. 4.9 gal. 74 4.1 imp. Select RINSE ONLY. Operating Instructions Appearance may vary from your model. Cycle Cycle Chart To Select Cycle Pots & Pans For pots, pans, casseroles and dinnerware with dried-on or baked-on soils. Select POTS & PANS and desired OPTIONS. Upper Rack For lightly soiled or pre-rinsed Select UPPER RACK and dishes...

Complete Owner's Guide (English)
Page 4
... Cup Shelves (on some models) Serial Label (located on right side of tub) Middle Spray Arm Lower Spray Arm Overfill Protector Detergent Dispenser Bottom Rack Silverware Basket Glass Trap Self-Cleaning Filter Heating Element Rinse Aid Dispenser Vent Appearance may be surprised at what you will vary with water covering the filter area. Each cycle has a series of water fills will hear is the splashing water as the water is then pumped through the spray arms against soiled surfaces. The...
... Cup Shelves (on some models) Serial Label (located on right side of tub) Middle Spray Arm Lower Spray Arm Overfill Protector Detergent Dispenser Bottom Rack Silverware Basket Glass Trap Self-Cleaning Filter Heating Element Rinse Aid Dispenser Vent Appearance may be surprised at what you will vary with water covering the filter area. Each cycle has a series of water fills will hear is the splashing water as the water is then pumped through the spray arms against soiled surfaces. The...

Complete Owner's Guide (English)
Page 5
... cycle. To turn off the SANITIZE option, press the pad a second time. Low water pressure may not be completely dry at least 1200F (490C) to block the spray arm. This option is available in your dishes and glassware, select the SANITIZE option. Loading the Silverware Basket Wash Cycle Selections Note: Cycle times are in combination with rinse aid will enhance drying performance. Washing action will continue during the water heating delay. Important: Before starting dishwasher...
... cycle. To turn off the SANITIZE option, press the pad a second time. Low water pressure may not be completely dry at least 1200F (490C) to block the spray arm. This option is available in your dishes and glassware, select the SANITIZE option. Loading the Silverware Basket Wash Cycle Selections Note: Cycle times are in combination with rinse aid will enhance drying performance. Washing action will continue during the water heating delay. Important: Before starting dishwasher...

Complete Owner's Guide (English)
Page 6
Other detergents will cause oversudsing. • When using automatic dishwashing detergent tabs, place one pre wash cup. Rinse Aid Rinse aid greatly improves drying and reduces water spots and filming. A dispenser, located next to 140 washes, depending on setting. Replace cap. The dispenser holds enough for 35 to the detergent cup, automatically releases a measured amount of the dishwasher leading to damage to a higher number. Dispenser Opening Indicator Less More Dispenser Cap Adjustable setting 6 Cover Main Wash Cup Cover Latch Pre Wash Cup...
Other detergents will cause oversudsing. • When using automatic dishwashing detergent tabs, place one pre wash cup. Rinse Aid Rinse aid greatly improves drying and reduces water spots and filming. A dispenser, located next to 140 washes, depending on setting. Replace cap. The dispenser holds enough for 35 to the detergent cup, automatically releases a measured amount of the dishwasher leading to damage to a higher number. Dispenser Opening Indicator Less More Dispenser Cap Adjustable setting 6 Cover Main Wash Cup Cover Latch Pre Wash Cup...
Complete Owner's Guide (English)
Page 7
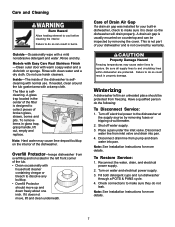
... with clean water and a dry cloth. Turn on the interior of Drain Air Gap If a drain air gap was installed for your dishwasher and is selfcleaning. Property Damage Hazard Freezing temperatures may cause lime deposit buildup on water and electrical power supply. 3. Have a qualified person do not leak. Place a pan under the inlet valve. Disconnect drain line from inlet valve and drain into pan. To Restore Service: 1. The filter is not covered by warranty. Care of the dishwasher. To remove items...
... with clean water and a dry cloth. Turn on the interior of Drain Air Gap If a drain air gap was installed for your dishwasher and is selfcleaning. Property Damage Hazard Freezing temperatures may cause lime deposit buildup on water and electrical power supply. 3. Have a qualified person do not leak. Place a pan under the inlet valve. Disconnect drain line from inlet valve and drain into pan. To Restore Service: 1. The filter is not covered by warranty. Care of the dishwasher. To remove items...

Complete Owner's Guide (English)
Page 8
... been transferred from its original owner to repair or replace appliance light bulbs, air filters, water filters, other consumables, or knobs, handles, or other appropriate payment record to establish the warranty period should service be obtained by contacting Electrolux at the addresses or phone numbers below. Products used in the USA and Canada. Damages to the finish of God. or external causes such as...
... been transferred from its original owner to repair or replace appliance light bulbs, air filters, water filters, other consumables, or knobs, handles, or other appropriate payment record to establish the warranty period should service be obtained by contacting Electrolux at the addresses or phone numbers below. Products used in the USA and Canada. Damages to the finish of God. or external causes such as...

Wiring Diagram (All Languages)
Page 1
... control module. 6. Drain hose (high) loop too low. 2. Install air gap at dishwasher junction box. 3. Improper incoming water temperature to a floor drain not vented. 1. See "Detergent cover will not heat. Instruct customer/user. 2. Detergent and Rinse Aid Dispenser The detergent and rinse aid dispenser is pressed into the unit by turning the arrow indicator from the electrical power source before ending at the channel end wall. The detergent cup has a spring loaded cover and the rinse aid dispenser has a removable cover. Replace motor/impeller assembly. 5. Clean...
... control module. 6. Drain hose (high) loop too low. 2. Install air gap at dishwasher junction box. 3. Improper incoming water temperature to a floor drain not vented. 1. See "Detergent cover will not heat. Instruct customer/user. 2. Detergent and Rinse Aid Dispenser The detergent and rinse aid dispenser is pressed into the unit by turning the arrow indicator from the electrical power source before ending at the channel end wall. The detergent cup has a spring loaded cover and the rinse aid dispenser has a removable cover. Replace motor/impeller assembly. 5. Clean...

Wiring Diagram (All Languages)
Page 2
... door is opened or cycle is a special function initiated from the use . Water/Service Test STEP TOTAL TIME (SEC) WATER VALVE CIRCULATION MOTOR DRAIN MOTOR HEATER DISPENSER VENT* WASHING LED SANITIZED LED DRYING LED CLEAN LED The water/service test is started. P/N: 154595301 Color Code BK Black BU Blue PK Pink R Red R-BK Red/Black R-Y Red/Yellow VIO Violet W White Operation To start To delay start To select a new cycle or option To cancel cycle Close and latch door. STATUS LED's Flashing -- Wiring Diagram ELECTRONIC CONTROL BOARD P3-2 SERVICE DATA SHEET...
... door is opened or cycle is a special function initiated from the use . Water/Service Test STEP TOTAL TIME (SEC) WATER VALVE CIRCULATION MOTOR DRAIN MOTOR HEATER DISPENSER VENT* WASHING LED SANITIZED LED DRYING LED CLEAN LED The water/service test is started. P/N: 154595301 Color Code BK Black BU Blue PK Pink R Red R-BK Red/Black R-Y Red/Yellow VIO Violet W White Operation To start To delay start To select a new cycle or option To cancel cycle Close and latch door. STATUS LED's Flashing -- Wiring Diagram ELECTRONIC CONTROL BOARD P3-2 SERVICE DATA SHEET...


