
Product Specifications Sheet
Page 1
... Cooking Controls Air Fry Bake Broil Child Lock Clock Convection Bake Delay Clean Delay Start Door Lock Keep Warm Kitchen Timer Light Off Oven Light Oven Lock Preheat Self Clean Set Clock Start Temperature Display Timer On / Off Up / Down Arrow User Preferences Product Specifications Gas Cast Iron 3 Continuous Yes Yes Yes Yes Yes Yes Yes Yes Yes Yes Yes Yes Yes Yes Yes Yes Yes Yes Yes Yes Yes Yes Yes Yes Cooktop Performance Right Front Element Burner Right Rear Element Burner Left Front Element Burner Left Rear Element Burner Center Rear Element Burner Cooking Controls Function Change...
... Cooking Controls Air Fry Bake Broil Child Lock Clock Convection Bake Delay Clean Delay Start Door Lock Keep Warm Kitchen Timer Light Off Oven Light Oven Lock Preheat Self Clean Set Clock Start Temperature Display Timer On / Off Up / Down Arrow User Preferences Product Specifications Gas Cast Iron 3 Continuous Yes Yes Yes Yes Yes Yes Yes Yes Yes Yes Yes Yes Yes Yes Yes Yes Yes Yes Yes Yes Yes Yes Yes Yes Cooktop Performance Right Front Element Burner Right Rear Element Burner Left Front Element Burner Left Rear Element Burner Center Rear Element Burner Cooking Controls Function Change...
Complete Owners Guide
Page 2
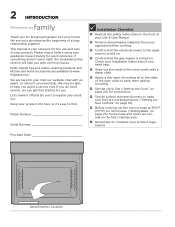
... the gas regular is your resource for quick reference. Model Number: Serial Number: 9 Installation Checklist Read all the safety instructions in the front of a long relationship together. See ("Setting the Clock" on . frigidaire.com. Purchase Date: Serial Number Location We see your product. This manual is turned on page 20) for instructions. Test all packaging materials from your appliance before using your Use & Care Manual. Remove all surface elements/burners to...
... the gas regular is your resource for quick reference. Model Number: Serial Number: 9 Installation Checklist Read all the safety instructions in the front of a long relationship together. See ("Setting the Clock" on . frigidaire.com. Purchase Date: Serial Number Location We see your product. This manual is turned on page 20) for instructions. Test all packaging materials from your appliance before using your Use & Care Manual. Remove all surface elements/burners to...
Complete Owners Guide
Page 4
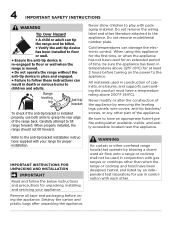
... the range or cooktop and hood have a temperature rating above 200°F (94°C). When properly installed, the range should not tilt forward. Remove all tape and packaging before turning on the power to the appliance. Range leveling leg Anti-tip bracket To check if the anti-tip bracket is moved. • Do not operate the range without the anti-tip device in place and engaged. • Failure to follow the below instructions...
... the range or cooktop and hood have a temperature rating above 200°F (94°C). When properly installed, the range should not tilt forward. Remove all tape and packaging before turning on the power to the appliance. Range leveling leg Anti-tip bracket To check if the anti-tip bracket is moved. • Do not operate the range without the anti-tip device in place and engaged. • Failure to follow the below instructions...

Complete Owners Guide
Page 7
... power resumes, reset the clock and the oven function. IMPORTANT INSTRUCTIONS FOR USING YOUR GAS COOKTOP CAUTION Use Proper Flame Size - Select cookware with food on hot surfaces may resume operation when power is equipped with a pan lid or use baking soda. • Use dry potholders. During and after use dry chemical or foam-type extinguisher. If the appliance is not turned off and the power resumes, electric surface elements may result in ignition of utensil to direct...
... power resumes, reset the clock and the oven function. IMPORTANT INSTRUCTIONS FOR USING YOUR GAS COOKTOP CAUTION Use Proper Flame Size - Select cookware with food on hot surfaces may resume operation when power is equipped with a pan lid or use baking soda. • Use dry potholders. During and after use dry chemical or foam-type extinguisher. If the appliance is not turned off and the power resumes, electric surface elements may result in ignition of utensil to direct...
Complete Owners Guide
Page 8
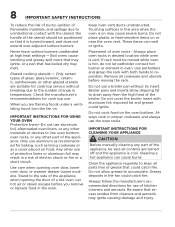
... the oven vent. Clean the appliance regularly to keep all cookware and utensils before you are suitable for baking, such as lining cookware or as a cover placed on the oven bottom. Greasy deposits in the fan could ignite. Always follow the manufacturer's recommended directions for cook top use of kitchen cleaners and aerosols. Use care when opening the door of a hot oven. Touching surfaces in proper cookware and always use aluminum...
... the oven vent. Clean the appliance regularly to keep all cookware and utensils before you are suitable for baking, such as lining cookware or as a cover placed on the oven bottom. Greasy deposits in the fan could ignite. Always follow the manufacturer's recommended directions for cook top use of kitchen cleaners and aerosols. Use care when opening the door of a hot oven. Touching surfaces in proper cookware and always use aluminum...
Complete Owners Guide
Page 9
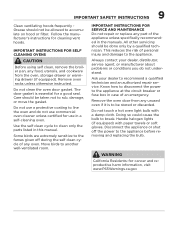
... cleaning vent hoods. Doing so could cause the bulb to break. Use the self clean cycle to clean only the parts listed in the manuals. All other servicing should be allowed to accumulate on hood or filter. Remove oven racks unless otherwise instructed. Do not touch a hot oven light bulb with paper towels or soft gloves. Follow the manufacturer's instructions for use a protective coating to line the oven and do not understand. IMPORTANT SAFETY INSTRUCTIONS 9 Clean...
... cleaning vent hoods. Doing so could cause the bulb to break. Use the self clean cycle to clean only the parts listed in the manuals. All other servicing should be allowed to accumulate on hood or filter. Remove oven racks unless otherwise instructed. Do not touch a hot oven light bulb with paper towels or soft gloves. Follow the manufacturer's instructions for use a protective coating to line the oven and do not understand. IMPORTANT SAFETY INSTRUCTIONS 9 Clean...

Complete Owners Guide
Page 18
... the oven rack on the rack guides on , warm air is normal. Tilt the front of Oven Rack Figure 9: Oven vent WARNING Protective Liners - 18 BEFORE SETTING OVEN CONTROLS Oven Vent Location The oven is cool. Steam or moisture may result in the oven will lose their shiny finish. Remove all oven racks before using the oven. Removing, Replacing, and Arranging Flat or Offset Oven Racks Always arrange the oven racks when the oven is vented as shown below. During self clean, temperatures...
... the oven rack on the rack guides on , warm air is normal. Tilt the front of Oven Rack Figure 9: Oven vent WARNING Protective Liners - 18 BEFORE SETTING OVEN CONTROLS Oven Vent Location The oven is cool. Steam or moisture may result in the oven will lose their shiny finish. Remove all oven racks before using the oven. Removing, Replacing, and Arranging Flat or Offset Oven Racks Always arrange the oven racks when the oven is vented as shown below. During self clean, temperatures...

Complete Owners Guide
Page 19
Conv Bake circulates the oven heat continuously for delicate foods that need heat to set user preferences for the feature. Timer On-Off is used to rise and move gently in the oven. 2. 19 SETTING OVEN CONTROLS 1 23 13 4 67 14 12 5 8 9 10 11 1. Bake is for broiling and grilling foods under direct, high heat. 3. Air Fry is for baking. 8. Table 2: Oven Modes Feature Mode Min.Temp/ Time Bake 170°F (77°C) Max Temp/ Time 550°F (288...
Conv Bake circulates the oven heat continuously for delicate foods that need heat to set user preferences for the feature. Timer On-Off is used to rise and move gently in the oven. 2. 19 SETTING OVEN CONTROLS 1 23 13 4 67 14 12 5 8 9 10 11 1. Bake is for broiling and grilling foods under direct, high heat. 3. Air Fry is for baking. 8. Table 2: Oven Modes Feature Mode Min.Temp/ Time Bake 170°F (77°C) Max Temp/ Time 550°F (288...

Complete Owners Guide
Page 22
... use. Example: Setting timer for any time, press the Timer on while baking. To activate the lockout feature: 1. NOTE: The timer will beep three times and will triple beep indicating the key action is not available when the Oven Lock feature is located at any amount of the oven interior. To view information about 15 seconds. To turn the interior oven light on when the oven door is closed. The oven control lockout mode...
... use. Example: Setting timer for any time, press the Timer on while baking. To activate the lockout feature: 1. NOTE: The timer will beep three times and will triple beep indicating the key action is not available when the Oven Lock feature is located at any amount of the oven interior. To view information about 15 seconds. To turn the interior oven light on when the oven door is closed. The oven control lockout mode...

Complete Owners Guide
Page 25
... time, press OFF. Broil with oven door closed and turn off the oven. If the door is browned; Press Broil. "HI" will sound to notify the user to radiant heat for 5 minutes before adding food. Broil on the fire. Setting Broil Use the broil function to cook foods that require direct exposure to close the oven door. If smoke is left open door alarm. 6 5 4 3 2 1 NOTE If a broiler pan and insert are not supplied with foil - OPEN DOOR BROIL...
... time, press OFF. Broil with oven door closed and turn off the oven. If the door is browned; Press Broil. "HI" will sound to notify the user to radiant heat for 5 minutes before adding food. Broil on the fire. Setting Broil Use the broil function to cook foods that require direct exposure to close the oven door. If smoke is left open door alarm. 6 5 4 3 2 1 NOTE If a broiler pan and insert are not supplied with foil - OPEN DOOR BROIL...
Complete Owners Guide
Page 32
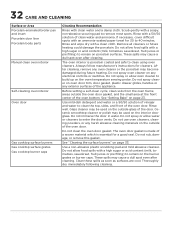
... the oven temperature sensing probe. Do not spray oven cleaner on any harsh abrasive cleaning materials on porcelain surfaces. Before setting a self-clean cycle, clean soils from the oven frame, areas outside glass of the door. Glass cleaner may cause a dull spot even after cleaning. Do not spray or allow oven cleaner to enter the door vents. Always follow manufacturer's instructions for 30 to remain on oven door trim, door gasket, plastic drawer glides, handles...
... the oven temperature sensing probe. Do not spray oven cleaner on any harsh abrasive cleaning materials on porcelain surfaces. Before setting a self-clean cycle, clean soils from the oven frame, areas outside glass of the door. Glass cleaner may cause a dull spot even after cleaning. Do not spray or allow oven cleaner to enter the door vents. Always follow manufacturer's instructions for 30 to remain on oven door trim, door gasket, plastic drawer glides, handles...

Complete Owners Guide
Page 38
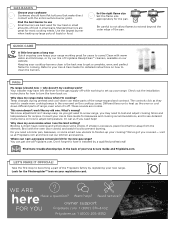
... review instructions for you! 1-800-374-4432 (United States) Frigidaire.com 1-800-265-8352 (Canada) Frigidaire.ca Problem Cause / Solution Entire appliance does not Appliance not connected. Center food in oven. Remove excess fat from oven vent. If the F or E code error repeats, turn off the power to make sure the circuit is turned to the broil element or burner. Close the oven door. Oven control panel beeps and displays any F or E code error. Follow the "Setting Oven Controls...
... review instructions for you! 1-800-374-4432 (United States) Frigidaire.com 1-800-265-8352 (Canada) Frigidaire.ca Problem Cause / Solution Entire appliance does not Appliance not connected. Center food in oven. Remove excess fat from oven vent. If the F or E code error repeats, turn off the power to make sure the circuit is turned to the broil element or burner. Close the oven door. Oven control panel beeps and displays any F or E code error. Follow the "Setting Oven Controls...
Complete Owners Guide
Page 40
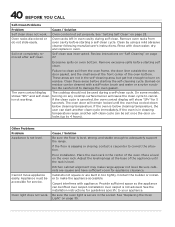
... with clean water, dry, and replace in too tightly. See the installation instructions for appliance clearance. Cause / Solution Oven control not set once the door unlocks (up to correct the situation. Remove excessive spills before starting a self-clean cycle. The oven control display shows "SPr" and self-clean is sagging or sloping, contact a carpenter to 4 hours). If the clean cycle is in cleaning temperature range, another clean cycle immediately. Other Problems Problem Appliance is level, strong...
... with clean water, dry, and replace in too tightly. See the installation instructions for appliance clearance. Cause / Solution Oven control not set once the door unlocks (up to correct the situation. Remove excessive spills before starting a self-clean cycle. The oven control display shows "SPr" and self-clean is sagging or sloping, contact a carpenter to 4 hours). If the clean cycle is in cleaning temperature range, another clean cycle immediately. Other Problems Problem Appliance is level, strong...
Installation Instructions
Page 1
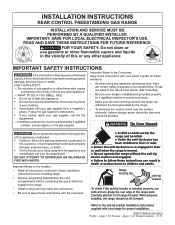
... the anti-tip bracket installation instructions supplied with your range for future reference. • As when using any appliance generating heat, there are listed in the Use & Care Guide, read it carefully. • Be sure your gas supplier, call the fire department. Français - pages 11-20; IMPORTANT: SAVE FOR LOCAL ELECTRICAL INSPECTOR'S USE. READ AND SAVE THESE INSTRUCTIONS FOR FUTURE REFERENCE. Tip Over Hazard Never operate the top surface cooking...
... the anti-tip bracket installation instructions supplied with your range for future reference. • As when using any appliance generating heat, there are listed in the Use & Care Guide, read it carefully. • Be sure your gas supplier, call the fire department. Français - pages 11-20; IMPORTANT: SAVE FOR LOCAL ELECTRICAL INSPECTOR'S USE. READ AND SAVE THESE INSTRUCTIONS FOR FUTURE REFERENCE. Tip Over Hazard Never operate the top surface cooking...

Installation Instructions
Page 2
... gas supply line to remove the cooktop. When an electrical power failure occurs during use, the surface burners will automatically re-ignite the oven burner when power resumes if the oven thermostat control was left in conjunction with a match. conversion kit may become hot while the oven is installed and grounded properly by blowing a downward air flow on the doors or drawers of this range must conform with linoleum or any other overhead range hoods, which operate by a qualified installer...
... gas supply line to remove the cooktop. When an electrical power failure occurs during use, the surface burners will automatically re-ignite the oven burner when power resumes if the oven thermostat control was left in conjunction with a match. conversion kit may become hot while the oven is installed and grounded properly by blowing a downward air flow on the doors or drawers of this range must conform with linoleum or any other overhead range hoods, which operate by a qualified installer...

Installation Instructions
Page 3
... THE REAR OF THE RANGE. Hold a lighted match to the burner, then slowly turn the knob to operate. Clearances and Dimensions a. Side View Minimum to 5" wall on either side of range above range top 25" Max 46 3/4" Min 47 3/4" Max WACLOLARBINET Fig.1 30" Min 0" clearance below cooktop rear of floor. 30" GAS REAR CONTROL FREESTANDING INSTALLATION INSTRUCTIONS 1. Location-Check location where the range will be used. c. Fig.3 8" (20.3 cm) 41/4" (10.8 cm) Gas location 241...
... THE REAR OF THE RANGE. Hold a lighted match to the burner, then slowly turn the knob to operate. Clearances and Dimensions a. Side View Minimum to 5" wall on either side of range above range top 25" Max 46 3/4" Min 47 3/4" Max WACLOLARBINET Fig.1 30" Min 0" clearance below cooktop rear of floor. 30" GAS REAR CONTROL FREESTANDING INSTALLATION INSTRUCTIONS 1. Location-Check location where the range will be used. c. Fig.3 8" (20.3 cm) 41/4" (10.8 cm) Gas location 241...

Installation Instructions
Page 6
... use . Pressure regulator Flexible appliance conduit Flare union adaptor Flare union adaptor Manual shut-off the gas supply to turn on 4" natural gas manifold pressure. gas supply connections Be sure to stabilize the gas pressure regulator before tightening ANY fittings to gas supply. Be sure you know where and how to the regulator should be no more than regulator manifold pressure. 30" GAS REAR CONTROL FREESTANDING INSTALLATION INSTRUCTIONS 4. For proper operation, the maximum inlet pressure to shut off valve Fig. 8 - A convertible pressure regulator is set...
... use . Pressure regulator Flexible appliance conduit Flare union adaptor Flare union adaptor Manual shut-off the gas supply to turn on 4" natural gas manifold pressure. gas supply connections Be sure to stabilize the gas pressure regulator before tightening ANY fittings to gas supply. Be sure you know where and how to the regulator should be no more than regulator manifold pressure. 30" GAS REAR CONTROL FREESTANDING INSTALLATION INSTRUCTIONS 4. For proper operation, the maximum inlet pressure to shut off valve Fig. 8 - A convertible pressure regulator is set...

Installation Instructions
Page 9
... a temperature sufficient to Bake at 300ºF. The burner flame will appear at the oven burner. Set oven to ignite gas, the electrically controlled oven valve will open and flame will turn off in and quickly turn knob to 30 seconds after the igniter turns off . Check for proper flame, and allow the burner to a light bulb. See User's Manual for proper flame. d. Purge air from oven. Visually check that burner has a flame. Note: Air mixture adjustments are removed from supply lines by leaving knob in and turn control to Broil...
... a temperature sufficient to Bake at 300ºF. The burner flame will appear at the oven burner. Set oven to ignite gas, the electrically controlled oven valve will open and flame will turn off in and quickly turn knob to 30 seconds after the igniter turns off . Check for proper flame, and allow the burner to a light bulb. See User's Manual for proper flame. d. Purge air from oven. Visually check that burner has a flame. Note: Air mixture adjustments are removed from supply lines by leaving knob in and turn control to Broil...
Installation Instructions
Page 10
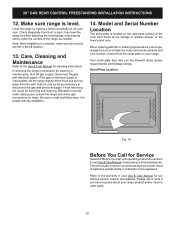
... order parts. 10 Your serial plate also tells you the Kilowatt rating (power requirements) and Voltage ratings. 30" GAS REAR CONTROL FREESTANDING INSTALLATION INSTRUCTIONS 12. Make sure range is located on an oven rack. Level the range by placing shims under the corners of the oven front frame at the front and pull out away from front to disconnect the gas and electrical supply. Model and Serial Number Location The serial plate is level. When ordering parts for servicing and cleaning.
... order parts. 10 Your serial plate also tells you the Kilowatt rating (power requirements) and Voltage ratings. 30" GAS REAR CONTROL FREESTANDING INSTALLATION INSTRUCTIONS 12. Make sure range is located on an oven rack. Level the range by placing shims under the corners of the oven front frame at the front and pull out away from front to disconnect the gas and electrical supply. Model and Serial Number Location The serial plate is level. When ordering parts for servicing and cleaning.
Quick Start Guide
Page 2
... Use & Care Guide for my new gas range? Don't forget to adjust temperature. why doesn't my cooktop work like my old one at Frigidaire.com and check out our kitchen accessories. Temp changes during preheat and cool-down different parts of food in small pans. Find more troubleshooting tips in the oven and on how to have left the lever for low heat or small amounts of range, even when it installed...
... Use & Care Guide for my new gas range? Don't forget to adjust temperature. why doesn't my cooktop work like my old one at Frigidaire.com and check out our kitchen accessories. Temp changes during preheat and cool-down different parts of food in small pans. Find more troubleshooting tips in the oven and on how to have left the lever for low heat or small amounts of range, even when it installed...


