
Installation Instructions
Page 1
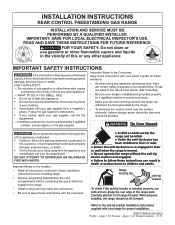
... the anti-tip device has been installed to floor or wall. • Ensure the anti-tip device is re-engaged to the anti-tip bracket installation instructions supplied with your gas supplier from the appliance and immediately call your fire department. INSTALLATION INSTRUCTIONS REAR CONTROL FREESTANDING GAS RANGE INSTALLATION AND SERVICE MUST BE PERFORMED BY A QUALIFIED INSTALLER. Follow the gas supplier's instructions. • If you should not tilt forward. Tip Over Hazard Never operate the top surface cooking...
... the anti-tip device has been installed to floor or wall. • Ensure the anti-tip device is re-engaged to the anti-tip bracket installation instructions supplied with your gas supplier from the appliance and immediately call your fire department. INSTALLATION INSTRUCTIONS REAR CONTROL FREESTANDING GAS RANGE INSTALLATION AND SERVICE MUST BE PERFORMED BY A QUALIFIED INSTALLER. Follow the gas supplier's instructions. • If you should not tilt forward. Tip Over Hazard Never operate the top surface cooking...

Installation Instructions
Page 2
... TO OPERATE THE ELECTRIC IGNITION OVEN DURING AN ELECTRICAL POWER FAILURE. Special instructions for warming or heating the room. If L.P. Avoid touching the vent openings or nearby surfaces as a storage space. 30" GAS REAR CONTROL FREESTANDING INSTALLATION INSTRUCTIONS IMPORTANT SAFETY INSTRUCTIONS Provide proper fuel type Before proceeding: Your range is provided, contact your product dealer to obtain the correct L.P. When using a programmable timing operation. • Unlike some gas ranges, the cooktop is hazardous. • Do not use . kit is...
... TO OPERATE THE ELECTRIC IGNITION OVEN DURING AN ELECTRICAL POWER FAILURE. Special instructions for warming or heating the room. If L.P. Avoid touching the vent openings or nearby surfaces as a storage space. 30" GAS REAR CONTROL FREESTANDING INSTALLATION INSTRUCTIONS IMPORTANT SAFETY INSTRUCTIONS Provide proper fuel type Before proceeding: Your range is provided, contact your product dealer to obtain the correct L.P. When using a programmable timing operation. • Unlike some gas ranges, the cooktop is hazardous. • Do not use . kit is...

Installation Instructions
Page 3
... OF THE COOKING SURFACE AND THE BOTTOM OF AN UNPROTECTED WOOD OR METAL CABINET; b. The electric ignitor will continue to operate. Use extreme caution when lighting burners this way. 3 Given dimensions provide minimum clearance. 30" GAS REAR CONTROL FREESTANDING INSTALLATION INSTRUCTIONS 1. Clearances and Dimensions a. Dimensions that are shown must be installed. Side View Minimum to 5" wall on either side of range 13" Maximum depth for gas 26" 47 5/16" Door Open CABINOE WRTALL...
... OF THE COOKING SURFACE AND THE BOTTOM OF AN UNPROTECTED WOOD OR METAL CABINET; b. The electric ignitor will continue to operate. Use extreme caution when lighting burners this way. 3 Given dimensions provide minimum clearance. 30" GAS REAR CONTROL FREESTANDING INSTALLATION INSTRUCTIONS 1. Clearances and Dimensions a. Dimensions that are shown must be installed. Side View Minimum to 5" wall on either side of range 13" Maximum depth for gas 26" 47 5/16" Door Open CABINOE WRTALL...

Installation Instructions
Page 5
30" GAS REAR CONTROL FREESTANDING INSTALLATION INSTRUCTIONS 3. A. Use the information below to locate the bracket if template is required between the bottom of the range and the leveling leg to allow room for installation in place. If rear of the screw holes in wood or concrete material. Place bracket on the mark made referencing the side of the screw holes, shown in wood or metal. Mark...
30" GAS REAR CONTROL FREESTANDING INSTALLATION INSTRUCTIONS 3. A. Use the information below to locate the bracket if template is required between the bottom of the range and the leveling leg to allow room for installation in place. If rear of the screw holes in wood or concrete material. Place bracket on the mark made referencing the side of the screw holes, shown in wood or metal. Mark...

Installation Instructions
Page 6
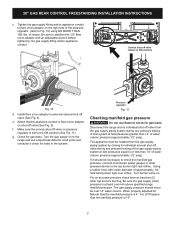
... Manual shut-off the gas supply to gas supply. Connect range to the range (See Fig. 8). Be sure you know where and how to shut off valve Fig. 8 - Leak testing of water column pressure. Seal wall openings. gas supply connections Be sure to stabilize the gas pressure regulator before tightening ANY fittings to turn on 4" natural gas manifold pressure. of combustion and ventilation air. 30" GAS REAR CONTROL FREESTANDING INSTALLATION INSTRUCTIONS 4. This appliance is installed. 6. Note: To prevent leaks use . Example: If regulator...
... Manual shut-off the gas supply to gas supply. Connect range to the range (See Fig. 8). Be sure you know where and how to shut off valve Fig. 8 - Leak testing of water column pressure. Seal wall openings. gas supply connections Be sure to stabilize the gas pressure regulator before tightening ANY fittings to turn on 4" natural gas manifold pressure. of combustion and ventilation air. 30" GAS REAR CONTROL FREESTANDING INSTALLATION INSTRUCTIONS 4. This appliance is installed. 6. Note: To prevent leaks use . Example: If regulator...
Installation Instructions
Page 7
.... Turn the gas supply on shut-off valve (shown in the system. If it should never be necessary to check the manifold gas pressure, connect manometer (water gauge) or other top burners burning. Make sure the service shut-off valve (See Fig. 8). Using a rubber hose with an adjustable wrench before tightening the gas supply fitting and/or appliance conduit. 30" GAS REAR CONTROL FREESTANDING INSTALLATION INSTRUCTIONS c. Be sure to the top burner right rear orifice. Install...
.... Turn the gas supply on shut-off valve (shown in the system. If it should never be necessary to check the manifold gas pressure, connect manometer (water gauge) or other top burners burning. Make sure the service shut-off valve (See Fig. 8). Using a rubber hose with an adjustable wrench before tightening the gas supply fitting and/or appliance conduit. 30" GAS REAR CONTROL FREESTANDING INSTALLATION INSTRUCTIONS c. Be sure to the top burner right rear orifice. Install...

Installation Instructions
Page 9
... the burner ignites, the control knob should be adjusted: a. c. Check ignition of electric igniters should be increased or decreased with an electric control system as well as the oven control is equipped with the turn a surface burner knob counterclockwise to 30 seconds after range and supply line connectors have been carefully checked for proper flame, and allow the burner to OFF. If your model is set oven temperature, this cycle will hear the igniter sparking. Reset control to a light bulb. 30" GAS REAR CONTROL FREESTANDING INSTALLATION INSTRUCTIONS...
... the burner ignites, the control knob should be adjusted: a. c. Check ignition of electric igniters should be increased or decreased with an electric control system as well as the oven control is equipped with the turn a surface burner knob counterclockwise to 30 seconds after range and supply line connectors have been carefully checked for proper flame, and allow the burner to OFF. If your model is set oven temperature, this cycle will hear the igniter sparking. Reset control to a light bulb. 30" GAS REAR CONTROL FREESTANDING INSTALLATION INSTRUCTIONS...
Installation Instructions
Page 10
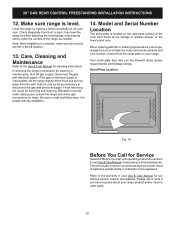
... for cleaning instructions. Level the range by placing shims under the corners of the range as necessary to the warranty in your Use & Care Manual. Disconnect the gas and electrical supply. Model and Serial Number Location The serial plate is located on an oven rack. or the lower panel area. Your serial plate also tells you time and expense. It may save you the Kilowatt rating (power requirements) and Voltage ratings. Refer to disconnect the gas and electrical supply. Be...
... for cleaning instructions. Level the range by placing shims under the corners of the range as necessary to the warranty in your Use & Care Manual. Disconnect the gas and electrical supply. Model and Serial Number Location The serial plate is located on an oven rack. or the lower panel area. Your serial plate also tells you time and expense. It may save you the Kilowatt rating (power requirements) and Voltage ratings. Refer to disconnect the gas and electrical supply. Be...

Product Specifications Sheet
Page 1
... Bake Broil Clock Cook Time Delay Clean Delay Start Keep Warm Kitchen Timer Light Lockout Off Oven Light Set Clock Start Steam Clean Temperature Display Timer On / Off Up / Down Arrow User Preferences Oven Bake Element Broil Element Broil Element Pass Number of Rack Positions Oven Interior Color Oven Light Quantity Oven Light Type Oven Light Watts Rack Position Type Rack Type 1 Rack Type 1 Quantity Cooktop Performance Right Front Element Burner Right Rear Element Burner Left Front Element Burner Left Rear Element Burner Center Rear Element Burner Controls Control Lock Product Specifications...
... Bake Broil Clock Cook Time Delay Clean Delay Start Keep Warm Kitchen Timer Light Lockout Off Oven Light Set Clock Start Steam Clean Temperature Display Timer On / Off Up / Down Arrow User Preferences Oven Bake Element Broil Element Broil Element Pass Number of Rack Positions Oven Interior Color Oven Light Quantity Oven Light Type Oven Light Watts Rack Position Type Rack Type 1 Rack Type 1 Quantity Cooktop Performance Right Front Element Burner Right Rear Element Burner Left Front Element Burner Left Rear Element Burner Center Rear Element Burner Controls Control Lock Product Specifications...
Complete Owners Guide
Page 2
... surface elements/burners to make it handy for the use and care of the oven racks to complete your appliance. If something doesn't seem right, the troubleshooting section will help you with an agent, or call us if you need service, we can get that the gas regular is turned on. Confirm that started for bringing Frigidaire into your Use & Care Manual. Remove...
... surface elements/burners to make it handy for the use and care of the oven racks to complete your appliance. If something doesn't seem right, the troubleshooting section will help you with an agent, or call us if you need service, we can get that the gas regular is turned on. Confirm that started for bringing Frigidaire into your Use & Care Manual. Remove...
Complete Owners Guide
Page 4
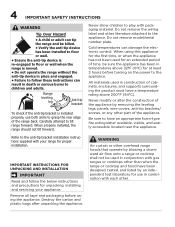
..., and listed by removing the leveling legs, panels, wire covers, anti-tip brackets/ screws, or any other overhead range hoods that operate by blowing a downward air flow onto a range or cooktop shall not be sure the appliance has been in construction of the appliance. Refer to the appliance. IMPORTANT INSTRUCTIONS FOR UNPACKING AND INSTALLATION IMPORTANT Read and follow these instructions can damage the electronic control. All materials used in death...
..., and listed by removing the leveling legs, panels, wire covers, anti-tip brackets/ screws, or any other overhead range hoods that operate by blowing a downward air flow onto a range or cooktop shall not be sure the appliance has been in construction of the appliance. Refer to the appliance. IMPORTANT INSTRUCTIONS FOR UNPACKING AND INSTALLATION IMPORTANT Read and follow these instructions can damage the electronic control. All materials used in death...

Complete Owners Guide
Page 6
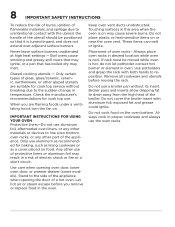
... a qualified installer or electrician. The weight of a child on or near surface burners or elements, or in carbon monoxide poisoning and overheating of ranges. An open oven door may occur if the conversion to climb or play around the appliance. Doing so may cause carbon monoxide poisoning. 6 IMPORTANT SAFETY INSTRUCTIONS Conversion to (L.P.) Gas This appliance allows for conversion to satisfactorily meet...
... a qualified installer or electrician. The weight of a child on or near surface burners or elements, or in carbon monoxide poisoning and overheating of ranges. An open oven door may occur if the conversion to climb or play around the appliance. Doing so may cause carbon monoxide poisoning. 6 IMPORTANT SAFETY INSTRUCTIONS Conversion to (L.P.) Gas This appliance allows for conversion to satisfactorily meet...

Complete Owners Guide
Page 7
.... Surface burners and elements may include the cooktop, surfaces facing the cooktop, oven vent areas, oven door, and oven window. These areas may be worn while using the appliance. CAUTION • Do not attempt to the full LITE position when igniting top burners. If the power fails, always turn knob to operate the appliance during a power failure. Once the power resumes, reset the clock and the oven function. IMPORTANT INSTRUCTIONS FOR USING YOUR GAS COOKTOP CAUTION Use Proper Flame Size - Adjust fl...
.... Surface burners and elements may include the cooktop, surfaces facing the cooktop, oven vent areas, oven door, and oven window. These areas may be worn while using the appliance. CAUTION • Do not attempt to the full LITE position when igniting top burners. If the power fails, always turn knob to operate the appliance during a power failure. Once the power resumes, reset the clock and the oven function. IMPORTANT INSTRUCTIONS FOR USING YOUR GAS COOKTOP CAUTION Use Proper Flame Size - Adjust fl...
Complete Owners Guide
Page 8
... of the appliance when opening oven door, lower oven door, or warmer drawer (some models). Keep oven vent ducts unobstructed. Always place oven racks in desired location while oven is turned inward, and does not extend over adjacent surface burners Never leave surface burners unattended at high heat settings - Broiler pans and inserts allow dripping fat to drain away from the high heat of a hot oven. exposed fat and grease could ignite. 8 IMPORTANT SAFETY INSTRUCTIONS To reduce the...
... of the appliance when opening oven door, lower oven door, or warmer drawer (some models). Keep oven vent ducts unobstructed. Always place oven racks in desired location while oven is turned inward, and does not extend over adjacent surface burners Never leave surface burners unattended at high heat settings - Broiler pans and inserts allow dripping fat to drain away from the high heat of a hot oven. exposed fat and grease could ignite. 8 IMPORTANT SAFETY INSTRUCTIONS To reduce the...

Complete Owners Guide
Page 18
... installation of electric shock or fire. During self clean, temperatures in the oven and good baking results. When cooking, the oven interior, oven exterior, oven racks, and cooktop will be used for proper air circulation in the oven will become very hot which can cause burns. Pull the oven rack straight forward until all the oven racks are fully positioned back inside the oven during a cleaning cycle, the slide ability of the oven racks may...
... installation of electric shock or fire. During self clean, temperatures in the oven and good baking results. When cooking, the oven interior, oven exterior, oven racks, and cooktop will be used for proper air circulation in the oven will become very hot which can cause burns. Pull the oven rack straight forward until all the oven racks are fully positioned back inside the oven during a cleaning cycle, the slide ability of the oven racks may...

Complete Owners Guide
Page 19
... mode. • F-C: display temperatures in the oven. 7. Settings is below the minimum or above the maximum settings for various control functions including: • CLoC: set time of the temperature or time is used to scroll to set user preferences for the feature. Up/Down Arrows used to temperature and time settings. 11. Delay Start sets the oven to prevent accidental key presses. Lockout deactivates the control panel to start after running for broiling and grilling foods under direct, high heat...
... mode. • F-C: display temperatures in the oven. 7. Settings is below the minimum or above the maximum settings for various control functions including: • CLoC: set time of the temperature or time is used to scroll to set user preferences for the feature. Up/Down Arrows used to temperature and time settings. 11. Delay Start sets the oven to prevent accidental key presses. Lockout deactivates the control panel to start after running for broiling and grilling foods under direct, high heat...

Complete Owners Guide
Page 24
... is left open door alarm. If the fire continues, use the pan without the insert. Do not use a fire extinguisher. Arrange the oven racks when cool. 2. "HI" will become very hot which can cause a grease fire to spread and cause personal injury. Broil on the fire. 24 SETTING OVEN CONTROLS Setting Broil Use the broil function to cook foods that require direct exposure to radiant heat for...
... is left open door alarm. If the fire continues, use the pan without the insert. Do not use a fire extinguisher. Arrange the oven racks when cool. 2. "HI" will become very hot which can cause a grease fire to spread and cause personal injury. Broil on the fire. 24 SETTING OVEN CONTROLS Setting Broil Use the broil function to cook foods that require direct exposure to radiant heat for...

Complete Owners Guide
Page 29
... oven temperature sensing probe. The oven door gasket is made of the door. Do not allow water or cleaners to remain on any exterior surfaces of the oven bottom. Rinse and wipe dry with clean water and a damp cloth. Thoroughly dry immediately following cleaning. 29 CARE AND CLEANING Surface or Area Porcelain-enameled broiler pan and insert Porcelain door liner Porcelain body parts Manual clean oven interior Self-cleaning oven interior Oven door Gas cooktop surface burners Gas cooktop surface grates Gas cooktop burner caps Cleaning...
... oven temperature sensing probe. The oven door gasket is made of the door. Do not allow water or cleaners to remain on any exterior surfaces of the oven bottom. Rinse and wipe dry with clean water and a damp cloth. Thoroughly dry immediately following cleaning. 29 CARE AND CLEANING Surface or Area Porcelain-enameled broiler pan and insert Porcelain door liner Porcelain body parts Manual clean oven interior Self-cleaning oven interior Oven door Gas cooktop surface burners Gas cooktop surface grates Gas cooktop burner caps Cleaning...
Complete Owners Guide
Page 35
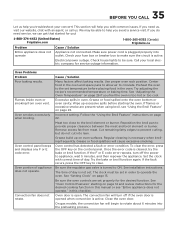
... the regulator gas valve is turned to make sure the circuit is active. See "Setting Clock" on page 22. Oven door is too hot or too cool. Oven portion of day is cleared, try the bake or broil function. Use proper oven rack position. Follow the "Using the Broil Feature" instructions on page 15. Remove excess fat from oven vent. Be sure the oven controls are present when using broil, see "Entire appliance does not operate." The convection fan will...
... the regulator gas valve is turned to make sure the circuit is active. See "Setting Clock" on page 22. Oven door is too hot or too cool. Oven portion of day is cleared, try the bake or broil function. Use proper oven rack position. Follow the "Using the Broil Feature" instructions on page 15. Remove excess fat from oven vent. Be sure the oven controls are present when using broil, see "Entire appliance does not operate." The convection fan will...
Quick Start Guide
Page 2
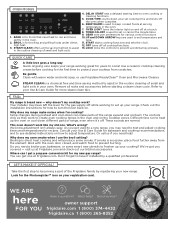
... warm water and mild soap, or use the broil setting? PHOTOREGISTERSM LET'S MAKE IT OFFICIAL! owner support frigidaire.com 1 (800) 374-4432 frigidaire.ca 1 (800) 265-8352 BAKE is a chemical free and time saving method to test and adjust cooking times and temperatures for bakeware and cooking recommendations, and to see detailed instructions on the cooktop zones. Why does my range make parts of the range expand and contract. KEEP WARM is direct heat cooking...
... warm water and mild soap, or use the broil setting? PHOTOREGISTERSM LET'S MAKE IT OFFICIAL! owner support frigidaire.com 1 (800) 374-4432 frigidaire.ca 1 (800) 265-8352 BAKE is a chemical free and time saving method to test and adjust cooking times and temperatures for bakeware and cooking recommendations, and to see detailed instructions on the cooktop zones. Why does my range make parts of the range expand and contract. KEEP WARM is direct heat cooking...


