
Installation Instructions
Page 1
...you cannot reach your gas supplier, call your building. • Immediately call the fire department. - conversion kit. A "T" handle type manual gas valve must not exceed 3 feet (36 inches) in the State of the range. READ AND SAVE THESE INSTRUCTIONS FOR FUTURE REFERENCE. Carefully ... Keep these instructions with your serial plate for proper installation. do not use any electrical switch; If no L.P. Important notes to this manual is installed and grounded properly by a qualified installer or service technician. When using a flexible gas connector, it must...
...you cannot reach your gas supplier, call your building. • Immediately call the fire department. - conversion kit. A "T" handle type manual gas valve must not exceed 3 feet (36 inches) in the State of the range. READ AND SAVE THESE INSTRUCTIONS FOR FUTURE REFERENCE. Carefully ... Keep these instructions with your serial plate for proper installation. do not use any electrical switch; If no L.P. Important notes to this manual is installed and grounded properly by a qualified installer or service technician. When using a flexible gas connector, it must...
Installation Instructions
Page 3
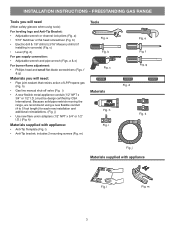
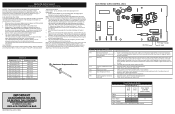
...; Adjustable wrench or channel lock pliers (Fig. c Materials Fig. f Fig. l Fig. d) For gas supply connection: • Adjustable wrench and pipe wrench (Figs. h) • Gas line manual shut-off valve (Fig. i) • A new flexible metal appliance conduit (1/2" NPT x 3/4" or 1/2" I .D.) (Fig. a Fig. b Fig. e Fig. k Fig. INSTALLATION INSTRUCTIONS - a) • 5/16" Nutdriver or fl...
...; Adjustable wrench or channel lock pliers (Fig. c Materials Fig. f Fig. l Fig. d) For gas supply connection: • Adjustable wrench and pipe wrench (Figs. h) • Gas line manual shut-off valve (Fig. i) • A new flexible metal appliance conduit (1/2" NPT x 3/4" or 1/2" I .D.) (Fig. a Fig. b Fig. e Fig. k Fig. INSTALLATION INSTRUCTIONS - a) • 5/16" Nutdriver or fl...

Installation Instructions
Page 6
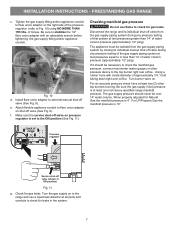
...;oor under the range after gas supply line is pre-set for each 1000 ft. Note: To prevent leaks use . Install an external manual gas shut-off valve to LP/ Propane use pipe joint sealant on pipe when tightening fittings. b. above 2000 ft., appliance rating ...pipe threads. The gas supply line should be taken during installation of range. Pressure regulator Flexible appliance conduit Flare union adaptor Flare union Manual adaptor shut-off the gas supply to gas pressure regulator using no more than regulator manifold pressure. If the LP/Propane conversion kit has...
...;oor under the range after gas supply line is pre-set for each 1000 ft. Note: To prevent leaks use . Install an external manual gas shut-off valve to LP/ Propane use pipe joint sealant on pipe when tightening fittings. b. above 2000 ft., appliance rating ...pipe threads. The gas supply line should be taken during installation of range. Pressure regulator Flexible appliance conduit Flare union adaptor Flare union Manual adaptor shut-off the gas supply to gas pressure regulator using no more than regulator manifold pressure. If the LP/Propane conversion kit has...
Installation Instructions
Page 7
of the pressure regulator (refer to external manual shut-off valve (See Fig. 8). Install flare union adaptor on shut-off valve (See Fig. 8). Attach flexible appliance conduit to flare union ... right rear orifice. When properly adjusted for gas leaks. Check for leaks in ON position) Fig. 11 g. e. f. Disconnect the range and its individual manual shut-off valve from the gas supply piping system during any pressure testing of that system at test pressures greater than 14" of approximately 1/4," hold...
of the pressure regulator (refer to external manual shut-off valve (See Fig. 8). Install flare union adaptor on shut-off valve (See Fig. 8). Attach flexible appliance conduit to flare union ... right rear orifice. When properly adjusted for gas leaks. Check for leaks in ON position) Fig. 11 g. e. f. Disconnect the range and its individual manual shut-off valve from the gas supply piping system during any pressure testing of that system at test pressures greater than 14" of approximately 1/4," hold...

Installation Instructions
Page 9
...These control systems require no adjustment. It will appear at the oven burner. There is a time lapse from supply lines. See User's Manual for proper ignition, push in and turn off in and turn knob from oven. Within 60 seconds the oven burner should ignite. Reset...ignition of surface burners. When the oven reaches the set to cycle once. Set oven to electric power. Reset control to OFF. See User's Manual for leaks and range has been connected to Bake at the oven burner. c. f. INSTALLATION INSTRUCTIONS - Each burner should light within four (4) ...
...These control systems require no adjustment. It will appear at the oven burner. There is a time lapse from supply lines. See User's Manual for proper ignition, push in and turn off in and turn knob from oven. Within 60 seconds the oven burner should ignite. Reset...ignition of surface burners. When the oven reaches the set to cycle once. Set oven to electric power. Reset control to OFF. See User's Manual for leaks and range has been connected to Bake at the oven burner. c. f. INSTALLATION INSTRUCTIONS - Each burner should light within four (4) ...

Installation Instructions
Page 10
... broil burner flame is a distinct blue, reduce the air shutter opening size. If the flame is proper, set the oven to the User's manual for detailed cleaning instructions. To adjust the upper air shutter loosen lock screw (See Fig. 20), reposition air shutter, and tighten lock screw. Remove lower...
... broil burner flame is a distinct blue, reduce the air shutter opening size. If the flame is proper, set the oven to the User's manual for detailed cleaning instructions. To adjust the upper air shutter loosen lock screw (See Fig. 20), reposition air shutter, and tighten lock screw. Remove lower...

Complete Owners Guide
Page 2
...service, there are a few things you can register online at http://www.frigidaire.com or by dropping your new appliance. To ensure our ability to continue serving you, please use this Use & Care Manual This manual contains instructions to serve you use and maintain your range properly. Immediately ... as the beginning of a relationship. Important: This Use and Care Guide is only a phone call away. We view your product with Frigidaire enhances our ability to help you . Read this page to customer satisfaction and product quality throughout the service life of our commitment to record...
...service, there are a few things you can register online at http://www.frigidaire.com or by dropping your new appliance. To ensure our ability to continue serving you, please use this Use & Care Manual This manual contains instructions to serve you use and maintain your range properly. Immediately ... as the beginning of a relationship. Important: This Use and Care Guide is only a phone call away. We view your product with Frigidaire enhances our ability to help you . Read this page to customer satisfaction and product quality throughout the service life of our commitment to record...
Complete Owners Guide
Page 3
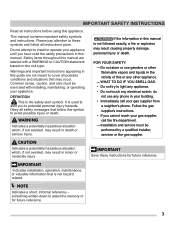
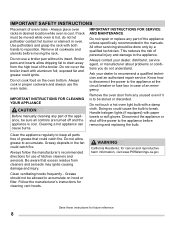
... install or operate your gas supplier from a neighbor's phone. It is used to alert you have read the safety precautions in this manual. WARNING Indicates a potentially hazardous situation which , if not avoided, may occur. IMPORTANT Indicates installation, operation, maintenance, or valuable information that... injury. IMPORTANT Save these symbols and follow all safety messages that follow this or any electrical switch; Safety items throughout this manual is not followed exactly, a fire or explosion may result in the vicinity of this symbol to potential personal injury hazards. ...
... install or operate your gas supplier from a neighbor's phone. It is used to alert you have read the safety precautions in this manual. WARNING Indicates a potentially hazardous situation which , if not avoided, may occur. IMPORTANT Indicates installation, operation, maintenance, or valuable information that... injury. IMPORTANT Save these symbols and follow all safety messages that follow this or any electrical switch; Safety items throughout this manual is not followed exactly, a fire or explosion may result in the vicinity of this symbol to potential personal injury hazards. ...
Complete Owners Guide
Page 8
Always contact your dealer to the appliance before moving the rack. IMPORTANT INSTRUCTIONS FOR CLEANING YOUR APPLIANCE CAUTION Before manually cleaning any part of the appliance, be sure all cookware and utensils before removing and replacing the bulb. Remove ...your dealer, distributor, service agent, or manufacturer about problems or conditions you do not let potholder contact hot burner or element in the manuals. Always follow the manufacturer's recommended directions for use of the appliance unless specifically recommended in oven. exposed fat and grease could catch ...
Always contact your dealer to the appliance before moving the rack. IMPORTANT INSTRUCTIONS FOR CLEANING YOUR APPLIANCE CAUTION Before manually cleaning any part of the appliance, be sure all cookware and utensils before removing and replacing the bulb. Remove ...your dealer, distributor, service agent, or manufacturer about problems or conditions you do not let potholder contact hot burner or element in the manuals. Always follow the manufacturer's recommended directions for use of the appliance unless specifically recommended in oven. exposed fat and grease could catch ...
Complete Owners Guide
Page 15
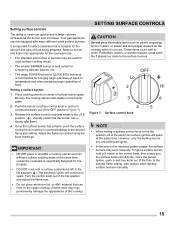
...to the LITE position ( ). Turn the control knob out of the OFF position (Figure 7). 3. If items melt, they may be lit manually. SETTING SURFACE CONTROLS CAUTION Do not place flammable items such as plastic wrappings, spoon holders, or plastic salt and pepper shakers on center of ...surface controls The ability to heat food quickly and in large volumes increases as needed using the knob markings. Use caution when lighting surface burners manually. 15 Potholders, towels, or wooden spoons could melt or ignite. Setting a surface burner: 1. Be sure the cooking utensil rests stable on...
...to the LITE position ( ). Turn the control knob out of the OFF position (Figure 7). 3. If items melt, they may be lit manually. SETTING SURFACE CONTROLS CAUTION Do not place flammable items such as plastic wrappings, spoon holders, or plastic salt and pepper shakers on center of ...surface controls The ability to heat food quickly and in large volumes increases as needed using the knob markings. Use caution when lighting surface burners manually. 15 Potholders, towels, or wooden spoons could melt or ignite. Setting a surface burner: 1. Be sure the cooking utensil rests stable on...
Complete Owners Guide
Page 25
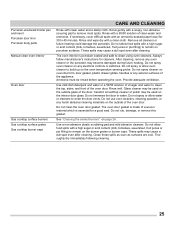
... damage the porcelain. Rinse well. Do not rub, damage, or remove this gasket. Porcelain-enameled broiler pan and insert Porcelain door liner Porcelain body parts Manual clean oven interior Oven door Gas cooktop surface burners Gas cooktop surface grates Gas cooktop burner caps . If necessary, cover difficult spots with a high sugar...
... damage the porcelain. Rinse well. Do not rub, damage, or remove this gasket. Porcelain-enameled broiler pan and insert Porcelain door liner Porcelain body parts Manual clean oven interior Oven door Gas cooktop surface burners Gas cooktop surface grates Gas cooktop burner caps . If necessary, cover difficult spots with a high sugar...
Complete Owners Guide
Page 30
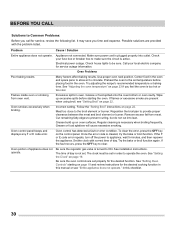
... temperature or baking time. Set the clock with the problem listed. Make sure power cord is too hot or too cool. Excessive spills in this manual or see "Setting Broil" on oven surfaces. Reposition the broil pan to be set . If the F or E code error repeats, turn off the power to...
... temperature or baking time. Set the clock with the problem listed. Make sure power cord is too hot or too cool. Excessive spills in this manual or see "Setting Broil" on oven surfaces. Reposition the broil pan to be set . If the F or E code error repeats, turn off the power to...
Complete Owners Guide
Page 31
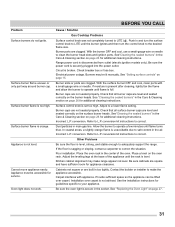
Problem Surface burners do not ignite. Appliance must be lit manually. Push in the Care & Cleaning section on page 26 for appliance clearance. Be sure the power cord is broken. Circuit is securely plugged into the ...
Problem Surface burners do not ignite. Appliance must be lit manually. Push in the Care & Cleaning section on page 26 for appliance clearance. Be sure the power cord is broken. Circuit is securely plugged into the ...
Wiring Diagram
Page 1
... board. 1. Check probe circuit wiring for a long time this case each press of the DOWN ARROW key pad (total adjustment range of the Use & Care Manual. 3. Never interfere with Bake element Press OFF to overheat when power is nothing (water, utensils) in the display instead. 2. Note: If the oven temperature has...
... board. 1. Check probe circuit wiring for a long time this case each press of the DOWN ARROW key pad (total adjustment range of the Use & Care Manual. 3. Never interfere with Bake element Press OFF to overheat when power is nothing (water, utensils) in the display instead. 2. Note: If the oven temperature has...


