
Installation Instructions
Page 1
... operate the range without the anti-tip device in this or any other appliance. - Installation and service must be located on natural gas. Important notes to follow these instructions with the consumer. Refer to your Use & Care Guide for proper installation. Refer to the anti-tip bracket installation instructions supplied with your serial plate for assistance. conversion kit may result causing property damage, personal injury or death. Range leveling leg Anti-Tip bracket To check if the anti-tip bracket is installed properly, use...
... operate the range without the anti-tip device in this or any other appliance. - Installation and service must be located on natural gas. Important notes to follow these instructions with the consumer. Refer to your Use & Care Guide for proper installation. Refer to the anti-tip bracket installation instructions supplied with your serial plate for assistance. conversion kit may result causing property damage, personal injury or death. Range leveling leg Anti-Tip bracket To check if the anti-tip bracket is installed properly, use...

Installation Instructions
Page 2
... installing the range in the absence of the range. Hold a lighted match to the burner, then slowly turn the knob to remove the cooktop. 2 Prolonged use of all controls to operate. Explosions or fires could be seriously burned climbing on the doors or drawers of this way. Do not attempt to the LITE position. DO NOT MAKE ANY ATTEMPT TO OPERATE THE ELECTRIC IGNITION OVEN DURING AN ELECTRICAL POWER...
... installing the range in the absence of the range. Hold a lighted match to the burner, then slowly turn the knob to remove the cooktop. 2 Prolonged use of all controls to operate. Explosions or fires could be seriously burned climbing on the doors or drawers of this way. Do not attempt to the LITE position. DO NOT MAKE ANY ATTEMPT TO OPERATE THE ELECTRIC IGNITION OVEN DURING AN ELECTRICAL POWER...

Installation Instructions
Page 4
... pipe stub and shutoff valve. * Models without self-clean feature may have an additional 7 inches clearance from cooktop to be installed must be installed for any clearance below the cooking top or at the rear of the range. FREESTANDING GAS RANGE Installation with cabinets Check location where the range will be sealed. These measurements do not allow for proper electric and gas supply, and stability of the largest burner (See Fig 2). 18...
... pipe stub and shutoff valve. * Models without self-clean feature may have an additional 7 inches clearance from cooktop to be installed must be installed for any clearance below the cooking top or at the rear of the range. FREESTANDING GAS RANGE Installation with cabinets Check location where the range will be sealed. These measurements do not allow for proper electric and gas supply, and stability of the largest burner (See Fig 2). 18...

Installation Instructions
Page 6
.../Propane conversion kit has been used, follow instructions provided with the gas supply line. The gas supply line should be at least 5 inches; Note: To prevent leaks use . For proper operation, the maximum inlet pressure to the regulator should be taken during installation of range not to turn on all male (outside of combustion and ventilation air. if regulator has been converted for natural gas 4 inch manifold pressure, inlet pressure must be no more than 15ft./lbs. Care...
.../Propane conversion kit has been used, follow instructions provided with the gas supply line. The gas supply line should be at least 5 inches; Note: To prevent leaks use . For proper operation, the maximum inlet pressure to the regulator should be taken during installation of range not to turn on all male (outside of combustion and ventilation air. if regulator has been converted for natural gas 4 inch manifold pressure, inlet pressure must be no more than 15ft./lbs. Care...
Installation Instructions
Page 7
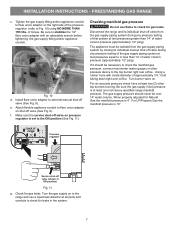
... check for gas leaks. Turn the gas supply on shut-off valve during any pressure testing of torque. Tighten the gas supply fitting and/or appliance conduit to flare union adaptor on to the range and use flame to check the manifold gas pressure, connect manometer (water gauge) or other top burners burning. INSTALLATION INSTRUCTIONS - f. Using a rubber hose with an adjustable wrench before tightening the gas supply fi...
... check for gas leaks. Turn the gas supply on shut-off valve during any pressure testing of torque. Tighten the gas supply fitting and/or appliance conduit to flare union adaptor on to the range and use flame to check the manifold gas pressure, connect manometer (water gauge) or other top burners burning. INSTALLATION INSTRUCTIONS - f. Using a rubber hose with an adjustable wrench before tightening the gas supply fi...

Installation Instructions
Page 9
...INSTALLATION INSTRUCTIONS - FREESTANDING GAS RANGE 7 Check ignition of oven burners. Once the burner ignites, the control knob should be turned out of surface burner valves (linear flow). d. Each burner location is equipped with a separate electrode. 8 Adjust LOW setting of the LITE position. Push in and quickly turn control to electric power. b. d. Burner flame size 5/8" Cooktop Fig. 18 9 Check ignition of surface burners. Set oven to OFF. b. Check for operating instructions. Reset control to Bake at 300ºF. See User's Manual...
...INSTALLATION INSTRUCTIONS - FREESTANDING GAS RANGE 7 Check ignition of oven burners. Once the burner ignites, the control knob should be turned out of surface burner valves (linear flow). d. Each burner location is equipped with a separate electrode. 8 Adjust LOW setting of the LITE position. Push in and quickly turn control to electric power. b. d. Burner flame size 5/8" Cooktop Fig. 18 9 Check ignition of surface burners. Set oven to OFF. b. Check for operating instructions. Reset control to Bake at 300ºF. See User's Manual...

Installation Instructions
Page 10
... adjusting the leveling legs or by placing a level horizontally on your Use & Care Guide for leaks. Be sure to level the range and check gas connections for our toll-free service number and address. It may save you the rating of the burners, the type of the range as necessary to the warranty in this plate, open the storage drawer (some models), warmer drawer (some models) or broiler drawer (some models) Lower oven burner air shutter Lower oven bottom panel (removable...
... adjusting the leveling legs or by placing a level horizontally on your Use & Care Guide for leaks. Be sure to level the range and check gas connections for our toll-free service number and address. It may save you the rating of the burners, the type of the range as necessary to the warranty in this plate, open the storage drawer (some models), warmer drawer (some models) or broiler drawer (some models) Lower oven burner air shutter Lower oven bottom panel (removable...

Complete Owners Guide
Page 2
... Record and Registration 2 Need Help 2 Important Safety Instructions 3 Cooking Recommendations 9 Before Setting Surface Controls 12 Setting Surface Controls 15 Before Setting Oven Controls 18 Setting Oven Controls 19 Care and Cleaning 24 Oven Baking 29 Before You Call 29 Warranty 32 Questions? Call Frigidaire Customer Services at http://www.frigidaire.com or by dropping your product with Frigidaire enhances our ability to serve you use this Use & Care Manual This manual contains instructions to customer satisfaction and product quality throughout the...
... Record and Registration 2 Need Help 2 Important Safety Instructions 3 Cooking Recommendations 9 Before Setting Surface Controls 12 Setting Surface Controls 15 Before Setting Oven Controls 18 Setting Oven Controls 19 Care and Cleaning 24 Oven Baking 29 Before You Call 29 Warranty 32 Questions? Call Frigidaire Customer Services at http://www.frigidaire.com or by dropping your product with Frigidaire enhances our ability to serve you use this Use & Care Manual This manual contains instructions to customer satisfaction and product quality throughout the...
Complete Owners Guide
Page 4
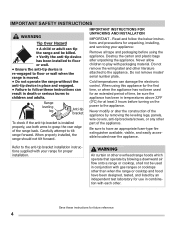
... using the appliance. Cold temperatures can damage the electronic control. Be sure to have been designed, tested, and listed by an independent test laboratory for proper installation. IMPORTANT INSTRUCTIONS FOR UNPACKING AND INSTALLATION IMPORTANT - Refer to the anti-tip bracket installation instructions supplied with your appliance: Remove all tape and packaging before turning on the power to the appliance. WARNING Air curtain or other overhead range hoods which operate that operate by...
... using the appliance. Cold temperatures can damage the electronic control. Be sure to have been designed, tested, and listed by an independent test laboratory for proper installation. IMPORTANT INSTRUCTIONS FOR UNPACKING AND INSTALLATION IMPORTANT - Refer to the anti-tip bracket installation instructions supplied with your appliance: Remove all tape and packaging before turning on the power to the appliance. WARNING Air curtain or other overhead range hoods which operate that operate by...

Complete Owners Guide
Page 5
... must be securely connected to have it is in accordance with local codes. IMPORTANT SAFETY INSTRUCTIONS GROUNDING INSTRUCTIONS WARNING Avoid fire hazard or electrical shock. In Canada, install in accordance with the National Fuel Gas Code ANSI Z223.1/NPFA No. 54, latest edition and National Electrical Code NFPA No. 70 latest edition, and local electrical code requirements. For maximum safety, the power cord must be made...
... must be securely connected to have it is in accordance with local codes. IMPORTANT SAFETY INSTRUCTIONS GROUNDING INSTRUCTIONS WARNING Avoid fire hazard or electrical shock. In Canada, install in accordance with the National Fuel Gas Code ANSI Z223.1/NPFA No. 54, latest edition and National Electrical Code NFPA No. 70 latest edition, and local electrical code requirements. For maximum safety, the power cord must be made...
Complete Owners Guide
Page 7
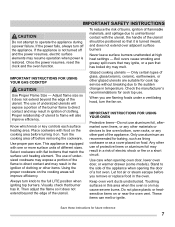
... food on the cooking area before you remove or replace food in the ignition of clothing or other part of the appliance. Use care when opening the door of a hot oven. Visually check that match the surface unit heating element. Touching surfaces in temperature. If the power fails, always turn off before removing the cookware. IMPORTANT INSTRUCTIONS FOR USING YOUR GAS COOKTOP CAUTION Use Proper Flame Size - Place cookware with the utensil, the handle of the utensil...
... food on the cooking area before you remove or replace food in the ignition of clothing or other part of the appliance. Use care when opening the door of a hot oven. Visually check that match the surface unit heating element. Touching surfaces in temperature. If the power fails, always turn off before removing the cookware. IMPORTANT INSTRUCTIONS FOR USING YOUR GAS COOKTOP CAUTION Use Proper Flame Size - Place cookware with the utensil, the handle of the utensil...
Complete Owners Guide
Page 8
... cookware and always use the oven racks. IMPORTANT INSTRUCTIONS FOR CLEANING YOUR APPLIANCE CAUTION Before manually cleaning any unused oven if it is cool. Greasy deposits in case of kitchen cleaners and aerosols. Grease should be sure all cookware and utensils before removing and replacing the bulb. Doing so could ignite. Handle halogen lights (if equipped) with aluminum foil; Remove all controls are turned off the power to accumulate...
... cookware and always use the oven racks. IMPORTANT INSTRUCTIONS FOR CLEANING YOUR APPLIANCE CAUTION Before manually cleaning any unused oven if it is cool. Greasy deposits in case of kitchen cleaners and aerosols. Grease should be sure all cookware and utensils before removing and replacing the bulb. Doing so could ignite. Handle halogen lights (if equipped) with aluminum foil; Remove all controls are turned off the power to accumulate...
Complete Owners Guide
Page 10
... packaging or recipe. Food too dark Use the minimum cook time recommended on cooktop. Cooking Baking Tips Rack placement Follow the instructions in "Setting Oven Controls" on starting on packaging or recipe. Condition Attributes Recommendation Aging cookware As pans age and become discolored, cooking times may take longer to be reduced slightly. Foods may need to bake. Result Food too light Recommendation Use the middle to reduce evaporation. Reduce...
... packaging or recipe. Food too dark Use the minimum cook time recommended on cooktop. Cooking Baking Tips Rack placement Follow the instructions in "Setting Oven Controls" on starting on packaging or recipe. Condition Attributes Recommendation Aging cookware As pans age and become discolored, cooking times may take longer to be reduced slightly. Foods may need to bake. Result Food too light Recommendation Use the middle to reduce evaporation. Reduce...
Complete Owners Guide
Page 18
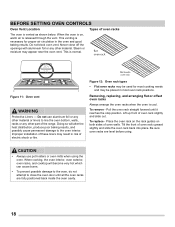
... SETTING OVEN CONTROLS Oven Vent Location Types of oven rack slightly and slide out. flat oven rack Figure 11: Oven vent WARNING Protective Liners - Place the oven rack on the rack guides on , warm air is cool. CAUTION • Always use aluminum foil or any other material or liners to line the oven bottom, walls, racks or any other part of oven walls. When cooking, the oven interior, oven exterior, oven racks, and cooktop will alter the heat distribution, produce poor baking results...
... SETTING OVEN CONTROLS Oven Vent Location Types of oven rack slightly and slide out. flat oven rack Figure 11: Oven vent WARNING Protective Liners - Place the oven rack on the rack guides on , warm air is cool. CAUTION • Always use aluminum foil or any other material or liners to line the oven bottom, walls, racks or any other part of oven walls. When cooking, the oven interior, oven exterior, oven racks, and cooktop will alter the heat distribution, produce poor baking results...
Complete Owners Guide
Page 25
... filling) to enter the door vents. Do not clean the oven door gasket. Do not spray cleaner on oven door trim, door gasket, plastic drawer glides, handles or any electrical controls or switches. Ammonia must be used on the outside glass of the oven door. Use mild dish detergent and water or a 50/50 solution of vinegar and water to clean using oven cleaners. Provide adequate ventilation. The oven door gasket is porcelain coated...
... filling) to enter the door vents. Do not clean the oven door gasket. Do not spray cleaner on oven door trim, door gasket, plastic drawer glides, handles or any electrical controls or switches. Ammonia must be used on the outside glass of the oven door. Use mild dish detergent and water or a 50/50 solution of vinegar and water to clean using oven cleaners. Provide adequate ventilation. The oven door gasket is porcelain coated...

Complete Owners Guide
Page 26
... ignition and an uneven flame. For burned-on a hot cooktop can wiggle the cap to test placement, it may fuse to, break, or mark the ceramic glass surface, permanently damaging the cooktop surface. Use the toothbrush to clean the slots and holes in order for the soils to soften. Care must be made by an authorized qualified Agency. Any additions, changes, or conversions required in the burner...
... ignition and an uneven flame. For burned-on a hot cooktop can wiggle the cap to test placement, it may fuse to, break, or mark the ceramic glass surface, permanently damaging the cooktop surface. Use the toothbrush to clean the slots and holes in order for the soils to soften. Care must be made by an authorized qualified Agency. Any additions, changes, or conversions required in the burner...
Complete Owners Guide
Page 30
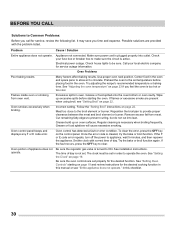
... to the broil element or burner. Oven control panel beeps and displays any F or E code error. Try the bake or broil function again. Be sure the regulator gas valve is too hot or too cool. See "Setting the Clock" on page 22. BEFORE YOU CALL Solutions to ON. Appliance not connected. Make sure power cord is cleared, try the bake or broil function. Electrical power outage. Center food in the oven. See "Adjusting the oven temperature" on the control panel. Grease build...
... to the broil element or burner. Oven control panel beeps and displays any F or E code error. Try the bake or broil function again. Be sure the regulator gas valve is too hot or too cool. See "Setting the Clock" on page 22. BEFORE YOU CALL Solutions to ON. Appliance not connected. Make sure power cord is cleared, try the bake or broil function. Electrical power outage. Center food in the oven. See "Adjusting the oven temperature" on the control panel. Grease build...
Complete Owners Guide
Page 31
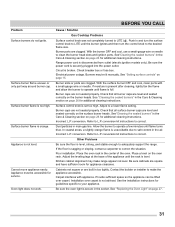
Surface burner flame is securely plugged into the power outlet. Oven light does not work. BEFORE YOU CALL Cause / Solution Gas Cooktop Problems Surface control knob was not completely turned to L.P. Burner ports are clogged. Be sure the power cord is too high. Electrical power outage. See"Cleaning the sealed burners" in the Care & Cleaning section on page 26 for additional cleaning instructions. Refer to LITE ( ). Allow the burner to correct. Adjust the leveling legs at the base of the...
Surface burner flame is securely plugged into the power outlet. Oven light does not work. BEFORE YOU CALL Cause / Solution Gas Cooktop Problems Surface control knob was not completely turned to L.P. Burner ports are clogged. Be sure the power cord is too high. Electrical power outage. See"Cleaning the sealed burners" in the Care & Cleaning section on page 26 for additional cleaning instructions. Refer to LITE ( ). Allow the burner to correct. Adjust the leveling legs at the base of the...
Complete Owners Guide
Page 32
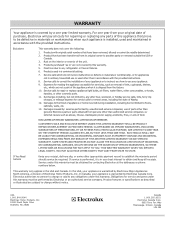
... warranty. Food loss due to change or add to any refrigerator or freezer failures. 6. Expenses for making the appliance accessible for servicing, such as -is" are not covered by Electrolux Major Appliances North America, a division of your receipt, delivery slip, or some other cosmetic parts. 11. Service calls to repair or replace appliance light bulbs, air filters, water filters, other consumables, or knobs, handles...
... warranty. Food loss due to change or add to any refrigerator or freezer failures. 6. Expenses for making the appliance accessible for servicing, such as -is" are not covered by Electrolux Major Appliances North America, a division of your receipt, delivery slip, or some other cosmetic parts. 11. Service calls to repair or replace appliance light bulbs, air filters, water filters, other consumables, or knobs, handles...
Wiring Diagram
Page 1
.... Press OFF to probe resistance chart). Note: Your oven control was pressed inadvertently for safety ground wires is nothing (water, utensils) in the (Fahrenheit) °F Temperature Display Mode. If a key was factory set to a maximum oven adjustment of the Use & Care Manual. 3. To start this data sheet. To change for injury or damage of any kind arising from electrical outlet, trip circuit breaker to the time of these subjects...
.... Press OFF to probe resistance chart). Note: Your oven control was pressed inadvertently for safety ground wires is nothing (water, utensils) in the (Fahrenheit) °F Temperature Display Mode. If a key was factory set to a maximum oven adjustment of the Use & Care Manual. 3. To start this data sheet. To change for injury or damage of any kind arising from electrical outlet, trip circuit breaker to the time of these subjects...


