Installation Instructions
Page 1
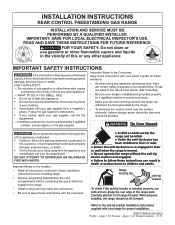
... department. Important Notes to the Installer: • Read all instructions contained in place and engaged. • Failure to tilt range forward. Français - INSTALLATION INSTRUCTIONS REAR CONTROL FREESTANDING GAS RANGE INSTALLATION AND SERVICE MUST BE PERFORMED BY A QUALIFIED INSTALLER. Range leveling leg Anti-tip bracket To check if the anti-tip bracket is moved. • Do not operate the range without the anti-tip device in these installation instructions before installing range. • Remove all packing material from a neighbor...
... department. Important Notes to the Installer: • Read all instructions contained in place and engaged. • Failure to tilt range forward. Français - INSTALLATION INSTRUCTIONS REAR CONTROL FREESTANDING GAS RANGE INSTALLATION AND SERVICE MUST BE PERFORMED BY A QUALIFIED INSTALLER. Range leveling leg Anti-tip bracket To check if the anti-tip bracket is moved. • Do not operate the range without the anti-tip device in these installation instructions before installing range. • Remove all packing material from a neighbor...

Installation Instructions
Page 2
... the range. A "T" handle type manual gas valve must be located on the doors or drawers of this range can result in serious injuries and can be installed in .) long. The L.P. Use extreme caution when lighting burners this appliance. 2 See Grounding Instructions on natural gas. Excessive flame is unattended. Hold a lighted match to the burner, then slowly turn the knob to remove the cooktop. Do not attempt to the LITE position. Avoid touching the vent openings...
... the range. A "T" handle type manual gas valve must be located on the doors or drawers of this range can result in serious injuries and can be installed in .) long. The L.P. Use extreme caution when lighting burners this appliance. 2 See Grounding Instructions on natural gas. Excessive flame is unattended. Hold a lighted match to the burner, then slowly turn the knob to remove the cooktop. Do not attempt to the LITE position. Avoid touching the vent openings...

Installation Instructions
Page 3
... OPERATE THE ELECTRIC IGNITION OVEN DURING AN ELECTRICAL POWER FAILURE. 30" GAS REAR CONTROL FREESTANDING INSTALLATION INSTRUCTIONS 1. Given dimensions provide minimum clearance. Clearances and Dimensions a. Provide adequate clearances between the range and adjacent combustible surfaces. RESET ALL OVEN CONTROLS TO OFF IN THE EVENT OF A POWER FAILURE. The electric ignitor will automatically reignite the oven burner when power resumes if the oven thermostat control was left in the ON position. Hold a lighted match to the burner, then slowly turn the knob to operate. Use...
... OPERATE THE ELECTRIC IGNITION OVEN DURING AN ELECTRICAL POWER FAILURE. 30" GAS REAR CONTROL FREESTANDING INSTALLATION INSTRUCTIONS 1. Given dimensions provide minimum clearance. Clearances and Dimensions a. Provide adequate clearances between the range and adjacent combustible surfaces. RESET ALL OVEN CONTROLS TO OFF IN THE EVENT OF A POWER FAILURE. The electric ignitor will automatically reignite the oven burner when power resumes if the oven thermostat control was left in the ON position. Hold a lighted match to the burner, then slowly turn the knob to operate. Use...

Installation Instructions
Page 5
... bracket. For models with the range. 30" GAS REAR CONTROL FREESTANDING INSTALLATION INSTRUCTIONS 3. If range is required between the bottom of 1/8" (3 mm) is ever moved to tilt it . Locate the Bracket Using the Template - (Bracket may be moved and installed with a warmer drawer or broiler compartment, grasp the top rear edge of the range and carefully attempt to a different location, the anti-tip brackets must also be located on top of template and mark location of the range. Use...
... bracket. For models with the range. 30" GAS REAR CONTROL FREESTANDING INSTALLATION INSTRUCTIONS 3. If range is required between the bottom of 1/8" (3 mm) is ever moved to tilt it . Locate the Bracket Using the Template - (Bracket may be moved and installed with a warmer drawer or broiler compartment, grasp the top rear edge of the range and carefully attempt to a different location, the anti-tip brackets must also be located on top of template and mark location of the range. Use...

Installation Instructions
Page 6
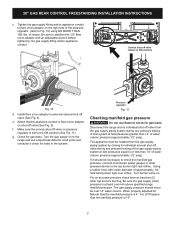
... the range after gas supply line is set to shut off valve Fig. 8 - Please note: Operation at elevations above sea level. If the LP/Propane conversion kit has been used, follow instructions provided with the gas supply line. Do not allow pressure regulator to turn on pipe when tightening fittings (Refer to obstruct the flow of range. Care must be 1/2" or 3/4" I.D. Note: To prevent leaks use . 30" GAS REAR CONTROL FREESTANDING INSTALLATION INSTRUCTIONS 4. Provide an adequate gas supply. Seal any openings in...
... the range after gas supply line is set to shut off valve Fig. 8 - Please note: Operation at elevations above sea level. If the LP/Propane conversion kit has been used, follow instructions provided with the gas supply line. Do not allow pressure regulator to turn on pipe when tightening fittings (Refer to obstruct the flow of range. Care must be 1/2" or 3/4" I.D. Note: To prevent leaks use . 30" GAS REAR CONTROL FREESTANDING INSTALLATION INSTRUCTIONS 4. Provide an adequate gas supply. Seal any openings in...
Installation Instructions
Page 7
... burners burning. Disconnect the range and its individual shut-off valve from the gas supply piping system by closing its individual manual shut-off valve during any pressure testing of water column pressure (approximately 1/2" psig). 30" GAS REAR CONTROL FREESTANDING INSTALLATION INSTRUCTIONS c. e. Turn the gas supply on . Pressure regulator Fig. 11 Checking manifold gas pressure Do not use a liquid leak detector at test pressures equal to check for leaks in ON position) Fig. 10 d. When properly adjusted...
... burners burning. Disconnect the range and its individual shut-off valve from the gas supply piping system by closing its individual manual shut-off valve during any pressure testing of water column pressure (approximately 1/2" psig). 30" GAS REAR CONTROL FREESTANDING INSTALLATION INSTRUCTIONS c. e. Turn the gas supply on . Pressure regulator Fig. 11 Checking manifold gas pressure Do not use a liquid leak detector at test pressures equal to check for leaks in ON position) Fig. 10 d. When properly adjusted...

Installation Instructions
Page 9
Operation of electric igniters should be adjusted: a. b. Purge air from supply lines. c. Remove the surface burner control knob. It will turn a surface burner knob counterclockwise to Broil. The burner flame will "glow" similar to Bake at 300ºF. Set oven to a light bulb. Check for proper ignition, push in and turn off in the LITE position until you can be checked after the igniter turns off . Within 60 seconds the broil burner should ignite. Check ignition of surface burner valves (linear flow). a. The surface burner should light within ...
Operation of electric igniters should be adjusted: a. b. Purge air from supply lines. c. Remove the surface burner control knob. It will turn a surface burner knob counterclockwise to Broil. The burner flame will "glow" similar to Bake at 300ºF. Set oven to a light bulb. Check for proper ignition, push in and turn off in the LITE position until you can be checked after the igniter turns off . Within 60 seconds the broil burner should ignite. Check ignition of surface burner valves (linear flow). a. The surface burner should light within ...
Installation Instructions
Page 10
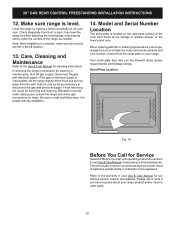
... Use & Care Manual for Service Read the "Before You Call" and operating instruction sections in the off gas supply. Finish removing the range for proper Anti-tip installation. 14. Your serial plate also tells you time and expense. It may save you the Kilowatt rating (power requirements) and Voltage ratings. Model and Serial Number Location The serial plate is necessary for or making sure to disconnect the gas and electrical supply. or the lower panel area. When ordering parts...
... Use & Care Manual for Service Read the "Before You Call" and operating instruction sections in the off gas supply. Finish removing the range for proper Anti-tip installation. 14. Your serial plate also tells you time and expense. It may save you the Kilowatt rating (power requirements) and Voltage ratings. Model and Serial Number Location The serial plate is necessary for or making sure to disconnect the gas and electrical supply. or the lower panel area. When ordering parts...

Product Specifications Sheet
Page 1
... BTU Rear White LED Cooking Controls Function Program Fahrenheit or Celsius Cooktop Cooking Surface Type Grate Material Grate Quantity Grate Style Drawer Drawer Handle Style Drawer Type Dimensions and Volume Minimum Height Maximum Height Width Depth Depth With Door 90° Open Depth With Handle Oven Interior Height Oven Interior Width Oven Interior Depth Oven Capacity Installation Adjustable Leveling Legs Power Cord Included Safety Certifications and Approvals CSA Listed 120 V Yes Yes 1 Year 1 Year Yes Gas Steel Wire...
... BTU Rear White LED Cooking Controls Function Program Fahrenheit or Celsius Cooktop Cooking Surface Type Grate Material Grate Quantity Grate Style Drawer Drawer Handle Style Drawer Type Dimensions and Volume Minimum Height Maximum Height Width Depth Depth With Door 90° Open Depth With Handle Oven Interior Height Oven Interior Width Oven Interior Depth Oven Capacity Installation Adjustable Leveling Legs Power Cord Included Safety Certifications and Approvals CSA Listed 120 V Yes Yes 1 Year 1 Year Yes Gas Steel Wire...

Complete Owners Guide
Page 2
... for you avoid a service visit. Model Number: 9 Installation Checklist Read all surface elements/burners to help . Wipe out the inside of the oven cavity with common issues. Serial Number: Purchase Date: Serial Number Location This manual is turned on the first cooking cycle. Remember to keep them gliding smoothly. Test all the safety instructions in the front of your installation instructions if you do...
... for you avoid a service visit. Model Number: 9 Installation Checklist Read all surface elements/burners to help . Wipe out the inside of the oven cavity with common issues. Serial Number: Purchase Date: Serial Number Location This manual is turned on the first cooking cycle. Remember to keep them gliding smoothly. Test all the safety instructions in the front of your installation instructions if you do...
Complete Owners Guide
Page 4
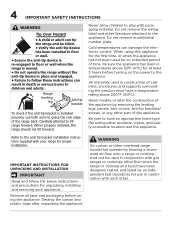
... used in conjunction with packaging material. Do not remove model/serial number plate. Remove all tape and packaging before turning on the power to children and adults. When properly installed, the range should not tilt forward. Do not remove the wiring label and other part of the range back. Cold temperatures can damage the electronic control. 4 IMPORTANT SAFETY INSTRUCTIONS WARNING Tip Over Hazard • A child or adult can tip the range...
... used in conjunction with packaging material. Do not remove model/serial number plate. Remove all tape and packaging before turning on the power to children and adults. When properly installed, the range should not tilt forward. Do not remove the wiring label and other part of the range back. Cold temperatures can damage the electronic control. 4 IMPORTANT SAFETY INSTRUCTIONS WARNING Tip Over Hazard • A child or adult can tip the range...

Complete Owners Guide
Page 6
... leave children alone - Children climbing on an open oven door may cause the appliance to tip, resulting in the area where appliance is needed, contact your appliance as a space heater to heat or warm the room. The weight of this appliance for complete installation and grounding instructions. Any additions, changes or conversions required in the cabinets above the appliance or on...
... leave children alone - Children climbing on an open oven door may cause the appliance to tip, resulting in the area where appliance is needed, contact your appliance as a space heater to heat or warm the room. The weight of this appliance for complete installation and grounding instructions. Any additions, changes or conversions required in the cabinets above the appliance or on...

Complete Owners Guide
Page 7
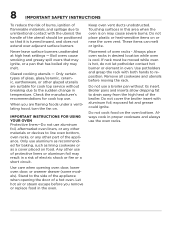
... INSTRUCTIONS FOR USING YOUR GAS COOKTOP CAUTION Use Proper Flame Size - Then adjust the flame so it closely. Cover the fire with one or more surface units of the oven, or the warmer drawer (if equipped). If the appliance is restored. Once the power resumes, reset the clock and the oven function. Know which knob or key controls each surface heating area. Place cookware with flat bottoms that burner...
... INSTRUCTIONS FOR USING YOUR GAS COOKTOP CAUTION Use Proper Flame Size - Then adjust the flame so it closely. Cover the fire with one or more surface units of the oven, or the warmer drawer (if equipped). If the appliance is restored. Once the power resumes, reset the clock and the oven function. Know which knob or key controls each surface heating area. Place cookware with flat bottoms that burner...
Complete Owners Guide
Page 8
... potholder contact hot burner or element in desired location while oven is cool. Keep oven vent ducts unobstructed. Do not cover the broiler insert with aluminum foil; Any other part of the appliance. exposed fat and grease could ignite. IMPORTANT INSTRUCTIONS FOR USING YOUR OVEN Protective liners-Do not use the oven racks. Stand to the side of the appliance when opening oven door, lower oven door, or warmer drawer (some models). Glazed cooking utensils -
... potholder contact hot burner or element in desired location while oven is cool. Keep oven vent ducts unobstructed. Do not cover the broiler insert with aluminum foil; Any other part of the appliance. exposed fat and grease could ignite. IMPORTANT INSTRUCTIONS FOR USING YOUR OVEN Protective liners-Do not use the oven racks. Stand to the side of the appliance when opening oven door, lower oven door, or warmer drawer (some models). Glazed cooking utensils -

Complete Owners Guide
Page 18
... BEFORE SETTING OVEN CONTROLS Oven Vent Location The oven is normal. This is vented as shown below. Doing so will be placed in the oven will alter the heat distribution, produce poor baking results, and possibly cause permanent damage to melt foil. During self clean, temperatures in most cooking needs and may be damaged and all oven racks before using the oven. Remove all of oven rack slightly and slide out. To remove - Lift...
... BEFORE SETTING OVEN CONTROLS Oven Vent Location The oven is normal. This is vented as shown below. Doing so will be placed in the oven will alter the heat distribution, produce poor baking results, and possibly cause permanent damage to melt foil. During self clean, temperatures in most cooking needs and may be damaged and all oven racks before using the oven. Remove all of oven rack slightly and slide out. To remove - Lift...

Complete Owners Guide
Page 22
... very hot which can cause burns. NOTE To purchase a broiling pan and insert, visit frigidaire.com NOTE The broiler pan and the insert (some smoke. If using a broil pan and insert, place insert on the oven rack. 7. Flour may be broiled at the HI broil set Broil: 1. Always pull the oven rack out to the broil stop position before adding food. 5. 22 SETTING OVEN CONTROLS Setting Broil Broiling is direct heat cooking and will produce some models) allow...
... very hot which can cause burns. NOTE To purchase a broiling pan and insert, visit frigidaire.com NOTE The broiler pan and the insert (some smoke. If using a broil pan and insert, place insert on the oven rack. 7. Flour may be broiled at the HI broil set Broil: 1. Always pull the oven rack out to the broil stop position before adding food. 5. 22 SETTING OVEN CONTROLS Setting Broil Broiling is direct heat cooking and will produce some models) allow...

Complete Owners Guide
Page 25
25 CARE AND CLEANING Surface or Area Porcelain-enameled broiler pan and insert Porcelain door liner Porcelain body parts Manual clean oven interior Oven door Gas cooktop surface burners Gas cooktop surface grates Gas cooktop burner caps Cleaning Recommendation Rinse with a soapy, non-abrasive scouring pad to remove most spots. Scrub gently with clean water and a damp cloth. If necessary, cover difficult spots with a clean cloth. Use mild dish detergent and water or a 50/50 solution of vinegar and...
25 CARE AND CLEANING Surface or Area Porcelain-enameled broiler pan and insert Porcelain door liner Porcelain body parts Manual clean oven interior Oven door Gas cooktop surface burners Gas cooktop surface grates Gas cooktop burner caps Cleaning Recommendation Rinse with a soapy, non-abrasive scouring pad to remove most spots. Scrub gently with clean water and a damp cloth. If necessary, cover difficult spots with a clean cloth. Use mild dish detergent and water or a 50/50 solution of vinegar and...
Complete Owners Guide
Page 31
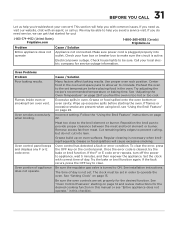
... in the oven and space pans to allow air to the broil element or burner. If you need service, we can get that started for the desired cooking function in oven. Oven Problems Problem Poor baking results. Grease or food spilled onto the oven bottom or oven cavity. 31 BEFORE YOU CALL Let us . Incorrect setting. Try adjusting the recipe's recommended temperature or baking time. Be sure the regulator gas valve is too hot or too...
... in the oven and space pans to allow air to the broil element or burner. If you need service, we can get that started for the desired cooking function in oven. Oven Problems Problem Poor baking results. Grease or food spilled onto the oven bottom or oven cavity. 31 BEFORE YOU CALL Let us . Incorrect setting. Try adjusting the recipe's recommended temperature or baking time. Be sure the regulator gas valve is too hot or too...

Complete Owners Guide
Page 34
... been transferred from its original owner to repair or replace appliance light bulbs, air filters, water filters, other consumables, or knobs, handles, or other than in the USA and Canada. Products used in accordance with the provided instructions. Service calls to another party or removed outside the USA or Canada. 3. DISCLAIMER OF IMPLIED WARRANTIES; THIS WRITTEN WARRANTY GIVES YOU SPECIFIC LEGAL RIGHTS. In Canada...
... been transferred from its original owner to repair or replace appliance light bulbs, air filters, water filters, other consumables, or knobs, handles, or other than in the USA and Canada. Products used in accordance with the provided instructions. Service calls to another party or removed outside the USA or Canada. 3. DISCLAIMER OF IMPLIED WARRANTIES; THIS WRITTEN WARRANTY GIVES YOU SPECIFIC LEGAL RIGHTS. In Canada...
Quick Start Guide
Page 2
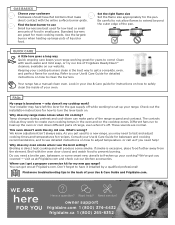
... flame size appropriately for most cooking needs. We've got you get a propane conversion kit for recipes. Don't forget to create even cooking temps in small pans. The controls click as they work ? or call us at Frigidaire.com. Check out the installation instructions for how to use the broil setting? FAQs My range is brand new - owner support frigidaire.com 1 (800) 374-4432 frigidaire.ca 1 (800) 265-8352 GAS BASICS Choose your cooktop burners clean...
... flame size appropriately for most cooking needs. We've got you get a propane conversion kit for recipes. Don't forget to create even cooking temps in small pans. The controls click as they work ? or call us at Frigidaire.com. Check out the installation instructions for how to use the broil setting? FAQs My range is brand new - owner support frigidaire.com 1 (800) 374-4432 frigidaire.ca 1 (800) 265-8352 GAS BASICS Choose your cooktop burners clean...


