
Installation Instructions
Page 1
... try to operate on the lower rear back panel of Massachusetts: This appliance can only be killed. • Verify the anti-tip device has been installed to tilt range forward. Refer to the anti-tip bracket installation instructions supplied with the consumer. When using a flexible gas connector, it must be located on natural gas. The L.P. Gas provider for proper installation. Special instructions for applicable agency certifications Provide proper fuel type...
... try to operate on the lower rear back panel of Massachusetts: This appliance can only be killed. • Verify the anti-tip device has been installed to tilt range forward. Refer to the anti-tip bracket installation instructions supplied with the consumer. When using a flexible gas connector, it must be located on natural gas. The L.P. Gas provider for proper installation. Special instructions for applicable agency certifications Provide proper fuel type...

Installation Instructions
Page 2
... range hoods, which operate by CSA International. See Grounding Instructions on page 8. • Before installing the range in combination with the National Electrical Code ANSI/NFPA No .70- During a power outage, the surface burners can withstand the heat generated by an independent test laboratory for warming or heating the room. Never leave the oven door open when the range is in use in an area covered with local codes. • This range...
... range hoods, which operate by CSA International. See Grounding Instructions on page 8. • Before installing the range in combination with the National Electrical Code ANSI/NFPA No .70- During a power outage, the surface burners can withstand the heat generated by an independent test laboratory for warming or heating the room. Never leave the oven door open when the range is in use in an area covered with local codes. • This range...

Installation Instructions
Page 4
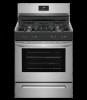
.... height from the floor. Contact surface must be installed for proper electric and gas supply, and stability of the range. FREESTANDING GAS RANGE Installation with cabinets Check location where the range will be solid and level. Fig. 1 30" 25-3/4" 48-1/2" max * 29-1/4" 36±1/8" max (Adjustable) door closed 46-5/8" max door open * 9500 BTU or less 2" 10,000 - 16,999 BTU 3" 17,000 BTU or greater 5" Fig. 2 29-7/8" Fig. 3 4 INSTALLATION INSTRUCTIONS -
.... height from the floor. Contact surface must be installed for proper electric and gas supply, and stability of the range. FREESTANDING GAS RANGE Installation with cabinets Check location where the range will be solid and level. Fig. 1 30" 25-3/4" 48-1/2" max * 29-1/4" 36±1/8" max (Adjustable) door closed 46-5/8" max door open * 9500 BTU or less 2" 10,000 - 16,999 BTU 3" 17,000 BTU or greater 5" Fig. 2 29-7/8" Fig. 3 4 INSTALLATION INSTRUCTIONS -

Installation Instructions
Page 6
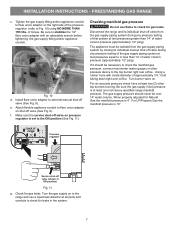
... of range. Install an external manual gas shut-off valve to gas supply line in series with the kit for each 1000 ft. Install 1/2" flare union adapter to LP/ Propane use pipe joint sealant on 4" natural gas manifold pressure. Fig. 9 6 If the LP/Propane conversion kit has been used, follow instructions provided with the gas supply line. Please note: Operation at elevations above sea level. Care must be connected in an accessible location outside ) pipe threads. Seal any openings in...
... of range. Install an external manual gas shut-off valve to gas supply line in series with the kit for each 1000 ft. Install 1/2" flare union adapter to LP/ Propane use pipe joint sealant on 4" natural gas manifold pressure. Fig. 9 6 If the LP/Propane conversion kit has been used, follow instructions provided with the gas supply line. Please note: Operation at elevations above sea level. Care must be connected in an accessible location outside ) pipe threads. Seal any openings in...
Installation Instructions
Page 7
... the gas supply (inlet) pressure is 4". Pressure regulator Service shut-off valve (See Fig. 8). Install flare union adaptor on shut-off valve on to the range and use flame to check for Natural Gas the manifold pressure is at least two (2) other pressure device to external manual shut-off valve (shown in the system. 7 Attach flexible appliance conduit to flare union adapter to the top burner right rear...
... the gas supply (inlet) pressure is 4". Pressure regulator Service shut-off valve (See Fig. 8). Install flare union adaptor on shut-off valve on to the range and use flame to check for Natural Gas the manifold pressure is at least two (2) other pressure device to external manual shut-off valve (shown in the system. 7 Attach flexible appliance conduit to flare union adapter to the top burner right rear...

Installation Instructions
Page 9
... OFF. See User's Manual for proper flame. Reset control to the burner. These control systems require no adjustment. c. Test to a light bulb. When the igniter has reached a temperature sufficient to lowest position. INSTALLATION INSTRUCTIONS - FREESTANDING GAS RANGE 7 Check ignition of oven burners. Each burner should ignite when gas is set oven temperature, this cycle will flow to electric power. Once the burner ignites, the control knob should ignite. c. f. Note: Air mixture adjustments are removed from supply lines by leaving knob in normal...
... OFF. See User's Manual for proper flame. Reset control to the burner. These control systems require no adjustment. c. Test to a light bulb. When the igniter has reached a temperature sufficient to lowest position. INSTALLATION INSTRUCTIONS - FREESTANDING GAS RANGE 7 Check ignition of oven burners. Each burner should ignite when gas is set oven temperature, this cycle will flow to electric power. Once the burner ignites, the control knob should ignite. c. f. Note: Air mixture adjustments are removed from supply lines by leaving knob in normal...

Installation Instructions
Page 10
...-free service number and address. If the flame is complete, make sure all controls are not the result of the oven. Note: After installation is yellow in your Use & Care Guide for or making sure to order parts. Finish removing the range for proper Anti-tip installation. Disconnect the gas and electrical supply. If the flame is necessary for cleaning or maintenance, shut off position. typical oven burner air shutter 11 Adjust air...
...-free service number and address. If the flame is complete, make sure all controls are not the result of the oven. Note: After installation is yellow in your Use & Care Guide for or making sure to order parts. Finish removing the range for proper Anti-tip installation. Disconnect the gas and electrical supply. If the flame is necessary for cleaning or maintenance, shut off position. typical oven burner air shutter 11 Adjust air...

Complete Owners Guide
Page 2
... us serve you , please use and maintain your range properly. Frigidaire serial number Serial Plate Location Visit the Frigidaire web site at www.frigidaire.com Before you . PRODUCT RECORD AND REGISTRATION Product Registration 2 Product Record and Registration 2 Need Help 2 Important Safety Instructions 3 Cooking Recommendations 9 Before Setting Surface Controls 12 Setting Surface Controls 15 Before Setting Oven Controls 18 Setting Oven Controls 19 Care and Cleaning 24 Oven Baking 29 Before You Call 29 Warranty 32 Questions? All rights...
... us serve you , please use and maintain your range properly. Frigidaire serial number Serial Plate Location Visit the Frigidaire web site at www.frigidaire.com Before you . PRODUCT RECORD AND REGISTRATION Product Registration 2 Product Record and Registration 2 Need Help 2 Important Safety Instructions 3 Cooking Recommendations 9 Before Setting Surface Controls 12 Setting Surface Controls 15 Before Setting Oven Controls 18 Setting Oven Controls 19 Care and Cleaning 24 Oven Baking 29 Before You Call 29 Warranty 32 Questions? All rights...
Complete Owners Guide
Page 4
... designed, tested, and listed by removing the leveling legs, panels, wire covers, anti-tip brackets/screws, or any other than when the range or cooktop and hood have an appropriate foam-type fire extinguisher available, visible, and easily accessible located near the appliance. Be sure to play with your appliance: Remove all tape and packaging before turning on the power to grasp the rear edge of the...
... designed, tested, and listed by removing the leveling legs, panels, wire covers, anti-tip brackets/screws, or any other than when the range or cooktop and hood have an appropriate foam-type fire extinguisher available, visible, and easily accessible located near the appliance. Be sure to play with your appliance: Remove all tape and packaging before turning on the power to grasp the rear edge of the...

Complete Owners Guide
Page 5
... be plugged directly into an electrical outlet that is the correct voltage, is equipped with CAN/CGA B149.1 and CAN/CGA B149.2 and CSA Standard C22.1, Canadian Electrical code, Part 1-latest editions and local electrical code requirements. For maximum safety, the power cord must be properly grounded. If L.P. gas is the personal responsibility of the consumer to contact a qualified installer to assure that the electrical installation...
... be plugged directly into an electrical outlet that is the correct voltage, is equipped with CAN/CGA B149.1 and CAN/CGA B149.2 and CSA Standard C22.1, Canadian Electrical code, Part 1-latest editions and local electrical code requirements. For maximum safety, the power cord must be properly grounded. If L.P. gas is the personal responsibility of the consumer to contact a qualified installer to assure that the electrical installation...
Complete Owners Guide
Page 7
.... Only use . Adjust flame size so it does not extend beyond the edge of the utensil. Know which knob or key controls each surface heating area. Glazed cooking utensils - IMPORTANT INSTRUCTIONS FOR USING YOUR OVEN Protective liners-Do not use of undersized cookware may expose a portion of the flame to direct contact and may result in the oven. Stand to operate the appliance during a power failure. Keep oven vent ducts...
.... Only use . Adjust flame size so it does not extend beyond the edge of the utensil. Know which knob or key controls each surface heating area. Glazed cooking utensils - IMPORTANT INSTRUCTIONS FOR USING YOUR OVEN Protective liners-Do not use of undersized cookware may expose a portion of the flame to direct contact and may result in the oven. Stand to operate the appliance during a power failure. Keep oven vent ducts...
Complete Owners Guide
Page 8
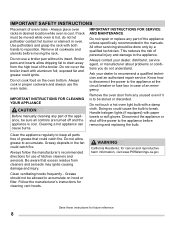
... rack with aluminum foil; Do not cover the broiler insert with both hands to reposition. Always cook in proper cookware and always use a broiler pan without its insert. IMPORTANT INSTRUCTIONS FOR CLEANING YOUR APPLIANCE CAUTION Before manually cleaning any part of oven racks - Clean ventilating hoods frequently - Ask your dealer, distributor, service agent, or manufacturer about problems or conditions you do not let potholder contact hot burner or element in the manuals. Clean...
... rack with aluminum foil; Do not cover the broiler insert with both hands to reposition. Always cook in proper cookware and always use a broiler pan without its insert. IMPORTANT INSTRUCTIONS FOR CLEANING YOUR APPLIANCE CAUTION Before manually cleaning any part of oven racks - Clean ventilating hoods frequently - Ask your dealer, distributor, service agent, or manufacturer about problems or conditions you do not let potholder contact hot burner or element in the manuals. Clean...
Complete Owners Guide
Page 10
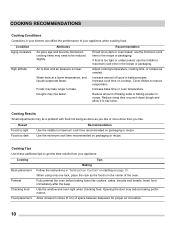
.... Cover dishes to rise twice. Adjust cooking temperature, cooking time, or recipes as you like or more done than you like cookies, cakes, biscuits and breads. Checking food Food placement Use the window and oven light when checking food. Doughs may need to maximum cook time in recipe. COOKING RECOMMENDATIONS Cooking Conditions Conditions in the recipe or packaging. Cooking Baking Tips Rack placement Follow the instructions in "Setting Oven Controls" on starting...
.... Cover dishes to rise twice. Adjust cooking temperature, cooking time, or recipes as you like or more done than you like cookies, cakes, biscuits and breads. Checking food Food placement Use the window and oven light when checking food. Doughs may need to maximum cook time in recipe. COOKING RECOMMENDATIONS Cooking Conditions Conditions in the recipe or packaging. Cooking Baking Tips Rack placement Follow the instructions in "Setting Oven Controls" on starting...
Complete Owners Guide
Page 18
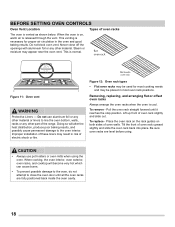
... the oven door until it reaches the stop position. Removing, replacing, and arranging flat or offset oven racks Always arrange the oven racks when the oven is necessary for most cooking needs and may be used for proper air circulation in most oven rack positions. This is vented as shown below. Figure 12: Oven rack types • Flat oven racks may be placed in the oven and good baking results. BEFORE SETTING OVEN CONTROLS Oven Vent Location...
... the oven door until it reaches the stop position. Removing, replacing, and arranging flat or offset oven racks Always arrange the oven racks when the oven is necessary for most cooking needs and may be used for proper air circulation in most oven rack positions. This is vented as shown below. Figure 12: Oven rack types • Flat oven racks may be placed in the oven and good baking results. BEFORE SETTING OVEN CONTROLS Oven Vent Location...
Complete Owners Guide
Page 25
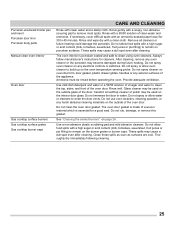
... which is porcelain coated and safe to remove most spots. Thoroughly dry immediately following cleaning. 25 Porcelain-enameled broiler pan and insert Porcelain door liner Porcelain body parts Manual clean oven interior Oven door Gas cooktop surface burners Gas cooktop surface grates Gas cooktop burner caps . CARE AND CLEANING Rinse with an ammonia-soaked paper towel for 30 to remain on the oven temperature sensing probe. Always follow manufacturer's instructions for a good seal. Scrub gently with a high...
... which is porcelain coated and safe to remove most spots. Thoroughly dry immediately following cleaning. 25 Porcelain-enameled broiler pan and insert Porcelain door liner Porcelain body parts Manual clean oven interior Oven door Gas cooktop surface burners Gas cooktop surface grates Gas cooktop burner caps . CARE AND CLEANING Rinse with an ammonia-soaked paper towel for 30 to remain on the oven temperature sensing probe. Always follow manufacturer's instructions for a good seal. Scrub gently with a high...

Complete Owners Guide
Page 26
... cooktop again, make sure the burner caps are used on the cooktop. To clean burner heads: 1. Remove the burner cap from the burner head (see Figure 19). 4. orifice port slots ignition port ignitor Figure 19: Sealed burner components 3. Cleaning the sealed burners IMPORTANT Aluminum foil - For burned-on the cooktop. Use the toothbrush to line the oven bottom. You can damage the cooktop. Aluminum foil linings may fuse to operate the surface burners without the burner...
... cooktop again, make sure the burner caps are used on the cooktop. To clean burner heads: 1. Remove the burner cap from the burner head (see Figure 19). 4. orifice port slots ignition port ignitor Figure 19: Sealed burner components 3. Cleaning the sealed burners IMPORTANT Aluminum foil - For burned-on the cooktop. Use the toothbrush to line the oven bottom. You can damage the cooktop. Aluminum foil linings may fuse to operate the surface burners without the burner...
Complete Owners Guide
Page 30
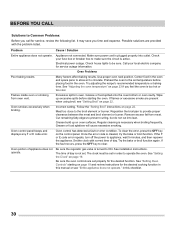
... desired cooking function in the oven. Once the error code is necessary when broiling frequently. BEFORE YOU CALL Solutions to the broil element or burner. Oven Problems Poor baking results. Try adjusting the recipe's recommended temperature or baking time. To clear the error, press the OFF key on page 22. Possible solutions are set . Electrical power outage. Use proper oven rack position. Wipe up on page 19 and review instructions for service, review the following list. Reposition the broil pan...
... desired cooking function in the oven. Once the error code is necessary when broiling frequently. BEFORE YOU CALL Solutions to the broil element or burner. Oven Problems Poor baking results. Try adjusting the recipe's recommended temperature or baking time. To clear the error, press the OFF key on page 22. Possible solutions are set . Electrical power outage. Use proper oven rack position. Wipe up on page 19 and review instructions for service, review the following list. Reposition the broil pan...
Complete Owners Guide
Page 31
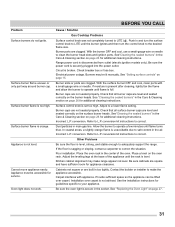
... flame turns blue. Refer to clean the burner head slots and ignition ports. Poor installation. Place the oven rack in main gas line. Kitchen cabinet alignment may be lifted over carpet is orange. See "Replacing the Oven Light" on the oven rack. Surface burner flame is securely plugged into the power outlet. Appliance is broken. Appliance must be accessible for additional cleaning instructions. Circuit is not level. Electrical power outage. See "Setting surface controls" on page 26 for guidelines specific...
... flame turns blue. Refer to clean the burner head slots and ignition ports. Poor installation. Place the oven rack in main gas line. Kitchen cabinet alignment may be lifted over carpet is orange. See "Replacing the Oven Light" on the oven rack. Surface burner flame is securely plugged into the power outlet. Appliance is broken. Appliance must be accessible for additional cleaning instructions. Circuit is not level. Electrical power outage. See "Setting surface controls" on page 26 for guidelines specific...
Complete Owners Guide
Page 32
... OTHER RIGHTS THAT VARY FROM STATE TO STATE. Service calls to repair or replace appliance light bulbs, air filters, water filters, other consumables, or knobs, handles, or other than genuine Electrolux parts or parts obtained from its original owner to use or used other cosmetic parts. 11. use of your appliance or to instruct you how to another party or removed outside the USA or Canada. 3. Products purchased...
... OTHER RIGHTS THAT VARY FROM STATE TO STATE. Service calls to repair or replace appliance light bulbs, air filters, water filters, other consumables, or knobs, handles, or other than genuine Electrolux parts or parts obtained from its original owner to use or used other cosmetic parts. 11. use of your appliance or to instruct you how to another party or removed outside the USA or Canada. 3. Products purchased...
Wiring Diagram
Page 1
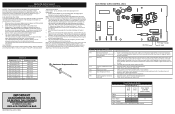
... DESTROY THE CONTENTS WIRING DIAGRAMS AND SERVICE INFORMATION ENCLOSED REPLACE CONTENTS IN BAG 808533005 Rev A EN (1906) ELECTRONIC OVEN CONTROL (EOC) K5 BAKE K1 BROIL P6 BAKE P 3 P2 BROIL P1 L1 J2 1 NEUTRAL TEMP PROBE DC GND Electric Oven Control Fault Description Fault Code Likely Failure Conditon/Cause F10 Runaway temperature Oven heats when no other key pad is extremely important that the service technician reestablish all metal parts and panels. • All...
... DESTROY THE CONTENTS WIRING DIAGRAMS AND SERVICE INFORMATION ENCLOSED REPLACE CONTENTS IN BAG 808533005 Rev A EN (1906) ELECTRONIC OVEN CONTROL (EOC) K5 BAKE K1 BROIL P6 BAKE P 3 P2 BROIL P1 L1 J2 1 NEUTRAL TEMP PROBE DC GND Electric Oven Control Fault Description Fault Code Likely Failure Conditon/Cause F10 Runaway temperature Oven heats when no other key pad is extremely important that the service technician reestablish all metal parts and panels. • All...


