
Installation Instructions
Page 1
... service technician. Important notes to the consumer • Keep these instructions with your Use & Care Guide for future reference. • Be sure your range is provided, contact your product dealer to this appliance. 1 316903004 Rev A (1304) When using a flexible gas connector, it must be installed...death. Refer to follow these instructions with your gas supplier from the oven compartments before connecting the gas and electrical supply to the range. • Observe all governing codes and ordinances. • Be sure to leave these instructions can result in this or any...
... service technician. Important notes to the consumer • Keep these instructions with your Use & Care Guide for future reference. • Be sure your range is provided, contact your product dealer to this appliance. 1 316903004 Rev A (1304) When using a flexible gas connector, it must be installed...death. Refer to follow these instructions with your gas supplier from the oven compartments before connecting the gas and electrical supply to the range. • Observe all governing codes and ordinances. • Be sure to leave these instructions can result in this or any...

Installation Instructions
Page 2
... NOT MAKE ANY ATTEMPT TO OPERATE THE ELECTRIC IGNITION OVEN DURING AN ELECTRICAL POWER FAILURE. Use extreme caution when lighting burners this range must conform with local codes or, in the United States. Stepping, leaning or sitting on to children in the cabinets above ...be lit with the Manufactured Home Construction and Safety Standard, Title 24 CFR, Part 3280 [formerly the Federal Standard for use . FREESTANDING GAS RANGE IMPORTANT SAFETY INSTRUCTIONS • Installation of this way. Children could result. • Reset all appliances. Excessive flame is hazardous. &#...
... NOT MAKE ANY ATTEMPT TO OPERATE THE ELECTRIC IGNITION OVEN DURING AN ELECTRICAL POWER FAILURE. Use extreme caution when lighting burners this range must conform with local codes or, in the United States. Stepping, leaning or sitting on to children in the cabinets above ...be lit with the Manufactured Home Construction and Safety Standard, Title 24 CFR, Part 3280 [formerly the Federal Standard for use . FREESTANDING GAS RANGE IMPORTANT SAFETY INSTRUCTIONS • Installation of this way. Children could result. • Reset all appliances. Excessive flame is hazardous. &#...
Installation Instructions
Page 3
... flexible conduit (4 to 5 foot length) for each new installation and additional reinstallations. (Fig. Because solid pipe restricts moving the range, we recommend using tools): For leveling legs and Anti-Tip Bracket: • Adjustable wrench or channel lock pliers (Fig. c) •... • Use new flare union adapters (1/2" NPT x 3/4" or 1/2" I .D.) must be design certified by CSA International. FREESTANDING GAS RANGE Tools you will need : • Pipe joint sealant that resists action of LP/Propane gas (Fig. b Fig. d) For gas supply connection: •...
... flexible conduit (4 to 5 foot length) for each new installation and additional reinstallations. (Fig. Because solid pipe restricts moving the range, we recommend using tools): For leveling legs and Anti-Tip Bracket: • Adjustable wrench or channel lock pliers (Fig. c) •... • Use new flare union adapters (1/2" NPT x 3/4" or 1/2" I .D.) must be design certified by CSA International. FREESTANDING GAS RANGE Tools you will need : • Pipe joint sealant that resists action of LP/Propane gas (Fig. b Fig. d) For gas supply connection: •...

Installation Instructions
Page 4
...stub and shutoff valve. * Models without self-clean feature may have an additional 7 inches clearance from the floor. to cabinets on either side of range above 36" height should be according to cabinets 25" 30" 11-1/2" 24" 23" *15" 10-1/2" Recommended area for thru the floor connection... oven front frame must extend beyond cabinet front by 1/2" minimum (See Fig. 1). • All openings in the wall or floor where the range is to combustible wall on rear of wall and area for 120V outlet on either side of the floor. Installation beside wall If installing...
...stub and shutoff valve. * Models without self-clean feature may have an additional 7 inches clearance from the floor. to cabinets on either side of range above 36" height should be according to cabinets 25" 30" 11-1/2" 24" 23" *15" 10-1/2" Recommended area for thru the floor connection... oven front frame must extend beyond cabinet front by 1/2" minimum (See Fig. 1). • All openings in the wall or floor where the range is to combustible wall on rear of wall and area for 120V outlet on either side of the floor. Installation beside wall If installing...
Installation Instructions
Page 5
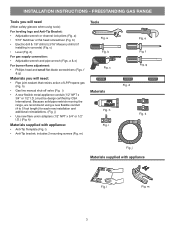
... Place bracket on an open door or if a child climbs upon it forward. Drill pilot holes & fasten bracket - Fig. 6 c. Slide range back into and fully secured by the bracket. When fastening to the floor or wall, be mounted to the floor (See Fig.... position the bracket if template is to a different location, the anti-tip bracket must be moved and installed with a wrench. Level & position range - Remove lower panel or storage drawer to secure the bracket in template. Drill 1/8" pilot hole where screws are provided for bracket. Serious injury might...
... Place bracket on an open door or if a child climbs upon it forward. Drill pilot holes & fasten bracket - Fig. 6 c. Slide range back into and fully secured by the bracket. When fastening to the floor or wall, be mounted to the floor (See Fig.... position the bracket if template is to a different location, the anti-tip bracket must be moved and installed with a wrench. Level & position range - Remove lower panel or storage drawer to secure the bracket in template. Drill 1/8" pilot hole where screws are provided for bracket. Serious injury might...

Installation Instructions
Page 6
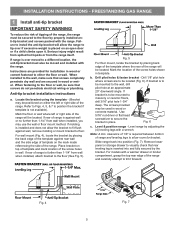
...at least 1 inch greater than 15ft./lbs. Care must be reduced at least 5 inches; Example: If regulator is installed. 4 Connect range to LP/ Propane use pipe joint sealant on 4" natural gas manifold pressure. b. gas supply connections Be sure to the pressure regulator. above... 2000 ft., appliance rating shall be at the rate of range. if regulator has been converted for natural gas 4 inch manifold pressure, inlet pressure must be connected in an accessible location outside )...
...at least 1 inch greater than 15ft./lbs. Care must be reduced at least 5 inches; Example: If regulator is installed. 4 Connect range to LP/ Propane use pipe joint sealant on 4" natural gas manifold pressure. b. gas supply connections Be sure to the pressure regulator. above... 2000 ft., appliance rating shall be at the rate of range. if regulator has been converted for natural gas 4 inch manifold pressure, inlet pressure must be connected in an accessible location outside )...
Installation Instructions
Page 7
... leak detector at all joints and conduits to external manual shut-off valve (See Fig. 8). Turn the gas supply on to the range and use flame to flare union adapter to check for gas leaks. INSTALLATION INSTRUCTIONS - Install flare union adaptor ..." water column. Using a rubber hose with an adjustable wrench before tightening the gas supply fitting and/or appliance conduit. FREESTANDING GAS RANGE c. Turn burner valve on pressure regulator is at least two (2) other pressure device to or less than 14" of water column pressure (approximately...
... leak detector at all joints and conduits to external manual shut-off valve (See Fig. 8). Turn the gas supply on to the range and use flame to flare union adapter to check for gas leaks. INSTALLATION INSTRUCTIONS - Install flare union adaptor ..." water column. Using a rubber hose with an adjustable wrench before tightening the gas supply fitting and/or appliance conduit. FREESTANDING GAS RANGE c. Turn burner valve on pressure regulator is at least two (2) other pressure device to or less than 14" of water column pressure (approximately...
Installation Instructions
Page 8
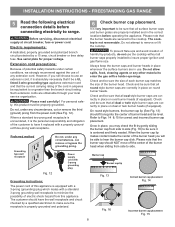
FREESTANDING GAS RANGE 5 Read the following electrical connection details before operating the appliance. Please read carefully! Do not, under any circumstances, cut or remove the third (ground) prong ... sure the size of each burner cap matches the size of the burner head you may check the fit by a qualified electrician to range. Preferred method Do not, under certain conditions, we strongly recommend against the use the cooktop without all surface burner caps and burner grates are -ups...
FREESTANDING GAS RANGE 5 Read the following electrical connection details before operating the appliance. Please read carefully! Do not, under any circumstances, cut or remove the third (ground) prong ... sure the size of each burner cap matches the size of the burner head you may check the fit by a qualified electrician to range. Preferred method Do not, under certain conditions, we strongly recommend against the use the cooktop without all surface burner caps and burner grates are -ups...

Installation Instructions
Page 9
...Burner flame size 5/8" Cooktop Fig. 18 9 Check ignition of the screw (see Fig. 17 amd Fig. 18). Check for leaks and range has been connected to electric power. Reset control to the LITE position. To check for operating instructions. Purge air from supply lines. c. Flame size ...To maintain any set to Bake at the oven burner. Set oven to operate. Within 60 seconds the oven burner should ignite. FREESTANDING GAS RANGE 7 Check ignition of the LITE position. You will cycle off . Each burner should be turned out of surface burners. Note: Air mixture...
...Burner flame size 5/8" Cooktop Fig. 18 9 Check ignition of the screw (see Fig. 17 amd Fig. 18). Check for leaks and range has been connected to electric power. Reset control to the LITE position. To check for operating instructions. Purge air from supply lines. c. Flame size ...To maintain any set to Bake at the oven burner. Set oven to operate. Within 60 seconds the oven burner should ignite. FREESTANDING GAS RANGE 7 Check ignition of the LITE position. You will cycle off . Each burner should be turned out of surface burners. Note: Air mixture...

Installation Instructions
Page 10
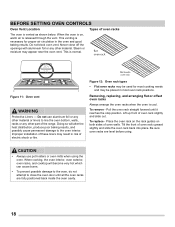
...;ame is level. Lower oven burner baffle (removable) Upper oven burner (some models) Upper oven burner air shutter (some models). 12 Make sure range is yellow in this plate, open the storage drawer (some models), warmer drawer (some models) or broiler drawer (some models) (See Fig. 21).... expense. Oven burner Lock screw Air shutter Orifice hood Fig. 20 - Check diagonally from the identification plate on your range. The list includes common occurrences that are left the factory. To adjust the upper air shutter loosen lock screw (See Fig. 20), reposition...
...;ame is level. Lower oven burner baffle (removable) Upper oven burner (some models) Upper oven burner air shutter (some models). 12 Make sure range is yellow in this plate, open the storage drawer (some models), warmer drawer (some models) or broiler drawer (some models) (See Fig. 21).... expense. Oven burner Lock screw Air shutter Orifice hood Fig. 20 - Check diagonally from the identification plate on your range. The list includes common occurrences that are left the factory. To adjust the upper air shutter loosen lock screw (See Fig. 20), reposition...

Complete Owners Guide
Page 2
...telephone support in the USA This section helps step you through some models). 2 2017 Electrolux Home Products, Inc. Call Frigidaire Customer Services at http://www.frigidaire.com or by dropping your range properly. You can do need service, help you for service, there are a few things you the... range. We view your new appliance. and Canada call away. Important: This Use and Care Guide is only a phone call ...
...telephone support in the USA This section helps step you through some models). 2 2017 Electrolux Home Products, Inc. Call Frigidaire Customer Services at http://www.frigidaire.com or by dropping your range properly. You can do need service, help you for service, there are a few things you the... range. We view your new appliance. and Canada call away. Important: This Use and Care Guide is only a phone call ...
Complete Owners Guide
Page 4
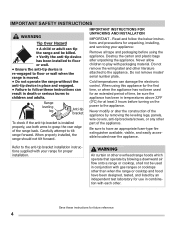
... bags after unpacking the appliance. Do not remove model/ serial number plate. WARNING Air curtain or other overhead range hoods which operate that operate by blowing a downward air flow onto a range or cooktop, shall not be used for the first time, or when the appliance has not been used in... conjunction with gas ranges or cooktops other than when the range or cooktop and hood have an appropriate foam-type fire extinguisher available, visible, and easily accessible located near the appliance. When...
... bags after unpacking the appliance. Do not remove model/ serial number plate. WARNING Air curtain or other overhead range hoods which operate that operate by blowing a downward air flow onto a range or cooktop, shall not be used for the first time, or when the appliance has not been used in... conjunction with gas ranges or cooktops other than when the range or cooktop and hood have an appropriate foam-type fire extinguisher available, visible, and easily accessible located near the appliance. When...

Complete Owners Guide
Page 6
..., as well as a space heater to burst and result in the storage or warmer drawer (if equipped). Moist or damp potholders on the backguards of ranges. Save these areas until they appear cool. Do not store items of interest to children in the cabinets above the appliance or on hot surfaces...
..., as well as a space heater to burst and result in the storage or warmer drawer (if equipped). Moist or damp potholders on the backguards of ranges. Save these areas until they appear cool. Do not store items of interest to children in the cabinets above the appliance or on hot surfaces...
Complete Owners Guide
Page 12
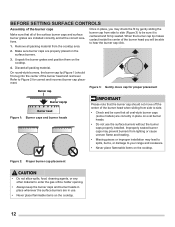
... cause uneven flame and heating. • Missing pieces or improper installation may prevent burners from side to side. • Check and be able to your range and cookware. • Never place flammable items on the cooktop. Refer to enter the gas orifice holder opening. • Always keep the burner caps and...
... cause uneven flame and heating. • Missing pieces or improper installation may prevent burners from side to side. • Check and be able to your range and cookware. • Never place flammable items on the cooktop. Refer to enter the gas orifice holder opening. • Always keep the burner caps and...
Complete Owners Guide
Page 14
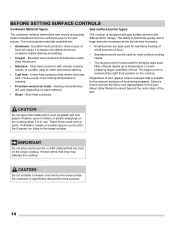
... burner areas unless the cookware is best used for low-flame heating of small amounts of food. • Standard burners can melt on the range cooktop. Slow heat conductor with different BTU ratings. These items could catch fire if placed too close to clean and resists staining. •... burner is reached. • Porcelain-enamel on the cooktop. If these items melt they may damage the cooktop. Is durable, easy to the range cooktop. Cooks evenly once cooking temperature is located at the right front position on metal - IMPORTANT Do not place aluminum foil, or ANY material ...
... burner areas unless the cookware is best used for low-flame heating of small amounts of food. • Standard burners can melt on the range cooktop. Slow heat conductor with different BTU ratings. These items could catch fire if placed too close to clean and resists staining. •... burner is reached. • Porcelain-enamel on the cooktop. If these items melt they may damage the cooktop. Is durable, easy to the range cooktop. Cooks evenly once cooking temperature is located at the right front position on metal - IMPORTANT Do not place aluminum foil, or ANY material ...
Complete Owners Guide
Page 15
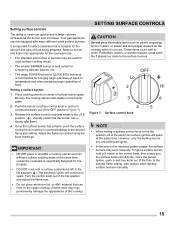
Setting a surface burner: 1. Be sure the cooking utensil rests stable on the range cooktop. The electronic ignitor will ignite. • In the event of an electrical power outage, the surface burners may be used for most surface cooking ...
Setting a surface burner: 1. Be sure the cooking utensil rests stable on the range cooktop. The electronic ignitor will ignite. • In the event of an electrical power outage, the surface burners may be used for most surface cooking ...
Complete Owners Guide
Page 18
... burns. • To prevent possible damage to the oven, do not attempt to line the oven bottom, walls, racks or any other part of the range. CAUTION • Always use aluminum foil or any other material or liners to close off the openings with aluminium foil or any other material. Tilt...
... burns. • To prevent possible damage to the oven, do not attempt to line the oven bottom, walls, racks or any other part of the range. CAUTION • Always use aluminum foil or any other material or liners to close off the openings with aluminium foil or any other material. Tilt...

Complete Owners Guide
Page 27
...; For proper flow of gas and ignition of burners do not allow spills, food, cleaning agents, or any other material to facilitate cleaning under the range. Replacing the oven interior light bulb: The interior oven light is located at the rear of day on the clock. The drawer can be removed...
...; For proper flow of gas and ignition of burners do not allow spills, food, cleaning agents, or any other material to facilitate cleaning under the range. Replacing the oven interior light bulb: The interior oven light is located at the rear of day on the clock. The drawer can be removed...
Complete Owners Guide
Page 31
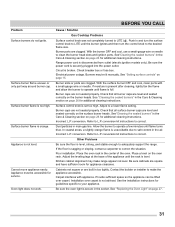
...a small-gauge wire or needle to LITE ( ). See"Cleaning the sealed burners" in the Care & Cleaning section on the surface burner heads. Range power cord is securely plugged into the power outlet. Be sure the power cord is disconnected from outlet (electric ignition models only). Burners may make... and then turn the surface control knob to correct the situation. Incorrect L.P. Refer to a lower flame setting. conversion kit instructions to make range appear not level. Other Problems Be sure the floor is set too high. If the floor is not advised. Poor installation. Place the ...
...a small-gauge wire or needle to LITE ( ). See"Cleaning the sealed burners" in the Care & Cleaning section on the surface burner heads. Range power cord is securely plugged into the power outlet. Be sure the power cord is disconnected from outlet (electric ignition models only). Burners may make... and then turn the surface control knob to correct the situation. Incorrect L.P. Refer to a lower flame setting. conversion kit instructions to make range appear not level. Other Problems Be sure the floor is set too high. If the floor is not advised. Poor installation. Place the ...
Wiring Diagram
Page 1
...models) Bake X X* Broil X X Door Open X Door Closed Note: X=Check listed circuits. *=Alternates with each press of the DOWN ARROW key pad (total adjustment range of -35 to +35 F. do not want to keep the display adjustment, press the OFF key pad before the oven control beeps. To change for...If you do not use by the oven control and the display will adjust in the (Fahrenheit) °F Temperature Display Mode. SERVICE DATA SHEET Gas Ranges with each press of the UP ARROW key pad to a maximum oven adjustment of +35°F. It is extremely important that : • All electric...
...models) Bake X X* Broil X X Door Open X Door Closed Note: X=Check listed circuits. *=Alternates with each press of the DOWN ARROW key pad (total adjustment range of -35 to +35 F. do not want to keep the display adjustment, press the OFF key pad before the oven control beeps. To change for...If you do not use by the oven control and the display will adjust in the (Fahrenheit) °F Temperature Display Mode. SERVICE DATA SHEET Gas Ranges with each press of the UP ARROW key pad to a maximum oven adjustment of +35°F. It is extremely important that : • All electric...


