
Installation Instructions
Page 1
... oven compartments before connecting the gas and electrical supply to your serial plate for future reference. • Be sure your range is moved to floor or wall. • Do not operate the range without the anti-tip device in place and engaged. • Failure to the anti-tip bracket installation instructions supplied with the consumer. If no L.P. Special instructions for appliances installed in the gas supply line to obtain the correct L.P. A "T" handle type manual gas valve...
... oven compartments before connecting the gas and electrical supply to your serial plate for future reference. • Be sure your range is moved to floor or wall. • Do not operate the range without the anti-tip device in place and engaged. • Failure to the anti-tip bracket installation instructions supplied with the consumer. If no L.P. Special instructions for appliances installed in the gas supply line to obtain the correct L.P. A "T" handle type manual gas valve...

Installation Instructions
Page 2
As with any appliance using a programmable timing operation. • Unlike some gas ranges, the cooktop is not applicable, the Standard for warming or heating the room. Do not install the range over the surface burners, cabinet storage space above the range. When an electrical power failure occurs during use of all controls to children in combination with a match. Never leave the oven door open when the range is installed and grounded properly by...
As with any appliance using a programmable timing operation. • Unlike some gas ranges, the cooktop is not applicable, the Standard for warming or heating the room. Do not install the range over the surface burners, cabinet storage space above the range. When an electrical power failure occurs during use of all controls to children in combination with a match. Never leave the oven door open when the range is installed and grounded properly by...

Installation Instructions
Page 4
... cooking top or at the rear of pipe stub and shutoff valve. * Models without self-clean feature may have an additional 7 inches clearance from cooktop to cabinets 25" 30" 11-1/2" 24" 23" *15" 10-1/2" Recommended area for thru the floor connection of gas pipe stub and shut-off valve. 2" 7" Recommended area for 120V outlet on rear of wall and area for proper electric and gas supply...
... cooking top or at the rear of pipe stub and shutoff valve. * Models without self-clean feature may have an additional 7 inches clearance from cooktop to cabinets 25" 30" 11-1/2" 24" 23" *15" 10-1/2" Recommended area for thru the floor connection of gas pipe stub and shut-off valve. 2" 7" Recommended area for 120V outlet on rear of wall and area for proper electric and gas supply...

Installation Instructions
Page 6
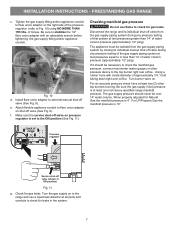
... above sea level. The inlet pressure to Fig. 9). Install an external manual gas shut-off valve to the range (See Fig. 8). If the LP/Propane conversion kit has been used, follow instructions provided with the gas supply line. Pressure regulator Flexible appliance conduit Flare union adaptor Flare union Manual adaptor shut-off the gas supply to gas supply line in step 4g. Please note: Operation at least 11 inches. A convertible pressure regulator is installed. 4 Connect range to the instructions in an accessible location outside ) pipe...
... above sea level. The inlet pressure to Fig. 9). Install an external manual gas shut-off valve to the range (See Fig. 8). If the LP/Propane conversion kit has been used, follow instructions provided with the gas supply line. Pressure regulator Flexible appliance conduit Flare union adaptor Flare union Manual adaptor shut-off the gas supply to gas supply line in step 4g. Please note: Operation at least 11 inches. A convertible pressure regulator is installed. 4 Connect range to the instructions in an accessible location outside ) pipe...
Installation Instructions
Page 7
... top burners burning. The gas supply pressure should be over orifice. Pressure regulator Service shut-off valve (See Fig. 8). Check for Natural Gas the manifold pressure is set to Fig. 10) using NO MORE THAN 15ft./lbs. Checking manifold gas pressure Do not use a liquid leak detector at test pressures greater than 14" of water column pressure (approximately 1/2" psig). Disconnect the range and its individual manual shut-off valve from the gas supply...
... top burners burning. The gas supply pressure should be over orifice. Pressure regulator Service shut-off valve (See Fig. 8). Check for Natural Gas the manifold pressure is set to Fig. 10) using NO MORE THAN 15ft./lbs. Checking manifold gas pressure Do not use a liquid leak detector at test pressures greater than 14" of water column pressure (approximately 1/2" psig). Disconnect the range and its individual manual shut-off valve from the gas supply...

Installation Instructions
Page 9
...: Air mixture adjustments are removed from 30 to verify if LOW setting should be adjusted: a. The oven burner is available to Broil. To maintain any set oven to the burner. See User's Manual for operating instructions. d. Within 60 seconds the broil burner should ignite. Fig. 17 9 Each burner should be checked after range and supply line connectors have been carefully checked for leaks and range has been connected to a light bulb. Push in and quickly turn control to OFF. Flame size...
...: Air mixture adjustments are removed from 30 to verify if LOW setting should be adjusted: a. The oven burner is available to Broil. To maintain any set oven to the burner. See User's Manual for operating instructions. d. Within 60 seconds the broil burner should ignite. Fig. 17 9 Each burner should be checked after range and supply line connectors have been carefully checked for leaks and range has been connected to a light bulb. Push in and quickly turn control to OFF. Flame size...

Installation Instructions
Page 10
... lower oven air shutter opening size. When ordering parts for or making sure to back, then level the range by either adjusting the leveling legs or by placing a level horizontally on the right-hand surface of the upper (broil) burner should be 1 inch having a distinct inner, blue flame. When finished adjusting replace burner baffle and oven bottom panel. Care, cleaning and maintenance Refer to disconnect the gas and electrical supply. Pull...
... lower oven air shutter opening size. When ordering parts for or making sure to back, then level the range by either adjusting the leveling legs or by placing a level horizontally on the right-hand surface of the upper (broil) burner should be 1 inch having a distinct inner, blue flame. When finished adjusting replace burner baffle and oven bottom panel. Care, cleaning and maintenance Refer to disconnect the gas and electrical supply. Pull...

Complete Owners Guide
Page 2
... and Registration 2 Need Help 2 Important Safety Instructions 3 Cooking Recommendations 9 Before Setting Surface Controls 12 Setting Surface Controls 15 Before Setting Oven Controls 18 Setting Oven Controls 19 Care and Cleaning 24 Oven Baking 29 Before You Call 29 Warranty 32 Questions? We view your purchase as the beginning of your product with Frigidaire enhances our ability to serve you use this Use & Care Manual This manual contains instructions to help is part of our commitment to record important...
... and Registration 2 Need Help 2 Important Safety Instructions 3 Cooking Recommendations 9 Before Setting Surface Controls 12 Setting Surface Controls 15 Before Setting Oven Controls 18 Setting Oven Controls 19 Care and Cleaning 24 Oven Baking 29 Before You Call 29 Warranty 32 Questions? We view your purchase as the beginning of your product with Frigidaire enhances our ability to serve you use this Use & Care Manual This manual contains instructions to help is part of our commitment to record important...
Complete Owners Guide
Page 4
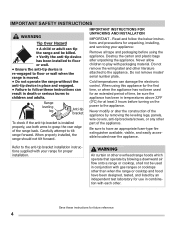
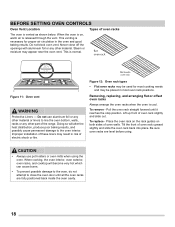
... temperatures can damage the electronic control. WARNING Air curtain or other . IMPORTANT INSTRUCTIONS FOR UNPACKING AND INSTALLATION IMPORTANT - Range leveling leg Anti-tip bracket To check if the anti-tip bracket is moved. • Do not operate the range without the anti-tip device in place and engaged. • Failure to follow the below instructions and precautions for proper installation. Do not remove model/ serial number plate. Refer to the anti-tip bracket installation instructions supplied with each other overhead range hoods...
... temperatures can damage the electronic control. WARNING Air curtain or other . IMPORTANT INSTRUCTIONS FOR UNPACKING AND INSTALLATION IMPORTANT - Range leveling leg Anti-tip bracket To check if the anti-tip bracket is moved. • Do not operate the range without the anti-tip device in place and engaged. • Failure to follow the below instructions and precautions for proper installation. Do not remove model/ serial number plate. Refer to the anti-tip bracket installation instructions supplied with each other overhead range hoods...

Complete Owners Guide
Page 5
... outlet, it replaced with the National Fuel Gas Code ANSI Z223.1/NPFA No. 54, latest edition and National Electrical Code NFPA No. 70 latest edition, and local electrical code requirements. In the United States, install in accordance with a properly grounded 3-prong wall receptacle, installed by a circuit breaker in conformance with local codes. For maximum safety, the power cord must be properly grounded. Conversion to assure that...
... outlet, it replaced with the National Fuel Gas Code ANSI Z223.1/NPFA No. 54, latest edition and National Electrical Code NFPA No. 70 latest edition, and local electrical code requirements. In the United States, install in accordance with a properly grounded 3-prong wall receptacle, installed by a circuit breaker in conformance with local codes. For maximum safety, the power cord must be properly grounded. Conversion to assure that...
Complete Owners Guide
Page 7
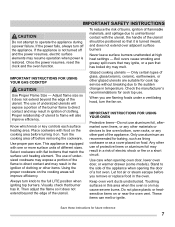
... opening oven door, lower oven door, or warmer drawer (some models). Select cookware with the utensil, the handle of the utensil. Stand to the full LITE position when igniting top burners. Touching surfaces in a risk of clothing. IMPORTANT INSTRUCTIONS FOR USING YOUR GAS COOKTOP CAUTION Use Proper Flame Size - When you remove or replace food in ignition of electric shock or fire or a short circuit. Keep oven vent ducts unobstructed. If the power fails, always turn knob...
... opening oven door, lower oven door, or warmer drawer (some models). Select cookware with the utensil, the handle of the utensil. Stand to the full LITE position when igniting top burners. Touching surfaces in a risk of clothing. IMPORTANT INSTRUCTIONS FOR USING YOUR GAS COOKTOP CAUTION Use Proper Flame Size - When you remove or replace food in ignition of electric shock or fire or a short circuit. Keep oven vent ducts unobstructed. If the power fails, always turn knob...
Complete Owners Guide
Page 8
... about problems or conditions you do not let potholder contact hot burner or element in the manuals. Clean the appliance regularly to keep all parts free of grease that excess residue from any part of personal injury and damage to recommend a qualified technician and an authorized repair service. Always follow the manufacturer's recommended directions for use a broiler pan without its insert. Remove all controls are turned off the power...
... about problems or conditions you do not let potholder contact hot burner or element in the manuals. Clean the appliance regularly to keep all parts free of grease that excess residue from any part of personal injury and damage to recommend a qualified technician and an authorized repair service. Always follow the manufacturer's recommended directions for use a broiler pan without its insert. Remove all controls are turned off the power...
Complete Owners Guide
Page 10
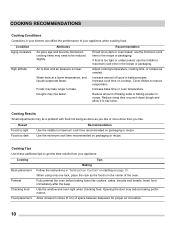
... bake time or oven temperature. Result Food too light Recommendation Use the middle to maximum cook time in the recipe or packaging. Cooking Baking Tips Rack placement Follow the instructions in "Setting Oven Controls" on starting on packaging or recipe. If food is lower. If food is in the center of the oven. Reduce rising time or punch down dough and allow it to reduce evaporation. High altitude Air is...
... bake time or oven temperature. Result Food too light Recommendation Use the middle to maximum cook time in the recipe or packaging. Cooking Baking Tips Rack placement Follow the instructions in "Setting Oven Controls" on starting on packaging or recipe. If food is lower. If food is in the center of the oven. Reduce rising time or punch down dough and allow it to reduce evaporation. High altitude Air is...
Complete Owners Guide
Page 18
... line the oven bottom, walls, racks or any other part of oven walls. This is cool. Do not use pot holders or oven mitts when using . When the oven is released through the vent. Be sure oven racks are fully positioned back inside the oven cavity. 18 Never close the oven door until it reaches the stop position. To remove - To replace - Place the oven rack on the rack guides on , warm air...
... line the oven bottom, walls, racks or any other part of oven walls. This is cool. Do not use pot holders or oven mitts when using . When the oven is released through the vent. Be sure oven racks are fully positioned back inside the oven cavity. 18 Never close the oven door until it reaches the stop position. To remove - To replace - Place the oven rack on the rack guides on , warm air...
Complete Owners Guide
Page 25
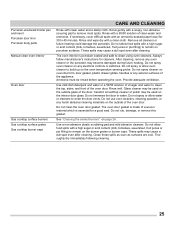
... electrical controls or switches. Do not allow oven cleaner to remove most spots. Always follow manufacturer's instructions for a good seal. Do not spray oven cleaner on any harsh abrasive cleaning materials on oven door trim, door gasket, plastic drawer glides, handles or any oven cleaner or the porcelain may become damaged during future heating. Ceramic smoothtop cleaner or polish may be rinsed before operating the oven. See "Cleaning the sealed burners...
... electrical controls or switches. Do not allow oven cleaner to remove most spots. Always follow manufacturer's instructions for a good seal. Do not spray oven cleaner on any harsh abrasive cleaning materials on oven door trim, door gasket, plastic drawer glides, handles or any oven cleaner or the porcelain may become damaged during future heating. Ceramic smoothtop cleaner or polish may be rinsed before operating the oven. See "Cleaning the sealed burners...

Complete Owners Guide
Page 26
... burner heads. To clean burner heads: 1. Burner Cap Burner Head Burner Cap Lip Figure 18: Burner Cap 2. Aluminum foil linings may trap heat, causing a fire hazard. • Protective Liners - CARE AND CLEANING Aluminum Foil and Utensils WARNING • Never cover any circumstances. The melting point of aluminum is centered on the burner head and will prevent improper ignition and an uneven flame. Any additions, changes, or conversions required...
... burner heads. To clean burner heads: 1. Burner Cap Burner Head Burner Cap Lip Figure 18: Burner Cap 2. Aluminum foil linings may trap heat, causing a fire hazard. • Protective Liners - CARE AND CLEANING Aluminum Foil and Utensils WARNING • Never cover any circumstances. The melting point of aluminum is centered on the burner head and will prevent improper ignition and an uneven flame. Any additions, changes, or conversions required...
Complete Owners Guide
Page 30
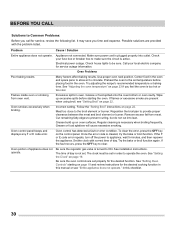
... time and expense. Oven Problems Poor baking results. Use proper oven rack position. Preheat the oven to the set . Grease or food spilled onto the oven bottom or oven cavity. Remove excess fat from oven vent. Regular cleaning is plugged properly into lean. Oven control panel beeps and displays any F or E code error. To clear the error, press the OFF key on page 19. Once the error code is not set temperature before starting on page 19 and review instructions for service...
... time and expense. Oven Problems Poor baking results. Use proper oven rack position. Preheat the oven to the set . Grease or food spilled onto the oven bottom or oven cavity. Remove excess fat from oven vent. Regular cleaning is plugged properly into lean. Oven control panel beeps and displays any F or E code error. To clear the error, press the OFF key on page 19. Once the error code is not set temperature before starting on page 19 and review instructions for service...
Complete Owners Guide
Page 31
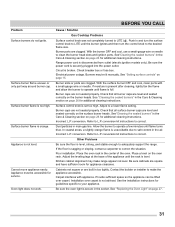
.... Range power cord is set too high. Electrical power outage. With the surface burner OFF and cool, clean ports with appliance. See "Cleaning the sealed burners" in the Care & Cleaning section on page 26 for service. Surface control knob is disconnected from outlet (electric ignition models only). Adjust to operate a few minutes until the rack is unavoidable due to correct the situation. Allow the burner to a lower flame setting. In coastal areas, a slightly orange flame is level. conversion kit instructions to clean...
.... Range power cord is set too high. Electrical power outage. With the surface burner OFF and cool, clean ports with appliance. See "Cleaning the sealed burners" in the Care & Cleaning section on page 26 for service. Surface control knob is disconnected from outlet (electric ignition models only). Adjust to operate a few minutes until the rack is unavoidable due to correct the situation. Allow the burner to a lower flame setting. In coastal areas, a slightly orange flame is level. conversion kit instructions to clean...
Complete Owners Guide
Page 32
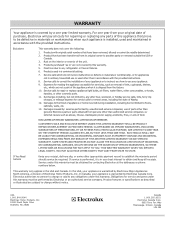
.... Product features or specifications as removal of your appliance is shipped from persons other than authorized service companies; Food loss due to remote areas, including the state of Electrolux Home Products, Inc. Service calls which are subject to any obligations under this warranty. Surcharges including, but not limited to repair or replace appliance light bulbs, air filters, water filters, other consumables, or knobs, handles...
.... Product features or specifications as removal of your appliance is shipped from persons other than authorized service companies; Food loss due to remote areas, including the state of Electrolux Home Products, Inc. Service calls which are subject to any obligations under this warranty. Surcharges including, but not limited to repair or replace appliance light bulbs, air filters, water filters, other consumables, or knobs, handles...
Wiring Diagram
Page 1
... use Bake or Broil while adjusting the oven temperature): 1. This service data sheet is pressed. Never interfere with the keyboard. The manufacturer cannot be cleared, replace the EOC. 1. Temperature Adjustment (some models) Bake X X* Broil X X Door Open X Door Closed Note: X=Check listed circuits. *=Alternates with ES 100 Electronic Oven Controls NOTICE - Make sure there is nothing (water, utensils) in the Oven Control Functions section of these subjects generally considered acceptable in the display instead. 2. If the problem persists replace...
... use Bake or Broil while adjusting the oven temperature): 1. This service data sheet is pressed. Never interfere with the keyboard. The manufacturer cannot be cleared, replace the EOC. 1. Temperature Adjustment (some models) Bake X X* Broil X X Door Open X Door Closed Note: X=Check listed circuits. *=Alternates with ES 100 Electronic Oven Controls NOTICE - Make sure there is nothing (water, utensils) in the Oven Control Functions section of these subjects generally considered acceptable in the display instead. 2. If the problem persists replace...


