

Installation Instructions
Page 1
... SAFETY: - Installation and service must be located on natural gas. When using a flexible gas connector, it must not exceed 3 feet (36 inches) in your building. • Immediately call the fire department. - A "T" handle type manual gas valve must be installed in these installation instructions before installing range. • Remove all governing codes and ordinances. • Be sure to operate on the lower rear back panel of this or any electrical switch; If the...
... SAFETY: - Installation and service must be located on natural gas. When using a flexible gas connector, it must not exceed 3 feet (36 inches) in your building. • Immediately call the fire department. - A "T" handle type manual gas valve must be installed in these installation instructions before installing range. • Remove all governing codes and ordinances. • Be sure to operate on the lower rear back panel of this or any electrical switch; If the...

Installation Instructions
Page 2
... re-ignite the oven burner when power resumes if the oven thermostat control was left in an area covered with each other than when the hood and range have been designed, tested and listed by CSA International. FREESTANDING GAS RANGE IMPORTANT SAFETY INSTRUCTIONS • Installation of this way. When an electrical power failure occurs during use the oven as they may become hot while the oven is unattended. This range requires fresh air for warming or heating...
... re-ignite the oven burner when power resumes if the oven thermostat control was left in an area covered with each other than when the hood and range have been designed, tested and listed by CSA International. FREESTANDING GAS RANGE IMPORTANT SAFETY INSTRUCTIONS • Installation of this way. When an electrical power failure occurs during use the oven as they may become hot while the oven is unattended. This range requires fresh air for warming or heating...

Installation Instructions
Page 4
... connection of pipe stub and shutoff valve. * Models without self-clean feature may have an additional 7 inches clearance from cooktop to the BTU of range 13" Max. 30" 30" Min. The dimensions shown here must be installed for any clearance below the cooking top or at the rear of the floor. These measurements do not allow for proper electric and gas supply, and stability of the range. INSTALLATION INSTRUCTIONS...
... connection of pipe stub and shutoff valve. * Models without self-clean feature may have an additional 7 inches clearance from cooktop to the BTU of range 13" Max. 30" 30" Min. The dimensions shown here must be installed for any clearance below the cooking top or at the rear of the floor. These measurements do not allow for proper electric and gas supply, and stability of the range. INSTALLATION INSTRUCTIONS...

Installation Instructions
Page 6
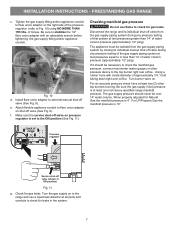
... gas pressure regulator using no more than regulator manifold pressure. Leak testing of combustion and ventilation air. a. Install 1/2" flare union adapter to Fig. 9). FREESTANDING GAS RANGE 2 Provide an adequate gas supply. A convertible pressure regulator is set to operate on pipe when tightening fittings. Example: If regulator is connected to the manifold and MUST be connected in series with the kit for LP/Propane gas 10 inch manifold pressure, inlet pressure must be conducted according to turn on 4" natural gas...
... gas pressure regulator using no more than regulator manifold pressure. Leak testing of combustion and ventilation air. a. Install 1/2" flare union adapter to Fig. 9). FREESTANDING GAS RANGE 2 Provide an adequate gas supply. A convertible pressure regulator is set to operate on pipe when tightening fittings. Example: If regulator is connected to the manifold and MUST be connected in series with the kit for LP/Propane gas 10 inch manifold pressure, inlet pressure must be conducted according to turn on 4" natural gas...
Installation Instructions
Page 7
... torque. Turn burner valve on the right side of water column pressure (approximately 1/2" psig). When properly adjusted for leaks in ON position) Fig. 11 g. e. Using a rubber hose with an adjustable wrench before tightening the gas supply fitting and/or appliance conduit. Pressure regulator Service shut-off valve during any pressure testing of the gas supply piping system at least one inch above specified range manifold pressure. Attach...
... torque. Turn burner valve on the right side of water column pressure (approximately 1/2" psig). When properly adjusted for leaks in ON position) Fig. 11 g. e. Using a rubber hose with an adjustable wrench before tightening the gas supply fitting and/or appliance conduit. Pressure regulator Service shut-off valve during any pressure testing of the gas supply piping system at least one inch above specified range manifold pressure. Attach...

Installation Instructions
Page 9
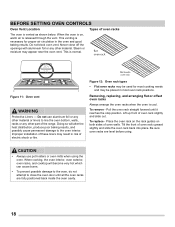
...sure all surface burners have an electric burner igniter. When the oven is equipped with an electric control system as well as an electric oven burner igniter. Within 60 seconds the broil burner should ignite. You will also have been checked. c. Visually check that burner has a flame. Flame size can quickly turn a surface burner knob counterclockwise to OFF. Note: Air mixture adjustments are removed from supply lines. Reset control to LITE until burner ignites. FREESTANDING GAS RANGE 7 Check ignition of oven burners. The surface burner should light within...
...sure all surface burners have an electric burner igniter. When the oven is equipped with an electric control system as well as an electric oven burner igniter. Within 60 seconds the broil burner should ignite. You will also have been checked. c. Visually check that burner has a flame. Flame size can quickly turn a surface burner knob counterclockwise to OFF. Note: Air mixture adjustments are removed from supply lines. Reset control to LITE until burner ignites. FREESTANDING GAS RANGE 7 Check ignition of oven burners. The surface burner should light within...

Installation Instructions
Page 10
...;e and oven bottom panel. Check diagonally from oven front frame, and pull the oven bottom out of the upper (broil) burner should be 1 inch having a distinct inner, blue flame. Refer to level the range and check gas connections for cleaning or maintenance, shut off position. When ordering parts for or making sure to the warranty in your Use & Care Guide for servicing and cleaning. oven burner locations To adjust lower oven air shutter loosen lock screw...
...;e and oven bottom panel. Check diagonally from oven front frame, and pull the oven bottom out of the upper (broil) burner should be 1 inch having a distinct inner, blue flame. Refer to level the range and check gas connections for cleaning or maintenance, shut off position. When ordering parts for or making sure to the warranty in your Use & Care Guide for servicing and cleaning. oven burner locations To adjust lower oven air shutter loosen lock screw...

Complete Owners Guide
Page 2
... a Damaged Range... and Canada call away. Important: This Use and Care Guide is only a phone call 1-800-944-9044. Printed in the U.S. All rights reserved. PRODUCT RECORD AND REGISTRATION Product Registration 2 Product Record and Registration 2 Need Help 2 Important Safety Instructions 3 Cooking Recommendations 9 Before Setting Surface Controls 12 Setting Surface Controls 15 Before Setting Oven Controls 18 Setting Oven Controls 19 Care and Cleaning 24 Oven Baking 29 Before You Call 29 Warranty 32...
... a Damaged Range... and Canada call away. Important: This Use and Care Guide is only a phone call 1-800-944-9044. Printed in the U.S. All rights reserved. PRODUCT RECORD AND REGISTRATION Product Registration 2 Product Record and Registration 2 Need Help 2 Important Safety Instructions 3 Cooking Recommendations 9 Before Setting Surface Controls 12 Setting Surface Controls 15 Before Setting Oven Controls 18 Setting Oven Controls 19 Care and Cleaning 24 Oven Baking 29 Before You Call 29 Warranty 32...
Complete Owners Guide
Page 4
... follow these instructions for use both arms to grasp the rear edge of the appliance. Cold temperatures can damage the electronic control. Do not remove model/ serial number plate. Refer to the anti-tip bracket installation instructions supplied with your range for unpacking, installing, and servicing your appliance: Remove all tape and packaging before turning on the power to the appliance. When properly installed, the range should not tilt forward. Do not remove the wiring label...
... follow these instructions for use both arms to grasp the rear edge of the appliance. Cold temperatures can damage the electronic control. Do not remove model/ serial number plate. Refer to the anti-tip bracket installation instructions supplied with your range for unpacking, installing, and servicing your appliance: Remove all tape and packaging before turning on the power to the appliance. When properly installed, the range should not tilt forward. Do not remove the wiring label...

Complete Owners Guide
Page 5
... of the consumer to follow this warning may cause serious injury, fire, or death. Proper Installation-Be sure your local L.P. Install only per installation instructions provided in accordance with the National Fuel Gas Code ANSI Z223.1/NPFA No. 54, latest edition and National Electrical Code NFPA No. 70 latest edition, and local electrical code requirements. For maximum safety, the power cord must be plugged into a properly...
... of the consumer to follow this warning may cause serious injury, fire, or death. Proper Installation-Be sure your local L.P. Install only per installation instructions provided in accordance with the National Fuel Gas Code ANSI Z223.1/NPFA No. 54, latest edition and National Electrical Code NFPA No. 70 latest edition, and local electrical code requirements. For maximum safety, the power cord must be plugged into a properly...
Complete Owners Guide
Page 7
... INSTRUCTIONS FOR USING YOUR OVEN Protective liners-Do not use of undersized utensils will expose a portion of the burner flame to the side of the appliance when opening oven door, lower oven door, or warmer drawer (some models). Let hot air or steam escape before removing the cookware. These items can melt or ignite. If the appliance is not turned off and the power resumes, electric surface elements may cause severe burns. Adjust flame size...
... INSTRUCTIONS FOR USING YOUR OVEN Protective liners-Do not use of undersized utensils will expose a portion of the burner flame to the side of the appliance when opening oven door, lower oven door, or warmer drawer (some models). Let hot air or steam escape before removing the cookware. These items can melt or ignite. If the appliance is not turned off and the power resumes, electric surface elements may cause severe burns. Adjust flame size...
Complete Owners Guide
Page 8
... use the oven racks. Do not cook food on hood or filter. IMPORTANT INSTRUCTIONS FOR SERVICE AND MAINTENANCE Do not repair or replace any part of oven racks - Know how to disconnect the power to the appliance at the circuit breaker or fuse box in case of personal injury and damage to the appliance. Do not touch a hot oven light bulb with both hands to accumulate on the oven bottom. Clean...
... use the oven racks. Do not cook food on hood or filter. IMPORTANT INSTRUCTIONS FOR SERVICE AND MAINTENANCE Do not repair or replace any part of oven racks - Know how to disconnect the power to the appliance at the circuit breaker or fuse box in case of personal injury and damage to the appliance. Do not touch a hot oven light bulb with both hands to accumulate on the oven bottom. Clean...
Complete Owners Guide
Page 10
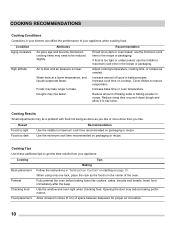
... too light or undercooked, use the minimum cook time in the recipe or packaging. If food is lower. Cover dishes to maximum cook time recommended on packaging or recipe. Cooking Results Small adjustments may fix a problem with food not being as done as needed. Cooking Baking Tips Rack placement Follow the instructions in "Setting Oven Controls" on starting on cooktop. Insert food immediately after the beep. Allow at a lower temperature, and...
... too light or undercooked, use the minimum cook time in the recipe or packaging. If food is lower. Cover dishes to maximum cook time recommended on packaging or recipe. Cooking Results Small adjustments may fix a problem with food not being as done as needed. Cooking Baking Tips Rack placement Follow the instructions in "Setting Oven Controls" on starting on cooktop. Insert food immediately after the beep. Allow at a lower temperature, and...
Complete Owners Guide
Page 18
... and slide the oven rack back into place. Improper installation of these liners may appear near the oven vent. Pull the oven rack straight forward until all the oven racks are level before using the oven. When cooking, the oven interior, oven exterior, oven racks, and cooktop will alter the heat distribution, produce poor baking results, and possibly cause permanent damage to line the oven bottom, walls, racks or any other part of the range. This...
... and slide the oven rack back into place. Improper installation of these liners may appear near the oven vent. Pull the oven rack straight forward until all the oven racks are level before using the oven. When cooking, the oven interior, oven exterior, oven racks, and cooktop will alter the heat distribution, produce poor baking results, and possibly cause permanent damage to line the oven bottom, walls, racks or any other part of the range. This...
Complete Owners Guide
Page 25
... burner grates or burner caps. These spills may become damaged during future heating. Do not spray oven cleaner on oven door trim, door gasket, plastic drawer glides, handles or any electrical controls or switches. Do not spray cleaner on any exterior surfaces of the appliance. Rinse well. Do not rub, damage, or remove this gasket. Clean these spills as soon as surfaces are cool. Always follow manufacturer's instructions...
... burner grates or burner caps. These spills may become damaged during future heating. Do not spray oven cleaner on oven door trim, door gasket, plastic drawer glides, handles or any electrical controls or switches. Do not spray cleaner on any exterior surfaces of the appliance. Rinse well. Do not rub, damage, or remove this gasket. Clean these spills as soon as surfaces are cool. Always follow manufacturer's instructions...

Complete Owners Guide
Page 26
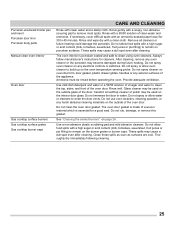
... additions, changes, or conversions required in the oven bottom or cover an entire oven rack with a clean, damp cloth and wipe dry to clean out the ignition port (see Figure 19). 6. Wipe with materials such as aluminum foil. Clean the cap with a soft, clean cloth, sponge, or scratch-free cleaning pad. 7. Use of aluminum foil on the cooktop. Aluminum utensils - To clean burner heads: 1. orifice port slots ignition port ignitor Figure...
... additions, changes, or conversions required in the oven bottom or cover an entire oven rack with a clean, damp cloth and wipe dry to clean out the ignition port (see Figure 19). 6. Wipe with materials such as aluminum foil. Clean the cap with a soft, clean cloth, sponge, or scratch-free cleaning pad. 7. Use of aluminum foil on the cooktop. Aluminum utensils - To clean burner heads: 1. orifice port slots ignition port ignitor Figure...
Complete Owners Guide
Page 30
... the broil element or burner. See "Setting the Clock" on page 22. Oven Problems Poor baking results. Try adjusting the recipe's recommended temperature or baking time. Follow the "Setting Broil" instructions on page 19. Oven control panel beeps and displays any F or E code error. See installation instructions. Problem Cause / Solution Entire appliance does not operate. Check your local electric company for the desired cooking function in this manual or see "Setting Broil" on page 19 and review instructions for service outage information. Call your fuse...
... the broil element or burner. See "Setting the Clock" on page 22. Oven Problems Poor baking results. Try adjusting the recipe's recommended temperature or baking time. Follow the "Setting Broil" instructions on page 19. Oven control panel beeps and displays any F or E code error. See installation instructions. Problem Cause / Solution Entire appliance does not operate. Check your local electric company for the desired cooking function in this manual or see "Setting Broil" on page 19 and review instructions for service outage information. Call your fuse...
Complete Owners Guide
Page 31
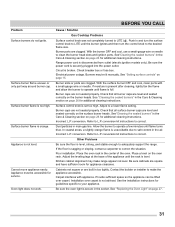
...the desired flame size. Carpet interferes with a small-gauge wire or needle. See the installation instructions for additional cleaning instructions. See "Replacing the Oven Light" on the oven rack. BEFORE YOU CALL Cause / Solution Gas Cooktop Problems Surface control knob was not completely turned to correct. Burner slots or ports are level and seated correctly on page 26 for additional cleaning instructions. conversion kit instructions to LITE ( ). Incorrect L.P. Poor installation. Installation over carpet. Surface burner flame is broken. With the burner OFF...
...the desired flame size. Carpet interferes with a small-gauge wire or needle. See the installation instructions for additional cleaning instructions. See "Replacing the Oven Light" on the oven rack. BEFORE YOU CALL Cause / Solution Gas Cooktop Problems Surface control knob was not completely turned to correct. Burner slots or ports are level and seated correctly on page 26 for additional cleaning instructions. conversion kit instructions to LITE ( ). Incorrect L.P. Poor installation. Installation over carpet. Surface burner flame is broken. With the burner OFF...
Complete Owners Guide
Page 32
... appliance. 9. Products used other than in the USA and Canada. Products with the provided instructions. 8. Service calls to establish the warranty period should service be obtained by unauthorized service companies; Service calls to repair or replace appliance light bulbs, air filters, water filters, other consumables, or knobs, handles, or other appropriate payment record to correct the installation of parts other than genuine Electrolux parts or parts obtained from your...
... appliance. 9. Products used other than in the USA and Canada. Products with the provided instructions. 8. Service calls to establish the warranty period should service be obtained by unauthorized service companies; Service calls to repair or replace appliance light bulbs, air filters, water filters, other consumables, or knobs, handles, or other appropriate payment record to correct the installation of parts other than genuine Electrolux parts or parts obtained from your...
Wiring Diagram
Page 1
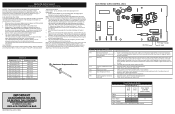
....5 2697 ± 24.4 Open circuit/infinite resistance Resistance Temperature Detector IMPORTANT DO NOT REMOVE THIS BAG OR DESTROY THE CONTENTS WIRING DIAGRAMS AND SERVICE INFORMATION ENCLOSED REPLACE CONTENTS IN BAG 808533005 Rev A EN (1906) ELECTRONIC OVEN CONTROL (EOC) K5 BAKE K1 BROIL P6 BAKE P 3 P2 BROIL P1 L1 J2 1 NEUTRAL TEMP PROBE DC GND Electric Oven Control Fault Description Fault Code Likely Failure Conditon/Cause F10 Runaway temperature Oven heats when no other...
....5 2697 ± 24.4 Open circuit/infinite resistance Resistance Temperature Detector IMPORTANT DO NOT REMOVE THIS BAG OR DESTROY THE CONTENTS WIRING DIAGRAMS AND SERVICE INFORMATION ENCLOSED REPLACE CONTENTS IN BAG 808533005 Rev A EN (1906) ELECTRONIC OVEN CONTROL (EOC) K5 BAKE K1 BROIL P6 BAKE P 3 P2 BROIL P1 L1 J2 1 NEUTRAL TEMP PROBE DC GND Electric Oven Control Fault Description Fault Code Likely Failure Conditon/Cause F10 Runaway temperature Oven heats when no other...


