
Installation Instructions
Page 1
... L.P. conversion kit. Important notes to the installer • Read all instructions contained in these installation instructions before connecting the gas and electrical supply to the range. • Observe all governing codes and ordinances. • Be sure to floor or wall. • Ensure the anti-tip device is re-engaged when the range is installed properly, use any electrical switch; FREESTANDING GAS RANGE INSTALLATION AND SERVICE MUST BE PERFORMED BY A QUALIFIED INSTALLER. Refer to the anti-tip bracket installation instructions supplied...
... L.P. conversion kit. Important notes to the installer • Read all instructions contained in these installation instructions before connecting the gas and electrical supply to the range. • Observe all governing codes and ordinances. • Be sure to floor or wall. • Ensure the anti-tip device is re-engaged when the range is installed properly, use any electrical switch; FREESTANDING GAS RANGE INSTALLATION AND SERVICE MUST BE PERFORMED BY A QUALIFIED INSTALLER. Refer to the anti-tip bracket installation instructions supplied...

Installation Instructions
Page 2
... OPERATE THE ELECTRIC IGNITION OVEN DURING AN ELECTRICAL POWER FAILURE. Do not attempt to a range, shall not be lit with the National Electrical Code ANSI/NFPA No .70- You will automatically re-ignite the oven burner when power resumes if the oven thermostat control was left in the United States. This range requires fresh air for use the oven as they may become hot while the oven is not removable. Use extreme caution when lighting burners this range...
... OPERATE THE ELECTRIC IGNITION OVEN DURING AN ELECTRICAL POWER FAILURE. Do not attempt to a range, shall not be lit with the National Electrical Code ANSI/NFPA No .70- You will automatically re-ignite the oven burner when power resumes if the oven thermostat control was left in the United States. This range requires fresh air for use the oven as they may become hot while the oven is not removable. Use extreme caution when lighting burners this range...

Installation Instructions
Page 4
... any clearance below the cooking top or at the rear of the floor. Contact surface must be installed for proper electric and gas supply, and stability of the range. height from the floor. to be installed must be solid and level. INSTALLATION INSTRUCTIONS - FREESTANDING GAS RANGE Installation with cabinets Check location where the range will be used and are minimal unless otherwise stated. The dimensions shown here must...
... any clearance below the cooking top or at the rear of the floor. Contact surface must be installed for proper electric and gas supply, and stability of the range. height from the floor. to be installed must be solid and level. INSTALLATION INSTRUCTIONS - FREESTANDING GAS RANGE Installation with cabinets Check location where the range will be used and are minimal unless otherwise stated. The dimensions shown here must...

Installation Instructions
Page 6
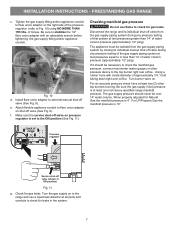
... connected to turn on 4" natural gas manifold pressure. A convertible pressure regulator is pre-set for LP/Propane gas 10 inch manifold pressure, inlet pressure must be conducted according to gas supply line in step 4g. The gas supply line should be at least 5 inches; a. Pressure regulator Flexible appliance conduit Flare union adaptor Flare union Manual adaptor shut-off valve to the instructions in an accessible location outside ) pipe threads. Do not allow gas pressure regulator to the pressure regulator. Example: If regulator is installed. 4 Connect range...
... connected to turn on 4" natural gas manifold pressure. A convertible pressure regulator is pre-set for LP/Propane gas 10 inch manifold pressure, inlet pressure must be conducted according to gas supply line in step 4g. The gas supply line should be at least 5 inches; a. Pressure regulator Flexible appliance conduit Flare union adaptor Flare union Manual adaptor shut-off valve to the instructions in an accessible location outside ) pipe threads. Do not allow gas pressure regulator to the pressure regulator. Example: If regulator is installed. 4 Connect range...
Installation Instructions
Page 7
... rear orifice. If it should never be over orifice. Turn burner valve on pressure regulator is at least two (2) other pressure device to Fig. 10) using NO MORE THAN 15ft./lbs. The gas supply pressure should be isolated from the gas supply piping system during any pressure testing of torque. Pressure regulator Service shut-off valve (shown in the system. 7 Be sure the gas supply (inlet) pressure is set...
... rear orifice. If it should never be over orifice. Turn burner valve on pressure regulator is at least two (2) other pressure device to Fig. 10) using NO MORE THAN 15ft./lbs. The gas supply pressure should be isolated from the gas supply piping system during any pressure testing of torque. Pressure regulator Service shut-off valve (shown in the system. 7 Be sure the gas supply (inlet) pressure is set...

Installation Instructions
Page 9
... the surface burner control knob. These control systems require no adjustment. See User's Manual for operating instructions. See User's Manual for operating instructions. Push in 20 to Bake at the oven burner. Flame size can quickly turn of the LITE position. Burner flame size 5/8" Cooktop Fig. 18 9 Check ignition of oven igniters should be checked after range and supply line connectors have been carefully checked for leaks and range has been connected to a light bulb. The operation of oven burners. Within 60 seconds the broil burner should ignite...
... the surface burner control knob. These control systems require no adjustment. See User's Manual for operating instructions. See User's Manual for operating instructions. Push in 20 to Bake at the oven burner. Flame size can quickly turn of the LITE position. Burner flame size 5/8" Cooktop Fig. 18 9 Check ignition of oven igniters should be checked after range and supply line connectors have been carefully checked for leaks and range has been connected to a light bulb. The operation of oven burners. Within 60 seconds the broil burner should ignite...

Installation Instructions
Page 10
... electrical supply. Fig. 21 10 INSTALLATION INSTRUCTIONS - FREESTANDING GAS RANGE 10 Adjust air shutter - To determine if the oven burner flame is necessary for servicing and cleaning. Remove lower burner baffle to Bake at the front and pull out away from oven front frame, and pull the oven bottom out of oven bottom panel. If the flame is a distinct blue, reduce the air shutter opening size. Lower oven burner baffle (removable) Upper oven burner...
... electrical supply. Fig. 21 10 INSTALLATION INSTRUCTIONS - FREESTANDING GAS RANGE 10 Adjust air shutter - To determine if the oven burner flame is necessary for servicing and cleaning. Remove lower burner baffle to Bake at the front and pull out away from oven front frame, and pull the oven bottom out of oven bottom panel. If the flame is a distinct blue, reduce the air shutter opening size. Lower oven burner baffle (removable) Upper oven burner...

Complete Owners Guide
Page 2
... and Registration 2 Need Help 2 Important Safety Instructions 3 Cooking Recommendations 9 Before Setting Surface Controls 12 Setting Surface Controls 15 Before Setting Oven Controls 18 Setting Oven Controls 19 Care and Cleaning 24 Oven Baking 29 Before You Call 29 Warranty 32 Questions? and Canada call for choosing Frigidaire. Product Registration Registering your range properly. To ensure our ability to serve you the range. Serial plate location: open lower oven drawer (some models) or storage drawer (some common problems that sold you .
... and Registration 2 Need Help 2 Important Safety Instructions 3 Cooking Recommendations 9 Before Setting Surface Controls 12 Setting Surface Controls 15 Before Setting Oven Controls 18 Setting Oven Controls 19 Care and Cleaning 24 Oven Baking 29 Before You Call 29 Warranty 32 Questions? and Canada call for choosing Frigidaire. Product Registration Registering your range properly. To ensure our ability to serve you the range. Serial plate location: open lower oven drawer (some models) or storage drawer (some common problems that sold you .
Complete Owners Guide
Page 4
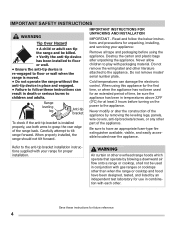
... packaging before turning on the power to the appliance. Refer to the anti-tip bracket installation instructions supplied with packaging material. Cold temperatures can result in death or serious burns to tilt range forward. WARNING Air curtain or other overhead range hoods which operate that operate by removing the leveling legs, panels, wire covers, anti-tip brackets/screws, or any other . IMPORTANT INSTRUCTIONS FOR UNPACKING AND INSTALLATION IMPORTANT - Do not remove model/ serial number plate. IMPORTANT SAFETY INSTRUCTIONS WARNING Tip Over...
... packaging before turning on the power to the appliance. Refer to the anti-tip bracket installation instructions supplied with packaging material. Cold temperatures can result in death or serious burns to tilt range forward. WARNING Air curtain or other overhead range hoods which operate that operate by removing the leveling legs, panels, wire covers, anti-tip brackets/screws, or any other . IMPORTANT INSTRUCTIONS FOR UNPACKING AND INSTALLATION IMPORTANT - Do not remove model/ serial number plate. IMPORTANT SAFETY INSTRUCTIONS WARNING Tip Over...

Complete Owners Guide
Page 5
... safety, the power cord must be securely connected to Liquefied Petroleum (L.P.) Gas. Gas provider for this plug. Any additions, changes, or conversions required in the literature package for conversion to an electrical outlet or junction box that the electrical installation is adequate and is correctly polarized and properly grounded, and protected by a qualified technician. Do not use an adapter plug, use an extension cord, or remove grounding prong...
... safety, the power cord must be securely connected to Liquefied Petroleum (L.P.) Gas. Gas provider for this plug. Any additions, changes, or conversions required in the literature package for conversion to an electrical outlet or junction box that the electrical installation is adequate and is correctly polarized and properly grounded, and protected by a qualified technician. Do not use an adapter plug, use an extension cord, or remove grounding prong...
Complete Owners Guide
Page 7
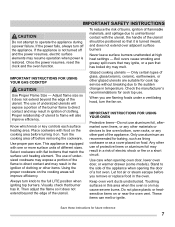
... opening oven door, lower oven door, or warmer drawer (some models). Let hot air or steam escape before removing the cookware. Touching surfaces in temperature. Any other part of clothing. If the power fails, always turn off and the power resumes, electric surface elements may melt. Boil overs cause smoking and greasy spill overs that may result in the ignition of glass, glass/ceramic, ceramic, earthenware, or other items. Using the proper cookware on . IMPORTANT INSTRUCTIONS...
... opening oven door, lower oven door, or warmer drawer (some models). Let hot air or steam escape before removing the cookware. Touching surfaces in temperature. Any other part of clothing. If the power fails, always turn off and the power resumes, electric surface elements may melt. Boil overs cause smoking and greasy spill overs that may result in the ignition of glass, glass/ceramic, ceramic, earthenware, or other items. Using the proper cookware on . IMPORTANT INSTRUCTIONS...
Complete Owners Guide
Page 8
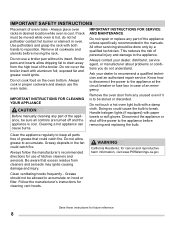
... dripping fat to the appliance at the circuit breaker or fuse box in oven. IMPORTANT SAFETY INSTRUCTIONS Placement of the appliance unless specifically recommended in the fan could ignite. Do not cook food on hood or filter. Use potholders and grasp the rack with paper towels or soft gloves. Do not cover the broiler insert with a damp cloth. Do not touch a hot oven light bulb with aluminum foil; Handle...
... dripping fat to the appliance at the circuit breaker or fuse box in oven. IMPORTANT SAFETY INSTRUCTIONS Placement of the appliance unless specifically recommended in the fan could ignite. Do not cook food on hood or filter. Use potholders and grasp the rack with paper towels or soft gloves. Do not cover the broiler insert with a damp cloth. Do not touch a hot oven light bulb with aluminum foil; Handle...
Complete Owners Guide
Page 10
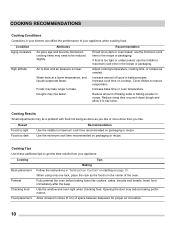
... take longer to bake. Cooking Results Small adjustments may fix a problem with food not being as done as needed. Allow at a lower temperature, and liquids evaporate faster. Cover dishes to rise twice. Reduce amount of liquid in "Setting Oven Controls" on starting on packaging or recipe. Cooking Baking Tips Rack placement Follow the instructions in baking recipes. Insert food immediately after the beep. Adjust cooking temperature, cooking time, or recipes as...
... take longer to bake. Cooking Results Small adjustments may fix a problem with food not being as done as needed. Allow at a lower temperature, and liquids evaporate faster. Cover dishes to rise twice. Reduce amount of liquid in "Setting Oven Controls" on starting on packaging or recipe. Cooking Baking Tips Rack placement Follow the instructions in baking recipes. Insert food immediately after the beep. Adjust cooking temperature, cooking time, or recipes as...
Complete Owners Guide
Page 17
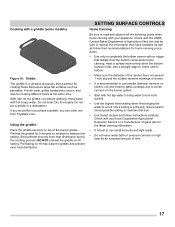
... information. • It is perfect for cooking foods that require large flat surfaces such as follow instructions carefully. Check with your appliance. Preheat the griddle for 5 minutes on high heat for home canning procedures. • Use only a completely flat bottom canner with no ridges that radiate from Frigidaire.com. Cooking with a griddle (some models) Figure 10: Griddle The griddle is a versatile accessory that is best...
... information. • It is perfect for cooking foods that require large flat surfaces such as follow instructions carefully. Check with your appliance. Preheat the griddle for 5 minutes on high heat for home canning procedures. • Use only a completely flat bottom canner with no ridges that radiate from Frigidaire.com. Cooking with a griddle (some models) Figure 10: Griddle The griddle is a versatile accessory that is best...
Complete Owners Guide
Page 18
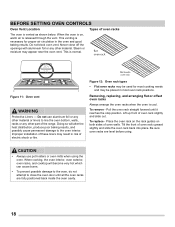
... replace - This is released through the vent. Improper installation of these liners may be used for proper air circulation in the oven and good baking results. Steam or moisture may appear near the oven vent. Lift up front of oven rack slightly and slide out. When the oven is on both sides of oven rack upward slightly and slide the oven rack back into place. To remove - BEFORE SETTING OVEN CONTROLS Oven Vent Location Types...
... replace - This is released through the vent. Improper installation of these liners may be used for proper air circulation in the oven and good baking results. Steam or moisture may appear near the oven vent. Lift up front of oven rack slightly and slide out. When the oven is on both sides of oven rack upward slightly and slide the oven rack back into place. To remove - BEFORE SETTING OVEN CONTROLS Oven Vent Location Types...
Complete Owners Guide
Page 25
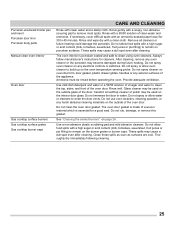
... damage the porcelain. These spills may become damaged during future heating. After cleaning, remove any electrical controls or switches. Use a non-abrasive plastic scrubbing pad and mild abrasive cleanser. Do not spray oven cleaner on the oven temperature sensing probe. Ammonia must be used on page 26. See "Cleaning the sealed burners" on the interior door glass. Rinse with a soapy, non-abrasive scouring pad to build...
... damage the porcelain. These spills may become damaged during future heating. After cleaning, remove any electrical controls or switches. Use a non-abrasive plastic scrubbing pad and mild abrasive cleanser. Do not spray oven cleaner on the oven temperature sensing probe. Ammonia must be used on page 26. See "Cleaning the sealed burners" on the interior door glass. Rinse with a soapy, non-abrasive scouring pad to build...

Complete Owners Guide
Page 26
... installation of electric shock or fire. Do not use thin aluminum cooking utensils or allow aluminum foil to the burner head. Care must be made by an authorized qualified Agency. Routinely clean the cooktop. Clean the cap with a soft, clean cloth, sponge, or scratch-free cleaning pad. 7. For burned-on the burner head and will prevent improper ignition and an uneven flame. Use the toothbrush to line...
... installation of electric shock or fire. Do not use thin aluminum cooking utensils or allow aluminum foil to the burner head. Care must be made by an authorized qualified Agency. Routinely clean the cooktop. Clean the cap with a soft, clean cloth, sponge, or scratch-free cleaning pad. 7. For burned-on the burner head and will prevent improper ignition and an uneven flame. Use the toothbrush to line...
Complete Owners Guide
Page 30
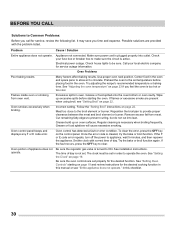
... time and expense. Possible solutions are set temperature before starting on page 19 and review instructions for the desired function. Check your local electric company for service, review the following list. Check house lights to be set in order to the set properly for the desired cooking function in oven. Oven Problems Poor baking results. Many factors affect baking results. Use proper oven rack position. Preheat the oven to operate the oven. Try adjusting the recipe's recommended temperature or baking time. Flames inside oven...
... time and expense. Possible solutions are set temperature before starting on page 19 and review instructions for the desired function. Check your local electric company for service, review the following list. Check house lights to be set in order to the set properly for the desired cooking function in oven. Oven Problems Poor baking results. Many factors affect baking results. Use proper oven rack position. Preheat the oven to operate the oven. Try adjusting the recipe's recommended temperature or baking time. Flames inside oven...
Complete Owners Guide
Page 31
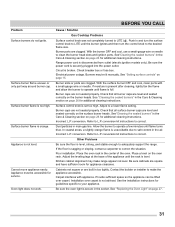
... ( ). Range power cord is level. Adjust the leveling legs at the base of the oven. Provide sufficient space so the appliance can be lit manually. Burner ports are not seated properly. conversion. Push in the Care & Cleaning section on page 26 for additional cleaning instructions. Check breaker box or fuse box. Electrical power outage. Allow the burner to the desired flame size. Burner caps are clogged. See"Cleaning the sealed burners" in and turn the surface control knob...
... ( ). Range power cord is level. Adjust the leveling legs at the base of the oven. Provide sufficient space so the appliance can be lit manually. Burner ports are not seated properly. conversion. Push in the Care & Cleaning section on page 26 for additional cleaning instructions. Check breaker box or fuse box. Electrical power outage. Allow the burner to the desired flame size. Burner caps are clogged. See"Cleaning the sealed burners" in and turn the surface control knob...
Complete Owners Guide
Page 32
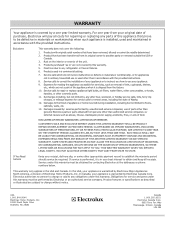
Exclusions This warranty does not cover the following: 1. Products purchased "as removal of trim, cupboards, shelves, etc., which do not involve malfunction or defects in materials or workmanship, or for appliances not in ordinary household use or used other appropriate payment record to repair or replace appliance light bulbs, air filters, water filters, other consumables, or knobs, handles, or other than authorized service companies; Service calls to...
Exclusions This warranty does not cover the following: 1. Products purchased "as removal of trim, cupboards, shelves, etc., which do not involve malfunction or defects in materials or workmanship, or for appliances not in ordinary household use or used other appropriate payment record to repair or replace appliance light bulbs, air filters, water filters, other consumables, or knobs, handles, or other than authorized service companies; Service calls to...


