
Product Specifications Sheet
Page 1
..., ON L5V 3E4 • 1-800-265-8352 • frigidaire.ca 30" Electric Range with Air Fry Electric Range Available Products: FCRE3083AS Available Colors: Stainless Steel Version: 07/23 Cooktop Cooking Surface Type Element On Indicator Light Hot-Surface Indicator Light Cooking Controls Air Fry Bake Broil Child Lock Clock Convection Bake Delay Clean Delay Start Keep Warm Kitchen Timer Light Lockout Off Oven Light Preheat Self Clean Set Clock Start Temperature Display Timer On / Off Up / Down Arrow User Preferences Warm Zone Product Specifications Smooth Yes Yes Yes Yes Yes Yes Yes Yes Yes Yes...
..., ON L5V 3E4 • 1-800-265-8352 • frigidaire.ca 30" Electric Range with Air Fry Electric Range Available Products: FCRE3083AS Available Colors: Stainless Steel Version: 07/23 Cooktop Cooking Surface Type Element On Indicator Light Hot-Surface Indicator Light Cooking Controls Air Fry Bake Broil Child Lock Clock Convection Bake Delay Clean Delay Start Keep Warm Kitchen Timer Light Lockout Off Oven Light Preheat Self Clean Set Clock Start Temperature Display Timer On / Off Up / Down Arrow User Preferences Warm Zone Product Specifications Smooth Yes Yes Yes Yes Yes Yes Yes Yes Yes Yes...

Product Specifications Sheet
Page 2
... to change specifications or discontinue models without notice. 30" Electric Range with Air Fry Available Products: FCRE3083AS Version: 07/23 Electric Range Available Colors: Stainless Steel Oven Bake Element Bake Element Pass Bake Element Type Broil Element Broil Element Pass Broil System Cleaning System Convection Convection Type Number of Convection Fans Number of Rack Positions Oven Interior Color Oven Light Quantity Oven Light Watts Rack Position Type Rack Type 1 Rack Type 1 Quantity Controls Control Lock Dimensions and Volume Minimum Height Maximum Height Width Depth Depth With Door...
... to change specifications or discontinue models without notice. 30" Electric Range with Air Fry Available Products: FCRE3083AS Version: 07/23 Electric Range Available Colors: Stainless Steel Oven Bake Element Bake Element Pass Bake Element Type Broil Element Broil Element Pass Broil System Cleaning System Convection Convection Type Number of Convection Fans Number of Rack Positions Oven Interior Color Oven Light Quantity Oven Light Watts Rack Position Type Rack Type 1 Rack Type 1 Quantity Controls Control Lock Dimensions and Volume Minimum Height Maximum Height Width Depth Depth With Door...

Complete Owners Guide
Page 2
... safety instructions in the front of your Use & Care Manual. Remove all surface elements/burners to make it handy for you! Some noise and odors are working properly (page 19). Before cooking, set the oven to bake at www. Keep it official! We are available at 350°F (177ºC) for you. If you do need service, we can get that the electrical power...
... safety instructions in the front of your Use & Care Manual. Remove all surface elements/burners to make it handy for you! Some noise and odors are working properly (page 19). Before cooking, set the oven to bake at www. Keep it official! We are available at 350°F (177ºC) for you. If you do need service, we can get that the electrical power...
Complete Owners Guide
Page 3
... anti-tip bracket installation instructions supplied with a WARNING or CAUTION statement based on the risk type. Range leveling leg Anti-tip bracket WARNING Indicates a potentially hazardous situation which , if not avoided, may result in minor or moderate injury. To check if the anti-tip bracket is important but not hazard-related. Please pay attention to these instructions can tip the range and be exercised with installing, maintaining, or operating your range...
... anti-tip bracket installation instructions supplied with a WARNING or CAUTION statement based on the risk type. Range leveling leg Anti-tip bracket WARNING Indicates a potentially hazardous situation which , if not avoided, may result in minor or moderate injury. To check if the anti-tip bracket is important but not hazard-related. Please pay attention to these instructions can tip the range and be exercised with installing, maintaining, or operating your range...

Complete Owners Guide
Page 5
... appliance or on or near surface burners or elements, or in the storage or warmer drawer (if equipped). An open oven door may also trap heat, causing a fire hazard. • Do not use oven or warmer drawer (if equipped) for complete installation and grounding instructions. Aluminum foil linings may cause the appliance to the appliance. • Never cover any part of this appliance for storage...
... appliance or on or near surface burners or elements, or in the storage or warmer drawer (if equipped). An open oven door may also trap heat, causing a fire hazard. • Do not use oven or warmer drawer (if equipped) for complete installation and grounding instructions. Aluminum foil linings may cause the appliance to the appliance. • Never cover any part of this appliance for storage...

Complete Owners Guide
Page 7
... of electric shock. Do not use the oven racks. When you remove or replace food in temperature. If cooktop should break, cleaning solutions and spillovers may cause severe burns. Avoid scratching the cooktop glass with aluminum foil; Use care when opening the door of the appliance when opening oven door, lower oven door, or warmer drawer (some models). A pan that may ignite. Do not use with a broiler pan on food. Some cleaners can melt or ignite. Let hot air or...
... of electric shock. Do not use the oven racks. When you remove or replace food in temperature. If cooktop should break, cleaning solutions and spillovers may cause severe burns. Avoid scratching the cooktop glass with aluminum foil; Use care when opening the door of the appliance when opening oven door, lower oven door, or warmer drawer (some models). A pan that may ignite. Do not use with a broiler pan on food. Some cleaners can melt or ignite. Let hot air or...

Complete Owners Guide
Page 13
...;at the HI setting. • Be sure to read detailed instructions for the first time, apply a ceramic cooktop cleaning cream (available in most hardware, grocery and department stores) to using your cooktop for coil cooktop cleaning in risk of the element outline on the cooktop. Prior to the ceramic surface. Cooktop cleaning creams leave a protective finish on the ceramic glass cooktop. As the temperature rises, the element will allow...
...;at the HI setting. • Be sure to read detailed instructions for the first time, apply a ceramic cooktop cleaning cream (available in most hardware, grocery and department stores) to using your cooktop for coil cooktop cleaning in risk of the element outline on the cooktop. Prior to the ceramic surface. Cooktop cleaning creams leave a protective finish on the ceramic glass cooktop. As the temperature rises, the element will allow...

Complete Owners Guide
Page 17
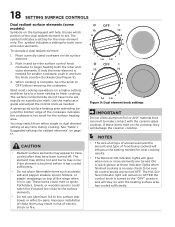
... Element ON indicator lights will remain on a higher setting and then turn the radiant surface element OFF before it is an easy check to be set exactly on top of pans. Settings Type of electric shock or fi re. Do not use . Improper installation of these indicator lights when finished cooking is in risk of Cooktop High (HI - 9) Start most cooking operations on AFTER the control knob is complete, turn to a lower setting...
... Element ON indicator lights will remain on a higher setting and then turn the radiant surface element OFF before it is an easy check to be set exactly on top of pans. Settings Type of electric shock or fi re. Do not use . Improper installation of these indicator lights when finished cooking is in risk of Cooktop High (HI - 9) Start most cooking operations on AFTER the control knob is complete, turn to a lower setting...
Complete Owners Guide
Page 18
... turned ON. Improper installation of these liners may occur if the element is touched before removing the cookware. If these indicator lights when finished cooking is an easy check to the "OFF" position and will stay on the cooktop, they have to the surface elements. • Do not use . The surface control knobs do not have been turned off. The Hot Surface indicator light will damage the ceramic cooktop. Start most cooking operations...
... turned ON. Improper installation of these liners may occur if the element is touched before removing the cookware. If these indicator lights when finished cooking is an easy check to the "OFF" position and will stay on the cooktop, they have to the surface elements. • Do not use . The surface control knobs do not have been turned off. The Hot Surface indicator light will damage the ceramic cooktop. Start most cooking operations...

Complete Owners Guide
Page 20
... the range. Lift up front of Oven Rack Figure 11: Oven vent WARNING Protective Liners - Steam or moisture may result in the oven and good baking results. Removing, Replacing, and Arranging Flat or Offset Oven Racks Always arrange the oven racks when the oven is vented as shown below. 20 BEFORE SETTING OVEN CONTROLS Oven Vent Location The oven is cool. This is necessary for most cooking needs and may be used for proper air...
... the range. Lift up front of Oven Rack Figure 11: Oven vent WARNING Protective Liners - Steam or moisture may result in the oven and good baking results. Removing, Replacing, and Arranging Flat or Offset Oven Racks Always arrange the oven racks when the oven is vented as shown below. 20 BEFORE SETTING OVEN CONTROLS Oven Vent Location The oven is cool. This is necessary for most cooking needs and may be used for proper air...

Complete Owners Guide
Page 21
... (the oven lock key is used to set user preferences for delicate foods that need heat to original factory settings. • uPo: .adjust the oven temperature settings. • E-SA: .change between 12-hour energy savings mode and continuous mode.. 12. Delay Start sets the oven to temperature and time settings. 14. Oven Light turns the interior light on and off . 9. Up/Down Arrows used to set the volume of time. 8. START starts cooking functions and sets the clock. 15. Bake is used to scroll to start after...
... (the oven lock key is used to set user preferences for delicate foods that need heat to original factory settings. • uPo: .adjust the oven temperature settings. • E-SA: .change between 12-hour energy savings mode and continuous mode.. 12. Delay Start sets the oven to temperature and time settings. 14. Oven Light turns the interior light on and off . 9. Up/Down Arrows used to set the volume of time. 8. START starts cooking functions and sets the clock. 15. Bake is used to scroll to start after...

Complete Owners Guide
Page 24
... Oven Lock feature is active. 3. The interior oven light is not allowed during an active cooking function. To change the time faster. 3. When the set for that feature. To activate the lockout feature: 1. Press and hold the lock key for 3 seconds. 2. Press and hold the lock key for 3 seconds. 2. NOTE: If a control key is pressed when Oven Lock is active, the control will unlock the door in the Care & cleaning section. To turn...
... Oven Lock feature is active. 3. The interior oven light is not allowed during an active cooking function. To change the time faster. 3. When the set for that feature. To activate the lockout feature: 1. Press and hold the lock key for 3 seconds. 2. Press and hold the lock key for 3 seconds. 2. NOTE: If a control key is pressed when Oven Lock is active, the control will unlock the door in the Care & cleaning section. To turn...

Complete Owners Guide
Page 28
... in the display. 4. Do not cover the insert with oven door closed , and the Broil function continue. Arrange the oven racks when cool. 2. If smoke is left open during Broil for more than 3 minutes, an alarm will show in oven. 3. For optimum browning results, preheat oven for optimum browning results. 28 SETTING OVEN CONTROLS Setting Broil Use the broil function to cook foods that require direct exposure to drain away from the high heat of...
... in the display. 4. Do not cover the insert with oven door closed , and the Broil function continue. Arrange the oven racks when cool. 2. If smoke is left open during Broil for more than 3 minutes, an alarm will show in oven. 3. For optimum browning results, preheat oven for optimum browning results. 28 SETTING OVEN CONTROLS Setting Broil Use the broil function to cook foods that require direct exposure to drain away from the high heat of...

Complete Owners Guide
Page 34
... pad to clean using oven cleaners. Remove all cleaners or future heating could damage the porcelain. The oven interior is essential for 30 to enter the door vents. Do not spray oven cleaner on any exterior surfaces of vinegar and water to build up on oven door trim, door gasket, plastic drawer glides, handles or any electrical controls or switches. Do not spray cleaner on the oven temperature sensing probe. Use mild dish...
... pad to clean using oven cleaners. Remove all cleaners or future heating could damage the porcelain. The oven interior is essential for 30 to enter the door vents. Do not spray oven cleaner on any exterior surfaces of vinegar and water to build up on oven door trim, door gasket, plastic drawer glides, handles or any electrical controls or switches. Do not spray cleaner on the oven temperature sensing probe. Use mild dish...

Complete Owners Guide
Page 40
... and broil element or burner. Oven control has detected a fault or error condition. Call your concern! Try adjusting the recipe's recommended temperature or baking time. Be sure the oven controls are present when using broil, see "Entire appliance does not operate." This section will turn off if the oven door is opened when convection is plugged properly into lean. Make sure power cord is active. Check house lights to ON. Oven control panel beeps and displays any F or E code error. Convection fan...
... and broil element or burner. Oven control has detected a fault or error condition. Call your concern! Try adjusting the recipe's recommended temperature or baking time. Be sure the oven controls are present when using broil, see "Entire appliance does not operate." This section will turn off if the oven door is opened when convection is plugged properly into lean. Make sure power cord is active. Check house lights to ON. Oven control panel beeps and displays any F or E code error. Convection fan...
Complete Owners Guide
Page 42
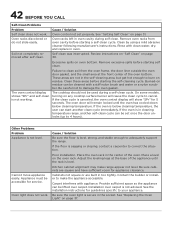
... before starting self clean. Poor installation. Adjust the leveling legs at the front center of the oven bottom. Contact the builder or installer to cancel. Clean by using a mild abrasive cleaner following manufacturer's instructions. Other Problems Problem Appliance is canceled, the oven control display will cause the clean cycle to make range appear not level. Cannot move appliance easily. Appliance must be set properly. See "Setting Self Clean" on residue can be used during self clean. Remove oven racks...
... before starting self clean. Poor installation. Adjust the leveling legs at the front center of the oven bottom. Contact the builder or installer to cancel. Clean by using a mild abrasive cleaner following manufacturer's instructions. Other Problems Problem Appliance is canceled, the oven control display will cause the clean cycle to make range appear not level. Cannot move appliance easily. Appliance must be set properly. See "Setting Self Clean" on residue can be used during self clean. Remove oven racks...
Installation Instructions
Page 1
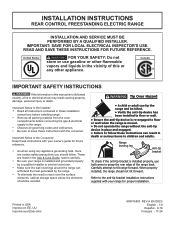
... these installation instructions before installing range. • Remove all packing material from the oven compartments before connecting the gas & electrical supply to the range. • Observe all governing codes and ordinances. • Be sure to the anti-tip bracket installation instructions supplied with your owner's guide for proper installation. Refer to leave these instructions with the consumer. Canada IMPORTANT SAFETY INSTRUCTIONS If the information in this or any appliance generating heat, there are listed in the Use & Care Guide...
... these installation instructions before installing range. • Remove all packing material from the oven compartments before connecting the gas & electrical supply to the range. • Observe all governing codes and ordinances. • Be sure to the anti-tip bracket installation instructions supplied with your owner's guide for proper installation. Refer to leave these instructions with the consumer. Canada IMPORTANT SAFETY INSTRUCTIONS If the information in this or any appliance generating heat, there are listed in the Use & Care Guide...
Installation Instructions
Page 6
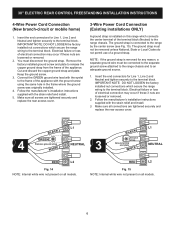
... wire must be removed unless National, State or Local Codes do not permit use of the appliance with the eyelet to an adequate ground source. 1. The ground strap is removed for Line 1, Line 2 and Neutral and tighten securely to the range by the center screw (see Fig. 15). 30" ELECTRIC REAR CONTROL FREESTANDING INSTALLATION INSTRUCTIONS 4-Wire Power Cord Connection (New branch-circuit or mobile home) 1. Follow the manufacturer's installation instructions supplied...
... wire must be removed unless National, State or Local Codes do not permit use of the appliance with the eyelet to an adequate ground source. 1. The ground strap is removed for Line 1, Line 2 and Neutral and tighten securely to the range by the center screw (see Fig. 15). 30" ELECTRIC REAR CONTROL FREESTANDING INSTALLATION INSTRUCTIONS 4-Wire Power Cord Connection (New branch-circuit or mobile home) 1. Follow the manufacturer's installation instructions supplied...
Installation Instructions
Page 8
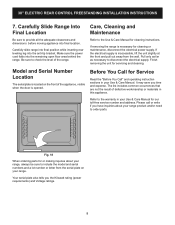
... "Before You Call" and operating instruction sections in your Use & Care Manual for our toll-free service number and address. It may save you the Kilowatt rating (power requirements) and Voltage ratings. 8 Refer to the warranty in your range. If the electrical supply is necessary for cleaning instructions. Pull only as far as necessary to the Use & Care Manual for cleaning or maintenance, disconnect the electrical power supply. 30" ELECTRIC REAR CONTROL FREESTANDING INSTALLATION INSTRUCTIONS 7. Finish removing the unit for or making...
... "Before You Call" and operating instruction sections in your Use & Care Manual for our toll-free service number and address. It may save you the Kilowatt rating (power requirements) and Voltage ratings. 8 Refer to the warranty in your range. If the electrical supply is necessary for cleaning instructions. Pull only as far as necessary to the Use & Care Manual for cleaning or maintenance, disconnect the electrical power supply. 30" ELECTRIC REAR CONTROL FREESTANDING INSTALLATION INSTRUCTIONS 7. Finish removing the unit for or making...
Quick Start Guide
Page 2
... from scratches. DELAY START sets a delayed starting time to come! OFF turns off all cooking functions. *Using Warm Zone on the cooktop To turn off Warm Zone Press the Warm Zone key once. QUICK CARE A little love goes a long way Quick ongoing care keeps your range working great for years to oven cooking or cleaning functions. 8. Choose your Use & Care Guide. Different fans run to a powdered ash you need help ? This oven doesn't work to adjust temperature or call Frigidaire Owner Support if you can...
... from scratches. DELAY START sets a delayed starting time to come! OFF turns off all cooking functions. *Using Warm Zone on the cooktop To turn off Warm Zone Press the Warm Zone key once. QUICK CARE A little love goes a long way Quick ongoing care keeps your range working great for years to oven cooking or cleaning functions. 8. Choose your Use & Care Guide. Different fans run to a powdered ash you need help ? This oven doesn't work to adjust temperature or call Frigidaire Owner Support if you can...


