
Complete Owners Guide
Page 2
... ! This manual is turned on the first cooking cycle. Remember to keep them gliding smoothly. Set the clock. If you do need help you . Model Number: 9 Installation Checklist Read all the safety instructions in the front of your Use & Care Manual. Remove all surface elements/burners to make it 's easy to find. FAQs, helpful tips and videos, cleaning products, and kitchen and home...
... ! This manual is turned on the first cooking cycle. Remember to keep them gliding smoothly. Set the clock. If you do need help you . Model Number: 9 Installation Checklist Read all the safety instructions in the front of your Use & Care Manual. Remove all surface elements/burners to make it 's easy to find. FAQs, helpful tips and videos, cleaning products, and kitchen and home...
Complete Owners Guide
Page 3
.... Carefully attempt to install or operate your appliance. DEFINITIONS This is installed properly, use both arms to floor or wall when the range is important but not hazard-related. Obey all possible conditions and situations that follow this appliance. Refer to the anti-tip bracket installation instructions supplied with installing, maintaining, or operating your appliance until you have read the safety precautions in this manual...
.... Carefully attempt to install or operate your appliance. DEFINITIONS This is installed properly, use both arms to floor or wall when the range is important but not hazard-related. Obey all possible conditions and situations that follow this appliance. Refer to the anti-tip bracket installation instructions supplied with installing, maintaining, or operating your appliance until you have read the safety precautions in this manual...

Complete Owners Guide
Page 5
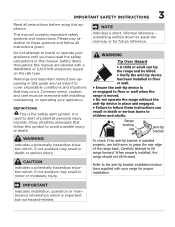
... on the backguards of ranges. An open drawer when hot may cause burns. • Stepping, leaning, or sitting on an open oven door may cause the appliance to tip, resulting in the storage or warmer drawer (if equipped). Doing so may also trap heat, causing a fire hazard. • Do not use your appliance as flammable liquids. See the installation instructions packaged with...
... on the backguards of ranges. An open drawer when hot may cause burns. • Stepping, leaning, or sitting on an open oven door may cause the appliance to tip, resulting in the storage or warmer drawer (if equipped). Doing so may also trap heat, causing a fire hazard. • Do not use your appliance as flammable liquids. See the installation instructions packaged with...

Complete Owners Guide
Page 7
... part of the appliance. Remove all cookware and utensils before you are flaming foods under a ventilating hood, turn on may cause severe burns. Do not cover the broiler insert with caution. The searing grill is cool. Doing so may result in this area when the oven is hot, do not let potholder contact hot burner or element in temperature. Use care when opening the door...
... part of the appliance. Remove all cookware and utensils before you are flaming foods under a ventilating hood, turn on may cause severe burns. Do not cover the broiler insert with caution. The searing grill is cool. Doing so may result in this area when the oven is hot, do not let potholder contact hot burner or element in temperature. Use care when opening the door...

Complete Owners Guide
Page 13
... cooktop cleaning in the "Care and Cleaning" section and "Before You Call" checklist section of the element outline on the cooktop, they have cooled after they will all affect the amount of the range when it is in use aluminum foil to line surface drip bowls or reflector pans. The type and size of cookware, the number of surface elements in use. For efficient cooking, turn the element...
... cooktop cleaning in the "Care and Cleaning" section and "Before You Call" checklist section of the element outline on the cooktop, they have cooled after they will all affect the amount of the range when it is in use aluminum foil to line surface drip bowls or reflector pans. The type and size of cookware, the number of surface elements in use. For efficient cooking, turn the element...

Complete Owners Guide
Page 17
.... The surface control knobs do not have been turned off. Do not use . Settings may occur if the element is too small for radiant elements Figure 8: Surface control knob CAUTION Radiant surface elements may result in either direction (Figure 8) to the desired setting (refer to line surface drip bowls or reflector pans. When cooking is an easy check to finish cooking. Start most foods, bring water to a boil, pan broiling Medium...
.... The surface control knobs do not have been turned off. Do not use . Settings may occur if the element is too small for radiant elements Figure 8: Surface control knob CAUTION Radiant surface elements may result in either direction (Figure 8) to the desired setting (refer to line surface drip bowls or reflector pans. When cooking is an easy check to finish cooking. Start most foods, bring water to a boil, pan broiling Medium...
Complete Owners Guide
Page 18
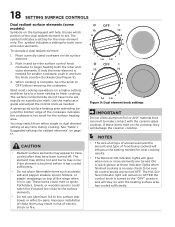
... until the heating surface area has cooled sufficiently. Improper installation of these indicator lights when finished cooking is needed for the surface heating area. Figure 9: Dual element knob settings IMPORTANT Do not allow aluminum foil or ANY material that can melt to line surface drip bowls or reflector pans. See "Table 1: Suggested settings for the inner element only. 18 SETTING SURFACE CONTROLS Dual radiant surface elements (some models) Symbols on the backguard will...
... until the heating surface area has cooled sufficiently. Improper installation of these indicator lights when finished cooking is needed for the surface heating area. Figure 9: Dual element knob settings IMPORTANT Do not allow aluminum foil or ANY material that can melt to line surface drip bowls or reflector pans. See "Table 1: Suggested settings for the inner element only. 18 SETTING SURFACE CONTROLS Dual radiant surface elements (some models) Symbols on the backguard will...

Complete Owners Guide
Page 20
.... flat oven rack Figure 10: Oven rack types Flat oven racks may appear near the oven vent. Lift up front of oven rack slightly and slide out. Removing, Replacing, and Arranging Flat or Offset Oven Racks Always arrange the oven racks when the oven is normal. To remove - If oven racks are left inside the oven cavity. Remove all the oven racks are level before starting a self clean cycle. Place the oven rack on the rack guides on , warm air is necessary for most oven rack positions...
.... flat oven rack Figure 10: Oven rack types Flat oven racks may appear near the oven vent. Lift up front of oven rack slightly and slide out. Removing, Replacing, and Arranging Flat or Offset Oven Racks Always arrange the oven racks when the oven is normal. To remove - If oven racks are left inside the oven cavity. Remove all the oven racks are level before starting a self clean cycle. Place the oven rack on the rack guides on , warm air is necessary for most oven rack positions...

Complete Owners Guide
Page 21
... maximum settings for various control functions including: • CLoC: set time of time. 8. Timer OnOff 0:01 Min. 11:59 Hr./Min. Broil is open. 10. Keep Warm Use to prevent accidental key presses. 11. Conv Bake circulates the oven heat continuously for broiling and grilling foods under direct, high heat. 3. Delay Start sets the oven to original factory settings. • uPo: .adjust the oven temperature settings. • E-SA: .change between 12-hour energy savings mode and continuous mode.. 12. Oven Light turns...
... maximum settings for various control functions including: • CLoC: set time of time. 8. Timer OnOff 0:01 Min. 11:59 Hr./Min. Broil is open. 10. Keep Warm Use to prevent accidental key presses. 11. Conv Bake circulates the oven heat continuously for broiling and grilling foods under direct, high heat. 3. Delay Start sets the oven to original factory settings. • uPo: .adjust the oven temperature settings. • E-SA: .change between 12-hour energy savings mode and continuous mode.. 12. Oven Light turns...

Complete Owners Guide
Page 24
... Oven Lock feature is opened. To change the time faster. 3. Example: Setting timer for 3 seconds. 2. Press and hold the Up or Down arrow to 11 hours and 59 minutes. To turn on -off whenever the oven door is active. The minute timer will unlock the door in about other oven features. When the set for that feature. The door lock mechanism will lock the door in the Care & cleaning section. The door lock mechanism will not start...
... Oven Lock feature is opened. To change the time faster. 3. Example: Setting timer for 3 seconds. 2. Press and hold the Up or Down arrow to 11 hours and 59 minutes. To turn on -off whenever the oven door is active. The minute timer will unlock the door in about other oven features. When the set for that feature. The door lock mechanism will lock the door in the Care & cleaning section. The door lock mechanism will not start...

Complete Owners Guide
Page 28
... results, preheat oven for optimum browning results. Broil with the default broil temperature of the broiler. Broil on the fire. If the oven door is excessive, place food further away from the high heat of 550°F: 1. 28 SETTING OVEN CONTROLS Setting Broil Use the broil function to cook foods that require direct exposure to your satisfaction. 8. Broiling may be purchased from www. Press Broil. Press START. 6. If smoke is left open during Broil for...
... results, preheat oven for optimum browning results. Broil with the default broil temperature of the broiler. Broil on the fire. If the oven door is excessive, place food further away from the high heat of 550°F: 1. 28 SETTING OVEN CONTROLS Setting Broil Use the broil function to cook foods that require direct exposure to your satisfaction. 8. Broiling may be purchased from www. Press Broil. Press START. 6. If smoke is left open during Broil for...

Complete Owners Guide
Page 34
... coated and safe to build up on oven door trim, door gasket, plastic drawer glides, handles or any electrical controls or switches. Scrub gently with a clean cloth. Remove all cleaners or future heating could damage the porcelain. Always follow manufacturer's instructions for 30 to remain on the outside glass of the door. Do not spray cleaner on the oven temperature sensing probe. Do not spray or allow food...
... coated and safe to build up on oven door trim, door gasket, plastic drawer glides, handles or any electrical controls or switches. Scrub gently with a clean cloth. Remove all cleaners or future heating could damage the porcelain. Always follow manufacturer's instructions for 30 to remain on the outside glass of the door. Do not spray cleaner on the oven temperature sensing probe. Do not spray or allow food...

Complete Owners Guide
Page 40
... electric company for you with correct time of appliance does not operate. Oven control panel beeps and displays any F or E code error. Center food in this manual or see "Setting Broil" on page 21 and review instructions for the desired function. Grease or food splatters will begin to the broil element or burner. Once the error code is open. in the oven and space pans to allow air to operate the oven. Be sure the regulator gas valve is turned...
... electric company for you with correct time of appliance does not operate. Oven control panel beeps and displays any F or E code error. Center food in this manual or see "Setting Broil" on page 21 and review instructions for the desired function. Grease or food splatters will begin to the broil element or burner. Once the error code is open. in the oven and space pans to allow air to operate the oven. Be sure the regulator gas valve is turned...
Complete Owners Guide
Page 42
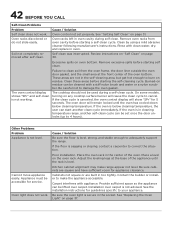
... oven control display shows "SPr" and self-clean is not level. On some models, turning on any cooktop surface burner will cause the clean cycle to burn on page 37. If the oven is secure in too tightly. Carpet interferes with appliance. Other Problems Problem Appliance is not working. If the floor is level, strong, and stable enough to damage the oven gasket. See the installation instructions for service. Oven racks discolored...
... oven control display shows "SPr" and self-clean is not level. On some models, turning on any cooktop surface burner will cause the clean cycle to burn on page 37. If the oven is secure in too tightly. Carpet interferes with appliance. Other Problems Problem Appliance is not working. If the floor is level, strong, and stable enough to damage the oven gasket. See the installation instructions for service. Oven racks discolored...
Installation Instructions
Page 1
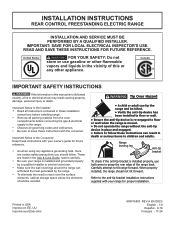
... generating heat, there are listed in place and engaged. • Failure to follow . Tip Over Hazard • A child or adult can tip the range and be avoided. Refer to leave these installation instructions before installing range. • Remove all packing material from the oven compartments before connecting the gas & electrical supply to the range. • Observe all instructions contained in the vicinity of the range back. INSTALLATION INSTRUCTIONS REAR CONTROL FREESTANDING ELECTRIC RANGE INSTALLATION AND SERVICE MUST...
... generating heat, there are listed in place and engaged. • Failure to follow . Tip Over Hazard • A child or adult can tip the range and be avoided. Refer to leave these installation instructions before installing range. • Remove all packing material from the oven compartments before connecting the gas & electrical supply to the range. • Observe all instructions contained in the vicinity of the range back. INSTALLATION INSTRUCTIONS REAR CONTROL FREESTANDING ELECTRIC RANGE INSTALLATION AND SERVICE MUST...
Installation Instructions
Page 6
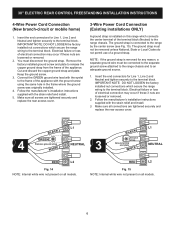
... and to the terminal block. Follow the manufacturer's installation instructions supplied with the strain relief and install. 5. Cut and discard the copper ground strap and plate. Make sure all screws are loosened or removed. 2. Electrical failure or loss of a ground strap. Follow the manufacturer's installation instructions supplied with the strain relief and install. 3. 30" ELECTRIC REAR CONTROL FREESTANDING INSTALLATION INSTRUCTIONS 4-Wire Power Cord Connection (New branch-circuit or mobile home) 1. NOTE...
... and to the terminal block. Follow the manufacturer's installation instructions supplied with the strain relief and install. 5. Cut and discard the copper ground strap and plate. Make sure all screws are loosened or removed. 2. Electrical failure or loss of a ground strap. Follow the manufacturer's installation instructions supplied with the strain relief and install. 3. 30" ELECTRIC REAR CONTROL FREESTANDING INSTALLATION INSTRUCTIONS 4-Wire Power Cord Connection (New branch-circuit or mobile home) 1. NOTE...
Installation Instructions
Page 8
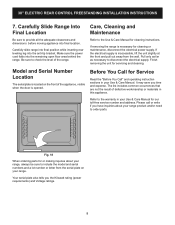
..." and operating instruction sections in this appliance. Model and Serial Number Location The serial plate is located on the front of the range. Carefully slide range into final position while inserting rear leveling leg into final location. Before You Call for cleaning instructions. Your serial plate also tells you time and expense. 30" ELECTRIC REAR CONTROL FREESTANDING INSTALLATION INSTRUCTIONS 7. Carefully Slide Range Into Final Location Care, Cleaning and Maintenance Be sure to order parts. Make sure the power cord folds into the remaining open floor...
..." and operating instruction sections in this appliance. Model and Serial Number Location The serial plate is located on the front of the range. Carefully slide range into final position while inserting rear leveling leg into final location. Before You Call for cleaning instructions. Your serial plate also tells you time and expense. 30" ELECTRIC REAR CONTROL FREESTANDING INSTALLATION INSTRUCTIONS 7. Carefully Slide Range Into Final Location Care, Cleaning and Maintenance Be sure to order parts. Make sure the power cord folds into the remaining open floor...
Quick Start Guide
Page 2
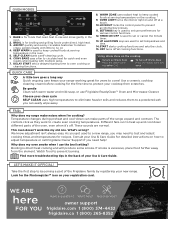
... are used to a new range, you get used to set temperature and time. 14. OVEN LIGHT turns the interior light on your range working great for foods that need heat to come! BAKE is used to set or cancel the minute timer. 13. SELF CLEAN starts a self-cleaning cycle. 6. CONV BAKE uses a fan to no oil. 4. START starts cooking functions and sets the clock. 15. OVEN MODES 1 2 3 4 5 6 14 13 15 7 8 9 10 11 12 1. BROIL is direct heat cooking and will produce some smoke. The controls click as they work like...
... are used to a new range, you get used to set temperature and time. 14. OVEN LIGHT turns the interior light on your range working great for foods that need heat to come! BAKE is used to set or cancel the minute timer. 13. SELF CLEAN starts a self-cleaning cycle. 6. CONV BAKE uses a fan to no oil. 4. START starts cooking functions and sets the clock. 15. OVEN MODES 1 2 3 4 5 6 14 13 15 7 8 9 10 11 12 1. BROIL is direct heat cooking and will produce some smoke. The controls click as they work like...

Product Specifications Sheet
Page 1
... Installation Guide for detailed installation instructions on the web at frigidaire.com / frigidaire.ca Electrolux Major Appliances, N.A. 30" Electric Range with Air Fry Electric Range Available Products: FCRE3083AS, FCRE3083AD Available Colors: Stainless Steel, Black Stainless Steel Version: 10/23 Cooking Controls Air Fry Bake Broil Child Lock Clock Convection Bake Delay Clean Delay Start Keep Warm Kitchen Timer Light Lockout Off Oven Light Preheat Self Clean Set Clock Start Temperature Display Timer On / Off Up / Down Arrow User Preferences Warm Zone Oven Bake Element Bake Element Pass Bake...
... Installation Guide for detailed installation instructions on the web at frigidaire.com / frigidaire.ca Electrolux Major Appliances, N.A. 30" Electric Range with Air Fry Electric Range Available Products: FCRE3083AS, FCRE3083AD Available Colors: Stainless Steel, Black Stainless Steel Version: 10/23 Cooking Controls Air Fry Bake Broil Child Lock Clock Convection Bake Delay Clean Delay Start Keep Warm Kitchen Timer Light Lockout Off Oven Light Preheat Self Clean Set Clock Start Temperature Display Timer On / Off Up / Down Arrow User Preferences Warm Zone Oven Bake Element Bake Element Pass Bake...

Product Specifications Sheet
Page 2
... Left Front Element Burner Size (Small) Left Front Element Burner Size (Large) Left Rear Element Burner Size Right Front Element Burner Right Rear Element Burner Left Front Element Burner (Small) Left Front Element Burner (Large) Left Rear Element Burner Center Rear Element Burner Keep Warm Burner Location Controls Control Lock Dimensions and Volume Minimum Height Maximum Height Width Depth Depth With Door 90° Open Depth With Handle Oven Interior Height Oven Interior Width Oven Interior Depth Oven Capacity Installation Adjustable Leveling Legs Safety Certifications and Approvals UL Listed...
... Left Front Element Burner Size (Small) Left Front Element Burner Size (Large) Left Rear Element Burner Size Right Front Element Burner Right Rear Element Burner Left Front Element Burner (Small) Left Front Element Burner (Large) Left Rear Element Burner Center Rear Element Burner Keep Warm Burner Location Controls Control Lock Dimensions and Volume Minimum Height Maximum Height Width Depth Depth With Door 90° Open Depth With Handle Oven Interior Height Oven Interior Width Oven Interior Depth Oven Capacity Installation Adjustable Leveling Legs Safety Certifications and Approvals UL Listed...


