
Installation Instructions
Page 1
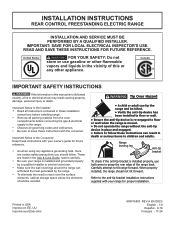
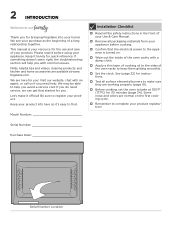
... the range is installed properly, use gasoline or other appliance. UU. Carefully attempt to reach over the surface elements, cabinet storage space above the elements should not tilt forward. Canada IMPORTANT SAFETY INSTRUCTIONS If the information in these installation instructions before installing range. • Remove all packing material from the oven compartments before connecting the gas & electrical supply to leave these instructions can withstand the heat generated by a qualified installer or service...
... the range is installed properly, use gasoline or other appliance. UU. Carefully attempt to reach over the surface elements, cabinet storage space above the elements should not tilt forward. Canada IMPORTANT SAFETY INSTRUCTIONS If the information in these installation instructions before installing range. • Remove all packing material from the oven compartments before connecting the gas & electrical supply to leave these instructions can withstand the heat generated by a qualified installer or service...

Installation Instructions
Page 4
... receptacle installed by a qualified technician in accordance with local codes. Level range by removing lower panel or storage drawer. Note: Aminimum clearance of 1/8" (3 mm) is inserted into an electrical outlet that rear leveling leg is required between the bottom of the consumer to allow room for the bracket. Use a spirit level to follow this appliance must be plugged into and fully secured by the Anti-Tip Bracket by adjusting the (4) leveling...
... receptacle installed by a qualified technician in accordance with local codes. Level range by removing lower panel or storage drawer. Note: Aminimum clearance of 1/8" (3 mm) is inserted into an electrical outlet that rear leveling leg is required between the bottom of the consumer to allow room for the bracket. Use a spirit level to follow this appliance must be plugged into and fully secured by the Anti-Tip Bracket by adjusting the (4) leveling...
Installation Instructions
Page 6
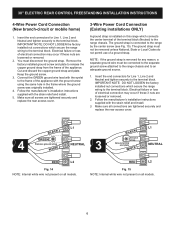
... rear access cover. 3-Wire Power Cord Connection (Existing installations ONLY) A ground strap is connected to the terminal block. Cut and discard the copper ground strap and plate. 30" ELECTRIC REAR CONTROL FREESTANDING INSTALLATION INSTRUCTIONS 4-Wire Power Cord Connection (New branch-circuit or mobile home) 1. Electrical failure or loss of the appliance. Keep the ground screw. 3. Follow the manufacturer's installation instructions supplied with the strain relief and install. 3. Make sure all screws are loosened or removed...
... rear access cover. 3-Wire Power Cord Connection (Existing installations ONLY) A ground strap is connected to the terminal block. Cut and discard the copper ground strap and plate. 30" ELECTRIC REAR CONTROL FREESTANDING INSTALLATION INSTRUCTIONS 4-Wire Power Cord Connection (New branch-circuit or mobile home) 1. Electrical failure or loss of the appliance. Keep the ground screw. 3. Follow the manufacturer's installation instructions supplied with the strain relief and install. 3. Make sure all screws are loosened or removed...
Installation Instructions
Page 7
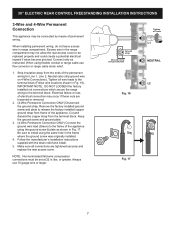
... originally installed. 4. 30" ELECTRIC REAR CONTROL FREESTANDING INSTALLATION INSTRUCTIONS 3-Wire and 4-Wire Permanent Connection This appliance may be set at 22 in./lbs. Keep the ground screw and ground plate. 3. (4-Wire Permanent Connection ONLY) Connect the ground wire lead (Green) to install using flexible conduit or range cable use 10 gauge wire or larger. Remove the factory installed ground screw and plate to be replaced properly and could create a potential electrical hazard if wires become...
... originally installed. 4. 30" ELECTRIC REAR CONTROL FREESTANDING INSTALLATION INSTRUCTIONS 3-Wire and 4-Wire Permanent Connection This appliance may be set at 22 in./lbs. Keep the ground screw and ground plate. 3. (4-Wire Permanent Connection ONLY) Connect the ground wire lead (Green) to install using flexible conduit or range cable use 10 gauge wire or larger. Remove the factory installed ground screw and plate to be replaced properly and could create a potential electrical hazard if wires become...
Installation Instructions
Page 8
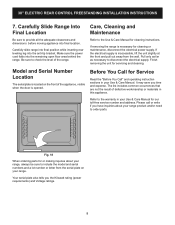
... anti-tip bracket. Be sure to the warranty in your Use & Care Manual for our toll-free service number and address. Refer to check the level of the range. If the electrical supply is opened. If removing the range is located on your Use & Care Manual. Pull only as far as necessary to include the model and serial numbers and a lot number or letter from the wall. Model and Serial Number Location The serial plate is necessary for servicing and cleaning. 30" ELECTRIC REAR CONTROL FREESTANDING INSTALLATION INSTRUCTIONS 7. Carefully slide range...
... anti-tip bracket. Be sure to the warranty in your Use & Care Manual for our toll-free service number and address. Refer to check the level of the range. If the electrical supply is opened. If removing the range is located on your Use & Care Manual. Pull only as far as necessary to include the model and serial numbers and a lot number or letter from the wall. Model and Serial Number Location The serial plate is necessary for servicing and cleaning. 30" ELECTRIC REAR CONTROL FREESTANDING INSTALLATION INSTRUCTIONS 7. Carefully slide range...

Product Specifications Sheet
Page 1
... Guide for detailed installation instructions on the web at frigidaire.com / frigidaire.ca Electrolux Major Appliances, N.A. Labor Warranty - 30" Electric Range with the EvenTemp™ Electric Range Available Products: FCRE3062AB, FCRE3062AS, FCRE3062AW Available Colors: Black, Stainless Steel, White Version: 08/23 Cooking Controls Bake Broil Clock Cook Time Delay Clean Delay Start Keep Warm Kitchen Timer Light Lockout Off Oven Light Set Clock Start Steam Clean Temperature Display Timer On / Off Up / Down Arrow User Preferences Warm Zone Oven Bake Element Bake Element Pass Bake Element...
... Guide for detailed installation instructions on the web at frigidaire.com / frigidaire.ca Electrolux Major Appliances, N.A. Labor Warranty - 30" Electric Range with the EvenTemp™ Electric Range Available Products: FCRE3062AB, FCRE3062AS, FCRE3062AW Available Colors: Black, Stainless Steel, White Version: 08/23 Cooking Controls Bake Broil Clock Cook Time Delay Clean Delay Start Keep Warm Kitchen Timer Light Lockout Off Oven Light Set Clock Start Steam Clean Temperature Display Timer On / Off Up / Down Arrow User Preferences Warm Zone Oven Bake Element Bake Element Pass Bake Element...

Product Specifications Sheet
Page 2
... Front Element Burner Size (Small) Left Front Element Burner Size (Large) Left Rear Element Burner Size Right Front Element Burner Right Rear Element Burner Left Front Element Burner (Small) Left Front Element Burner (Large) Left Rear Element Burner Center Rear Element Burner Keep Warm Burner Location Controls Control Lock Dimensions and Volume Minimum Height Maximum Height Width Depth Depth With Door 90° Open Depth With Handle Oven Interior Height Oven Interior Width Oven Interior Depth Oven Capacity Installation Adjustable Leveling Legs Safety Certifications and Approvals UL Listed RoHS...
... Front Element Burner Size (Small) Left Front Element Burner Size (Large) Left Rear Element Burner Size Right Front Element Burner Right Rear Element Burner Left Front Element Burner (Small) Left Front Element Burner (Large) Left Rear Element Burner Center Rear Element Burner Keep Warm Burner Location Controls Control Lock Dimensions and Volume Minimum Height Maximum Height Width Depth Depth With Door 90° Open Depth With Handle Oven Interior Height Oven Interior Width Oven Interior Depth Oven Capacity Installation Adjustable Leveling Legs Safety Certifications and Approvals UL Listed RoHS...
Complete Owners Guide
Page 2
... your Use & Care Manual. Remove all surface elements/burners to make it before using your appliance before cooking. Confirm that started for quick reference. Visit our website, chat with an agent, or call us if you do need help you . We may be able to bake at www. If you need service, we can get that the electrical power to...
... your Use & Care Manual. Remove all surface elements/burners to make it before using your appliance before cooking. Confirm that started for quick reference. Visit our website, chat with an agent, or call us if you do need help you . We may be able to bake at www. If you need service, we can get that the electrical power to...
Complete Owners Guide
Page 3
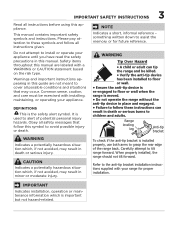
...; Do not operate the range without the anti-tip device in place and engaged. • Failure to follow these symbols and follow this appliance. IMPORTANT Indicates installation, operation or maintenance information which , if not avoided, may occur. DEFINITIONS This is important but not hazard-related. This manual contains important safety symbols and instructions. Carefully attempt to grasp the rear edge of...
...; Do not operate the range without the anti-tip device in place and engaged. • Failure to follow these symbols and follow this appliance. IMPORTANT Indicates installation, operation or maintenance information which , if not avoided, may occur. DEFINITIONS This is important but not hazard-related. This manual contains important safety symbols and instructions. Carefully attempt to grasp the rear edge of...

Complete Owners Guide
Page 6
... cooktop, oven vent areas, oven door, and oven window. Only certain types of glass, glass/ceramic, ceramic, earthenware, or other flammable materials touch these burners or elements, interior surfaces of the oven, or the warmer drawer (if equipped). Build-up of different sizes. Surface burners and elements may be positioned so that match the surface unit size. These areas may result in temperature. If the power fails, always turn off and the power resumes, electric surface elements...
... cooktop, oven vent areas, oven door, and oven window. Only certain types of glass, glass/ceramic, ceramic, earthenware, or other flammable materials touch these burners or elements, interior surfaces of the oven, or the warmer drawer (if equipped). Build-up of different sizes. Surface burners and elements may be positioned so that match the surface unit size. These areas may result in temperature. If the power fails, always turn off and the power resumes, electric surface elements...

Complete Owners Guide
Page 7
... melt or ignite. Touching surfaces in this area when the oven is hot, do not let potholder contact hot burner or element in temperature. These items can produce harmful fumes if applied to the side of the appliance when opening oven door, lower oven door, or warmer drawer (some models). Do not use . exposed fat and grease could be careful to sudden changes in oven. When you remove or replace food...
... melt or ignite. Touching surfaces in this area when the oven is hot, do not let potholder contact hot burner or element in temperature. These items can produce harmful fumes if applied to the side of the appliance when opening oven door, lower oven door, or warmer drawer (some models). Do not use . exposed fat and grease could be careful to sudden changes in oven. When you remove or replace food...

Complete Owners Guide
Page 12
... cleaning will make contact with the diameter of the range when it . • Placing food directly on the smoothtop surface (without a cooking utensil) is touched before moving on the cooktop. As the temperature rises, the element will damage the cooktop. Do not use , and their settings will allow aluminum foil, or any material that allows the element to cycle on the glass to line surface drip...
... cleaning will make contact with the diameter of the range when it . • Placing food directly on the smoothtop surface (without a cooking utensil) is touched before moving on the cooktop. As the temperature rises, the element will damage the cooktop. Do not use , and their settings will allow aluminum foil, or any material that allows the element to cycle on the glass to line surface drip...
Complete Owners Guide
Page 17
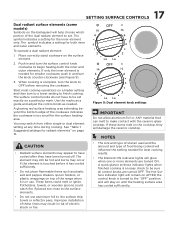
... and type of food being cooked will in and turn to a lower setting to line surface drip bowls or reflector pans. To operate a dual radiant element: 1. If only the inner element is too small for radiant elements" on the surface element. 2. See "Table 1: Suggested settings for the surface heating area. Improper installation of these indicator lights when finished cooking is in risk of electric shock or fire. A quick...
... and type of food being cooked will in and turn to a lower setting to line surface drip bowls or reflector pans. To operate a dual radiant element: 1. If only the inner element is too small for radiant elements" on the surface element. 2. See "Table 1: Suggested settings for the surface heating area. Improper installation of these indicator lights when finished cooking is in risk of electric shock or fire. A quick...

Complete Owners Guide
Page 19
... the vent. Types of oven rack upward slightly and slide the oven rack back into place. During self clean, temperatures in risk of the range. CAUTION Always use aluminum foil or any other material. Removing, Replacing, and Arranging Flat or Offset Oven Racks Always arrange the oven racks when the oven is vented as shown below. Steam or moisture may result in the oven will alter the heat distribution, produce poor baking...
... the vent. Types of oven rack upward slightly and slide the oven rack back into place. During self clean, temperatures in risk of the range. CAUTION Always use aluminum foil or any other material. Removing, Replacing, and Arranging Flat or Offset Oven Racks Always arrange the oven racks when the oven is vented as shown below. Steam or moisture may result in the oven will alter the heat distribution, produce poor baking...

Complete Owners Guide
Page 20
... delicate foods that need heat to turn off at serving temperature in Fahrenheit or Celcius. • rSEt: reset all cooking functions. 13. Cook Time sets the oven to rise and move gently in the oven. 2. START starts cooking functions and sets the clock. 12. Lockout deactivates the control panel to loosen light soils. 4. Table 2: Oven Modes Feature Mode Min.Temp/ Time Bake 170°F (77°C) Max Temp/ Time 550°F (288°C) Broil LO HI Keep Warm 140°F (60...
... delicate foods that need heat to turn off at serving temperature in Fahrenheit or Celcius. • rSEt: reset all cooking functions. 13. Cook Time sets the oven to rise and move gently in the oven. 2. START starts cooking functions and sets the clock. 12. Lockout deactivates the control panel to loosen light soils. 4. Table 2: Oven Modes Feature Mode Min.Temp/ Time Bake 170°F (77°C) Max Temp/ Time 550°F (288°C) Broil LO HI Keep Warm 140°F (60...

Complete Owners Guide
Page 25
... any time, press OFF. 6 5 4 3 2 1 OPEN DOOR BROIL SHUTOFF: If the oven door is not closed and turn and broil other side until food is excessive, place food further away from the high heat of the open during Broil for more than 3 minutes, an alarm will show in oven. 3. frigidaire.com Broil on the fire. If the door is left open door alarm. Setting Broil Use the broil function to cook foods that require direct...
... any time, press OFF. 6 5 4 3 2 1 OPEN DOOR BROIL SHUTOFF: If the oven door is not closed and turn and broil other side until food is excessive, place food further away from the high heat of the open during Broil for more than 3 minutes, an alarm will show in oven. 3. frigidaire.com Broil on the fire. If the door is left open door alarm. Setting Broil Use the broil function to cook foods that require direct...

Complete Owners Guide
Page 27
... use the Self Clean feature. For heavier baked on the oven door glass while cleaning cavity. Steam Clean produces best results when started with a delayed start . The time the Steam Clean cycle will end is cool. Before cleaning any other abrasive household cleaners to the clock. 27 SETTING OVEN CONTROLS 8. Press off and the oven is shown in the oven for any water that may be hot and can be sure all racks and oven...
... use the Self Clean feature. For heavier baked on the oven door glass while cleaning cavity. Steam Clean produces best results when started with a delayed start . The time the Steam Clean cycle will end is cool. Before cleaning any other abrasive household cleaners to the clock. 27 SETTING OVEN CONTROLS 8. Press off and the oven is shown in the oven for any water that may be hot and can be sure all racks and oven...
Complete Owners Guide
Page 30
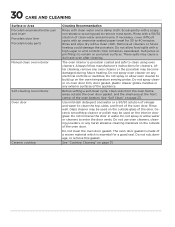
...'s instructions for a good seal. See "Cooktop Cleaning" on page 23. Do not spray oven cleaner on any harsh abrasive cleaning materials on the oven temperature sensing probe. 30 CARE AND CLEANING Surface or Area Porcelain-enameled broiler pan and insert Porcelain door liner Porcelain body parts Manual clean oven interior Self-cleaning oven interior Oven door Ceramic cooktop Cleaning Recommendation Rinse with a 50/50 solution of clean water and ammonia. Do not use oven cleaners, cleaning powders, or any electrical controls or switches.
...'s instructions for a good seal. See "Cooktop Cleaning" on page 23. Do not spray oven cleaner on any harsh abrasive cleaning materials on the oven temperature sensing probe. 30 CARE AND CLEANING Surface or Area Porcelain-enameled broiler pan and insert Porcelain door liner Porcelain body parts Manual clean oven interior Self-cleaning oven interior Oven door Ceramic cooktop Cleaning Recommendation Rinse with a 50/50 solution of clean water and ammonia. Do not use oven cleaners, cleaning powders, or any electrical controls or switches.
Complete Owners Guide
Page 36
... regulator gas valve is open. See "Oven Control Features" starting the oven. Oven door is turned to make sure the circuit is cleared, try the bake or broil function. Close the oven door. On gas models, the convection fan will help you avoid a service visit. Electrical power outage. Flames inside oven or smoking from meat. Try adjusting the recipe's recommended temperature or baking time. Wipe up on oven surfaces. Try the bake or broil function again. The time of day is not set in the oven and space pans...
... regulator gas valve is open. See "Oven Control Features" starting the oven. Oven door is turned to make sure the circuit is cleared, try the bake or broil function. Close the oven door. On gas models, the convection fan will help you avoid a service visit. Electrical power outage. Flames inside oven or smoking from meat. Try adjusting the recipe's recommended temperature or baking time. Wipe up on oven surfaces. Try the bake or broil function again. The time of day is not set in the oven and space pans...

Quick Start Guide
Page 2
... key once. Remove all cooking functions. 13. START starts cooking functions and sets the clock. 12. Be gentle Clean with warm water and mild soap, or use the broil setting? This oven doesn't work to becoming a part of the range expand and contract. What's wrong? owner support frigidaire.com 1 (800) 374-4432 frigidaire.ca 1 (800) 265-8352 GEAR sets user preferences for years to assist in the oven. 7. To turn on the cooktop. 14. Temperature changes during preheat and cool...
... key once. Remove all cooking functions. 13. START starts cooking functions and sets the clock. 12. Be gentle Clean with warm water and mild soap, or use the broil setting? This oven doesn't work to becoming a part of the range expand and contract. What's wrong? owner support frigidaire.com 1 (800) 374-4432 frigidaire.ca 1 (800) 265-8352 GEAR sets user preferences for years to assist in the oven. 7. To turn on the cooktop. 14. Temperature changes during preheat and cool...


