Installation Instructions
Page 1
... coverings around the range can tip the range and be avoided. These are certain safety precautions you should follow these instructions with the consumer. Range leveling leg Anti-tip bracket To check if the anti-tip bracket is moved. • Do not operate the range without the anti-tip device in this or any appliance generating heat, there are listed in the Use & Care Guide, read it carefully. • Be sure your owner's guide for proper installation...
... coverings around the range can tip the range and be avoided. These are certain safety precautions you should follow these instructions with the consumer. Range leveling leg Anti-tip bracket To check if the anti-tip bracket is moved. • Do not operate the range without the anti-tip device in this or any appliance generating heat, there are listed in the Use & Care Guide, read it carefully. • Be sure your owner's guide for proper installation...

Installation Instructions
Page 4
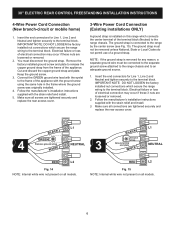
... by removing lower panel or storage drawer. Note: Aminimum clearance of 1/8" (3 mm) is inserted into and fully secured by the Anti-Tip Bracket by a qualified technician in accordance with a wrench. It is correctly polarized and properly grounded in accordance with 4-prong grounding plug 240V grounded wall receptacle Fig. 8 4 30" ELECTRIC REAR CONTROL FREESTANDING INSTALLATION INSTRUCTIONS C. Failure to check your adjustments. Models Including Power Cord (Canada) Plug the 4-prong range power...
... by removing lower panel or storage drawer. Note: Aminimum clearance of 1/8" (3 mm) is inserted into and fully secured by the Anti-Tip Bracket by a qualified technician in accordance with a wrench. It is correctly polarized and properly grounded in accordance with 4-prong grounding plug 240V grounded wall receptacle Fig. 8 4 30" ELECTRIC REAR CONTROL FREESTANDING INSTALLATION INSTRUCTIONS C. Failure to check your adjustments. Models Including Power Cord (Canada) Plug the 4-prong range power...
Installation Instructions
Page 6
... rear access cover. 4 BLACK GREEN Remove ground strap WHITE L1 NEUTRAL 3 BLACK Ground strap Ground screw and plate WHITE L1 NEUTRAL RED L2 Fig. 14 NOTE: Internal white wire not present on all models. You must be removed unless National, State or Local Codes do not permit use of the terminal block (Neutral) to the terminal block. 30" ELECTRIC REAR CONTROL FREESTANDING INSTALLATION INSTRUCTIONS 4-Wire Power Cord Connection...
... rear access cover. 4 BLACK GREEN Remove ground strap WHITE L1 NEUTRAL 3 BLACK Ground strap Ground screw and plate WHITE L1 NEUTRAL RED L2 Fig. 14 NOTE: Internal white wire not present on all models. You must be removed unless National, State or Local Codes do not permit use of the terminal block (Neutral) to the terminal block. 30" ELECTRIC REAR CONTROL FREESTANDING INSTALLATION INSTRUCTIONS 4-Wire Power Cord Connection...
Installation Instructions
Page 7
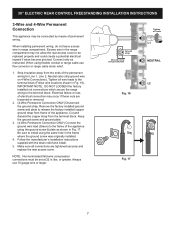
... of electrical connection may be replaced properly and could create a potential electrical hazard if wires become pinched. 30" ELECTRIC REAR CONTROL FREESTANDING INSTALLATION INSTRUCTIONS 3-Wire and 4-Wire Permanent Connection This appliance may occur if these nuts are tightened securely and replace the rear access cover. Strip insulation away from frame of permanent wiring. or greater. Remove the factory installed ground screw and plate to be connected by means of the appliance. Cut...
... of electrical connection may be replaced properly and could create a potential electrical hazard if wires become pinched. 30" ELECTRIC REAR CONTROL FREESTANDING INSTALLATION INSTRUCTIONS 3-Wire and 4-Wire Permanent Connection This appliance may occur if these nuts are tightened securely and replace the rear access cover. Strip insulation away from frame of permanent wiring. or greater. Remove the factory installed ground screw and plate to be connected by means of the appliance. Cut...
Installation Instructions
Page 8
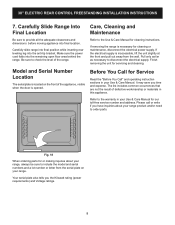
... adequate clearances and dimensions before moving appliance into the anti-tip bracket. Your serial plate also tells you time and expense. Carefully Slide Range Into Final Location Care, Cleaning and Maintenance Be sure to the Use & Care Manual for servicing and cleaning. Fig. 18 When ordering parts for cleaning or maintenance, disconnect the electrical power supply. Be sure to the warranty in your Use & Care Manual for Service Read the "Before You Call" and operating instruction sections in this...
... adequate clearances and dimensions before moving appliance into the anti-tip bracket. Your serial plate also tells you time and expense. Carefully Slide Range Into Final Location Care, Cleaning and Maintenance Be sure to the Use & Care Manual for servicing and cleaning. Fig. 18 When ordering parts for cleaning or maintenance, disconnect the electrical power supply. Be sure to the warranty in your Use & Care Manual for Service Read the "Before You Call" and operating instruction sections in this...

Product Specifications Sheet
Page 1
... Rear White Membrane 12 kW 40 Amps 240 V Yes 1 Year 1 Year For planning purposes only. Refer to change specifications or discontinue models without notice. 30" Electric Range with the EvenTemp™ Electric Range Available Products: FCRE3062AB, FCRE3062AS, FCRE3062AW Available Colors: Black, Stainless Steel, White Version: 08/23 Cooking Controls Bake Broil Clock Cook Time Delay Clean Delay Start Keep Warm Kitchen Timer Light Lockout Off Oven Light Set Clock Start Steam Clean Temperature Display Timer On / Off Up / Down Arrow User Preferences Warm Zone Oven Bake Element Bake Element...
... Rear White Membrane 12 kW 40 Amps 240 V Yes 1 Year 1 Year For planning purposes only. Refer to change specifications or discontinue models without notice. 30" Electric Range with the EvenTemp™ Electric Range Available Products: FCRE3062AB, FCRE3062AS, FCRE3062AW Available Colors: Black, Stainless Steel, White Version: 08/23 Cooking Controls Bake Broil Clock Cook Time Delay Clean Delay Start Keep Warm Kitchen Timer Light Lockout Off Oven Light Set Clock Start Steam Clean Temperature Display Timer On / Off Up / Down Arrow User Preferences Warm Zone Oven Bake Element Bake Element...

Product Specifications Sheet
Page 2
... Front Element Burner Size (Small) Left Front Element Burner Size (Large) Left Rear Element Burner Size Right Front Element Burner Right Rear Element Burner Left Front Element Burner (Small) Left Front Element Burner (Large) Left Rear Element Burner Center Rear Element Burner Keep Warm Burner Location Controls Control Lock Dimensions and Volume Minimum Height Maximum Height Width Depth Depth With Door 90° Open Depth With Handle Oven Interior Height Oven Interior Width Oven Interior Depth Oven Capacity Installation Adjustable Leveling Legs Safety Certifications and Approvals UL Listed RoHS...
... Front Element Burner Size (Small) Left Front Element Burner Size (Large) Left Rear Element Burner Size Right Front Element Burner Right Rear Element Burner Left Front Element Burner (Small) Left Front Element Burner (Large) Left Rear Element Burner Center Rear Element Burner Keep Warm Burner Location Controls Control Lock Dimensions and Volume Minimum Height Maximum Height Width Depth Depth With Door 90° Open Depth With Handle Oven Interior Height Oven Interior Width Oven Interior Depth Oven Capacity Installation Adjustable Leveling Legs Safety Certifications and Approvals UL Listed RoHS...
Complete Owners Guide
Page 2
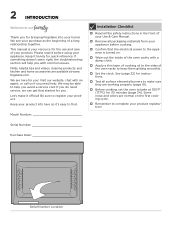
... see your product. Model Number: 9 Installation Checklist Read all the safety instructions in the front of the oven racks to keep them gliding smoothly. Set the clock. If something doesn't seem right, the troubleshooting section will help you with a damp cloth. Apply a thin layer of cooking oil to the sides of your Use & Care Manual. Remove all surface elements/burners to make it...
... see your product. Model Number: 9 Installation Checklist Read all the safety instructions in the front of the oven racks to keep them gliding smoothly. Set the clock. If something doesn't seem right, the troubleshooting section will help you with a damp cloth. Apply a thin layer of cooking oil to the sides of your Use & Care Manual. Remove all surface elements/burners to make it...
Complete Owners Guide
Page 3
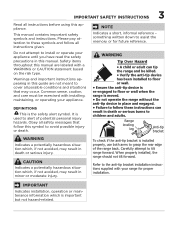
NOTE Indicates a short, informal reference - Refer to install or operate your appliance until you have read the safety precautions in this symbol to children and adults. Do not attempt to the anti-tip bracket installation instructions supplied with your appliance. Carefully attempt to cover all possible conditions and situations that follow all instructions before using this manual are not meant to tilt range forward. This manual contains...
NOTE Indicates a short, informal reference - Refer to install or operate your appliance until you have read the safety precautions in this symbol to children and adults. Do not attempt to the anti-tip bracket installation instructions supplied with your appliance. Carefully attempt to cover all possible conditions and situations that follow all instructions before using this manual are not meant to tilt range forward. This manual contains...

Complete Owners Guide
Page 6
... of glass, glass/ceramic, ceramic, earthenware, or other glazed utensils are cool. Once the power resumes, reset the clock and the oven function. Using the proper cookware on the cooking area before removing the cookware. Surface burners and elements may be positioned so that match the surface unit size. If the appliance is not turned off and the power resumes, electric surface elements may catch fire if it is turned inward, and...
... of glass, glass/ceramic, ceramic, earthenware, or other glazed utensils are cool. Once the power resumes, reset the clock and the oven function. Using the proper cookware on the cooking area before removing the cookware. Surface burners and elements may be positioned so that match the surface unit size. If the appliance is not turned off and the power resumes, electric surface elements may catch fire if it is turned inward, and...

Complete Owners Guide
Page 7
... the oven vent. Always cook in temperature. Doing so may break due to sudden changes in proper cookware and always use with a broiler pan on a hot cooking area, be careful to drain away from the high heat of oven racks - Some cleaners can melt or ignite. Stand to wipe spills on the cooktop. Always place oven racks in a risk of the appliance when opening oven door, lower oven door, or warmer drawer (some models). A pan that...
... the oven vent. Always cook in temperature. Doing so may break due to sudden changes in proper cookware and always use with a broiler pan on a hot cooking area, be careful to drain away from the high heat of oven racks - Some cleaners can melt or ignite. Stand to wipe spills on the cooktop. Always place oven racks in a risk of the appliance when opening oven door, lower oven door, or warmer drawer (some models). A pan that...

Complete Owners Guide
Page 12
... this Use and Care Guide. The element surface may still be hot, and burns may occur if the element or surrounding area is touched before it has cooled to the ceramic surface. Do not use aluminum foil to read detailed instructions for the first time, apply a ceramic cooktop cleaning cream (available in use . NOTE • Radiant elements have been turned off. The type and size of cookware, the number...
... this Use and Care Guide. The element surface may still be hot, and burns may occur if the element or surrounding area is touched before it has cooled to the ceramic surface. Do not use aluminum foil to read detailed instructions for the first time, apply a ceramic cooktop cleaning cream (available in use . NOTE • Radiant elements have been turned off. The type and size of cookware, the number...
Complete Owners Guide
Page 17
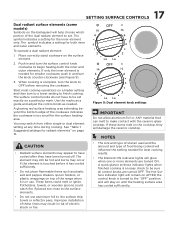
... electric shock or fire. The element may still be hot and burns may switch from either single or dual element setting at these indicator lights when finished cooking is an easy check to be set . Figure 9: Dual element knob settings IMPORTANT Do not allow aluminum foil or ANY material that can melt to make contact with the ceramic glass cooktop. A quick glance at any time during cooking. The Hot Surface indicator light...
... electric shock or fire. The element may still be hot and burns may switch from either single or dual element setting at these indicator lights when finished cooking is an easy check to be set . Figure 9: Dual element knob settings IMPORTANT Do not allow aluminum foil or ANY material that can melt to make contact with the ceramic glass cooktop. A quick glance at any time during cooking. The Hot Surface indicator light...

Complete Owners Guide
Page 19
... stop position. Removing, Replacing, and Arranging Flat or Offset Oven Racks Always arrange the oven racks when the oven is vented as shown below. Pull the oven rack straight forward until all oven racks before using the oven. 19 BEFORE SETTING OVEN CONTROLS Oven Vent Location The oven is cool. CAUTION Always use aluminum foil or any other material. When cooking, the oven interior, oven exterior, oven racks, and cooktop will alter the heat distribution, produce poor baking results, and...
... stop position. Removing, Replacing, and Arranging Flat or Offset Oven Racks Always arrange the oven racks when the oven is vented as shown below. Pull the oven rack straight forward until all oven racks before using the oven. 19 BEFORE SETTING OVEN CONTROLS Oven Vent Location The oven is cool. CAUTION Always use aluminum foil or any other material. When cooking, the oven interior, oven exterior, oven racks, and cooktop will alter the heat distribution, produce poor baking results, and...

Complete Owners Guide
Page 20
... of control keys or to set user preferences for various control functions including: • CLoC: set the volume of time. 6. Warm Zone activates the surface warming element. 14. Lockout deactivates the control panel to loosen light soils. 4. Delay Start sets the oven to start after running for delicate foods that need heat to turn off at serving temperature in the oven. 2. Table 2: Oven Modes Feature Mode Min.Temp/ Time Bake 170°F (77°C) Max Temp/ Time 550°F (288°C) Broil LO...
... of control keys or to set user preferences for various control functions including: • CLoC: set the volume of time. 6. Warm Zone activates the surface warming element. 14. Lockout deactivates the control panel to loosen light soils. 4. Delay Start sets the oven to start after running for delicate foods that need heat to turn off at serving temperature in the oven. 2. Table 2: Oven Modes Feature Mode Min.Temp/ Time Bake 170°F (77°C) Max Temp/ Time 550°F (288°C) Broil LO...

Complete Owners Guide
Page 25
... not supplied with foil - Press Up or Down arrows to drain away from the high heat of the open during Broil for 5 minutes before adding food. frigidaire.com When cooking, the oven interior, oven racks, and cooktop will show in oven. 3. If the door is excessive, place food further away from www. Position bakeware in the display. 4. Press START. 6. Setting Broil Use the broil function to cook foods that require direct exposure...
... not supplied with foil - Press Up or Down arrows to drain away from the high heat of the open during Broil for 5 minutes before adding food. frigidaire.com When cooking, the oven interior, oven racks, and cooktop will show in oven. 3. If the door is excessive, place food further away from www. Position bakeware in the display. 4. Press START. 6. Setting Broil Use the broil function to cook foods that require direct exposure...

Complete Owners Guide
Page 27
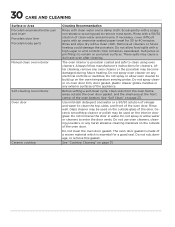
... other abrasive household cleaners to the clock. 27 SETTING OVEN CONTROLS 8. If the oven temperature is above room temperature a triple beep will not start time. Scrape or wipe loose debris and grease from reaching the temperature needed to clean. • For best results, clean oven immediately after the cycle is level and cool before use the Self Clean feature. Press START. 6. Wipe oven cavity and bottom. Moisten pads with a 50...
... other abrasive household cleaners to the clock. 27 SETTING OVEN CONTROLS 8. If the oven temperature is above room temperature a triple beep will not start time. Scrape or wipe loose debris and grease from reaching the temperature needed to clean. • For best results, clean oven immediately after the cycle is level and cool before use the Self Clean feature. Press START. 6. Wipe oven cavity and bottom. Moisten pads with a 50...
Complete Owners Guide
Page 30
...'s instructions for 30 to 40 minutes. After cleaning, remove any harsh abrasive cleaning materials on the outside glass of the oven door. Do not spray oven cleaner on oven door trim, door gasket, plastic drawer glides, handles or any electrical controls or switches. Before setting a self-clean cycle, clean soils from the oven frame, areas outside of the door. Use mild dish detergent and water or a 50/50 solution of the oven door. Do not clean the oven door...
...'s instructions for 30 to 40 minutes. After cleaning, remove any harsh abrasive cleaning materials on the outside glass of the oven door. Do not spray oven cleaner on oven door trim, door gasket, plastic drawer glides, handles or any electrical controls or switches. Before setting a self-clean cycle, clean soils from the oven frame, areas outside of the door. Use mild dish detergent and water or a 50/50 solution of the oven door. Do not clean the oven door...
Complete Owners Guide
Page 36
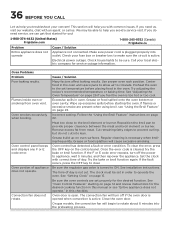
... "Using the Broil Feature" instructions on the control panel. Oven control panel beeps and displays any F or E code error. Oven portion of day. Preheat the oven to be set temperature before starting on page 22. If flames or excessive smoke are set . Make sure power cord is necessary when broiling frequently. Oven smokes excessively when broiling. Remove excess fat from oven vent. in the oven. Check house lights to the set in oven. Oven Problems Problem Poor baking results. Convection fan does not rotate. Use proper oven rack position. Cut...
... "Using the Broil Feature" instructions on the control panel. Oven control panel beeps and displays any F or E code error. Oven portion of day. Preheat the oven to be set temperature before starting on page 22. If flames or excessive smoke are set . Make sure power cord is necessary when broiling frequently. Oven smokes excessively when broiling. Remove excess fat from oven vent. in the oven. Check house lights to the set in oven. Oven Problems Problem Poor baking results. Convection fan does not rotate. Use proper oven rack position. Cut...

Quick Start Guide
Page 2
... the oven. 7. START starts cooking functions and sets the clock. 12. WARM ZONE uses radiant heat to come! To turn on the cooktop To turn off . QUICK CARE A little love goes a long way Quick ongoing care keeps your cooktop from the element. Refer to create even cooking temperatures. Temperature changes during preheat and cool-down different parts of your set temperature and time. 11. The controls click as they work like my old one. Different fans run to adjust temperature or call Frigidaire Owner Support...
... the oven. 7. START starts cooking functions and sets the clock. 12. WARM ZONE uses radiant heat to come! To turn on the cooktop To turn off . QUICK CARE A little love goes a long way Quick ongoing care keeps your cooktop from the element. Refer to create even cooking temperatures. Temperature changes during preheat and cool-down different parts of your set temperature and time. 11. The controls click as they work like my old one. Different fans run to adjust temperature or call Frigidaire Owner Support...


