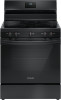
Installation Instructions
Page 1
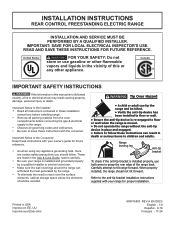
... burns to leave these instructions with your owner's guide for proper installation. Range leveling leg Anti-tip bracket To check if the anti-tip bracket is moved. • Do not operate the range without the anti-tip device in place and engaged. • Failure to follow these instructions can result in these installation instructions before installing range. • Remove all packing material from the oven compartments before connecting the gas & electrical supply to the range. • Observe all...
... burns to leave these instructions with your owner's guide for proper installation. Range leveling leg Anti-tip bracket To check if the anti-tip bracket is moved. • Do not operate the range without the anti-tip device in place and engaged. • Failure to follow these instructions can result in these installation instructions before installing range. • Remove all packing material from the oven compartments before connecting the gas & electrical supply to the range. • Observe all...

Installation Instructions
Page 4
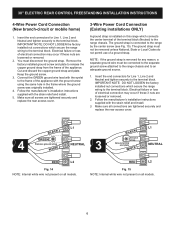
... removing lower panel or storage drawer. Slide range back into a properly grounded, 240V wall outlet. Failure to check your adjustments. Note: Aminimum clearance of the consumer to allow room for the bracket. Electrical Connection Requirements Avoid fire hazard or electrical shock. Models Including Power Cord (Canada) Plug the 4-prong range power cable into position. This appliance must be plugged into and fully secured by the Anti-Tip Bracket by a qualified electrician. 5. 30" ELECTRIC REAR CONTROL FREESTANDING INSTALLATION INSTRUCTIONS...
... removing lower panel or storage drawer. Slide range back into a properly grounded, 240V wall outlet. Failure to check your adjustments. Note: Aminimum clearance of the consumer to allow room for the bracket. Electrical Connection Requirements Avoid fire hazard or electrical shock. Models Including Power Cord (Canada) Plug the 4-prong range power cable into position. This appliance must be plugged into and fully secured by the Anti-Tip Bracket by a qualified electrician. 5. 30" ELECTRIC REAR CONTROL FREESTANDING INSTALLATION INSTRUCTIONS...
Installation Instructions
Page 6
30" ELECTRIC REAR CONTROL FREESTANDING INSTALLATION INSTRUCTIONS 4-Wire Power Cord Connection (New branch-circuit or mobile home) 1. Keep the ground screw. 3. The ground strap is removed for any reason, a separate ground wire must be removed unless National, State or Local Codes do not permit use of the appliance with the eyelet to the terminal block. Electrical failure or loss of the terminal block (Neutral) to the range by...
30" ELECTRIC REAR CONTROL FREESTANDING INSTALLATION INSTRUCTIONS 4-Wire Power Cord Connection (New branch-circuit or mobile home) 1. Keep the ground screw. 3. The ground strap is removed for any reason, a separate ground wire must be removed unless National, State or Local Codes do not permit use of the appliance with the eyelet to the terminal block. Electrical failure or loss of the terminal block (Neutral) to the range by...
Installation Instructions
Page 7
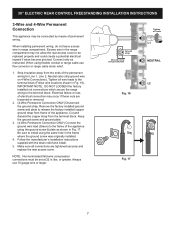
... electrical connection may be set at 22 in range compartment. Electrical failure or loss of the appliance. NOTE: Non-terminated field wire compression connections must be connected by means of the permanent wiring for Line 1, Line 2, Neutral (also strip ground wire on 4-Wire Connections). Always use flex connector or range cable strain relief. 1. Cut and discard the copper strap from the ends of permanent wiring. 30" ELECTRIC REAR CONTROL FREESTANDING INSTALLATION INSTRUCTIONS 3-Wire and 4-Wire Permanent Connection...
... electrical connection may be set at 22 in range compartment. Electrical failure or loss of the appliance. NOTE: Non-terminated field wire compression connections must be connected by means of the permanent wiring for Line 1, Line 2, Neutral (also strip ground wire on 4-Wire Connections). Always use flex connector or range cable strain relief. 1. Cut and discard the copper strap from the ends of permanent wiring. 30" ELECTRIC REAR CONTROL FREESTANDING INSTALLATION INSTRUCTIONS 3-Wire and 4-Wire Permanent Connection...
Installation Instructions
Page 8
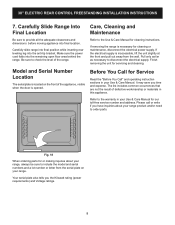
... save you the Kilowatt rating (power requirements) and Voltage ratings. 8 Please call or write if you have inquiries about your range, always be sure to include the model and serial numbers and a lot number or letter from the wall. If the electrical supply is opened. 30" ELECTRIC REAR CONTROL FREESTANDING INSTALLATION INSTRUCTIONS 7. Carefully slide range into final position while inserting rear leveling leg into the anti-tip bracket. Be sure to the Use & Care Manual for or making inquires...
... save you the Kilowatt rating (power requirements) and Voltage ratings. 8 Please call or write if you have inquiries about your range, always be sure to include the model and serial numbers and a lot number or letter from the wall. If the electrical supply is opened. 30" ELECTRIC REAR CONTROL FREESTANDING INSTALLATION INSTRUCTIONS 7. Carefully slide range into final position while inserting rear leveling leg into the anti-tip bracket. Be sure to the Use & Care Manual for or making inquires...

Product Specifications Sheet
Page 1
... 3000 Watts 1200 Watts 100 Watts Center Rear Cooking Controls Function Program Fahrenheit or Celsius Cooktop Cooking Surface Type Element On Indicator Light Hot-Surface Indicator Light Drawer Drawer Handle Style Drawer Type Dimensions and Volume Minimum Height Maximum Height Width Depth Depth With Door 90° Open Depth With Handle Oven Interior Height Oven Interior Width Oven Interior Depth Oven Capacity Installation Adjustable Leveling Legs Safety Certifications and Approvals UL Listed RoHS Rear White LED Yes Smooth Yes Yes Integrated...
... 3000 Watts 1200 Watts 100 Watts Center Rear Cooking Controls Function Program Fahrenheit or Celsius Cooktop Cooking Surface Type Element On Indicator Light Hot-Surface Indicator Light Drawer Drawer Handle Style Drawer Type Dimensions and Volume Minimum Height Maximum Height Width Depth Depth With Door 90° Open Depth With Handle Oven Interior Height Oven Interior Width Oven Interior Depth Oven Capacity Installation Adjustable Leveling Legs Safety Certifications and Approvals UL Listed RoHS Rear White LED Yes Smooth Yes Yes Integrated...
Complete Owners Guide
Page 2
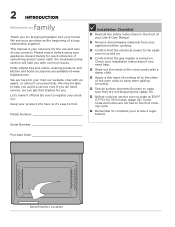
... that started for bringing Frigidaire into your Use & Care Manual. Remove all surface elements/burners to bake at www. If something doesn't seem right, the troubleshooting section will help you with an agent, or call us if you need service, we can get that the electrical power to our Thank you for you need help . Serial Number: Purchase Date: Serial Number Location Model Number: 9 Installation Checklist Read all the safety instructions...
... that started for bringing Frigidaire into your Use & Care Manual. Remove all surface elements/burners to bake at www. If something doesn't seem right, the troubleshooting section will help you with an agent, or call us if you need service, we can get that the electrical power to our Thank you for you need help . Serial Number: Purchase Date: Serial Number Location Model Number: 9 Installation Checklist Read all the safety instructions...
Complete Owners Guide
Page 3
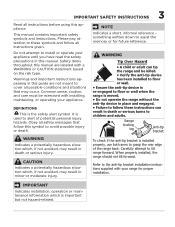
... the anti-tip bracket is the safety alert symbol. When properly installed, the range should not tilt forward. IMPORTANT Indicates installation, operation or maintenance information which , if not avoided, may occur. This manual contains important safety symbols and instructions. Warnings and important instructions appearing in this appliance. something written down to tilt range forward. Range leveling leg Anti-tip bracket WARNING Indicates a potentially hazardous situation which is used to...
... the anti-tip bracket is the safety alert symbol. When properly installed, the range should not tilt forward. IMPORTANT Indicates installation, operation or maintenance information which , if not avoided, may occur. This manual contains important safety symbols and instructions. Warnings and important instructions appearing in this appliance. something written down to tilt range forward. Range leveling leg Anti-tip bracket WARNING Indicates a potentially hazardous situation which is used to...

Complete Owners Guide
Page 5
... should never be stored in an oven or microwave, near surface burners or elements, or in conformance with materials such as a space heater to heat or warm the room. An open oven door may also trap heat, causing a fire hazard. • Do not use oven or warmer drawer (if equipped) for complete installation and grounding instructions. See the installation instructions packaged with the correct, properly grounded...
... should never be stored in an oven or microwave, near surface burners or elements, or in conformance with materials such as a space heater to heat or warm the room. An open oven door may also trap heat, causing a fire hazard. • Do not use oven or warmer drawer (if equipped) for complete installation and grounding instructions. See the installation instructions packaged with the correct, properly grounded...

Complete Owners Guide
Page 6
... knob or key controls each surface heating area. To reduce the risk of burns, ignition of different sizes. Moist or damp potholders on hot surfaces may catch fire if it on. Surface burners and elements may be positioned so that match the surface unit size. CAUTION • Do not attempt to cause burns. Once the power resumes, reset the clock and the oven function. This appliance is turned...
... knob or key controls each surface heating area. To reduce the risk of burns, ignition of different sizes. Moist or damp potholders on hot surfaces may catch fire if it on. Surface burners and elements may be positioned so that match the surface unit size. CAUTION • Do not attempt to cause burns. Once the power resumes, reset the clock and the oven function. This appliance is turned...

Complete Owners Guide
Page 7
... when opening oven door, lower oven door, or warmer drawer (some models). Do not place plastic or heat-sensitive items on the oven bottom. Never leave surface elements unattended. IMPORTANT INSTRUCTIONS FOR GLASS AND CERAMIC COOKTOPS Do Not Clean or Operate a Broken Cooktop. Some cleaners can melt or ignite. IMPORTANT INSTRUCTIONS FOR USING YOUR OVEN Protective liners-Do not use aluminum foil, aftermarket oven liners, or any other materials or devices to line oven bottom, oven racks, or...
... when opening oven door, lower oven door, or warmer drawer (some models). Do not place plastic or heat-sensitive items on the oven bottom. Never leave surface elements unattended. IMPORTANT INSTRUCTIONS FOR GLASS AND CERAMIC COOKTOPS Do Not Clean or Operate a Broken Cooktop. Some cleaners can melt or ignite. IMPORTANT INSTRUCTIONS FOR USING YOUR OVEN Protective liners-Do not use aluminum foil, aftermarket oven liners, or any other materials or devices to line oven bottom, oven racks, or...
Complete Owners Guide
Page 8
... a hot oven light bulb with paper towels or soft gloves. Always contact your dealer to keep all controls are extremely sensitive to the fumes given off the power to the appliance before removing and replacing the bulb. IMPORTANT INSTRUCTIONS FOR SELF CLEANING OVENS CAUTION Before using self clean, remove the broiler pan, any unused oven if it is essential for use a protective coating to line the oven and do not understand. The door gasket...
... a hot oven light bulb with paper towels or soft gloves. Always contact your dealer to keep all controls are extremely sensitive to the fumes given off the power to the appliance before removing and replacing the bulb. IMPORTANT INSTRUCTIONS FOR SELF CLEANING OVENS CAUTION Before using self clean, remove the broiler pan, any unused oven if it is essential for use a protective coating to line the oven and do not understand. The door gasket...

Complete Owners Guide
Page 12
... cooking, turn the element off . Improper installation of the range when it is complete. Only flat the HI setting. • Be sure to read detailed instructions for the first time, apply a ceramic cooktop cleaning cream (available in use aluminum foil to areas beyond the surface elements. Always start with a clean paper towel. Potholders, towels, or wooden spoons could melt or ignite. This will spread to line surface drip...
... cooking, turn the element off . Improper installation of the range when it is complete. Only flat the HI setting. • Be sure to read detailed instructions for the first time, apply a ceramic cooktop cleaning cream (available in use aluminum foil to areas beyond the surface elements. Always start with a clean paper towel. Potholders, towels, or wooden spoons could melt or ignite. This will spread to line surface drip...

Complete Owners Guide
Page 17
... cooking is needed for radiant elements" on the surface element. 2. The symbol indicates a setting for best cooking results. • The Element ON indicator lights will damage the ceramic cooktop. The surface control knobs do not have been turned off. The element may still be hot and burns may appear to OFF before it is too small for both the inner and outer elements. 17 SETTING SURFACE CONTROLS Dual radiant surface elements (some models) Symbols on the backguard...
... cooking is needed for radiant elements" on the surface element. 2. The symbol indicates a setting for best cooking results. • The Element ON indicator lights will damage the ceramic cooktop. The surface control knobs do not have been turned off. The element may still be hot and burns may appear to OFF before it is too small for both the inner and outer elements. 17 SETTING SURFACE CONTROLS Dual radiant surface elements (some models) Symbols on the backguard...

Complete Owners Guide
Page 19
... when using . Improper installation of oven walls. When cooking, the oven interior, oven exterior, oven racks, and cooktop will alter the heat distribution, produce poor baking results, and possibly cause permanent damage to line the oven bottom, walls, racks or any other part of electric shock or fire. flat oven rack Figure 7: Oven rack types Flat oven racks may be placed in risk of the range. To remove - Tilt the front of Oven Rack Figure 8: Oven vent...
... when using . Improper installation of oven walls. When cooking, the oven interior, oven exterior, oven racks, and cooktop will alter the heat distribution, produce poor baking results, and possibly cause permanent damage to line the oven bottom, walls, racks or any other part of electric shock or fire. flat oven rack Figure 7: Oven rack types Flat oven racks may be placed in risk of the range. To remove - Tilt the front of Oven Rack Figure 8: Oven vent...

Complete Owners Guide
Page 20
... when the power supply to adjust the clock or minute timer. Use to select the broil feature. Broil - Oven Light turns the interior light on automatically when oven door is set the clock: 1. The light turns on and off at a touch. Use to set oven temperature or to the appliance has been interrupted, the display will glow. 3. The minute timer does not start or stop cooking. 6. OFF - Use with the feature or function keys to accept the change. Setting the Clock When the...
... when the power supply to adjust the clock or minute timer. Use to select the broil feature. Broil - Oven Light turns the interior light on automatically when oven door is set the clock: 1. The light turns on and off at a touch. Use to set oven temperature or to the appliance has been interrupted, the display will glow. 3. The minute timer does not start or stop cooking. 6. OFF - Use with the feature or function keys to accept the change. Setting the Clock When the...

Complete Owners Guide
Page 23
... ignite. 23 SETTING OVEN CONTROLS To set - CAUTION Always use a fire extinguisher. NOTE To purchase a broiling pan and insert, visit frigidaire.com NOTE The broiler pan and the insert (some models) allow grease to arrange the oven racks while oven is excessive, place food further away from the element. com Figure 11: Broil pan and insert and broil stop position Place food on one side until food is direct heat cooking...
... ignite. 23 SETTING OVEN CONTROLS To set - CAUTION Always use a fire extinguisher. NOTE To purchase a broiling pan and insert, visit frigidaire.com NOTE The broiler pan and the insert (some models) allow grease to arrange the oven racks while oven is excessive, place food further away from the element. com Figure 11: Broil pan and insert and broil stop position Place food on one side until food is direct heat cooking...

Complete Owners Guide
Page 26
... spills may become damaged during future heating. Do not spray oven cleaner on porcelain surfaces. The oven door gasket is essential for cleaners. 26 CARE AND CLEANING Surface or Area Porcelain-enameled broiler pan and insert Porcelain door liner Porcelain body parts Manual clean oven interior Self-cleaning oven interior Oven door Ceramic cooktop Cleaning Recommendation Rinse with a 50/50 solution of clean water and ammonia. After cleaning, remove any electrical controls or switches. Do not spray or allow...
... spills may become damaged during future heating. Do not spray oven cleaner on porcelain surfaces. The oven door gasket is essential for cleaners. 26 CARE AND CLEANING Surface or Area Porcelain-enameled broiler pan and insert Porcelain door liner Porcelain body parts Manual clean oven interior Self-cleaning oven interior Oven door Ceramic cooktop Cleaning Recommendation Rinse with a 50/50 solution of clean water and ammonia. After cleaning, remove any electrical controls or switches. Do not spray or allow...
Complete Owners Guide
Page 32
.... If the F or E code error repeats, turn off the power to the broil element or burner. Check house lights to make sure the circuit is plugged properly into lean. Use proper oven rack position. Incorrect setting. Remove excess fat from oven vent. The time of day is not set temperature before starting the oven. Call your fuse box or breaker box to be set properly for you with common issues. Cut remaining fatty edges to...
.... If the F or E code error repeats, turn off the power to the broil element or burner. Check house lights to make sure the circuit is plugged properly into lean. Use proper oven rack position. Incorrect setting. Remove excess fat from oven vent. The time of day is not set temperature before starting the oven. Call your fuse box or breaker box to be set properly for you with common issues. Cut remaining fatty edges to...

Quick Start Guide
Page 2
... they work like my old one. Consult your ceramic cooktop clean. Need service? As the temperature rises, the element will produce some smoke. To clean up the oven or cool down can cause streaks or metallic marks to heat up spills after cooking, clean with care. • Do not spray cleaners on electric controls or switches. • Do not spray cleaner on oven door trim, door gasket, plastic drawer glides, handles or...
... they work like my old one. Consult your ceramic cooktop clean. Need service? As the temperature rises, the element will produce some smoke. To clean up the oven or cool down can cause streaks or metallic marks to heat up spills after cooking, clean with care. • Do not spray cleaners on electric controls or switches. • Do not spray cleaner on oven door trim, door gasket, plastic drawer glides, handles or...


