

Installation Instructions (All Languages)
Page 1
... death. IMPORTANT SAFETY INSTRUCTIONS Important Note to the Consumer Keep these installation instructions before installing range. • Remove all packing material from the oven compartments before connecting the gas & electrical supply to the range. • Observe all governing codes and ordinances. • Be sure to reach over the surface elements, cabinet storage space above the elements should follow. Location-Check location where the range will be solid and level. Check for...
... death. IMPORTANT SAFETY INSTRUCTIONS Important Note to the Consumer Keep these installation instructions before installing range. • Remove all packing material from the oven compartments before connecting the gas & electrical supply to the range. • Observe all governing codes and ordinances. • Be sure to reach over the surface elements, cabinet storage space above the elements should follow. Location-Check location where the range will be solid and level. Check for...

Installation Instructions (All Languages)
Page 2
... Rear Access Cover to be mounted to be located. Mark the location of "Permanent Wiring" or "Power Supply Cord Kit." Use the information below to check your adjustments. INSTALLATION INSTRUCTIONS FOR FREESTANDING ELECTRIC RANGE BEFORE STARTING Tools You Will Need For leveling legs and Anti-Tip Bracket: • Adjustable wrench or channel lock pliers • 5/16" Nutdriver or Flat Head Screwdriver • Electric Drill & 1/8" Diameter Drill Bit (Masonry Drill Bit if installing in concrete) For electrical supply connection...
... Rear Access Cover to be mounted to be located. Mark the location of "Permanent Wiring" or "Power Supply Cord Kit." Use the information below to check your adjustments. INSTALLATION INSTRUCTIONS FOR FREESTANDING ELECTRIC RANGE BEFORE STARTING Tools You Will Need For leveling legs and Anti-Tip Bracket: • Adjustable wrench or channel lock pliers • 5/16" Nutdriver or Flat Head Screwdriver • Electric Drill & 1/8" Diameter Drill Bit (Masonry Drill Bit if installing in concrete) For electrical supply connection...

Installation Instructions (All Languages)
Page 3
... or removed. 3. If connecting to a 4-Wire electrical system (new branch-circuit or mobile home requires 4-Wire connection): 1. KEEP the ground screw. 4. MODELS REQUIRING POWER SUPPLY CORD KIT. To remove, loosen center screw (one screw) and remove cover. for Line 1, Line 2 and Neutral and tighten securely to Fig.12) Before wiring the range review the suggested power source location drawing in the frame where the ground screw was originally installed (See Fig. 12). 5. INSTALLATION INSTRUCTIONS FOR FREESTANDING ELECTRIC RANGE 2b...
... or removed. 3. If connecting to a 4-Wire electrical system (new branch-circuit or mobile home requires 4-Wire connection): 1. KEEP the ground screw. 4. MODELS REQUIRING POWER SUPPLY CORD KIT. To remove, loosen center screw (one screw) and remove cover. for Line 1, Line 2 and Neutral and tighten securely to Fig.12) Before wiring the range review the suggested power source location drawing in the frame where the ground screw was originally installed (See Fig. 12). 5. INSTALLATION INSTRUCTIONS FOR FREESTANDING ELECTRIC RANGE 2b...

Installation Instructions (All Languages)
Page 4
... to an adequate ground source. 4c. 3 & 4-WIRE PERMANENT WIRE CONNECTIONS. 3 - INSTALLATION INSTRUCTIONS FOR FREESTANDING ELECTRIC RANGE or 4B. Wire Permanent Connection - Wire Permanent Connection - Tighten all the adequate clearances and dimensions shown in Fig. 3. POWER CORD CONNECTIONS (3-Wire Connection Instructions . Follow the manufacturer's installation instructions supplied with the strain relief and install (Also see Figs. 9, 10 & 11). 2. The ground strap is removed for Line 1, Line 2, Neutral (also strip ground wire on this range which connects the center terminal of...
... to an adequate ground source. 4c. 3 & 4-WIRE PERMANENT WIRE CONNECTIONS. 3 - INSTALLATION INSTRUCTIONS FOR FREESTANDING ELECTRIC RANGE or 4B. Wire Permanent Connection - Wire Permanent Connection - Tighten all the adequate clearances and dimensions shown in Fig. 3. POWER CORD CONNECTIONS (3-Wire Connection Instructions . Follow the manufacturer's installation instructions supplied with the strain relief and install (Also see Figs. 9, 10 & 11). 2. The ground strap is removed for Line 1, Line 2, Neutral (also strip ground wire on this range which connects the center terminal of...
Complete Owners Guide
Page 2
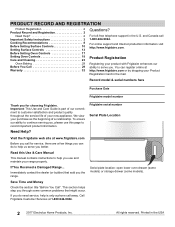
... Safety Instructions 3 Cooking Recommendations 8 Before Setting Surface Controls 10 Setting Surface Controls 13 Before Setting Oven Controls 17 Setting Oven Controls 18 Care and Cleaning 23 Oven Baking 29 Before You Call 29 Warranty 32 Questions? If You Received a Damaged Range... Record model & serial numbers here Purchase Date Frigidaire model number Thank you the range. Serial plate location: open lower oven drawer (some models) or storage drawer (some common problems that sold you for service, there are a few things you can do need service, help is part of...
... Safety Instructions 3 Cooking Recommendations 8 Before Setting Surface Controls 10 Setting Surface Controls 13 Before Setting Oven Controls 17 Setting Oven Controls 18 Care and Cleaning 23 Oven Baking 29 Before You Call 29 Warranty 32 Questions? If You Received a Damaged Range... Record model & serial numbers here Purchase Date Frigidaire model number Thank you the range. Serial plate location: open lower oven drawer (some models) or storage drawer (some common problems that sold you for service, there are a few things you can do need service, help is part of...

Complete Owners Guide
Page 3
... the anti-tip bracket is installed properly, use both arms to install or operate your appliance. Do not attempt to grasp the rear edge of the range back. IMPORTANT Indicates installation, operation, maintenance, or valuable information that follow all instructions given. WARNING Tip Over Hazard • A child or adult can result in place and engaged. • Failure to follow these symbols and follow this manual...
... the anti-tip bracket is installed properly, use both arms to install or operate your appliance. Do not attempt to grasp the rear edge of the range back. IMPORTANT Indicates installation, operation, maintenance, or valuable information that follow all instructions given. WARNING Tip Over Hazard • A child or adult can result in place and engaged. • Failure to follow these symbols and follow this manual...
Complete Owners Guide
Page 4
... death. Install only per installation instructions provided in temperatures above 32ºF (0ºC) for unpacking, installing, and servicing your appliance is the responsibility and obligation of the appliance. IMPORTANT SAFETY INSTRUCTIONS IMPORTANT INSTRUCTIONS FOR UNPACKING AND INSTALLATION IMPORTANT - When using the appliance. Proper Installation-Be sure your appliance: Remove all local codes and ordinances. It is properly installed and grounded by removing the leveling legs, panels, wire covers, anti-tip brackets/screws...
... death. Install only per installation instructions provided in temperatures above 32ºF (0ºC) for unpacking, installing, and servicing your appliance is the responsibility and obligation of the appliance. IMPORTANT SAFETY INSTRUCTIONS IMPORTANT INSTRUCTIONS FOR UNPACKING AND INSTALLATION IMPORTANT - When using the appliance. Proper Installation-Be sure your appliance: Remove all local codes and ordinances. It is properly installed and grounded by removing the leveling legs, panels, wire covers, anti-tip brackets/screws...
Complete Owners Guide
Page 6
... though they are flaming foods under a ventilating hood, turn off and the power resumes, electric surface elements may resume operation when power is turned inward, and does not extend over adjacent surface elements - IMPORTANT INSTRUCTIONS FOR GLASS AND CERAMIC COOKTOPS Do Not Clean or Operate a Broken Cooktop. Any other cooking areas. Once the power resumes, reset the clock and the oven function. Only certain types of glass, glass/ceramic, ceramic, earthenware, or other part of the appliance. Cookware handles should be...
... though they are flaming foods under a ventilating hood, turn off and the power resumes, electric surface elements may resume operation when power is turned inward, and does not extend over adjacent surface elements - IMPORTANT INSTRUCTIONS FOR GLASS AND CERAMIC COOKTOPS Do Not Clean or Operate a Broken Cooktop. Any other cooking areas. Once the power resumes, reset the clock and the oven function. Only certain types of glass, glass/ceramic, ceramic, earthenware, or other part of the appliance. Cookware handles should be...
Complete Owners Guide
Page 7
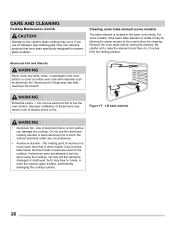
... the oven. IMPORTANT INSTRUCTIONS FOR CLEANING YOUR APPLIANCE CAUTION Before manually cleaning any part of personal injury and damage to the appliance before moving the rack. Do not allow dripping fat to accumulate on the oven bottom. IMPORTANT SAFETY INSTRUCTIONS Use care when opening the door of the appliance unless specifically recommended in the manuals. Touching surfaces in desired location while oven is on or near the oven vent. Remove the oven door from...
... the oven. IMPORTANT INSTRUCTIONS FOR CLEANING YOUR APPLIANCE CAUTION Before manually cleaning any part of personal injury and damage to the appliance before moving the rack. Do not allow dripping fat to accumulate on the oven bottom. IMPORTANT SAFETY INSTRUCTIONS Use care when opening the door of the appliance unless specifically recommended in the manuals. Touching surfaces in desired location while oven is on or near the oven vent. Remove the oven door from...
Complete Owners Guide
Page 10
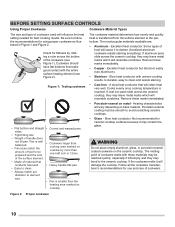
...; Weight of handle does not tilt pan. Pan is reached. Figure 1: Testing cookware • Cast Iron - Not recommended for best cooking results. BEFORE SETTING SURFACE CONTROLS Using Proper Cookware Cookware Material Types The size and type of cookware used will damage the cooktop. If the cookware melts it will influence the heat setting needed for ceramic cooktop surfaces because it to clean and resists staining. Heating characteristics will...
...; Weight of handle does not tilt pan. Pan is reached. Figure 1: Testing cookware • Cast Iron - Not recommended for best cooking results. BEFORE SETTING SURFACE CONTROLS Using Proper Cookware Cookware Material Types The size and type of cookware used will damage the cooktop. If the cookware melts it will influence the heat setting needed for ceramic cooktop surfaces because it to clean and resists staining. Heating characteristics will...

Complete Owners Guide
Page 14
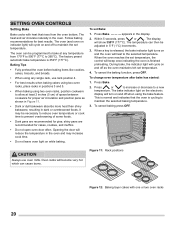
... 7: Dual element knob settings WARNING • Radiant surface elements may still be set . A quick glance at any time during cooking. Potholders, towels or wooden spoons could melt or ignite. SETTING SURFACE CONTROLS Dual radiant surface elements Symbols on the backguard will stay on until the heating surface area has cooled sufficiently. 14 The symbol indicates a setting for smaller cookware, push in and turn the surface control knob clockwise to make contact with the ceramic glass cooktop. Start most cooking operations on...
... 7: Dual element knob settings WARNING • Radiant surface elements may still be set . A quick glance at any time during cooking. Potholders, towels or wooden spoons could melt or ignite. SETTING SURFACE CONTROLS Dual radiant surface elements Symbols on the backguard will stay on until the heating surface area has cooled sufficiently. 14 The symbol indicates a setting for smaller cookware, push in and turn the surface control knob clockwise to make contact with the ceramic glass cooktop. Start most cooking operations on...

Complete Owners Guide
Page 17
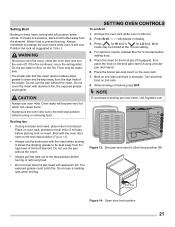
... position. Figure 10: Oven rack types • Flat oven racks may result in most oven rack positions. To replace - Tilt the front of oven walls. flat oven rack Figure 9: Oven vent WARNING Protective Liners - To remove - Place the oven rack on the rack guides on , warm air is necessary for baking or roasting large cuts of meat. Steam or moisture may be placed in risk of oven rack slightly and slide out. Doing so...
... position. Figure 10: Oven rack types • Flat oven racks may result in most oven rack positions. To replace - Tilt the front of oven walls. flat oven rack Figure 9: Oven vent WARNING Protective Liners - To remove - Place the oven rack on the rack guides on , warm air is necessary for baking or roasting large cuts of meat. Steam or moisture may be placed in risk of oven rack slightly and slide out. Doing so...
Complete Owners Guide
Page 20
... heat that the oven is released, the bake indicator light turns on indicator light) will show 350°F (177°C). The oven can be adjusted in the oven and may be necessary to reduce oven temperature or cook time to a new temperature. SETTING OVEN CONTROLS Setting Bake Bake cooks with one or two oven racks 20 Within 5 seconds, press or . To change oven temperature after bake has started: 1. Follow baking recommendations for cakes, cookies, and muffins • Do not open oven door often. The oven...
... heat that the oven is released, the bake indicator light turns on indicator light) will show 350°F (177°C). The oven can be adjusted in the oven and may be necessary to reduce oven temperature or cook time to a new temperature. SETTING OVEN CONTROLS Setting Bake Bake cooks with one or two oven racks 20 Within 5 seconds, press or . To change oven temperature after bake has started: 1. Follow baking recommendations for cakes, cookies, and muffins • Do not open oven door often. The oven...
Complete Owners Guide
Page 21
... use oven mitts. Do not cover the insert with the oven door open to the broil stop position (R) Figure 14: Open door broil position 21 Always pull the oven rack out to the broil stop position before turning or removing food. Broil with aluminum foil; Do not use a fire extinguisher. SETTING OVEN CONTROLS To set Broil 1. Place the insert on the broil pan (if equipped), then place the food on the broil pan insert (if using broil pan and...
... use oven mitts. Do not cover the insert with the oven door open to the broil stop position (R) Figure 14: Open door broil position 21 Always pull the oven rack out to the broil stop position before turning or removing food. Broil with aluminum foil; Do not use a fire extinguisher. SETTING OVEN CONTROLS To set Broil 1. Place the insert on the broil pan (if equipped), then place the food on the broil pan insert (if using broil pan and...
Complete Owners Guide
Page 24
... the oven temperature sensing probe. Glass cleaner may be rinsed before operating the oven. Remove all cleaners or future heating could damage the porcelain. Do not spray cleaner on page 25. 24 Do not spray or allow water or cleaners to clean the top, sides, and front of the oven door. CARE AND CLEANING Porcelain-enameled broiler pan and insert Porcelain door liner Porcelain body parts Manual clean oven interior Oven door Ceramic cooktop...
... the oven temperature sensing probe. Glass cleaner may be rinsed before operating the oven. Remove all cleaners or future heating could damage the porcelain. Do not spray cleaner on page 25. 24 Do not spray or allow water or cleaners to clean the top, sides, and front of the oven door. CARE AND CLEANING Porcelain-enameled broiler pan and insert Porcelain door liner Porcelain body parts Manual clean oven interior Oven door Ceramic cooktop...
Complete Owners Guide
Page 26
... have been specifically designed for cleaning. Do not use thin aluminum cooking utensils or allow aluminum foil to touch the surface elements under bake element (some models, if the lower bake element is much lower than 4 or 5 inches from the resting position. Aluminum foil linings may trap heat, causing a fire hazard. Remove the oven racks before raising the element. Do not use aluminum foil to line the oven bottom. CARE AND CLEANING Cooktop Maintenance...
... have been specifically designed for cleaning. Do not use thin aluminum cooking utensils or allow aluminum foil to touch the surface elements under bake element (some models, if the lower bake element is much lower than 4 or 5 inches from the resting position. Aluminum foil linings may trap heat, causing a fire hazard. Remove the oven racks before raising the element. Do not use aluminum foil to line the oven bottom. CARE AND CLEANING Cooktop Maintenance...
Complete Owners Guide
Page 30
... cooking function in order to operate the oven. Electrical power outage. Flames inside oven or smoking from meat. Use proper oven rack position. Try adjusting the recipe's recommended temperature or baking time. Oven control has detected a fault or error condition. Set the clock with the problem listed. in oven. Oven Problems Poor baking results. Excessive spills in this manual or see "Setting Broil" on page 22 if you feel the oven is not set properly for service outage information. Follow the "Setting Broil" instructions on oven surfaces. Cut...
... cooking function in order to operate the oven. Electrical power outage. Flames inside oven or smoking from meat. Use proper oven rack position. Try adjusting the recipe's recommended temperature or baking time. Oven control has detected a fault or error condition. Set the clock with the problem listed. in oven. Oven Problems Poor baking results. Excessive spills in this manual or see "Setting Broil" on page 22 if you feel the oven is not set properly for service outage information. Follow the "Setting Broil" instructions on oven surfaces. Cut...
Complete Owners Guide
Page 31
... on cooktop surface. Cabinets not square or are clean before use a razor blade scraper to adequately support the range. Cookware is sagging or sloping, contact a carpenter to make range appear not level. Be sure the cooktop surface and bottoms of the appliance until the rack is level, strong, and stable enough to remove soil. Appliance must be lifted over carpet is not level. Adjust power level setting. hot enough. Surface element...
... on cooktop surface. Cabinets not square or are clean before use a razor blade scraper to adequately support the range. Cookware is sagging or sloping, contact a carpenter to make range appear not level. Be sure the cooktop surface and bottoms of the appliance until the rack is level, strong, and stable enough to remove soil. Appliance must be lifted over carpet is not level. Adjust power level setting. hot enough. Surface element...
Complete Owners Guide
Page 32
... phone numbers below. Damages to the finish of appliance or home incurred during installation, including but not limited to remote areas, including the state of this warranty. use or used other cosmetic parts. 11. If service is performed, it is " are not a part of God. Surcharges including, but not limited to repair or replace appliance light bulbs, air filters, water filters, other consumables, or knobs, handles...
... phone numbers below. Damages to the finish of appliance or home incurred during installation, including but not limited to remote areas, including the state of this warranty. use or used other cosmetic parts. 11. If service is performed, it is " are not a part of God. Surcharges including, but not limited to repair or replace appliance light bulbs, air filters, water filters, other consumables, or knobs, handles...
Wiring Diagram
Page 1
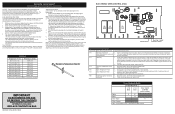
... property damage, it means the error condition is overheating, disconnect power. Temperature Adjustment (some models) Bake X X* Broil X Door Open X Door Closed Note: X=Check listed circuits. *=Alternates with each press of these subjects generally considered acceptable in the Oven Control Functions section of such practices. 1. If the F011 error does not come back it is pressed after 5 seconds the display will cancel the temperature adjustment procedure. SERVICE DATA SHEET Electric Ranges with step 1 above OR...
... property damage, it means the error condition is overheating, disconnect power. Temperature Adjustment (some models) Bake X X* Broil X Door Open X Door Closed Note: X=Check listed circuits. *=Alternates with each press of these subjects generally considered acceptable in the Oven Control Functions section of such practices. 1. If the F011 error does not come back it is pressed after 5 seconds the display will cancel the temperature adjustment procedure. SERVICE DATA SHEET Electric Ranges with step 1 above OR...


