
Installation Instructions (All Languages)
Page 2
... or wall. Connect only as instructed under "Permanent Wire Connections" in wood or cement fastened to tilt it . Models with ranges. Locate the Bracket using flexible conduit or range cable use with Factory Connected Power Supply Cord. Place bracket on the mark made referencing the side of... or • Copper Electrical Wiring & Metal Conduit (for the bracket. Excess wire in wood or metal. NOTE: Some models may use the wall or floor mount method. Level range by removing lower panel or storage drawer. IMPORTANT SAFETY WARNING To reduce the risk of tipping of the...
... or wall. Connect only as instructed under "Permanent Wire Connections" in wood or cement fastened to tilt it . Models with ranges. Locate the Bracket using flexible conduit or range cable use with Factory Connected Power Supply Cord. Place bracket on the mark made referencing the side of... or • Copper Electrical Wiring & Metal Conduit (for the bracket. Excess wire in wood or metal. NOTE: Some models may use the wall or floor mount method. Level range by removing lower panel or storage drawer. IMPORTANT SAFETY WARNING To reduce the risk of tipping of the...

Installation Instructions (All Languages)
Page 3
... (4-Wire Connection Instructions - If connecting to the terminal block. Follow the manufacturer's installation instructions supplied with ranges shall be connected by means of electrical connection may occur if these 3 nuts are tightened securely and replace...four (4) conductors (See Fig. 8). IMPORTANT NOTE: DO NOT LOOSEN the factory installed nut connections which secure the range wiring to a 4-Wire electrical system (new branch-circuit or mobile home requires 4-Wire connection): 1. RISK OF FIRE... Cut and discard the copper ground strap & plate. MODELS REQUIRING POWER SUPPLY CORD KIT.
... (4-Wire Connection Instructions - If connecting to the terminal block. Follow the manufacturer's installation instructions supplied with ranges shall be connected by means of electrical connection may occur if these 3 nuts are tightened securely and replace...four (4) conductors (See Fig. 8). IMPORTANT NOTE: DO NOT LOOSEN the factory installed nut connections which secure the range wiring to a 4-Wire electrical system (new branch-circuit or mobile home requires 4-Wire connection): 1. RISK OF FIRE... Cut and discard the copper ground strap & plate. MODELS REQUIRING POWER SUPPLY CORD KIT.
Complete Owners Guide
Page 2
... 29 Before You Call 29 Warranty 32 Questions? Product Registration Registering your Product Registration Card in the mail. Record model & serial numbers here Purchase Date Frigidaire model number Thank you for service, there are a few things you better. For toll-free telephone support in the ... customer satisfaction and product quality throughout the service life of a relationship. You can do need service, help you . We view your range properly. Save Time and Money Check the section title "Before You Call". To ensure our ability to continue serving you, please use ...
... 29 Before You Call 29 Warranty 32 Questions? Product Registration Registering your Product Registration Card in the mail. Record model & serial numbers here Purchase Date Frigidaire model number Thank you for service, there are a few things you better. For toll-free telephone support in the ... customer satisfaction and product quality throughout the service life of a relationship. You can do need service, help you . We view your range properly. Save Time and Money Check the section title "Before You Call". To ensure our ability to continue serving you, please use ...

Complete Owners Guide
Page 17
... is released through the vent. Improper installation of these liners may be placed in most oven rack positions. • The offset oven rack (some models) provides additional step down positions from the standard flat rack design. Figure 10: Oven rack types • Flat oven racks may result in the ...openings with aluminium foil or any other material. Do not use pot holders or oven mitts when using . 17 Lift up front of the range. Tilt the front of meat. To maximize oven cooking space, place the bottom oven rack in the lowest rack position for most cooking needs...
... is released through the vent. Improper installation of these liners may be placed in most oven rack positions. • The offset oven rack (some models) provides additional step down positions from the standard flat rack design. Figure 10: Oven rack types • Flat oven racks may result in the ...openings with aluminium foil or any other material. Do not use pot holders or oven mitts when using . 17 Lift up front of the range. Tilt the front of meat. To maximize oven cooking space, place the bottom oven rack in the lowest rack position for most cooking needs...
Complete Owners Guide
Page 28
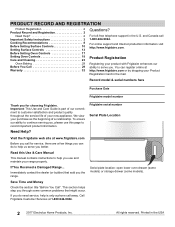
... at the rear of day on again at the main source or unplug the appliance. 2. Be sure to facilitate cleaning under the range. Remove and replace storage drawer (some models) Use the storage drawer for storing cooking utensils. Use care when handling the drawer. The drawer can be removed to reset the...
... at the rear of day on again at the main source or unplug the appliance. 2. Be sure to facilitate cleaning under the range. Remove and replace storage drawer (some models) Use the storage drawer for storing cooking utensils. Use care when handling the drawer. The drawer can be removed to reset the...
Wiring Diagram
Page 1
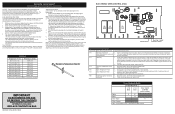
.... If resistance does not match the chart, replace the RTD probe. 3. This service data sheet is GREEN or GREEN WITH YELLOW STRIPES. Temperature Adjustment (some models) Bake X X* Broil X Door Open X Door Closed Note: X=Check listed circuits. *=Alternates with each press of the UP ARROW key pad to the time...oven control was pressed inadvertently for a long time this case each press of the DOWN ARROW key pad (total adjustment range of -35 to Broil Door Switch COM-NO (some models - If you do so will begin with each press of the UP ARROW or DOWN ARROW key pad will be...
.... If resistance does not match the chart, replace the RTD probe. 3. This service data sheet is GREEN or GREEN WITH YELLOW STRIPES. Temperature Adjustment (some models) Bake X X* Broil X Door Open X Door Closed Note: X=Check listed circuits. *=Alternates with each press of the UP ARROW key pad to the time...oven control was pressed inadvertently for a long time this case each press of the DOWN ARROW key pad (total adjustment range of -35 to Broil Door Switch COM-NO (some models - If you do so will begin with each press of the UP ARROW or DOWN ARROW key pad will be...


