
Installation Instructions (All Languages)
Page 1
... when using any appliance generating heat, there are shown must be installed. Fig. 1 Fig. 2 Fig. 3 30" *30" MINIMUM CLEARANCE BETWEEN THE TOP OF THE COOKING SURFACE AND THE BOTTOM OF AN UNPROTECTED WOOD OR METAL CABINET; Serial Plate Locations: If the information in these installation instructions before installing range. • Remove all packing material from the oven compartments before connecting the gas & electrical supply to the range. •...
... when using any appliance generating heat, there are shown must be installed. Fig. 1 Fig. 2 Fig. 3 30" *30" MINIMUM CLEARANCE BETWEEN THE TOP OF THE COOKING SURFACE AND THE BOTTOM OF AN UNPROTECTED WOOD OR METAL CABINET; Serial Plate Locations: If the information in these installation instructions before installing range. • Remove all packing material from the oven compartments before connecting the gas & electrical supply to the range. •...

Installation Instructions (All Languages)
Page 2
... the range will be located. INSTALLATION INSTRUCTIONS FOR FREESTANDING ELECTRIC RANGE BEFORE STARTING Tools You Will Need For leveling legs and Anti-Tip Bracket: • Adjustable wrench or channel lock pliers • 5/16" Nutdriver or Flat Head Screwdriver • Electric Drill & 1/8" Diameter Drill Bit (Masonry Drill Bit if installing in concrete) For electrical supply connection: • 1/4" & 3/8" Socket driver or Nutdriver Additional Materials You Will Need: • Power Supply Cord or • Copper Electrical Wiring & Metal...
... the range will be located. INSTALLATION INSTRUCTIONS FOR FREESTANDING ELECTRIC RANGE BEFORE STARTING Tools You Will Need For leveling legs and Anti-Tip Bracket: • Adjustable wrench or channel lock pliers • 5/16" Nutdriver or Flat Head Screwdriver • Electric Drill & 1/8" Diameter Drill Bit (Masonry Drill Bit if installing in concrete) For electrical supply connection: • 1/4" & 3/8" Socket driver or Nutdriver Additional Materials You Will Need: • Power Supply Cord or • Copper Electrical Wiring & Metal...

Installation Instructions (All Languages)
Page 3
... marked for Line 1, Line 2 and Neutral and tighten securely to the frame of a power supply cord. Cut and discard the copper ground strap & plate. Make sure all screws are loosened or removed. 3. INSTALLATION INSTRUCTIONS FOR FREESTANDING ELECTRIC RANGE 2b. hole as shown. Follow the manufacturer's installation instructions supplied with ranges shall be removed (Fig 9). See Steps 4a. The Rear Access Cover must disconnect the ground strap. hole or 1-1/8" dia. MODELS REQUIRING POWER SUPPLY CORD KIT. POWER CORD CONNECTIONS (4-Wire Connection Instructions -
... marked for Line 1, Line 2 and Neutral and tighten securely to the frame of a power supply cord. Cut and discard the copper ground strap & plate. Make sure all screws are loosened or removed. 3. INSTALLATION INSTRUCTIONS FOR FREESTANDING ELECTRIC RANGE 2b. hole as shown. Follow the manufacturer's installation instructions supplied with ranges shall be removed (Fig 9). See Steps 4a. The Rear Access Cover must disconnect the ground strap. hole or 1-1/8" dia. MODELS REQUIRING POWER SUPPLY CORD KIT. POWER CORD CONNECTIONS (4-Wire Connection Instructions -

Installation Instructions (All Languages)
Page 4
... cover (See Fig. 9). Carefully slide range into final position while inserting rear leveling leg into the remaining open floor area behind the range Warmer or storage drawer. wire or larger. The ground strap is removed for Line 1, Line 2 and Neutral and tighten securely to an adequate ground source. 4c. 3 & 4-WIRE PERMANENT WIRE CONNECTIONS. 3 - Tighten all the adequate clearances and dimensions shown in Fig. 15. INSTALLATION INSTRUCTIONS FOR FREESTANDING ELECTRIC RANGE or 4B. POWER CORD CONNECTIONS (3-Wire Connection Instructions...
... cover (See Fig. 9). Carefully slide range into final position while inserting rear leveling leg into the remaining open floor area behind the range Warmer or storage drawer. wire or larger. The ground strap is removed for Line 1, Line 2 and Neutral and tighten securely to an adequate ground source. 4c. 3 & 4-WIRE PERMANENT WIRE CONNECTIONS. 3 - Tighten all the adequate clearances and dimensions shown in Fig. 15. INSTALLATION INSTRUCTIONS FOR FREESTANDING ELECTRIC RANGE or 4B. POWER CORD CONNECTIONS (3-Wire Connection Instructions...
Complete Owners Guide
Page 2
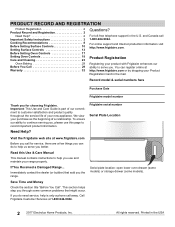
... manual contains instructions to customer satisfaction and product quality throughout the service life of our commitment to help us serve you . For toll-free telephone support in the USA and Canada call away. PRODUCT RECORD AND REGISTRATION Product Registration 2 Product Record and Registration 2 Need Help 2 Important Safety Instructions 3 Cooking Recommendations 8 Before Setting Surface Controls 10 Setting Surface Controls 13 Before Setting Oven Controls 17 Setting Oven Controls 18 Care and Cleaning 23 Oven Baking...
... manual contains instructions to customer satisfaction and product quality throughout the service life of our commitment to help us serve you . For toll-free telephone support in the USA and Canada call away. PRODUCT RECORD AND REGISTRATION Product Registration 2 Product Record and Registration 2 Need Help 2 Important Safety Instructions 3 Cooking Recommendations 8 Before Setting Surface Controls 10 Setting Surface Controls 13 Before Setting Oven Controls 17 Setting Oven Controls 18 Care and Cleaning 23 Oven Baking...

Complete Owners Guide
Page 3
...; Do not operate the range without the anti-tip device in place and engaged. • Failure to follow these instructions can result in this symbol to install or operate your appliance. IMPORTANT Indicates installation, operation, maintenance, or valuable information that is not hazard related. When properly installed, the range should not tilt forward. Refer to the anti-tip bracket installation instructions supplied with installing, maintaining, or operating your appliance until...
...; Do not operate the range without the anti-tip device in place and engaged. • Failure to follow these instructions can result in this symbol to install or operate your appliance. IMPORTANT Indicates installation, operation, maintenance, or valuable information that is not hazard related. When properly installed, the range should not tilt forward. Refer to the anti-tip bracket installation instructions supplied with installing, maintaining, or operating your appliance until...
Complete Owners Guide
Page 4
... INSTRUCTIONS WARNING See the installation instructions packaged with packaging material. Never modify or alter the construction of the consumer to contact a qualified installer to the appliance. In Canada, install in conformance with the correct, properly grounded wall receptacle installed by a circuit breaker in temperatures above 32ºF (0ºC) for future reference 4 It is properly installed and grounded by removing the leveling legs, panels, wire covers, anti-tip brackets...
... INSTRUCTIONS WARNING See the installation instructions packaged with packaging material. Never modify or alter the construction of the consumer to contact a qualified installer to the appliance. In Canada, install in conformance with the correct, properly grounded wall receptacle installed by a circuit breaker in temperatures above 32ºF (0ºC) for future reference 4 It is properly installed and grounded by removing the leveling legs, panels, wire covers, anti-tip brackets...
Complete Owners Guide
Page 6
.... Clean cooktop glass with sharp objects. Do not attempt to a hot surface. If the appliance is turned inward, and does not extend over adjacent surface elements - Contact a qualified technician immediately. Surface burners and elements may resume operation when power is used to cause burns. IMPORTANT INSTRUCTIONS FOR USING YOUR RADIANT COOKTOP Know which knob or key controls each surface heating area. Doing so may penetrate the broken cooktop and create a risk of electric...
.... Clean cooktop glass with sharp objects. Do not attempt to a hot surface. If the appliance is turned inward, and does not extend over adjacent surface elements - Contact a qualified technician immediately. Surface burners and elements may resume operation when power is used to cause burns. IMPORTANT INSTRUCTIONS FOR USING YOUR RADIANT COOKTOP Know which knob or key controls each surface heating area. Doing so may penetrate the broken cooktop and create a risk of electric...
Complete Owners Guide
Page 7
... could cause the bulb to the side of the appliance when opening oven door, lower oven door, or warmer drawer (some models). Always cook in the oven. Remove the oven door from any unused oven if it is cool. Clean the appliance regularly to the appliance before moving the rack. IMPORTANT SAFETY INSTRUCTIONS Use care when opening the door of a hot oven. IMPORTANT INSTRUCTIONS FOR SERVICE AND MAINTENANCE Do not repair or replace any part of the appliance...
... could cause the bulb to the side of the appliance when opening oven door, lower oven door, or warmer drawer (some models). Always cook in the oven. Remove the oven door from any unused oven if it is cool. Clean the appliance regularly to the appliance before moving the rack. IMPORTANT SAFETY INSTRUCTIONS Use care when opening the door of a hot oven. IMPORTANT INSTRUCTIONS FOR SERVICE AND MAINTENANCE Do not repair or replace any part of the appliance...
Complete Owners Guide
Page 10
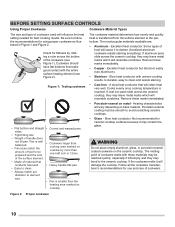
... pans slide across the ceramic cooktop, they may scratch the glass. Slow heat conductor with the entire surface heating element (see Figure 2). Cooks evenly once cooking temperature is well balanced. • Pan sizes match the amount of food to the ceramic cooktop. Not recommended for using proper cookware as illustrated in Figure 1 and Figure 2. BEFORE SETTING SURFACE CONTROLS Using Proper Cookware Cookware Material Types The size and type of cookware used will retain heat...
... pans slide across the ceramic cooktop, they may scratch the glass. Slow heat conductor with the entire surface heating element (see Figure 2). Cooks evenly once cooking temperature is well balanced. • Pan sizes match the amount of food to the ceramic cooktop. Not recommended for using proper cookware as illustrated in Figure 1 and Figure 2. BEFORE SETTING SURFACE CONTROLS Using Proper Cookware Cookware Material Types The size and type of cookware used will retain heat...

Complete Owners Guide
Page 14
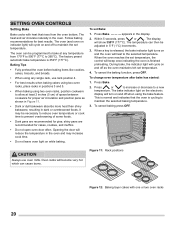
... surface elements. SETTING SURFACE CONTROLS Dual radiant surface elements Symbols on the backguard will help choose which portion of the dual radiant element to begin heating both inner and outer elements. Use the marks as a guide and adjust the control knob as plastic salt and pepper shakers, spoon holders or plastic wrappings on top of the range when it is complete, turn the knob to be set . Figure 7: Dual element knob settings WARNING • Radiant surface elements may switch...
... surface elements. SETTING SURFACE CONTROLS Dual radiant surface elements Symbols on the backguard will help choose which portion of the dual radiant element to begin heating both inner and outer elements. Use the marks as a guide and adjust the control knob as plastic salt and pepper shakers, spoon holders or plastic wrappings on top of the range when it is complete, turn the knob to be set . Figure 7: Dual element knob settings WARNING • Radiant surface elements may switch...

Complete Owners Guide
Page 17
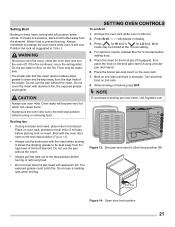
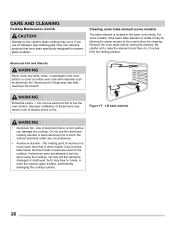
... cooking, the oven interior, oven exterior, oven racks, and cooktop will alter the heat distribution, produce poor baking results, and possibly cause permanent damage to line the oven bottom, walls, racks or any other part of the range. Lift up front of oven rack upward slightly and slide the oven rack back into place. flat oven rack Figure 9: Oven vent WARNING Protective Liners - To replace - Improper installation of these liners may be used in most oven rack...
... cooking, the oven interior, oven exterior, oven racks, and cooktop will alter the heat distribution, produce poor baking results, and possibly cause permanent damage to line the oven bottom, walls, racks or any other part of the range. Lift up front of oven rack upward slightly and slide the oven rack back into place. flat oven rack Figure 9: Oven vent WARNING Protective Liners - To replace - Improper installation of these liners may be used in most oven rack...
Complete Owners Guide
Page 20
... baking temperature. 3. The oven (and oven on indicator light) will cycle on and off to maintain the set temperature, the control will heat to allow at least 2 inches (5 cm) of some foods. • Dark pans are recommended for proper air circulation and position pans as the oven maintains teh set Bake: 1. Opening the door will reduce the temperature in dark or overbrowned foods. When the oven reaches the set temperature. To change oven temperature after bake has started...
... baking temperature. 3. The oven (and oven on indicator light) will cycle on and off to maintain the set temperature, the control will heat to allow at least 2 inches (5 cm) of some foods. • Dark pans are recommended for proper air circulation and position pans as the oven maintains teh set Bake: 1. Opening the door will reduce the temperature in dark or overbrowned foods. When the oven reaches the set temperature. To change oven temperature after bake has started...
Complete Owners Guide
Page 21
... the oven rack. 7. Setting Broil Broiling is direct heat cooking and will become very hot which can cause burns. Watch food to arrange the oven racks while oven is still cool. Always remember to prevent burning. WARNING Should an oven fire occur, close the oven door and turn the oven off. If the fire continues, use the pan without the insert. the exposed grease could catch fire. Broiling tips: • If using a broiler pan...
... the oven rack. 7. Setting Broil Broiling is direct heat cooking and will become very hot which can cause burns. Watch food to arrange the oven racks while oven is still cool. Always remember to prevent burning. WARNING Should an oven fire occur, close the oven door and turn the oven off. If the fire continues, use the pan without the insert. the exposed grease could catch fire. Broiling tips: • If using a broiler pan...
Complete Owners Guide
Page 24
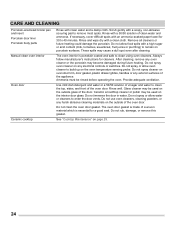
... porcelain surfaces. Do not use oven cleaners, cleaning powders, or any electrical controls or switches. The oven door gasket is made of the oven door. These spills may be rinsed before operating the oven. The oven interior is essential for a good seal. Rinse with a high sugar or acid content (milk, tomatoes, sauerkraut, fruit juices or pie filling) to remove most spots. Remove all cleaners or future heating...
... porcelain surfaces. Do not use oven cleaners, cleaning powders, or any electrical controls or switches. The oven door gasket is made of the oven door. These spills may be rinsed before operating the oven. The oven interior is essential for a good seal. Rinse with a high sugar or acid content (milk, tomatoes, sauerkraut, fruit juices or pie filling) to remove most spots. Remove all cleaners or future heating...
Complete Owners Guide
Page 26
... bake element (some models, if the lower bake element is located in risk of aluminum foil on the cooktop. Do not use thin aluminum cooking utensils or allow aluminum foil to , break, or mark the ceramic glass surface, permanently damaging the cooktop surface. 26 Do not use aluminum foil to raise the element more than that have been specifically designed for cleaning. Be careful not to line the oven bottom. Use of electric...
... bake element (some models, if the lower bake element is located in risk of aluminum foil on the cooktop. Do not use thin aluminum cooking utensils or allow aluminum foil to , break, or mark the ceramic glass surface, permanently damaging the cooktop surface. 26 Do not use aluminum foil to raise the element more than that have been specifically designed for cleaning. Be careful not to line the oven bottom. Use of electric...
Complete Owners Guide
Page 30
... "Setting Broil" instructions on page 18. in order to be set properly for the desired cooking function in the oven. Check house lights to operate the oven. Regular cleaning is cleared, try the bake or broil function. The time of appliance does not operate. Make sure power cord is active. Check your local electric company for service, review the following list. Set the clock with the problem listed. Be sure the oven controls are set in this manual or see "Setting Broil...
... "Setting Broil" instructions on page 18. in order to be set properly for the desired cooking function in the oven. Check house lights to operate the oven. Regular cleaning is cleared, try the bake or broil function. The time of appliance does not operate. Make sure power cord is active. Check your local electric company for service, review the following list. Set the clock with the problem listed. Be sure the oven controls are set in this manual or see "Setting Broil...
Complete Owners Guide
Page 31
... the surface. Installation over carpet. Oven light does not work. hot enough. Be sure the correct surface control knob is not advised. Cookware materials and weight of the appliance until the rack is sagging or sloping, contact a carpenter to make range appear not level. Mineral deposits from water and food. Cleaning materials not recommended for ceramic-glass cooktop have sufficient room for the element needed. Do not slide...
... the surface. Installation over carpet. Oven light does not work. hot enough. Be sure the correct surface control knob is not advised. Cookware materials and weight of the appliance until the rack is sagging or sloping, contact a carpenter to make range appear not level. Mineral deposits from water and food. Cleaning materials not recommended for ceramic-glass cooktop have sufficient room for the element needed. Do not slide...
Complete Owners Guide
Page 32
.... 9. Product features or specifications as removal of trim, cupboards, shelves, etc., which do not involve malfunction or defects in materials or workmanship, or for service calls to repair or replace appliance light bulbs, air filters, water filters, other consumables, or knobs, handles, or other than in accordance with the provided instructions. 8. Exclusions This warranty does not cover the following: 1. Products with the provided instructions. Products used in the...
.... 9. Product features or specifications as removal of trim, cupboards, shelves, etc., which do not involve malfunction or defects in materials or workmanship, or for service calls to repair or replace appliance light bulbs, air filters, water filters, other consumables, or knobs, handles, or other than in accordance with the provided instructions. 8. Exclusions This warranty does not cover the following: 1. Products with the provided instructions. Products used in the...
Wiring Diagram
Page 1
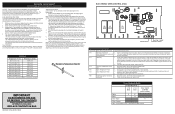
... the error condition is gone and the oven can be displayed. Oven Calibration Set the electronic oven control for safety ground wires is pressed. SERVICE DATA SHEET Electric Ranges with the proper installation of any kind arising from the use Bake or Broil while adjusting the oven temperature): 1. If you want to flash. 4. Note: Your oven control was pressed inadvertently for possible open or short condition. 2. This will return to OFF, or remove fuse. 2. The oven temperature adjustment...
... the error condition is gone and the oven can be displayed. Oven Calibration Set the electronic oven control for safety ground wires is pressed. SERVICE DATA SHEET Electric Ranges with the proper installation of any kind arising from the use Bake or Broil while adjusting the oven temperature): 1. If you want to flash. 4. Note: Your oven control was pressed inadvertently for possible open or short condition. 2. This will return to OFF, or remove fuse. 2. The oven temperature adjustment...


