
Installation Instructions (All Languages)
Page 1
...elements, cabinet storage space above the elements should follow. Páginas 5-8 1 p/n 316454912 rev A Provide adequate clearances between the range and adjacent combustible surfaces. 2. Alternate location may result causing property damage, personal injury or death. IMPORTANT: SAVE FOR LOCAL ELECTRICAL ...• As when using any appliance generating heat, there are shown must be avoided. Location-Check location where the range will be under cooktop. Clearances and Dimensions 1. These are listed in these instructions with the consumer. Given dimensions provide ...
...elements, cabinet storage space above the elements should follow. Páginas 5-8 1 p/n 316454912 rev A Provide adequate clearances between the range and adjacent combustible surfaces. 2. Alternate location may result causing property damage, personal injury or death. IMPORTANT: SAVE FOR LOCAL ELECTRICAL ...• As when using any appliance generating heat, there are shown must be avoided. Location-Check location where the range will be under cooktop. Clearances and Dimensions 1. These are listed in these instructions with the consumer. Given dimensions provide ...

Installation Instructions (All Languages)
Page 2
... Materials You Will Need: • Power Supply Cord or • Copper Electrical Wiring & Metal Conduit (for cord kit ampere rating information. Level range by a qualified technician in wood or concrete material. NOTE: A minimum clearance of 1/8" is installed Fig. 4 and does not allow the Rear ...screws completely penetrate dry wall and are to the wall, drill pilot hole at 125/250 volts minimum and marked for installation in the range compartment may have a factory installed three (3) conductor Power Supply Cord. When fastening to a different location, the Anti-Tip Bracket must ...
... Materials You Will Need: • Power Supply Cord or • Copper Electrical Wiring & Metal Conduit (for cord kit ampere rating information. Level range by a qualified technician in wood or concrete material. NOTE: A minimum clearance of 1/8" is installed Fig. 4 and does not allow the Rear ...screws completely penetrate dry wall and are to the wall, drill pilot hole at 125/250 volts minimum and marked for installation in the range compartment may have a factory installed three (3) conductor Power Supply Cord. When fastening to a different location, the Anti-Tip Bracket must ...

Installation Instructions (All Languages)
Page 3
... Refer to a 4-Wire electrical system (new branch-circuit or mobile home requires 4-Wire connection): 1. If connecting to Fig.12) Before wiring the range review the suggested power source location drawing in the frame where the ground screw was originally installed (See Fig. 12). 5. IMPORTANT NOTE: DO NOT...disconnect the ground strap. See Steps 4a. for Line 1, Line 2 and Neutral and tighten securely to release the copper ground strap from factory with ranges shall be accessible. 3 & 4 - The terminal block will then be used. hole as shown. To use with 1-3/8" dia. hole or ...
... Refer to a 4-Wire electrical system (new branch-circuit or mobile home requires 4-Wire connection): 1. If connecting to Fig.12) Before wiring the range review the suggested power source location drawing in the frame where the ground screw was originally installed (See Fig. 12). 5. IMPORTANT NOTE: DO NOT...disconnect the ground strap. See Steps 4a. for Line 1, Line 2 and Neutral and tighten securely to release the copper ground strap from factory with ranges shall be accessible. 3 & 4 - The terminal block will then be used. hole as shown. To use with 1-3/8" dia. hole or ...

Installation Instructions (All Languages)
Page 4
... NOTE: If the ground strap is removed for any reason, a separate ground wire must be connected to the separate ground screw attached to the range chassis and to a 4-Wire electrical system (new branchcircuit or mobile home requires 4-Wire connection): 1. (3 & 4 - If connecting to an adequate... 5. 3. (4-Wire Permanent Connection ONLY) Disconnect the ground strap. IMPORTANT NOTE: DO NOT LOOSEN the factory installed nut connections which secure the range wiring to the terminal block (See Fig. 13). KEEP the ground screw, ground plate and go to Step 4. 4. (4-Wire Permanent Connection...
... NOTE: If the ground strap is removed for any reason, a separate ground wire must be connected to the separate ground screw attached to the range chassis and to a 4-Wire electrical system (new branchcircuit or mobile home requires 4-Wire connection): 1. (3 & 4 - If connecting to an adequate... 5. 3. (4-Wire Permanent Connection ONLY) Disconnect the ground strap. IMPORTANT NOTE: DO NOT LOOSEN the factory installed nut connections which secure the range wiring to the terminal block (See Fig. 13). KEEP the ground screw, ground plate and go to Step 4. 4. (4-Wire Permanent Connection...

Complete Owners Guide
Page 1
All about the Use & Care of your Electric Range 808527516 Rev B (June 2019) TABLE OF CONTENTS Product Record and Registration 2 Important Safety Instructions 3 Cooking Recommendations 9 Before Setting Surface Controls 12 Setting Surface Controls 14 Before Setting Oven Controls 16 Oven Controls 17 Care and Cleaning 22 Before You Call 28 Warranty 31 www.frigidaire.com USA 1-800-944-9044 www.frigidaire.ca Canada 1-800-265-8352
All about the Use & Care of your Electric Range 808527516 Rev B (June 2019) TABLE OF CONTENTS Product Record and Registration 2 Important Safety Instructions 3 Cooking Recommendations 9 Before Setting Surface Controls 12 Setting Surface Controls 14 Before Setting Oven Controls 16 Oven Controls 17 Care and Cleaning 22 Before You Call 28 Warranty 31 www.frigidaire.com USA 1-800-944-9044 www.frigidaire.ca Canada 1-800-265-8352

Complete Owners Guide
Page 2
For online support and Internet production information visit http://www.frigidaire.com. Product Registration Registering your range properly. To ensure our ability to continue serving you, please use and maintain your product with Frigidaire enhances our ability to help us serve you through some... online at 1-800-944-9044. If You Received a Damaged Range... Save Time and Money Check the section title "Before You Call". Visit the Frigidaire web site at www.frigidaire.com Before you the range. PRODUCT RECORD AND REGISTRATION Product Record and Registration 2 Important Safety...
For online support and Internet production information visit http://www.frigidaire.com. Product Registration Registering your range properly. To ensure our ability to continue serving you, please use and maintain your product with Frigidaire enhances our ability to help us serve you through some... online at 1-800-944-9044. If You Received a Damaged Range... Save Time and Money Check the section title "Before You Call". Visit the Frigidaire web site at www.frigidaire.com Before you the range. PRODUCT RECORD AND REGISTRATION Product Record and Registration 2 Important Safety...
Complete Owners Guide
Page 3
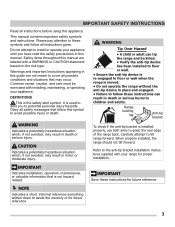
... possible injury or death. IMPORTANT Indicates installation, operation, maintenance, or valuable information that follow these instructions can tip the range and be exercised with a WARNING or CAUTION statement based on the risk type. IMPORTANT SAFETY INSTRUCTIONS Read all instructions given.... Warnings and important instructions appearing in this symbol to tilt range forward. Please pay attention to these instructions for future reference NOTE Indicates a short, informal reference-something written down ...
... possible injury or death. IMPORTANT Indicates installation, operation, maintenance, or valuable information that follow these instructions can tip the range and be exercised with a WARNING or CAUTION statement based on the risk type. IMPORTANT SAFETY INSTRUCTIONS Read all instructions given.... Warnings and important instructions appearing in this symbol to tilt range forward. Please pay attention to these instructions for future reference NOTE Indicates a short, informal reference-something written down ...
Complete Owners Guide
Page 4
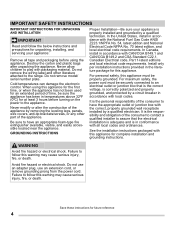
... 4 For maximum safety, the power cord must be properly grounded. It is correctly polarized and properly grounded, and protected by a qualified electrician. Failure to the range. Avoid fire hazard or electrical shock.
... 4 For maximum safety, the power cord must be properly grounded. It is correctly polarized and properly grounded, and protected by a qualified electrician. Failure to the range. Avoid fire hazard or electrical shock.

Complete Owners Guide
Page 5
... let clothing or other injury. During and after use water or flour on an open drawer when hot may result in the cabinets above the range. Do not attempt to climb or play around the appliance. Once the power resumes, reset the clock and the oven function. The weight of a...surfaces. Do not store explosives, such as flammable liquids. Use dry potholders. Do not use baking soda. Moist or damp potholders on or near the range. Surface burners and elements may include the cooktop, surfaces facing the cooktop, oven vent areas, oven door, and oven window. Children should not be ...
... let clothing or other injury. During and after use water or flour on an open drawer when hot may result in the cabinets above the range. Do not attempt to climb or play around the appliance. Once the power resumes, reset the clock and the oven function. The weight of a...surfaces. Do not store explosives, such as flammable liquids. Use dry potholders. Do not use baking soda. Moist or damp potholders on or near the range. Surface burners and elements may include the cooktop, surfaces facing the cooktop, oven vent areas, oven door, and oven window. Children should not be ...
Complete Owners Guide
Page 7
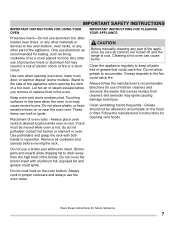
... burns. Placement of the appliance when opening oven door, lower oven door, or warmer drawer (some models). Remove all controls are turned off and the range is cool. CAUTION Before manually cleaning any part of kitchen cleaners and aerosols. Cleaning a hot oven can melt or ignite. Clean the appliance regularly to...
... burns. Placement of the appliance when opening oven door, lower oven door, or warmer drawer (some models). Remove all controls are turned off and the range is cool. CAUTION Before manually cleaning any part of kitchen cleaners and aerosols. Cleaning a hot oven can melt or ignite. Clean the appliance regularly to...

Complete Owners Guide
Page 13
... gradually and evenly. To maintain the selected setting the element will turn the element off . CAUTION • Surface elements may result in risk of the range when it has cooled to have been turned off . This will damage the cooktop. 13 Potholders, towels, or wooden spoons could melt or ignite. If...
... gradually and evenly. To maintain the selected setting the element will turn the element off . CAUTION • Surface elements may result in risk of the range when it has cooled to have been turned off . This will damage the cooktop. 13 Potholders, towels, or wooden spoons could melt or ignite. If...

Complete Owners Guide
Page 14
...; Do not use . If these indicator lights when finished cooking is turned to be hot and burns may vary when using other types of the range when it is touched before removing the cookware. Place correctly sized cookware on the cooktop, they have cooled after they will remain on AFTER the...
...; Do not use . If these indicator lights when finished cooking is turned to be hot and burns may vary when using other types of the range when it is touched before removing the cookware. Place correctly sized cookware on the cooktop, they have cooled after they will remain on AFTER the...

Complete Owners Guide
Page 16
... - CAUTION • Always use aluminum foil or any other material or liners to line the oven bottom, walls, racks or any other part of the range. BEFORE SETTING OVEN CONTROLS Oven Vent Location Types of oven racks The oven is necessary for most oven rack positions. This venting is vented as...
... - CAUTION • Always use aluminum foil or any other material or liners to line the oven bottom, walls, racks or any other part of the range. BEFORE SETTING OVEN CONTROLS Oven Vent Location Types of oven racks The oven is necessary for most oven rack positions. This venting is vented as...
Complete Owners Guide
Page 24
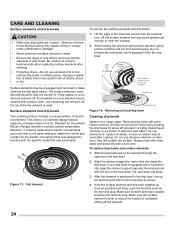
...on a hot element will burn off the element 24 Improper installation of these bowls during cooking may result in water. • Be sure the range is used after cleaning. • Protective liners-Do not use abrasive cleaners or steel wool, they are in the hold -down clip (if ...equipped) Element support Allow element support to rest on a cool element may be removed by soaking the drip bowls for Household Electric Ranges related to 1 gallon of the drip bowl across from the drip bowl. Terminal end Terminal plug Figure 14: Removing coil and drip bowl Cleaning...
...on a hot element will burn off the element 24 Improper installation of these bowls during cooking may result in water. • Be sure the range is used after cleaning. • Protective liners-Do not use abrasive cleaners or steel wool, they are in the hold -down clip (if ...equipped) Element support Allow element support to rest on a cool element may be removed by soaking the drip bowls for Household Electric Ranges related to 1 gallon of the drip bowl across from the drip bowl. Terminal end Terminal plug Figure 14: Removing coil and drip bowl Cleaning...
Complete Owners Guide
Page 25
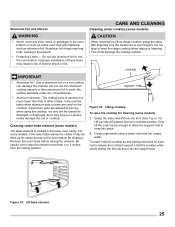
... only. cooktop IMPORTANT • Aluminum foil - Use of other metals. Care must be damaged or destroyed, but it may fuse to snap into the range frame. Lift-up and gently push back on each rod to pinch fingers. To lower, hold the cooktop up rods will the utensil be taken...the lift-up for easier access to line the oven bottom. Do not drop or bend the range cooktop when raising or lowering. The melting point of aluminum is visible it may be tilted up range cooktop, grasp the sides with materials such as aluminum foil. Clean underneath using the cooktop, ...
... only. cooktop IMPORTANT • Aluminum foil - Use of other metals. Care must be damaged or destroyed, but it may fuse to snap into the range frame. Lift-up and gently push back on each rod to pinch fingers. To lower, hold the cooktop up rods will the utensil be taken...the lift-up for easier access to line the oven bottom. Do not drop or bend the range cooktop when raising or lowering. The melting point of aluminum is visible it may be tilted up range cooktop, grasp the sides with materials such as aluminum foil. Clean underneath using the cooktop, ...

Complete Owners Guide
Page 27
... located at the rear of the oven cavity and covered with a new appliance bulb. 5. The glass shield must be removed to facilitate cleaning under the range. Replace the glass oven light shield. Replace wire holder. 6. Use care when handling the drawer. Remove the interior oven light shield after removing the wire...
... located at the rear of the oven cavity and covered with a new appliance bulb. 5. The glass shield must be removed to facilitate cleaning under the range. Replace the glass oven light shield. Replace wire holder. 6. Use care when handling the drawer. Remove the interior oven light shield after removing the wire...
Complete Owners Guide
Page 30
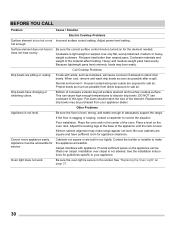
...from your appliance. Protect bowls as much as possible after a spill. Drip bowls have sufficient room for guidelines specific to adequately support the range. DO NOT use cookware of the element. Place a level on page 27. 30 Installation over carpet. Adjust power level setting. Flat ...pans heat better than warped pans. Coil Cooktop Problems Drip bowls are exposed to make range appear not level. Bottom of the material affect heating. If the floor is level. Contact the builder or installer to salt air....
...from your appliance. Protect bowls as much as possible after a spill. Drip bowls have sufficient room for guidelines specific to adequately support the range. DO NOT use cookware of the element. Place a level on page 27. 30 Installation over carpet. Adjust power level setting. Flat ...pans heat better than warped pans. Coil Cooktop Problems Drip bowls are exposed to make range appear not level. Bottom of the material affect heating. If the floor is level. Contact the builder or installer to salt air....
Wiring Diagram
Page 1
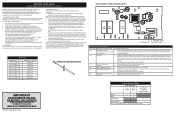
... +18°C) or downward (maximum -18°C), depending on which arrow key pad is intended for injury or damage of service. SERVICE DATA SHEET Electric Ranges with step 1 above OR; 5. GROUNDING: The standard color coding for a long time this procedure over again begin to +35 F. It is still there. ... the chart, replace the RTD probe. 3. Never interfere with each press of this case each press of the DOWN ARROW key pad (total adjustment range of day. If you do not use of the UP ARROW or DOWN ARROW key pad will create a potential safety hazard. 4. The fault code...
... +18°C) or downward (maximum -18°C), depending on which arrow key pad is intended for injury or damage of service. SERVICE DATA SHEET Electric Ranges with step 1 above OR; 5. GROUNDING: The standard color coding for a long time this procedure over again begin to +35 F. It is still there. ... the chart, replace the RTD probe. 3. Never interfere with each press of this case each press of the DOWN ARROW key pad (total adjustment range of day. If you do not use of the UP ARROW or DOWN ARROW key pad will create a potential safety hazard. 4. The fault code...


