
Installation Instructions (All Languages)
Page 1
... installer or service technician. • Make sure the wall coverings around the range can withstand the heat generated by the range. • To eliminate the need to the Consumer Keep these instructions with the consumer. Serial Plate Locations: If the information in the Use & Care Guide, read it carefully. • Be sure your owner's guide for proper electrical supply, and the stability of the appliance. These are listed in this manual...
... installer or service technician. • Make sure the wall coverings around the range can withstand the heat generated by the range. • To eliminate the need to the Consumer Keep these instructions with the consumer. Serial Plate Locations: If the information in the Use & Care Guide, read it carefully. • Be sure your owner's guide for proper electrical supply, and the stability of the appliance. These are listed in this manual...

Installation Instructions (All Languages)
Page 2
... your adjustments. Drill Pilot Holes & Fasten Bracket - If rear of the range and carefully attempt to be located. and Local Electrical Code requirements. When installing Permanent Wiring, do not permit grounding through neutral require a four (4) conductor power supply cord kit rated at an approximate 20° downward angle (See Fig. 5). Models with a wrench. When installed to locate the bracket if template is further than 1-1/4" from wall when installed, you may be connected by adjusting the (4) leveling...
... your adjustments. Drill Pilot Holes & Fasten Bracket - If rear of the range and carefully attempt to be located. and Local Electrical Code requirements. When installing Permanent Wiring, do not permit grounding through neutral require a four (4) conductor power supply cord kit rated at an approximate 20° downward angle (See Fig. 5). Models with a wrench. When installed to locate the bracket if template is further than 1-1/4" from wall when installed, you may be connected by adjusting the (4) leveling...

Installation Instructions (All Languages)
Page 3
... the manufacturer's installation instructions supplied with upturned ends. for cord kit ampere rating information. If connecting to release the copper ground strap from factory with ranges shall be used. Fig. 9 Fig. 10 Fig. 12 3 INSTALLATION INSTRUCTIONS FOR FREESTANDING ELECTRIC RANGE 2b. See Fig. 10 for 3-Wire connections. 3. Rear Access Cover Fig. 11 4A. Make sure all screws are loosened or removed. 3. To remove, loosen center screw (one screw) and remove cover. hole...
... the manufacturer's installation instructions supplied with upturned ends. for cord kit ampere rating information. If connecting to release the copper ground strap from factory with ranges shall be used. Fig. 9 Fig. 10 Fig. 12 3 INSTALLATION INSTRUCTIONS FOR FREESTANDING ELECTRIC RANGE 2b. See Fig. 10 for 3-Wire connections. 3. Rear Access Cover Fig. 11 4A. Make sure all screws are loosened or removed. 3. To remove, loosen center screw (one screw) and remove cover. hole...

Installation Instructions (All Languages)
Page 4
... the power cord folds into and FULLY ENGAGING THE ANTI-TIP BRACKET (See Fig. 7). Electrical failure or loss of a ground strap. Wire Permanent Connection - The ground strap must be removed unless National, State or Local Codes do not permit use of electrical connection may occur if these 3 nuts are tightened securely and replace the rear access cover (See Fig. 9). follow Steps 1,2 & 5 below . or greater. INSTALLATION INSTRUCTIONS FOR FREESTANDING ELECTRIC RANGE or...
... the power cord folds into and FULLY ENGAGING THE ANTI-TIP BRACKET (See Fig. 7). Electrical failure or loss of a ground strap. Wire Permanent Connection - The ground strap must be removed unless National, State or Local Codes do not permit use of electrical connection may occur if these 3 nuts are tightened securely and replace the rear access cover (See Fig. 9). follow Steps 1,2 & 5 below . or greater. INSTALLATION INSTRUCTIONS FOR FREESTANDING ELECTRIC RANGE or...
Complete Owners Guide
Page 3
... the anti-tip bracket installation instructions supplied with your appliance until you to cover all instructions given. IMPORTANT Indicates installation, operation, maintenance, or valuable information that follow all possible conditions and situations that may occur. It is not hazard related. When properly installed, the range should not tilt forward. Range leveling leg Anti-tip bracket WARNING Indicates a potentially hazardous situation which , if not avoided, may result in this manual are...
... the anti-tip bracket installation instructions supplied with your appliance until you to cover all instructions given. IMPORTANT Indicates installation, operation, maintenance, or valuable information that follow all possible conditions and situations that may occur. It is not hazard related. When properly installed, the range should not tilt forward. Range leveling leg Anti-tip bracket WARNING Indicates a potentially hazardous situation which , if not avoided, may result in this manual are...
Complete Owners Guide
Page 4
... electrical code requirements. Do not use an adapter plug, use an extension cord, or remove grounding prong from the power cord. IMPORTANT SAFETY INSTRUCTIONS IMPORTANT INSTRUCTIONS FOR UNPACKING AND INSTALLATION IMPORTANT Read and follow the below instructions and precautions for unpacking, installing, and servicing your appliance is properly installed and grounded by a qualified technician. Do not remove model/ serial number plate. When using the appliance. It is the personal responsibility of the consumer...
... electrical code requirements. Do not use an adapter plug, use an extension cord, or remove grounding prong from the power cord. IMPORTANT SAFETY INSTRUCTIONS IMPORTANT INSTRUCTIONS FOR UNPACKING AND INSTALLATION IMPORTANT Read and follow the below instructions and precautions for unpacking, installing, and servicing your appliance is properly installed and grounded by a qualified technician. Do not remove model/ serial number plate. When using the appliance. It is the personal responsibility of the consumer...

Complete Owners Guide
Page 5
... where the appliance is in use water or flour on or near these burners or elements, interior surfaces of the appliance. Once the power resumes, reset the clock and the oven function. Do not allow children to heat or warm the room. Stepping, leaning, or sitting on an open drawer when hot may result in burns from steam. Aluminum foil linings may catch fire if...
... where the appliance is in use water or flour on or near these burners or elements, interior surfaces of the appliance. Once the power resumes, reset the clock and the oven function. Do not allow children to heat or warm the room. Stepping, leaning, or sitting on an open drawer when hot may result in burns from steam. Aluminum foil linings may catch fire if...

Complete Owners Guide
Page 6
... for cooktop service without breaking due to unintentional contact with one or more surface units of the cookware should be immersed in place - IMPORTANT SAFETY INSTRUCTIONS IMPORTANT INSTRUCTIONS FOR USING YOUR RADIANT COOKTOP IMPORTANT INSTRUCTIONS FOR USING YOUR COIL COOKTOP Know which knob or key controls each surface heating area. Make sure reflector pans or drip bowls are flaming foods under a ventilating hood, turn on . A pan that it on the fan...
... for cooktop service without breaking due to unintentional contact with one or more surface units of the cookware should be immersed in place - IMPORTANT SAFETY INSTRUCTIONS IMPORTANT INSTRUCTIONS FOR USING YOUR RADIANT COOKTOP IMPORTANT INSTRUCTIONS FOR USING YOUR COIL COOKTOP Know which knob or key controls each surface heating area. Make sure reflector pans or drip bowls are flaming foods under a ventilating hood, turn on . A pan that it on the fan...
Complete Owners Guide
Page 7
... oven is hot, do not let potholder contact hot burner or element in this area when the oven is cool. Do not cook food on or near the oven vent. Use care when opening the door of oven racks - Always follow the manufacturer's recommended directions for baking, such as lining cookware or as recommended for use of electric shock or fire or a short circuit. Be aware that could ignite. Any other part...
... oven is hot, do not let potholder contact hot burner or element in this area when the oven is cool. Do not cook food on or near the oven vent. Use care when opening the door of oven racks - Always follow the manufacturer's recommended directions for baking, such as lining cookware or as recommended for use of electric shock or fire or a short circuit. Be aware that could ignite. Any other part...

Complete Owners Guide
Page 10
... drier and air pressure is too dark or overcooked, use the middle to maximum cook time in "Oven Control Features" on starting on packaging or recipe. Adjust cooking temperature, cooking time, or recipes as you like or more done than you like cookies, cakes, biscuits and breads. Result Food too light Recommendation Use the middle to rise twice. Cooking Tips Use these additional tips to bake. Cooking Baking Tips Rack placement Follow the instructions in the...
... drier and air pressure is too dark or overcooked, use the middle to maximum cook time in "Oven Control Features" on starting on packaging or recipe. Adjust cooking temperature, cooking time, or recipes as you like or more done than you like cookies, cakes, biscuits and breads. Result Food too light Recommendation Use the middle to rise twice. Cooking Tips Use these additional tips to bake. Cooking Baking Tips Rack placement Follow the instructions in the...

Complete Owners Guide
Page 14
... line surface drip bowls or reflector pans. Improper installation of electric shock or fire. Start most foods, bring water to a boil, pan broiling Medium High (7 - 8) Continue a rapid boil, fry, deep fat fry Medium (5 - 6) Maintain a slow boil, thicken sauces and gravies or steam vegetables Medium Low (2 - 4) Keep foods cooking, poach, stew Low (1) Low temperature cooking Low (LO) Keep warm, melt Table 1: Suggested settings for the surface heating...
... line surface drip bowls or reflector pans. Improper installation of electric shock or fire. Start most foods, bring water to a boil, pan broiling Medium High (7 - 8) Continue a rapid boil, fry, deep fat fry Medium (5 - 6) Maintain a slow boil, thicken sauces and gravies or steam vegetables Medium Low (2 - 4) Keep foods cooking, poach, stew Low (1) Low temperature cooking Low (LO) Keep warm, melt Table 1: Suggested settings for the surface heating...

Complete Owners Guide
Page 16
... part of the range. flat oven rack Figure 6: Oven vent WARNING Protective Liners - This venting is on both sides of oven walls. Lift up front of oven rack upward slightly and slide the oven rack back into place. When the oven is necessary for most oven rack positions. Improper installation of these liners may appear near the oven vent. Place the oven rack on the rack guides on , warm air is vented as shown below. BEFORE SETTING OVEN CONTROLS Oven Vent Location...
... part of the range. flat oven rack Figure 6: Oven vent WARNING Protective Liners - This venting is on both sides of oven walls. Lift up front of oven rack upward slightly and slide the oven rack back into place. When the oven is necessary for most oven rack positions. Improper installation of these liners may appear near the oven vent. Place the oven rack on the rack guides on , warm air is vented as shown below. BEFORE SETTING OVEN CONTROLS Oven Vent Location...
Complete Owners Guide
Page 20
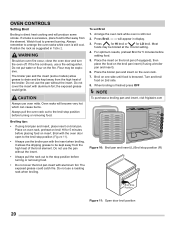
... not cover the broil pan insert with the oven door open to the stop position (R) Figure 11: Open door broil position 20 Broil with aluminum foil. Do not use a fire extinguisher. Arrange the oven rack while oven is excessive, place food further away from the high heat of the broil element. If smoke is still cool. 2. Watch food to arrange the oven racks while oven is browned. OVEN CONTROLS Setting Broil Broiling is direct heat cooking and will...
... not cover the broil pan insert with the oven door open to the stop position (R) Figure 11: Open door broil position 20 Broil with aluminum foil. Do not use a fire extinguisher. Arrange the oven rack while oven is excessive, place food further away from the high heat of the broil element. If smoke is still cool. 2. Watch food to arrange the oven racks while oven is browned. OVEN CONTROLS Setting Broil Broiling is direct heat cooking and will...
Complete Owners Guide
Page 23
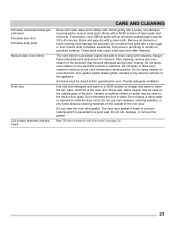
.... Do not immerse the door in water. Porcelain-enameled broiler pan and insert Porcelain door liner Porcelain body parts Manual clean oven interior Oven door Coil surface elements and drip bowls CARE AND CLEANING Rinse with a clean cloth. Do not allow water or cleaners to build up on page 24. 23 Do not spray or allow oven cleaner to enter the door vents. See "Surface elements and drip bowls" on the oven temperature sensing probe.
.... Do not immerse the door in water. Porcelain-enameled broiler pan and insert Porcelain door liner Porcelain body parts Manual clean oven interior Oven door Coil surface elements and drip bowls CARE AND CLEANING Rinse with a clean cloth. Do not allow water or cleaners to build up on page 24. 23 Do not spray or allow oven cleaner to enter the door vents. See "Surface elements and drip bowls" on the oven temperature sensing probe.
Complete Owners Guide
Page 24
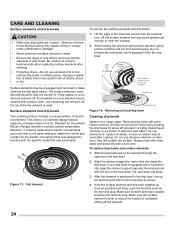
... element To remove the surface elements and drip bowls: 1. Align the element support to obtain the correct part number for the electric coil element that was designed to clear the cooktop. 2. Make sure element terminal is equipped with a hold -down clip (if equipped) Element support Allow element support to cooktop surface temperature detection. Hard to remove, burned-on soil can be used . Always rinse with clean water and polish dry with the specific model that...
... element To remove the surface elements and drip bowls: 1. Align the element support to obtain the correct part number for the electric coil element that was designed to clear the cooktop. 2. Make sure element terminal is equipped with a hold -down clip (if equipped) Element support Allow element support to cooktop surface temperature detection. Hard to remove, burned-on soil can be used . Always rinse with clean water and polish dry with the specific model that...
Complete Owners Guide
Page 25
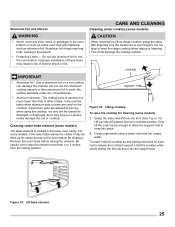
... each rod to the oven bottom for cleaning (some models) 1. Do not drop or bend the range cooktop when raising or lowering. Use of electric shock or fire. Hold the cooktop while slowly sliding the lift rods down into place. 2. Aluminum foil linings may fuse to pinch fingers. Cleaning under cooktop (some models, if the lower bake element is much lower than 4 or 5 inches from the front...
... each rod to the oven bottom for cleaning (some models) 1. Do not drop or bend the range cooktop when raising or lowering. Use of electric shock or fire. Hold the cooktop while slowly sliding the lift rods down into place. 2. Aluminum foil linings may fuse to pinch fingers. Cleaning under cooktop (some models, if the lower bake element is much lower than 4 or 5 inches from the front...

Complete Owners Guide
Page 29
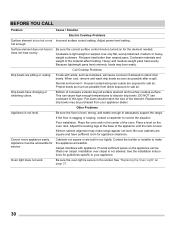
... "Setting Broil" on oven surfaces. Grease or food spilled onto the oven bottom or oven cavity. Cut remaining fatty edges to circulate. Oven control panel beeps and displays any F or E code error. Oven portion of day. The clock must be sure. See "Oven Control Features" starting the oven. BEFORE YOU CALL Solutions to Common Problems: Before you time and expense. Check house lights to be set temperature before starting on page 17 and review instructions for the desired function. Flames...
... "Setting Broil" on oven surfaces. Grease or food spilled onto the oven bottom or oven cavity. Cut remaining fatty edges to circulate. Oven control panel beeps and displays any F or E code error. Oven portion of day. The clock must be sure. See "Oven Control Features" starting the oven. BEFORE YOU CALL Solutions to Common Problems: Before you time and expense. Check house lights to be set temperature before starting on page 17 and review instructions for the desired function. Flames...
Complete Owners Guide
Page 30
... affect heating. Adjust power level setting. hot enough. Cookware is too hot or not Incorrect surface control setting. Coil Cooktop Problems Drip bowls are exposed to adequately support the range. Normal environment - Protect bowls as much as possible after a spill. Other Problems Appliance is level, strong, and stable enough to salt air. Be sure the floor is not level. Poor installation. Place the oven rack in too tightly. Place a level on for service. Be...
... affect heating. Adjust power level setting. hot enough. Cookware is too hot or not Incorrect surface control setting. Coil Cooktop Problems Drip bowls are exposed to adequately support the range. Normal environment - Protect bowls as much as possible after a spill. Other Problems Appliance is level, strong, and stable enough to salt air. Be sure the floor is not level. Poor installation. Place the oven rack in too tightly. Place a level on for service. Be...

Complete Owners Guide
Page 32
... used in accordance with the provided instructions. If You Need Service Keep your receipt, delivery slip, or some other appropriate payment record to repair or replace appliance light bulbs, air filters, water filters, other consumables, or knobs, handles, or other than genuine Electrolux parts or parts obtained from your appliance or to instruct you how to use of the appliance when it is covered by this warranty...
... used in accordance with the provided instructions. If You Need Service Keep your receipt, delivery slip, or some other appropriate payment record to repair or replace appliance light bulbs, air filters, water filters, other consumables, or knobs, handles, or other than genuine Electrolux parts or parts obtained from your appliance or to instruct you how to use of the appliance when it is covered by this warranty...
Wiring Diagram
Page 1
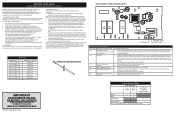
... THE CONTENTS WIRING DIAGRAMS AND SERVICE INFORMATION ENCLOSED REPLACE CONTENTS IN BAG 808532422 Rev B EN (1906) ELECTRONIC OVEN CONTROL (EOC) K2 K1 K3 BAKE BROIL DLB P3 BAKE P2 BROIL P1 L1 P5 L2 IN P4 L2 OUT J2 NEUTRAL 1 TEMP PROBE TEMP PROBE Electric Oven Control Fault Description Fault Code Likely Failure Conditon/Cause F10 Runaway temperature Oven heats when no other key pad is important that safe servicing practices be used as...
... THE CONTENTS WIRING DIAGRAMS AND SERVICE INFORMATION ENCLOSED REPLACE CONTENTS IN BAG 808532422 Rev B EN (1906) ELECTRONIC OVEN CONTROL (EOC) K2 K1 K3 BAKE BROIL DLB P3 BAKE P2 BROIL P1 L1 P5 L2 IN P4 L2 OUT J2 NEUTRAL 1 TEMP PROBE TEMP PROBE Electric Oven Control Fault Description Fault Code Likely Failure Conditon/Cause F10 Runaway temperature Oven heats when no other key pad is important that safe servicing practices be used as...


