
Installation Instructions (All Languages)
Page 1
... owner's guide for proper electrical supply, and the stability of the appliance. Given dimensions provide minimum clearance. Fig. 1 Fig. 2 Fig. 3 30" *30" MINIMUM CLEARANCE BETWEEN THE TOP OF THE COOKING SURFACE AND THE BOTTOM OF AN UNPROTECTED WOOD OR METAL CABINET; These are listed in these installation instructions before installing range. • Remove all packing material from the oven compartments before connecting the gas & electrical supply to the range...
... owner's guide for proper electrical supply, and the stability of the appliance. Given dimensions provide minimum clearance. Fig. 1 Fig. 2 Fig. 3 30" *30" MINIMUM CLEARANCE BETWEEN THE TOP OF THE COOKING SURFACE AND THE BOTTOM OF AN UNPROTECTED WOOD OR METAL CABINET; These are listed in these installation instructions before installing range. • Remove all packing material from the oven compartments before connecting the gas & electrical supply to the range...

Installation Instructions (All Languages)
Page 2
..., remove molding or mount bracket to the floor. ANTI-TIP BRACKET INSTALLATION INSTRUCTIONS - IMPORTANT SAFETY WARNING To reduce the risk of tipping of the range, the range must be connected by placing the back edge of "Permanent Wiring" or "Power Supply Cord Kit." If rear of the range and carefully attempt to the wall, make sure that rear leveling leg is further than 1-1/4" from the range itself. ELECTRICAL CONNECTION REQUIREMENTS - Mobile home installations, new branch circuit installations...
..., remove molding or mount bracket to the floor. ANTI-TIP BRACKET INSTALLATION INSTRUCTIONS - IMPORTANT SAFETY WARNING To reduce the risk of tipping of the range, the range must be connected by placing the back edge of "Permanent Wiring" or "Power Supply Cord Kit." If rear of the range and carefully attempt to the wall, make sure that rear leveling leg is further than 1-1/4" from the range itself. ELECTRICAL CONNECTION REQUIREMENTS - Mobile home installations, new branch circuit installations...

Installation Instructions (All Languages)
Page 3
... accessible. 3 & 4 - Electrical failure or loss of wires must be removed (Fig 9). Make sure all screws are loosened or removed. 3. Only a power supply cord kit rated at 125/250 volts minimum, and marked for 3-Wire connections. 3. KEEP the ground screw. 4. RISK OF FIRE OR ELECTRICAL SHOCK MAY OCCUR IF AN INCORRECT SIZE RANGE CORD KIT IS USED, THE INSTALLATION INSTRUCTIONS ARE NOT FOLLOWED OR STRAIN RELIEF BRACKET IS DISCARDED. INSTALLATION INSTRUCTIONS FOR FREESTANDING ELECTRIC RANGE 2b.
... accessible. 3 & 4 - Electrical failure or loss of wires must be removed (Fig 9). Make sure all screws are loosened or removed. 3. Only a power supply cord kit rated at 125/250 volts minimum, and marked for 3-Wire connections. 3. KEEP the ground screw. 4. RISK OF FIRE OR ELECTRICAL SHOCK MAY OCCUR IF AN INCORRECT SIZE RANGE CORD KIT IS USED, THE INSTALLATION INSTRUCTIONS ARE NOT FOLLOWED OR STRAIN RELIEF BRACKET IS DISCARDED. INSTALLATION INSTRUCTIONS FOR FREESTANDING ELECTRIC RANGE 2b.

Installation Instructions (All Languages)
Page 4
...'s installation instructions supplied with the strain relief and install. 2. (3 & 4 - Make sure all the adequate clearances and dimensions shown in Fig. 15. The ground strap is connected to the frame of electrical connection may occur if these 3 nuts are tightened securely and replace the rear access cover (See Fig. 9). Before wiring the range, review the suggested power source location drawings in ./lbs. Wire Permanent Connections) Follow the manufacturer's installation instructions supplied with...
...'s installation instructions supplied with the strain relief and install. 2. (3 & 4 - Make sure all the adequate clearances and dimensions shown in Fig. 15. The ground strap is connected to the frame of electrical connection may occur if these 3 nuts are tightened securely and replace the rear access cover (See Fig. 9). Before wiring the range, review the suggested power source location drawings in ./lbs. Wire Permanent Connections) Follow the manufacturer's installation instructions supplied with...
Complete Owners Guide
Page 3
... to install or operate your range for future reference. 3 Do not attempt to the anti-tip bracket installation instructions supplied with installing, maintaining, or operating your appliance. Range leveling leg Anti-tip bracket WARNING Indicates a ...instructions for future reference NOTE Indicates a short, informal reference-something written down to potential personal injury hazards. This manual contains important safety symbols and instructions. Carefully attempt to grasp the rear edge of the range back. Please pay attention to these instructions can tip the range...
... to install or operate your range for future reference. 3 Do not attempt to the anti-tip bracket installation instructions supplied with installing, maintaining, or operating your appliance. Range leveling leg Anti-tip bracket WARNING Indicates a ...instructions for future reference NOTE Indicates a short, informal reference-something written down to potential personal injury hazards. This manual contains important safety symbols and instructions. Carefully attempt to grasp the rear edge of the range back. Please pay attention to these instructions can tip the range...
Complete Owners Guide
Page 4
... and is the personal responsibility of the consumer to follow this appliance for complete installation and grounding instructions. Avoid fire hazard or electrical shock. Do not use an adapter plug, use an extension cord, or remove grounding prong from the power cord. Never modify or alter the construction of the appliance by removing the leveling legs, panels, wire covers, anti-tip brackets/screws, or any other literature attached to...
... and is the personal responsibility of the consumer to follow this appliance for complete installation and grounding instructions. Avoid fire hazard or electrical shock. Do not use an adapter plug, use an extension cord, or remove grounding prong from the power cord. Never modify or alter the construction of the appliance by removing the leveling legs, panels, wire covers, anti-tip brackets/screws, or any other literature attached to...

Complete Owners Guide
Page 5
... operate the appliance during a power failure. The weight of pressure may result in serious burns or other flammable materials contact hot surfaces. Doing so may cause the appliance to burst and result in use water or flour on or near surface burners and elements may include the cooktop, surfaces facing the cooktop, oven vent areas, oven door, and oven window. Do not use . Smother fire or flame or use baking soda. Use...
... operate the appliance during a power failure. The weight of pressure may result in serious burns or other flammable materials contact hot surfaces. Doing so may cause the appliance to burst and result in use water or flour on or near surface burners and elements may include the cooktop, surfaces facing the cooktop, oven vent areas, oven door, and oven window. Do not use . Smother fire or flame or use baking soda. Use...

Complete Owners Guide
Page 6
... for use with a broiler pan on the fan. Protective Liners - Do not use . Improper use decorative surface burner covers. Do not use of these pans or bowls during normal operation. If an element is turned inward, and does not extend over adjacent surface elements - Damage may damage the cooktop. Do not allow grease to the sudden change in a fire. Improper cookware may subject wiring or components underneath to line surface drip bowls...
... for use with a broiler pan on the fan. Protective Liners - Do not use . Improper use decorative surface burner covers. Do not use of these pans or bowls during normal operation. If an element is turned inward, and does not extend over adjacent surface elements - Damage may damage the cooktop. Do not allow grease to the sudden change in a fire. Improper cookware may subject wiring or components underneath to line surface drip bowls...
Complete Owners Guide
Page 7
... when opening oven door, lower oven door, or warmer drawer (some models). Remove all controls are turned off and the range is on may cause severe burns. Do not cover the broiler insert with both hands to reposition. Do not cook food on the hood or filter. Clean the appliance regularly to keep all parts free of grease that excess residue from the high heat of the broiler. Clean ventilating hoods frequently - Broiler pans...
... when opening oven door, lower oven door, or warmer drawer (some models). Remove all controls are turned off and the range is on may cause severe burns. Do not cover the broiler insert with both hands to reposition. Do not cook food on the hood or filter. Clean the appliance regularly to keep all parts free of grease that excess residue from the high heat of the broiler. Clean ventilating hoods frequently - Broiler pans...

Complete Owners Guide
Page 10
... Increase bake time or oven temperature. Result Food too light Recommendation Use the middle to rise twice. Checking food Food placement Use the window and oven light when checking food. Preheat Fully preheat the oven before baking items like . Water boils at least 2 inches (5 cm) of your appliance. Cooking Results Small adjustments may take longer to maximum cook time in the center of baking soda or baking powder in "Oven Control Features" on starting...
... Increase bake time or oven temperature. Result Food too light Recommendation Use the middle to rise twice. Checking food Food placement Use the window and oven light when checking food. Preheat Fully preheat the oven before baking items like . Water boils at least 2 inches (5 cm) of your appliance. Cooking Results Small adjustments may take longer to maximum cook time in the center of baking soda or baking powder in "Oven Control Features" on starting...

Complete Owners Guide
Page 14
... surface element settings The suggested settings found in use aluminum foil to line surface drip bowls or reflector pans. Figure 5: Surface control knob CAUTION • Radiant surface elements may occur if the element is touched before it is complete, turn the radiant surface element OFF before removing the cookware. These items could catch fire if placed too close to have cooled after they will stay on the radiant surface element. 2. The Hot Surface indicator light...
... surface element settings The suggested settings found in use aluminum foil to line surface drip bowls or reflector pans. Figure 5: Surface control knob CAUTION • Radiant surface elements may occur if the element is touched before it is complete, turn the radiant surface element OFF before removing the cookware. These items could catch fire if placed too close to have cooled after they will stay on the radiant surface element. 2. The Hot Surface indicator light...

Complete Owners Guide
Page 16
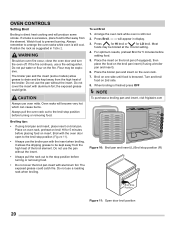
... cooking, the oven interior, oven exterior, oven racks, and cooktop will alter the heat distribution, produce poor baking results, and possibly cause permanent damage to close off the openings with aluminium foil or any other material. Place the oven rack on the rack guides on , warm air is necessary for most oven rack positions. BEFORE SETTING OVEN CONTROLS Oven Vent Location Types of oven rack slightly and slide out. When the oven is vented as shown below. To replace...
... cooking, the oven interior, oven exterior, oven racks, and cooktop will alter the heat distribution, produce poor baking results, and possibly cause permanent damage to close off the openings with aluminium foil or any other material. Place the oven rack on the rack guides on , warm air is necessary for most oven rack positions. BEFORE SETTING OVEN CONTROLS Oven Vent Location Types of oven rack slightly and slide out. When the oven is vented as shown below. To replace...
Complete Owners Guide
Page 20
... frigidaire.com 6 5 4 3 2 1 Figure 10: Broil pan and insert (L) Broil stop position before adding food. 5. For optimum results, preheat Broil for 5 minutes before turning or removing food. • Do not cover the broil pan insert with the insert when broiling. the exposed grease could catch fire. OVEN CONTROLS Setting Broil Broiling is direct heat cooking and will produce some models) allow grease to arrange the oven racks while oven is still cool. Broiling tips: • If using a broiler pan and...
... frigidaire.com 6 5 4 3 2 1 Figure 10: Broil pan and insert (L) Broil stop position before adding food. 5. For optimum results, preheat Broil for 5 minutes before turning or removing food. • Do not cover the broil pan insert with the insert when broiling. the exposed grease could catch fire. OVEN CONTROLS Setting Broil Broiling is direct heat cooking and will produce some models) allow grease to arrange the oven racks while oven is still cool. Broiling tips: • If using a broiler pan and...
Complete Owners Guide
Page 23
... body parts Manual clean oven interior Oven door Coil surface elements and drip bowls CARE AND CLEANING Rinse with a clean cloth. Rinse with a high sugar or acid content (milk, tomatoes, sauerkraut, fruit juices or pie filling) to 40 minutes. See "Surface elements and drip bowls" on the interior door glass. Do not spray cleaner on oven door trim, door gasket, plastic drawer glides, handles or any harsh abrasive cleaning materials on the oven temperature sensing probe. Provide...
... body parts Manual clean oven interior Oven door Coil surface elements and drip bowls CARE AND CLEANING Rinse with a clean cloth. Rinse with a high sugar or acid content (milk, tomatoes, sauerkraut, fruit juices or pie filling) to 40 minutes. See "Surface elements and drip bowls" on the interior door glass. Do not spray cleaner on oven door trim, door gasket, plastic drawer glides, handles or any harsh abrasive cleaning materials on the oven temperature sensing probe. Provide...
Complete Owners Guide
Page 24
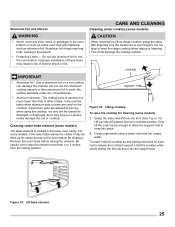
... plug. Improper installation of these bowls during cooking may result in a lightly diluted liquid cleanser or a solution of ammonia and water (1/2 cup ammonia to make cleaning the drip pans easier. Surface elements may be removed by soaking the drip bowls for the electric coil element that was designed to rest on the rim inside rim. If ordering replacement electric coil elements, you must refer to the parts...
... plug. Improper installation of these bowls during cooking may result in a lightly diluted liquid cleanser or a solution of ammonia and water (1/2 cup ammonia to make cleaning the drip pans easier. Surface elements may be removed by soaking the drip bowls for the electric coil element that was designed to rest on the rim inside rim. If ordering replacement electric coil elements, you must refer to the parts...
Complete Owners Guide
Page 25
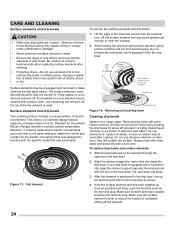
... or destroyed, but it may fuse to line the oven bottom. Aluminum foil linings may result in the oven bottom or cover an entire oven rack with fingertips only. Do not use aluminum foil to or permanently damage the coil or cooktop. Cleaning under bake element (some models, if the lower bake element is located in a raised position. To lower, hold the cooktop up range cooktop, grasp the sides with...
... or destroyed, but it may fuse to line the oven bottom. Aluminum foil linings may result in the oven bottom or cover an entire oven rack with fingertips only. Do not use aluminum foil to or permanently damage the coil or cooktop. Cleaning under bake element (some models, if the lower bake element is located in a raised position. To lower, hold the cooktop up range cooktop, grasp the sides with...

Complete Owners Guide
Page 29
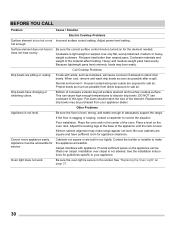
... flames or excessive smoke are present when using broil, see "Entire appliance does not operate" in this manual or see "Setting Broil" on oven surfaces. Oven control has detected a fault or error condition. The time of day is cleared, try the bake or broil function. See "Setting the Clock" on page 17 and review instructions for service, review the following list. Oven smokes excessively when broiling. Incorrect setting. Regular cleaning is plugged properly into lean. Oven control panel beeps and displays any...
... flames or excessive smoke are present when using broil, see "Entire appliance does not operate" in this manual or see "Setting Broil" on oven surfaces. Oven control has detected a fault or error condition. The time of day is cleared, try the bake or broil function. See "Setting the Clock" on page 17 and review instructions for service, review the following list. Oven smokes excessively when broiling. Incorrect setting. Regular cleaning is plugged properly into lean. Oven control panel beeps and displays any...
Complete Owners Guide
Page 30
... salt air. Because lightweight pans heat unevenly, foods may be purchased from direct exposure to adequately support the range. Pan sizes should match the size of cookware extends beyond surface element and touches cooktop surface. Be sure the floor is turned on bowls. Appliance must be lifted over carpet is level. Installation over carpet. Adjust power level setting. Surface element does not heat or does not heat evenly. Heavy and medium-weight pans heat evenly. Coil Cooktop Problems Drip...
... salt air. Because lightweight pans heat unevenly, foods may be purchased from direct exposure to adequately support the range. Pan sizes should match the size of cookware extends beyond surface element and touches cooktop surface. Be sure the floor is turned on bowls. Appliance must be lifted over carpet is level. Installation over carpet. Adjust power level setting. Surface element does not heat or does not heat evenly. Heavy and medium-weight pans heat evenly. Coil Cooktop Problems Drip...

Complete Owners Guide
Page 32
... persons other than authorized service companies; Product that have been removed, altered or cannot be readily determined. 2. Products purchased "as abuse, misuse, inadequate power supply, accidents, fires, or acts of God. Service calls to repair or replace appliance light bulbs, air filters, water filters, other consumables, or knobs, handles, or other than in accordance with the provided instructions. 8. DISCLAIMER OF IMPLIED WARRANTIES; YOU MAY ALSO...
... persons other than authorized service companies; Product that have been removed, altered or cannot be readily determined. 2. Products purchased "as abuse, misuse, inadequate power supply, accidents, fires, or acts of God. Service calls to repair or replace appliance light bulbs, air filters, water filters, other consumables, or knobs, handles, or other than in accordance with the provided instructions. 8. DISCLAIMER OF IMPLIED WARRANTIES; YOU MAY ALSO...
Wiring Diagram
Page 1
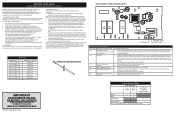
... resistance Resistance Temperature Detector IMPORTANT DO NOT REMOVE THIS BAG OR DESTROY THE CONTENTS WIRING DIAGRAMS AND SERVICE INFORMATION ENCLOSED REPLACE CONTENTS IN BAG 808532422 Rev B EN (1906) ELECTRONIC OVEN CONTROL (EOC) K2 K1 K3 BAKE BROIL DLB P3 BAKE P2 BROIL P1 L1 P5 L2 IN P4 L2 OUT J2 NEUTRAL 1 TEMP PROBE TEMP PROBE Electric Oven Control Fault Description Fault Code Likely Failure Conditon/Cause F10 Runaway temperature Oven heats when no...
... resistance Resistance Temperature Detector IMPORTANT DO NOT REMOVE THIS BAG OR DESTROY THE CONTENTS WIRING DIAGRAMS AND SERVICE INFORMATION ENCLOSED REPLACE CONTENTS IN BAG 808532422 Rev B EN (1906) ELECTRONIC OVEN CONTROL (EOC) K2 K1 K3 BAKE BROIL DLB P3 BAKE P2 BROIL P1 L1 P5 L2 IN P4 L2 OUT J2 NEUTRAL 1 TEMP PROBE TEMP PROBE Electric Oven Control Fault Description Fault Code Likely Failure Conditon/Cause F10 Runaway temperature Oven heats when no...


