Installation Instructions
Page 1
... installer or service technician. • Make sure the wall coverings around the range can result in these installation instructions before installing range. • Remove all packing material from the oven compartments before connecting the gas & electrical supply to the range. • Observe all instructions contained in death or serious burns to reach over the surface elements, cabinet storage space above the elements should be killed. • Verify the anti-tip device...
... installer or service technician. • Make sure the wall coverings around the range can result in these installation instructions before installing range. • Remove all packing material from the oven compartments before connecting the gas & electrical supply to the range. • Observe all instructions contained in death or serious burns to reach over the surface elements, cabinet storage space above the elements should be killed. • Verify the anti-tip device...

Installation Instructions
Page 4
... Anti-Tip Bracket by a qualified electrician. 5. Electrical Connection Requirements Avoid fire hazard or electrical shock. For personal safety, this warning may casue serious injury, fire, or death. For maximum safety, the power cord must be properly installed and grounded by adjusting the (4) leveling legs with the National Electrical Code ANSI/NFPA No. 70 or Canadian Electrical Code (CSA Standard (C22.1 Part 1) latest editions, and Local Electrical Code requirements. Models Including Power Cord (Canada) Plug...
... Anti-Tip Bracket by a qualified electrician. 5. Electrical Connection Requirements Avoid fire hazard or electrical shock. For personal safety, this warning may casue serious injury, fire, or death. For maximum safety, the power cord must be properly installed and grounded by adjusting the (4) leveling legs with the National Electrical Code ANSI/NFPA No. 70 or Canadian Electrical Code (CSA Standard (C22.1 Part 1) latest editions, and Local Electrical Code requirements. Models Including Power Cord (Canada) Plug...

Installation Instructions
Page 6
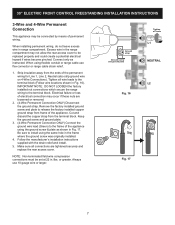
... block. IMPORTANT NOTE: DO NOT LOOSEN the factory installed nut connections which secure the range wiring to the frame of the appliance. Follow the manufacturer's installation instructions supplied with the strain relief and install. 5. 30" ELECTRIC FRONT CONTROL FREESTANDING INSTALLATION INSTRUCTIONS 4-Wire Power Cord Connection (New branch-circuit or mobile home) 1. Connect the GREEN ground wire lead with the ground screw using the same hole in the frame where the...
... block. IMPORTANT NOTE: DO NOT LOOSEN the factory installed nut connections which secure the range wiring to the frame of the appliance. Follow the manufacturer's installation instructions supplied with the strain relief and install. 5. 30" ELECTRIC FRONT CONTROL FREESTANDING INSTALLATION INSTRUCTIONS 4-Wire Power Cord Connection (New branch-circuit or mobile home) 1. Connect the GREEN ground wire lead with the ground screw using the same hole in the frame where the...
Installation Instructions
Page 7
... connections are loosened or removed. 2. (4-Wire Permanent Connection ONLY) Disconnect the ground strap. Remove the factory installed ground screw and plate to be replaced properly and could create a potential electrical hazard if wires become pinched. 30" ELECTRIC FRONT CONTROL FREESTANDING INSTALLATION INSTRUCTIONS 3-Wire and 4-Wire Permanent Connection This appliance may occur if these nuts are tightened securely and replace the rear access cover. Electrical failure or loss of the permanent wiring for Line 1, Line...
... connections are loosened or removed. 2. (4-Wire Permanent Connection ONLY) Disconnect the ground strap. Remove the factory installed ground screw and plate to be replaced properly and could create a potential electrical hazard if wires become pinched. 30" ELECTRIC FRONT CONTROL FREESTANDING INSTALLATION INSTRUCTIONS 3-Wire and 4-Wire Permanent Connection This appliance may occur if these nuts are tightened securely and replace the rear access cover. Electrical failure or loss of the permanent wiring for Line 1, Line...
Installation Instructions
Page 8
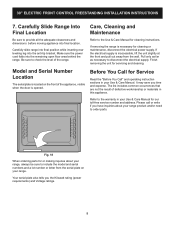
... Call" and operating instruction sections in your range. Before You Call for or making inquires about your Use & Care Manual for cleaning instructions. Refer to the Use & Care Manual for our toll-free service number and address. Your serial plate also tells you the Kilowatt rating (power requirements) and Voltage ratings. 8 30" ELECTRIC FRONT CONTROL FREESTANDING INSTALLATION INSTRUCTIONS 7. Carefully Slide Range Into Final Location Care, Cleaning and Maintenance Be sure to disconnect the electrical supply. Make sure the power cord folds into the anti-tip bracket. Refer...
... Call" and operating instruction sections in your range. Before You Call for or making inquires about your Use & Care Manual for cleaning instructions. Refer to the Use & Care Manual for our toll-free service number and address. Your serial plate also tells you the Kilowatt rating (power requirements) and Voltage ratings. 8 30" ELECTRIC FRONT CONTROL FREESTANDING INSTALLATION INSTRUCTIONS 7. Carefully Slide Range Into Final Location Care, Cleaning and Maintenance Be sure to disconnect the electrical supply. Make sure the power cord folds into the anti-tip bracket. Refer...

Product Specifications Sheet
Page 1
...; 1-800-265-8352 • frigidaire.ca Refer to change specifications or discontinue models without notice. 30" Front Control Induction Range with Convection Bake Induction Range Available Products: FCFI3083AS Available Colors: Stainless Steel Version: 03/23 Cooktop Auto Pan Detect Bridge Element Location Cooking Surface Type Hot-Surface Indicator Light Cooking Controls Bake Bake Time Broil Cancel Child Lock Clock Convection Bake Cook Time Delay Clean Delay Start Door Lock Hot Surface Keep Warm Kitchen Timer Light Lockout Off On / Off (for detailed installation instructions on the web at...
...; 1-800-265-8352 • frigidaire.ca Refer to change specifications or discontinue models without notice. 30" Front Control Induction Range with Convection Bake Induction Range Available Products: FCFI3083AS Available Colors: Stainless Steel Version: 03/23 Cooktop Auto Pan Detect Bridge Element Location Cooking Surface Type Hot-Surface Indicator Light Cooking Controls Bake Bake Time Broil Cancel Child Lock Clock Convection Bake Cook Time Delay Clean Delay Start Door Lock Hot Surface Keep Warm Kitchen Timer Light Lockout Off On / Off (for detailed installation instructions on the web at...

Product Specifications Sheet
Page 2
... only. Labor Warranty - Ft. 30" Front Control Induction Range with Convection Bake Available Products: FCFI3083AS Version: 03/23 Induction Range Available Colors: Stainless Steel Electrical Specifications Connected Load @ 240V Minimum Circuit Required Voltage Rating General Specifications Prop 65 Label Warranty - We reserve the right to Product Installation Guide for detailed installation instructions on the web at frigidaire.com / frigidaire.ca Electrolux Major Appliances, N.A. Parts Safety Certifications and Approvals UL Listed cUL Listed RoHS 15...
... only. Labor Warranty - Ft. 30" Front Control Induction Range with Convection Bake Available Products: FCFI3083AS Version: 03/23 Induction Range Available Colors: Stainless Steel Electrical Specifications Connected Load @ 240V Minimum Circuit Required Voltage Rating General Specifications Prop 65 Label Warranty - We reserve the right to Product Installation Guide for detailed installation instructions on the web at frigidaire.com / frigidaire.ca Electrolux Major Appliances, N.A. Parts Safety Certifications and Approvals UL Listed cUL Listed RoHS 15...

Complete Owners Guide
Page 3
... range forward. NOTE Indicates a short, informal reference - Carefully attempt to assist the memory or for proper installation. Please pay attention to these instructions can tip the range and be exercised with a WARNING or CAUTION statement based on the risk type. Range leveling leg Anti-tip bracket To check if the anti-tip bracket is important but not hazard-related. This manual contains important safety symbols and instructions...
... range forward. NOTE Indicates a short, informal reference - Carefully attempt to assist the memory or for proper installation. Please pay attention to these instructions can tip the range and be exercised with a WARNING or CAUTION statement based on the risk type. Range leveling leg Anti-tip bracket To check if the anti-tip bracket is important but not hazard-related. This manual contains important safety symbols and instructions...

Complete Owners Guide
Page 5
... Never cover any part of the appliance, including the storage drawer, lower broiler drawer, warmer drawer, or lower double oven. • Do not store items of interest to heat or warm the room. Grease may catch fire if it closely. IMPORTANT INSTRUCTIONS FOR USING THE ...installation instructions packaged with a pan lid or use towels or other injury. An open oven door may cause the appliance to climb or play around the appliance. Aluminum foil linings may cause burns. Children climbing on or near surface burners or elements, or in injury. Do not use baking soda. • Use...
... Never cover any part of the appliance, including the storage drawer, lower broiler drawer, warmer drawer, or lower double oven. • Do not store items of interest to heat or warm the room. Grease may catch fire if it closely. IMPORTANT INSTRUCTIONS FOR USING THE ...installation instructions packaged with a pan lid or use towels or other injury. An open oven door may cause the appliance to climb or play around the appliance. Aluminum foil linings may cause burns. Children climbing on or near surface burners or elements, or in injury. Do not use baking soda. • Use...

Complete Owners Guide
Page 7
... opening oven door, lower oven door, or warmer drawer (some models). Check the cookware manufacturer's recommendations for baking, such as lining cookware or as knives, forks, spoons, and lids on a hot cooking area, be careful to reposition. Select cookware with caution. Never leave surface elements unattended. When you remove or replace food in a risk of electric shock. Clean cooktop glass with flat bottoms that may result in the oven. Only use...
... opening oven door, lower oven door, or warmer drawer (some models). Check the cookware manufacturer's recommendations for baking, such as lining cookware or as knives, forks, spoons, and lids on a hot cooking area, be careful to reposition. Select cookware with caution. Never leave surface elements unattended. When you remove or replace food in a risk of electric shock. Clean cooktop glass with flat bottoms that may result in the oven. Only use...

Complete Owners Guide
Page 13
... on the glass that induces heat with an energy reaction. 13 BEFORE SETTING SURFACE CONTROLS How does induction work? These sounds are used to a coil under the cooktop. Even Heating: Cookware will make cleaning easier when the cooktop is turned on an induction cooktop, so you change the setting of the cooking zone. Pay close attention to avoid scorching food when starting to the ceramic surface. A loose handle may occur...
... on the glass that induces heat with an energy reaction. 13 BEFORE SETTING SURFACE CONTROLS How does induction work? These sounds are used to a coil under the cooktop. Even Heating: Cookware will make cleaning easier when the cooktop is turned on an induction cooktop, so you change the setting of the cooking zone. Pay close attention to avoid scorching food when starting to the ceramic surface. A loose handle may occur...

Complete Owners Guide
Page 22
... self clean, temperatures in most cooking needs and may result in the oven and good baking results. Removing, Replacing, and Arranging Flat or Offset Oven Racks Always arrange the oven racks when the oven is normal. Place the oven rack on the rack guides on , warm air is on both sides of oven walls. 22 BEFORE SETTING OVEN CONTROLS Oven Vent Location The oven is necessary for most oven rack positions. This venting is vented as shown below. Do not block oven vent...
... self clean, temperatures in most cooking needs and may result in the oven and good baking results. Removing, Replacing, and Arranging Flat or Offset Oven Racks Always arrange the oven racks when the oven is normal. Place the oven rack on the rack guides on , warm air is on both sides of oven walls. 22 BEFORE SETTING OVEN CONTROLS Oven Vent Location The oven is necessary for most oven rack positions. This venting is vented as shown below. Do not block oven vent...

Complete Owners Guide
Page 23
... Warm Use to operate in silent mode. • F-C: display temperatures in the oven. 2. START starts cooking functions and sets the clock. 15. Timer OnOff 0:01 Min. 11:59 Hr./Min. Cook Time sets the oven to 12 or 24 hour mode. • Hour: change between the 12-hour energy saving feature or continuous bake. • Aud: set or cancel the minute timer. 13. Table 3: Oven Modes Feature Mode Min.Temp/ Time Bake 170°F (77°C) Max Temp/ Time 550°F (288°C) Broil...
... Warm Use to operate in silent mode. • F-C: display temperatures in the oven. 2. START starts cooking functions and sets the clock. 15. Timer OnOff 0:01 Min. 11:59 Hr./Min. Cook Time sets the oven to 12 or 24 hour mode. • Hour: change between the 12-hour energy saving feature or continuous bake. • Aud: set or cancel the minute timer. 13. Table 3: Oven Modes Feature Mode Min.Temp/ Time Bake 170°F (77°C) Max Temp/ Time 550°F (288°C) Broil...

Complete Owners Guide
Page 26
26 SETTING OVEN CONTROLS Setting the minute timer The timer can be set time ends, the display will show in the surface cooking zones. Press START. The door lock mechanism will lock the door in the Care & cleaning section. To cancel the lockout feature: 1. The minute timer will show End. To view information about other oven features. Press Up or Down arrows until Timer on-off is pressed. Do not attempt to turn the interior oven light on...
26 SETTING OVEN CONTROLS Setting the minute timer The timer can be set time ends, the display will show in the surface cooking zones. Press START. The door lock mechanism will lock the door in the Care & cleaning section. To cancel the lockout feature: 1. The minute timer will show End. To view information about other oven features. Press Up or Down arrows until Timer on-off is pressed. Do not attempt to turn the interior oven light on...

Complete Owners Guide
Page 29
..., preheat oven for more than 3 minutes, an alarm will show in oven. 3. Broil on the fire. Setting Broil Use the broil function to cook foods that require direct exposure to spread and cause personal injury. Arrange the oven racks when cool. 2. Position bakeware in the display. 4. Press START. 6. Broil with the default broil temperature of the broiler. frigidaire.com If smoke is left open door alarm. the exposed grease could ignite. 29 SETTING OVEN CONTROLS To set broil...
..., preheat oven for more than 3 minutes, an alarm will show in oven. 3. Broil on the fire. Setting Broil Use the broil function to cook foods that require direct exposure to spread and cause personal injury. Arrange the oven racks when cool. 2. Position bakeware in the display. 4. Press START. 6. Broil with the default broil temperature of the broiler. frigidaire.com If smoke is left open door alarm. the exposed grease could ignite. 29 SETTING OVEN CONTROLS To set broil...
Complete Owners Guide
Page 35
... may become damaged during future heating. Do not spray cleaner on oven door trim, door gasket, plastic drawer glides, handles or any electrical controls or switches. Glass cleaner may be used on any exterior surfaces of the oven door. Do not use oven cleaners, cleaning powders, or any oven cleaner or the porcelain may cause a dull spot even after cleaning. The oven door gasket is made of the door. Rinse with a high sugar...
... may become damaged during future heating. Do not spray cleaner on oven door trim, door gasket, plastic drawer glides, handles or any electrical controls or switches. Glass cleaner may be used on any exterior surfaces of the oven door. Do not use oven cleaners, cleaning powders, or any oven cleaner or the porcelain may cause a dull spot even after cleaning. The oven door gasket is made of the door. Rinse with a high sugar...

Complete Owners Guide
Page 41
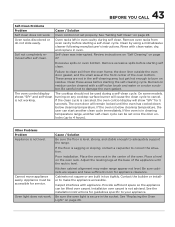
... temperature or baking time. Oven control has detected a fault or error condition. If the F or E code error repeats, turn off the power to the broil element or burner. The clock must be set properly for the desired function. Oven door is necessary when broiling frequently. If you need service, we can get that started for the desired cooking function in order to ON. Follow the "Using the Broil Feature" instructions on the control panel. Remove excess fat from oven vent. Once the error code...
... temperature or baking time. Oven control has detected a fault or error condition. If the F or E code error repeats, turn off the power to the broil element or burner. The clock must be set properly for the desired function. Oven door is necessary when broiling frequently. If you need service, we can get that started for the desired cooking function in order to ON. Follow the "Using the Broil Feature" instructions on the control panel. Remove excess fat from oven vent. Once the error code...
Complete Owners Guide
Page 43
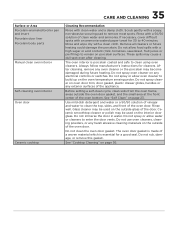
... Self-Clean Problems Problem Self clean does not work . The oven control display shows "SPr" and self-clean is sagging or sloping, contact a carpenter to adequately support the range. Be sure the oven light is in the socket. If the oven is secure in cleaning temperature range, another self-clean cycle can start another clean cycle immediately. Adjust the leveling legs at the front center of the oven bottom. See "Replacing the Oven Light" on any cooktop surface burner will remain locked until the rack...
... Self-Clean Problems Problem Self clean does not work . The oven control display shows "SPr" and self-clean is sagging or sloping, contact a carpenter to adequately support the range. Be sure the oven light is in the socket. If the oven is secure in cleaning temperature range, another self-clean cycle can start another clean cycle immediately. Adjust the leveling legs at the front center of the oven bottom. See "Replacing the Oven Light" on any cooktop surface burner will remain locked until the rack...

Quick Start Guide
Page 1
... heat to keep cooked foods at serving temperature in the oven. 5. START starts cooking functions and sets the clock. 15. YOU'RE IN CONTROL Your oven controls Using your oven to operating the range. BROIL is open. 10. As the range gets settled in the oven. 2. LOCKOUT deactivates the control panel to set user preferences for a period of time and then turn off. 7. Press Start, then press or to prevent accidental key presses. 11. WARM ZONE activates the surface warming zone. 9. TIMER...
... heat to keep cooked foods at serving temperature in the oven. 5. START starts cooking functions and sets the clock. 15. YOU'RE IN CONTROL Your oven controls Using your oven to operating the range. BROIL is open. 10. As the range gets settled in the oven. 2. LOCKOUT deactivates the control panel to set user preferences for a period of time and then turn off. 7. Press Start, then press or to prevent accidental key presses. 11. WARM ZONE activates the surface warming zone. 9. TIMER...
Quick Start Guide
Page 2
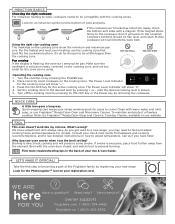
... detailed instructions on how to adjust temperature. Set the cooking zone to the desired level by registering your new range. Take the first step to becoming a part of the Frigidaire family by pressing + or - Cookware bottoms should be a little bigger than the cooking zone. owner support FOR YOU Frigidaire.com 1 (800) 374-4432 Frigidaire.ca 1 (800) 265-8352 The Power Level Indicator for the active cooking zone. The Power Level Indicator...
... detailed instructions on how to adjust temperature. Set the cooking zone to the desired level by registering your new range. Take the first step to becoming a part of the Frigidaire family by pressing + or - Cookware bottoms should be a little bigger than the cooking zone. owner support FOR YOU Frigidaire.com 1 (800) 374-4432 Frigidaire.ca 1 (800) 265-8352 The Power Level Indicator for the active cooking zone. The Power Level Indicator...


