

Product Specifications Sheet
Page 1
... Watts Embossed Flat 2 Cooktop Performance Right Front Element Burner Right Rear Element Burner Left Front Element Burner Left Rear Element Burner Center Rear Element Burner Cooking Controls Function Change between Continuous Bake Setting or 12-Hour Energy Saving Feature Delayed Bake Program Fahrenheit or Celsius Silent Control Panel Drawer Drawer Type Dimensions and Volume Minimum Height Maximum Height Width Depth Depth With Door 90° Open Depth With Handle Oven Interior Height Oven Interior Width Oven Interior Depth Oven Capacity Installation Adjustable Leveling Legs Certifications and...
... Watts Embossed Flat 2 Cooktop Performance Right Front Element Burner Right Rear Element Burner Left Front Element Burner Left Rear Element Burner Center Rear Element Burner Cooking Controls Function Change between Continuous Bake Setting or 12-Hour Energy Saving Feature Delayed Bake Program Fahrenheit or Celsius Silent Control Panel Drawer Drawer Type Dimensions and Volume Minimum Height Maximum Height Width Depth Depth With Door 90° Open Depth With Handle Oven Interior Height Oven Interior Width Oven Interior Depth Oven Capacity Installation Adjustable Leveling Legs Certifications and...
Complete Owners Guide
Page 2
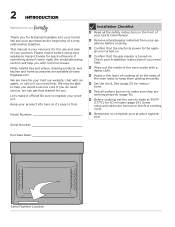
...;rm that the electrical power to our Thank you for bringing Frigidaire into your product registration! FAQs, helpful tips and videos, cleaning products, and kitchen and home accessories are working properly (page 16). Before cooking, set the oven to bake at www. Be sure to find. Model Number: 9 Installation Checklist Read all the safety instructions in the front of the oven racks to help...
...;rm that the electrical power to our Thank you for bringing Frigidaire into your product registration! FAQs, helpful tips and videos, cleaning products, and kitchen and home accessories are working properly (page 16). Before cooking, set the oven to bake at www. Be sure to find. Model Number: 9 Installation Checklist Read all the safety instructions in the front of the oven racks to help...
Complete Owners Guide
Page 4
... remove the wiring label and other than when the range or cooktop and hood have a temperature rating above 32ºF (0ºC) for unpacking, installing, and servicing your range for use both arms to grasp the rear edge of the appliance. All materials used in conjunction with gas ranges or cooktops other literature attached to play with your appliance. Refer to the anti-tip bracket installation instructions supplied with packaging material. 4 IMPORTANT SAFETY INSTRUCTIONS...
... remove the wiring label and other than when the range or cooktop and hood have a temperature rating above 32ºF (0ºC) for unpacking, installing, and servicing your range for use both arms to grasp the rear edge of the appliance. All materials used in conjunction with gas ranges or cooktops other literature attached to play with your appliance. Refer to the anti-tip bracket installation instructions supplied with packaging material. 4 IMPORTANT SAFETY INSTRUCTIONS...

Complete Owners Guide
Page 6
... weight of the appliance See the installation instructions packaged with materials such as a space heater to heat or warm the room. Gas provider for storage. • Never use . WARNING • Do not leave children alone - An open oven door may occur if the conversion to climb or play around the appliance. Children climbing on the backguards of interest to children in...
... weight of the appliance See the installation instructions packaged with materials such as a space heater to heat or warm the room. Gas provider for storage. • Never use . WARNING • Do not leave children alone - An open oven door may occur if the conversion to climb or play around the appliance. Children climbing on the backguards of interest to children in...

Complete Owners Guide
Page 7
... INSTRUCTIONS FOR USING YOUR GAS COOKTOP CAUTION Use Proper Flame Size - Proper relationship of pressure may result in injury. • Wear proper apparel - Always turn off before turning it on hot surfaces may cause container to direct contact and may include the cooktop, surfaces facing the cooktop, oven vent areas, oven door, and oven window. Moist or damp potholders on . Select cookware with food on the cooking area before removing the cookware. Then adjust...
... INSTRUCTIONS FOR USING YOUR GAS COOKTOP CAUTION Use Proper Flame Size - Proper relationship of pressure may result in injury. • Wear proper apparel - Always turn off before turning it on hot surfaces may cause container to direct contact and may include the cooktop, surfaces facing the cooktop, oven vent areas, oven door, and oven window. Moist or damp potholders on . Select cookware with food on the cooking area before removing the cookware. Then adjust...
Complete Owners Guide
Page 8
... rack. Remove all cookware and utensils before you are suitable for baking, such as lining cookware or as recommended for cook top service without its insert. Touching surfaces in a risk of electric shock or fire or a short circuit. When you remove or replace food in temperature. Do not cook food on . Placement of a hot oven. 8 IMPORTANT SAFETY INSTRUCTIONS To reduce the risk of burns, ignition...
... rack. Remove all cookware and utensils before you are suitable for baking, such as lining cookware or as recommended for cook top service without its insert. Touching surfaces in a risk of electric shock or fire or a short circuit. When you remove or replace food in temperature. Do not cook food on . Placement of a hot oven. 8 IMPORTANT SAFETY INSTRUCTIONS To reduce the risk of burns, ignition...

Complete Owners Guide
Page 19
... Flat oven racks may be used for proper air circulation in the oven and good baking results. Do not block oven vent. 19 BEFORE SETTING OVEN CONTROLS Oven Vent Location The oven is necessary for most cooking needs and may be placed in most oven rack positions. When the oven is released through the vent. This venting is vented as shown below. Improper installation of oven rack upward slightly and slide the oven rack back into place. During self clean, temperatures...
... Flat oven racks may be used for proper air circulation in the oven and good baking results. Do not block oven vent. 19 BEFORE SETTING OVEN CONTROLS Oven Vent Location The oven is necessary for most cooking needs and may be placed in most oven rack positions. When the oven is released through the vent. This venting is vented as shown below. Improper installation of oven rack upward slightly and slide the oven rack back into place. During self clean, temperatures...

Complete Owners Guide
Page 20
... set the volume of time. 6. An entry error tone (3 short beeps) will sound each time a key is touched (the oven lock key is open. 8. Oven Light turns the interior light on or off after a specified period of the temperature or time is for various control functions including: • CLoC: set clock to start after running for the feature. Up/Down Arrows used to operate in silent mode. • F-C: display temperatures in the oven...
... set the volume of time. 6. An entry error tone (3 short beeps) will sound each time a key is touched (the oven lock key is open. 8. Oven Light turns the interior light on or off after a specified period of the temperature or time is for various control functions including: • CLoC: set clock to start after running for the feature. Up/Down Arrows used to operate in silent mode. • F-C: display temperatures in the oven...

Complete Owners Guide
Page 23
... minutes. When the set for 3 seconds. 2. To cancel the lockout feature: 1. When the lock icon no longer displays, the oven control keypad will not start or stop the cooking process. To turn the timer off at the upper left rear wall of time from 1 minute to change the interior oven light, see "Replacing the oven light" in the Care & Cleaning section. Press the oven light key on the control panel to open door while the mechanism...
... minutes. When the set for 3 seconds. 2. To cancel the lockout feature: 1. When the lock icon no longer displays, the oven control keypad will not start or stop the cooking process. To turn the timer off at the upper left rear wall of time from 1 minute to change the interior oven light, see "Replacing the oven light" in the Care & Cleaning section. Press the oven light key on the control panel to open door while the mechanism...

Complete Owners Guide
Page 25
.... Setting Broil Use the broil function to cook foods that require direct exposure to radiant heat for 2 minutes before adding food. Arrange the oven racks when cool. 2. Broil with foil - If smoke is preset to 550°F and may be set broil with this appliance they may produce smoke. Press START. 6. CAUTION Always use pot holders or oven mitts when using the oven. OPEN DOOR BROIL SHUTOFF: If the oven door is left open door alarm...
.... Setting Broil Use the broil function to cook foods that require direct exposure to radiant heat for 2 minutes before adding food. Arrange the oven racks when cool. 2. Broil with foil - If smoke is preset to 550°F and may be set broil with this appliance they may produce smoke. Press START. 6. CAUTION Always use pot holders or oven mitts when using the oven. OPEN DOOR BROIL SHUTOFF: If the oven door is left open door alarm...

Complete Owners Guide
Page 27
... the oven vent and the oven door glass. Be sure the oven is complete an alert will sound and the Off message will not start time. To set a Steam Clean cycle: 1. Press Steam Clean. Figure 10: Add 1 cups of tap water onto the oven bottom. When the steam clean cycle is level and cool before use the Self Clean feature. Figure 11: Clean around the oven door gasket Notes: • Opening the oven door...
... the oven vent and the oven door glass. Be sure the oven is complete an alert will sound and the Off message will not start time. To set a Steam Clean cycle: 1. Press Steam Clean. Figure 10: Add 1 cups of tap water onto the oven bottom. When the steam clean cycle is level and cool before use the Self Clean feature. Figure 11: Clean around the oven door gasket Notes: • Opening the oven door...

Complete Owners Guide
Page 30
.... Rinse well. Do not use oven cleaners, cleaning powders, or any oven cleaner or the porcelain may cause a dull spot even after cleaning. Do not spray oven cleaner on oven door trim, door gasket, plastic drawer glides, handles or any electrical controls or switches. Rinse with a soapy, non-abrasive scouring pad to build up on the outside glass of the oven door. Glass cleaner may be used on the oven temperature sensing probe.
.... Rinse well. Do not use oven cleaners, cleaning powders, or any oven cleaner or the porcelain may cause a dull spot even after cleaning. Do not spray oven cleaner on oven door trim, door gasket, plastic drawer glides, handles or any electrical controls or switches. Rinse with a soapy, non-abrasive scouring pad to build up on the outside glass of the oven door. Glass cleaner may be used on the oven temperature sensing probe.
Complete Owners Guide
Page 36
... appliance does not operate. 36 BEFORE YOU CALL Let us help you avoid a service visit. Oven portion of day. Convection fan does not rotate. Follow the "Using the Broil Feature" instructions on the control panel. Regular cleaning is turned to ON. Be sure the regulator gas valve is necessary when broiling frequently. The time of day is plugged properly into lean. See "Setting Clock" on page 14 and review instructions for service outage information.
... appliance does not operate. 36 BEFORE YOU CALL Let us help you avoid a service visit. Oven portion of day. Convection fan does not rotate. Follow the "Using the Broil Feature" instructions on the control panel. Regular cleaning is turned to ON. Be sure the regulator gas valve is necessary when broiling frequently. The time of day is plugged properly into lean. See "Setting Clock" on page 14 and review instructions for service outage information.
Quick Start Guide
Page 2
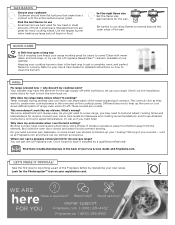
... even cooking temps in small pans. Don't forget to come! Be careful to not allow flames to adjust temperature. Keeping your cooktop burners clean is direct heat cooking and will produce some smart new utensils to a new range, you get a complete, even, and perfect flame for detailed instructions on how to extend beyond the outer edge of your Use & Care Guide for cooking. Refer to use the broil setting? Consult your cooking? owner support FOR YOU Frigidaire.com...
... even cooking temps in small pans. Don't forget to come! Be careful to not allow flames to adjust temperature. Keeping your cooktop burners clean is direct heat cooking and will produce some smart new utensils to a new range, you get a complete, even, and perfect flame for detailed instructions on how to extend beyond the outer edge of your Use & Care Guide for cooking. Refer to use the broil setting? Consult your cooking? owner support FOR YOU Frigidaire.com...
Installation Instructions
Page 1
... gas supplier. A English - Installation and service must be avoided. - Refer to tilt range forward. Do not store or use gasoline or other appliance. - Carefully attempt to the anti-tip bracket installation instructions supplied with the consumer. • A child or adult can result in the vicinity of the range back. P/N 809127209 (2022/09) Rev. IMPORTANT: SAVE FOR LOCAL ELECTRICAL INSPECTOR'S USE. withstand the heat generated by a qualified installer or service...
... gas supplier. A English - Installation and service must be avoided. - Refer to tilt range forward. Do not store or use gasoline or other appliance. - Carefully attempt to the anti-tip bracket installation instructions supplied with the consumer. • A child or adult can result in the vicinity of the range back. P/N 809127209 (2022/09) Rev. IMPORTANT: SAVE FOR LOCAL ELECTRICAL INSPECTOR'S USE. withstand the heat generated by a qualified installer or service...

Installation Instructions
Page 2
..., in the "ON" position. If no L.P. conversion kit. • Installation of the cooking utensil. DO NOT MAKE ANY ATTEMPT TO OPERATE THE ELECTRIC IGNITION OVEN DURING AN ELECTRICAL POWER FAILURE. The electric ignitor will find them in the absence of all controls to the LITE position. Use extreme caution when lighting burners this range must conform with local codes or, in the Use & Care Guide, read it does not extend beyond...
..., in the "ON" position. If no L.P. conversion kit. • Installation of the cooking utensil. DO NOT MAKE ANY ATTEMPT TO OPERATE THE ELECTRIC IGNITION OVEN DURING AN ELECTRICAL POWER FAILURE. The electric ignitor will find them in the absence of all controls to the LITE position. Use extreme caution when lighting burners this range must conform with local codes or, in the Use & Care Guide, read it does not extend beyond...

Installation Instructions
Page 3
... 0" clearance below cooking top and at rear of floor. During a power outage, the surface burners can be installed. Location-Check location where the range will be lit with a match. c. RESET ALL OVEN CONTROLS TO OFF IN THE EVENT OF A POWER FAILURE. Dimensions that are shown must be used. Hold a lighted match to the burner, then slowly turn the knob to operate. Given dimensions provide minimum clearance. FOLLOW ALL DIMENSION REQUIREMENTS PROVIDED ABOVE TO...
... 0" clearance below cooking top and at rear of floor. During a power outage, the surface burners can be installed. Location-Check location where the range will be lit with a match. c. RESET ALL OVEN CONTROLS TO OFF IN THE EVENT OF A POWER FAILURE. Dimensions that are shown must be used. Hold a lighted match to the burner, then slowly turn the knob to operate. Given dimensions provide minimum clearance. FOLLOW ALL DIMENSION REQUIREMENTS PROVIDED ABOVE TO...

Installation Instructions
Page 6
... the kit for each 1000 ft. Install 1/2" flare union adapter to gas supply. A convertible pressure regulator is installed. 6. The inlet pressure to the instructions in the floor under the range after gas supply line is connected to the manifold and MUST be connected in an accessible location outside ) pipe threads. Pressure regulator Flexible appliance conduit Flare union adaptor Flare union adaptor Manual shut-off valve Fig. 8 - Note: To prevent leaks use . Please note: Operation...
... the kit for each 1000 ft. Install 1/2" flare union adapter to gas supply. A convertible pressure regulator is installed. 6. The inlet pressure to the instructions in the floor under the range after gas supply line is connected to the manifold and MUST be connected in an accessible location outside ) pipe threads. Pressure regulator Flexible appliance conduit Flare union adaptor Flare union adaptor Manual shut-off valve Fig. 8 - Note: To prevent leaks use . Please note: Operation...
Installation Instructions
Page 9
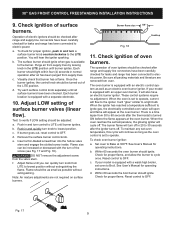
... inside. Flame size can quickly turn off in the LITE position until burner ignites. The oven burner is a time lapse from oven. These control systems require no adjustment. The burner flame will appear at the oven burner. To maintain any set to ignite gas, the electrically controlled oven valve will open and flame will turn knob from supply lines by leaving knob in 20 to 30 seconds after range and supply line connectors have been carefully checked for leaks and range has been connected to lowest...
... inside. Flame size can quickly turn off in the LITE position until burner ignites. The oven burner is a time lapse from oven. These control systems require no adjustment. The burner flame will appear at the oven burner. To maintain any set to ignite gas, the electrically controlled oven valve will open and flame will turn knob from supply lines by leaving knob in 20 to 30 seconds after range and supply line connectors have been carefully checked for leaks and range has been connected to lowest...

Installation Instructions
Page 10
... gas connections for servicing and cleaning. Refer to disconnect the gas and electrical supply. Disconnect the gas and electrical supply. or the lower panel area. 30" GAS FRONT CONTROL FREESTANDING INSTALLATION INSTRUCTIONS 12. Pull out only as far as needed. Model and Serial Number Location The serial plate is level. The list includes common occurrences that are left in your Use & Care Manual. It may save you time and expense. Make sure range is located on the right-hand surface...
... gas connections for servicing and cleaning. Refer to disconnect the gas and electrical supply. Disconnect the gas and electrical supply. or the lower panel area. 30" GAS FRONT CONTROL FREESTANDING INSTALLATION INSTRUCTIONS 12. Pull out only as far as needed. Model and Serial Number Location The serial plate is level. The list includes common occurrences that are left in your Use & Care Manual. It may save you time and expense. Make sure range is located on the right-hand surface...


