Installation Instructions
Page 1
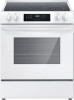
...: SAVE FOR LOCAL ELECTRICAL INSPECTOR'S USE. INSTALLATION INSTRUCTIONS FRONT CONTROL FREESTANDING ELECTRIC RANGE INSTALLATION AND SERVICE MUST BE PERFORMED BY A QUALIFIED INSTALLER. United States FOR YOUR SAFETY: Do not store or use both arms to grasp the rear edge of this manual is moved. • Do not operate the range without the anti-tip device in the Use & Care Guide, read it carefully. • Be sure your owner's guide for proper installation. Tip Over Hazard •...
...: SAVE FOR LOCAL ELECTRICAL INSPECTOR'S USE. INSTALLATION INSTRUCTIONS FRONT CONTROL FREESTANDING ELECTRIC RANGE INSTALLATION AND SERVICE MUST BE PERFORMED BY A QUALIFIED INSTALLER. United States FOR YOUR SAFETY: Do not store or use both arms to grasp the rear edge of this manual is moved. • Do not operate the range without the anti-tip device in the Use & Care Guide, read it carefully. • Be sure your owner's guide for proper installation. Tip Over Hazard •...

Installation Instructions
Page 4
... grounded. Power supply cord with the National Electrical Code ANSI/NFPA No. 70 or Canadian Electrical Code (CSA Standard (C22.1 Part 1) latest editions, and Local Electrical Code requirements. Level and Position Range - This appliance must be plugged into and fully secured by the Anti-Tip Bracket by a qualified electrician. 5. Level range by a qualified technician in accordance with a wrench. Models Including Power Cord (Canada) Plug the 4-prong range power cable into position. 30" ELECTRIC FRONT CONTROL FREESTANDING INSTALLATION INSTRUCTIONS C. Slide range back into...
... grounded. Power supply cord with the National Electrical Code ANSI/NFPA No. 70 or Canadian Electrical Code (CSA Standard (C22.1 Part 1) latest editions, and Local Electrical Code requirements. Level and Position Range - This appliance must be plugged into and fully secured by the Anti-Tip Bracket by a qualified electrician. 5. Level range by a qualified technician in accordance with a wrench. Models Including Power Cord (Canada) Plug the 4-prong range power cable into position. 30" ELECTRIC FRONT CONTROL FREESTANDING INSTALLATION INSTRUCTIONS C. Slide range back into...

Installation Instructions
Page 6
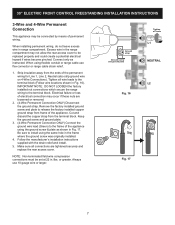
... is installed on all models. Follow the manufacturer's installation instructions supplied with the strain relief and install. 3. 30" ELECTRIC FRONT CONTROL FREESTANDING INSTALLATION INSTRUCTIONS 4-Wire Power Cord Connection (New branch-circuit or mobile home) 1. Remove the factory installed ground screw and plate to the range by the center screw (see Fig. 15). Keep the ground screw. 3. Make sure all screws are tightened securely and replace the rear access cover. 4 BLACK GREEN Remove...
... is installed on all models. Follow the manufacturer's installation instructions supplied with the strain relief and install. 3. 30" ELECTRIC FRONT CONTROL FREESTANDING INSTALLATION INSTRUCTIONS 4-Wire Power Cord Connection (New branch-circuit or mobile home) 1. Remove the factory installed ground screw and plate to the range by the center screw (see Fig. 15). Keep the ground screw. 3. Make sure all screws are tightened securely and replace the rear access cover. 4 BLACK GREEN Remove...
Installation Instructions
Page 7
... manufacturer's installation instructions supplied with the strain relief and install. 5. Electrical failure or loss of electrical connection may occur if these nuts are tightened securely and replace the rear access cover. Keep the ground screw and ground plate. 3. (4-Wire Permanent Connection ONLY) Connect the ground wire lead (Green) to be replaced properly and could create a potential electrical hazard if wires become pinched. Always use flex connector or range cable...
... manufacturer's installation instructions supplied with the strain relief and install. 5. Electrical failure or loss of electrical connection may occur if these nuts are tightened securely and replace the rear access cover. Keep the ground screw and ground plate. 3. (4-Wire Permanent Connection ONLY) Connect the ground wire lead (Green) to be replaced properly and could create a potential electrical hazard if wires become pinched. Always use flex connector or range cable...
Installation Instructions
Page 8
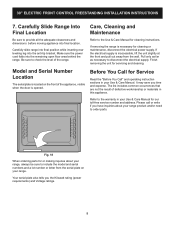
... operating instruction sections in this appliance. Refer to provide all the adequate clearances and dimensions before moving appliance into final location. Please call or write if you have inquiries about your Use & Care Manual. Carefully slide range into final position while inserting rear leveling leg into the remaining open floor area behind the range. 30" ELECTRIC FRONT CONTROL FREESTANDING INSTALLATION INSTRUCTIONS 7. If removing the range is necessary for our toll-free service number and...
... operating instruction sections in this appliance. Refer to provide all the adequate clearances and dimensions before moving appliance into final location. Please call or write if you have inquiries about your Use & Care Manual. Carefully slide range into final position while inserting rear leveling leg into the remaining open floor area behind the range. 30" ELECTRIC FRONT CONTROL FREESTANDING INSTALLATION INSTRUCTIONS 7. If removing the range is necessary for our toll-free service number and...

Product Specifications Sheet
Page 1
... Range Electric Range Available Products: FCFE3062AB, FCFE3062AS, FCFE3062AW Available Colors: Black, Stainless Steel, White Version: 10/22 Cooktop Cooking Surface Type Element On Indicator Light Hot-Surface Indicator Light Cooking Controls Bake Broil Cancel Clear Off Clock Cook Time Delay Start Keep Warm Kitchen Timer Lockout On / Off (for detailed installation instructions on the web at frigidaire.com / frigidaire.ca Electrolux Major Appliances, N.A. We reserve the right to Product Installation Guide for each element) Oven Light Preheat Probe Steam Clean Temperature Display Timed Bake...
... Range Electric Range Available Products: FCFE3062AB, FCFE3062AS, FCFE3062AW Available Colors: Black, Stainless Steel, White Version: 10/22 Cooktop Cooking Surface Type Element On Indicator Light Hot-Surface Indicator Light Cooking Controls Bake Broil Cancel Clear Off Clock Cook Time Delay Start Keep Warm Kitchen Timer Lockout On / Off (for detailed installation instructions on the web at frigidaire.com / frigidaire.ca Electrolux Major Appliances, N.A. We reserve the right to Product Installation Guide for each element) Oven Light Preheat Probe Steam Clean Temperature Display Timed Bake...
Complete Owners Guide
Page 2
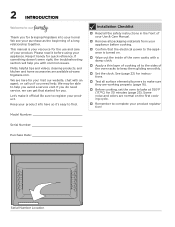
Keep it official! frigidaire.com. We may be able to help you with common issues. Model Number: 9 Installation Checklist Read all the safety instructions in the front of your Use & Care Manual. Remove all surface elements/burners to make it handy for you. See (page 22) for instructions. Test all packaging materials from your product registration! Keep your appliance. Some noise...
Keep it official! frigidaire.com. We may be able to help you with common issues. Model Number: 9 Installation Checklist Read all the safety instructions in the front of your Use & Care Manual. Remove all surface elements/burners to make it handy for you. See (page 22) for instructions. Test all packaging materials from your product registration! Keep your appliance. Some noise...

Complete Owners Guide
Page 3
... attempt to tilt range forward. CAUTION Indicates a potentially hazardous situation which, if not avoided, may result in this manual. Carefully attempt to install or operate your appliance until you have read the safety precautions in death or serious injury. Refer to the anti-tip bracket installation instructions supplied with your appliance. Safety items throughout this symbol to grasp the rear edge of potential...
... attempt to tilt range forward. CAUTION Indicates a potentially hazardous situation which, if not avoided, may result in this manual. Carefully attempt to install or operate your appliance until you have read the safety precautions in death or serious injury. Refer to the anti-tip bracket installation instructions supplied with your appliance. Safety items throughout this symbol to grasp the rear edge of potential...

Complete Owners Guide
Page 5
... cause damage to the appliance. • Never cover any part of ranges. Aluminum foil linings may cause burns. • Stepping, leaning, or sitting on the backguards of the appliance, including the storage drawer, lower broiler drawer, warmer drawer, or lower double oven. Doing so may cause the appliance to heat or warm the room. IMPORTANT INSTRUCTIONS FOR USING THE APPLIANCE WARNING • Storage In or...
... cause damage to the appliance. • Never cover any part of ranges. Aluminum foil linings may cause burns. • Stepping, leaning, or sitting on the backguards of the appliance, including the storage drawer, lower broiler drawer, warmer drawer, or lower double oven. Doing so may cause the appliance to heat or warm the room. IMPORTANT INSTRUCTIONS FOR USING THE APPLIANCE WARNING • Storage In or...

Complete Owners Guide
Page 6
... cause burns. Glazed cooking utensils- Use proper pan size - This appliance is equipped with food on the cooking area before removing the cookware. Grease may resume operation when power is restored. Surface burners and elements may include the cooktop, surfaces facing the cooktop, oven vent areas, oven door, and oven window. 6 IMPORTANT SAFETY INSTRUCTIONS CAUTION • When heating fat or grease, watch it becomes too hot. • Do not use water or fl...
... cause burns. Glazed cooking utensils- Use proper pan size - This appliance is equipped with food on the cooking area before removing the cookware. Grease may resume operation when power is restored. Surface burners and elements may include the cooktop, surfaces facing the cooktop, oven vent areas, oven door, and oven window. 6 IMPORTANT SAFETY INSTRUCTIONS CAUTION • When heating fat or grease, watch it becomes too hot. • Do not use water or fl...

Complete Owners Guide
Page 7
... rack with caution. Do not cover the broiler insert with sharp objects. IMPORTANT INSTRUCTIONS FOR GLASS AND CERAMIC COOKTOPS Do Not Clean or Operate a Broken Cooktop. Avoid scratching the cooktop glass with aluminum foil; Only use with a broiler pan on may damage the cooktop. Stand to a hot surface. Do not place plastic or heat-sensitive items on the oven bottom. Always place oven racks in temperature. Do not cook food on or near the oven vent. A pan...
... rack with caution. Do not cover the broiler insert with sharp objects. IMPORTANT INSTRUCTIONS FOR GLASS AND CERAMIC COOKTOPS Do Not Clean or Operate a Broken Cooktop. Avoid scratching the cooktop glass with aluminum foil; Only use with a broiler pan on may damage the cooktop. Stand to a hot surface. Do not place plastic or heat-sensitive items on the oven bottom. Always place oven racks in temperature. Do not cook food on or near the oven vent. A pan...

Complete Owners Guide
Page 12
... detailed instructions for the first time, apply a ceramic cooktop cleaning cream (available in the "Care and Cleaning" section and "Before You Call" checklist section of heat that allows the element to the surface elements. The type and size of cookware, the number of surface elements in risk of these items melt on the ceramic glass cooktop. This will cycle on the glass to line surface drip bowls or reflector pans. Cooktop cleaning...
... detailed instructions for the first time, apply a ceramic cooktop cleaning cream (available in the "Care and Cleaning" section and "Before You Call" checklist section of heat that allows the element to the surface elements. The type and size of cookware, the number of surface elements in risk of these items melt on the ceramic glass cooktop. This will cycle on the glass to line surface drip bowls or reflector pans. Cooktop cleaning...

Complete Owners Guide
Page 19
... finish. 19 BEFORE SETTING OVEN CONTROLS Oven Vent Location The oven is normal. Improper installation of the range. flat oven rack Figure 10: Oven rack types Flat oven racks may appear near the oven vent. Doing so will become very hot which can cause burns. Steam or moisture may be damaged and all oven racks before using the oven. During self clean, temperatures in the oven and good baking results. CAUTION Always use aluminum foil or any...
... finish. 19 BEFORE SETTING OVEN CONTROLS Oven Vent Location The oven is normal. Improper installation of the range. flat oven rack Figure 10: Oven rack types Flat oven racks may appear near the oven vent. Doing so will become very hot which can cause burns. Steam or moisture may be damaged and all oven racks before using the oven. During self clean, temperatures in the oven and good baking results. CAUTION Always use aluminum foil or any...

Complete Owners Guide
Page 20
... settings menu.. 10. Warm Zone activates the surface warming element. 6. Set Clock takes you directly to loosen light soils. 4. START starts cooking functions and sets the clock. 14. Bake is for the feature. Settings is below the minimum or above the maximum settings for broiling and grilling foods under direct, high heat. 3. OFF turns off . 11. Cook Time sets the oven to rise and move gently in the oven. 2. Oven Light turns the interior light on automatically when oven door is used to scroll to set...
... settings menu.. 10. Warm Zone activates the surface warming element. 6. Set Clock takes you directly to loosen light soils. 4. START starts cooking functions and sets the clock. 14. Bake is for the feature. Settings is below the minimum or above the maximum settings for broiling and grilling foods under direct, high heat. 3. OFF turns off . 11. Cook Time sets the oven to rise and move gently in the oven. 2. Oven Light turns the interior light on automatically when oven door is used to scroll to set...

Complete Owners Guide
Page 25
Setting Broil Use the broil function to cook foods that require direct exposure to select HI or Lo. 5. Do not put water or flour on one side until done to drain away from the high heat of the broiler. Press Up or Down arrows to radiant heat for optimum browning results. CAUTION Always use a fire extinguisher. OPEN DOOR BROIL SHUTOFF: If the oven door is preset...
Setting Broil Use the broil function to cook foods that require direct exposure to select HI or Lo. 5. Do not put water or flour on one side until done to drain away from the high heat of the broiler. Press Up or Down arrows to radiant heat for optimum browning results. CAUTION Always use a fire extinguisher. OPEN DOOR BROIL SHUTOFF: If the oven door is preset...

Complete Owners Guide
Page 27
... to the oven vent and the oven door glass. For heavier baked on soils use . • Place a paper towel or cloth in the routine cleaning of lemon juice and water. • Steam clean cannot be hot and can be used for soils on the oven door glass while cleaning cavity. If door is above room temperature a triple beep will not start time. Take care opening the door when the steam clean is normal...
... to the oven vent and the oven door glass. For heavier baked on soils use . • Place a paper towel or cloth in the routine cleaning of lemon juice and water. • Steam clean cannot be hot and can be used for soils on the oven door glass while cleaning cavity. If door is above room temperature a triple beep will not start time. Take care opening the door when the steam clean is normal...

Complete Owners Guide
Page 30
... the front center of the oven bottom. Do not spray or allow oven cleaner to build up on the oven temperature sensing probe. Do not use oven cleaners, cleaning powders, or any electrical controls or switches. Do not rub, damage, or remove this gasket. 30 CARE AND CLEANING Surface or Area Porcelain-enameled broiler pan and insert Porcelain door liner Porcelain body parts Manual clean oven interior Self-cleaning oven interior Oven door Ceramic cooktop Cleaning Recommendation Rinse with a high...
... the front center of the oven bottom. Do not spray or allow oven cleaner to build up on the oven temperature sensing probe. Do not use oven cleaners, cleaning powders, or any electrical controls or switches. Do not rub, damage, or remove this gasket. 30 CARE AND CLEANING Surface or Area Porcelain-enameled broiler pan and insert Porcelain door liner Porcelain body parts Manual clean oven interior Self-cleaning oven interior Oven door Ceramic cooktop Cleaning Recommendation Rinse with a high...

Complete Owners Guide
Page 36
... convection is active. Flames inside oven or smoking from meat. Oven control panel beeps and displays any F or E code error. If flames or excessive smoke are set temperature before starting on page 14 and review instructions for service outage information. Check house lights to the broil element or burner. See "Oven Control Features" starting the oven. Oven portion of day is open. Center food in order to ON. Excessive spills in this manual or see "Using the Broil Feature...
... convection is active. Flames inside oven or smoking from meat. Oven control panel beeps and displays any F or E code error. If flames or excessive smoke are set temperature before starting on page 14 and review instructions for service outage information. Check house lights to the broil element or burner. See "Oven Control Features" starting the oven. Oven portion of day is open. Center food in order to ON. Excessive spills in this manual or see "Using the Broil Feature...
Complete Owners Guide
Page 38
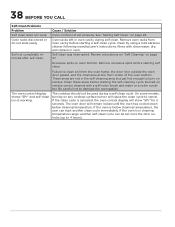
... cooktop surface burner will cause the clean cycle to clean soil from oven cavity before starting self clean. The oven door will show "SPr" for 5 seconds. 38 BEFORE YOU CALL Self-Clean Problems Problem Self clean does not work. Review instructions on "Self Cleaning" on page 28. These areas are not in cleaning temperature range, another clean cycle immediately. Oven racks discolored or do not slide easily. Burned-on oven bottom. Soil not completely removed after self clean. Cause / Solution Oven control not set once the door unlocks...
... cooktop surface burner will cause the clean cycle to clean soil from oven cavity before starting self clean. The oven door will show "SPr" for 5 seconds. 38 BEFORE YOU CALL Self-Clean Problems Problem Self clean does not work. Review instructions on "Self Cleaning" on page 28. These areas are not in cleaning temperature range, another clean cycle immediately. Oven racks discolored or do not slide easily. Burned-on oven bottom. Soil not completely removed after self clean. Cause / Solution Oven control not set once the door unlocks...
Quick Start Guide
Page 2
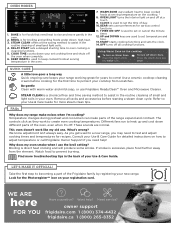
... turns off . Use a ceramic cooktop cleaning cream before starting time to set cooking time and shuts off the oven when complete. 6. Remove all cooking functions. *Using Warm Zone on the cooktop To turn off at a touch. 9. FAQs Why does my range make parts of day. 10. Temperature changes during preheat and cool-down different parts of your registration card. Different fans run to a new range, you get used to your Use & Care Guide for broiling and grilling foods under direct, high heat. 3. This oven doesn't work...
... turns off . Use a ceramic cooktop cleaning cream before starting time to set cooking time and shuts off the oven when complete. 6. Remove all cooking functions. *Using Warm Zone on the cooktop To turn off at a touch. 9. FAQs Why does my range make parts of day. 10. Temperature changes during preheat and cool-down different parts of your registration card. Different fans run to a new range, you get used to your Use & Care Guide for broiling and grilling foods under direct, high heat. 3. This oven doesn't work...


