
Installation Instructions
Page 5
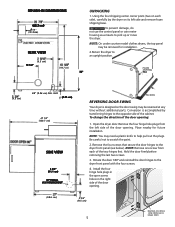
...screws. 4. Rotate the door 180° and reinstall the door hinges to scratch the paint. 2. ROUGH-IN DIMENSIONS (68.3 cm) 43/8" (11.2cm) ELECTRIC CONNECTION REAR VIEW (6.5 cm) 13 1/2" (110.7 cm) UNPACKING 1. NOTE: You may be removed for future installation. To change the direction of the door ... FROM EACH HINGE FIRST) To prevent damage, do not use the control panel or coin meter housing as a means to help pull out the plugs. Open the dryer door. NOTE: On under counter model clothes dryers, the top panel may be reversed at any time without additional parts. Using the ...
...screws. 4. Rotate the door 180° and reinstall the door hinges to scratch the paint. 2. ROUGH-IN DIMENSIONS (68.3 cm) 43/8" (11.2cm) ELECTRIC CONNECTION REAR VIEW (6.5 cm) 13 1/2" (110.7 cm) UNPACKING 1. NOTE: You may be removed for future installation. To change the direction of the door ... FROM EACH HINGE FIRST) To prevent damage, do not use the control panel or coin meter housing as a means to help pull out the plugs. Open the dryer door. NOTE: On under counter model clothes dryers, the top panel may be reversed at any time without additional parts. Using the ...
Wiring Schematic
Page 1
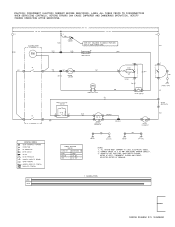
VERIFY PROPER OPERATION AFTER SERVICING. 120 VAC 240 VAC 120 VAC GRN CABINET BLUE WIRE NOT INCLUDED IN MODELS PROVIDED ACCUMULATOR WITH 4-WIRE POWER CORD. LABEL ALL WIRES PRIOR TO DISCONNECTION WHEN SERVICING CONTROLS. !CAUTION: DISCONNECT ELECTRIC CURRENT BEFORE SERVICING. CONNECT DRYER TO A 30 AMP INDIVIDUAL BRANCH CIRCUIT. 3. SPLICE MOTOR PROTECTOR 47 CHASSIS (CABINET) GROUND...
VERIFY PROPER OPERATION AFTER SERVICING. 120 VAC 240 VAC 120 VAC GRN CABINET BLUE WIRE NOT INCLUDED IN MODELS PROVIDED ACCUMULATOR WITH 4-WIRE POWER CORD. LABEL ALL WIRES PRIOR TO DISCONNECTION WHEN SERVICING CONTROLS. !CAUTION: DISCONNECT ELECTRIC CURRENT BEFORE SERVICING. CONNECT DRYER TO A 30 AMP INDIVIDUAL BRANCH CIRCUIT. 3. SPLICE MOTOR PROTECTOR 47 CHASSIS (CABINET) GROUND...


