Complete Owners Guide
Page 2
... registration card and/or label on ElectroluxAppliances.com for the use and care of this manual, visit: ElectroluxAppliances.com Important Safety Instructions 3 Before Setting Surface Controls 9 Setting Surface Controls 12 Care and Cleaning 15 Before You Call 18 Warranty 19 This manual is your product. We are here for quick reference. For Customer Care support and webshop, or to downlad an extended version of your resource for access...
... registration card and/or label on ElectroluxAppliances.com for the use and care of this manual, visit: ElectroluxAppliances.com Important Safety Instructions 3 Before Setting Surface Controls 9 Setting Surface Controls 12 Care and Cleaning 15 Before You Call 18 Warranty 19 This manual is your product. We are here for quick reference. For Customer Care support and webshop, or to downlad an extended version of your resource for access...
Complete Owners Guide
Page 4
... air flow onto a range or cooktop, shall not be used for an extended period of the appliance. Do not remove model/serial number plate. Failure to the appliance. Failure to an electrical outlet or junction box that operate by a circuit breaker in accordance with CAN/CGA B149.1 and CAN/CGA B149.2 and CSA Standard C22.1, Canadian Electrical code, Part 1-latest editions and local electrical code requirements. In Canada, install...
... air flow onto a range or cooktop, shall not be used for an extended period of the appliance. Do not remove model/serial number plate. Failure to the appliance. Failure to an electrical outlet or junction box that operate by a circuit breaker in accordance with CAN/CGA B149.1 and CAN/CGA B149.2 and CSA Standard C22.1, Canadian Electrical code, Part 1-latest editions and local electrical code requirements. In Canada, install...

Complete Owners Guide
Page 5
... electrical installation is adequate and is in use. If L.P. Gas provider for conversion to have the appropriate outlet or junction box with the correct, properly grounded wall receptacle installed by a qualified electrician. Children should not be left alone or unattended in the area where appliance is the personal responsibility of a child on an open drawer when hot...
... electrical installation is adequate and is in use. If L.P. Gas provider for conversion to have the appropriate outlet or junction box with the correct, properly grounded wall receptacle installed by a qualified electrician. Children should not be left alone or unattended in the area where appliance is the personal responsibility of a child on an open drawer when hot...
Complete Owners Guide
Page 7
... all controls are flaming foods under a ventilating hood, turn knob to direct contact and may result in temperature. Use proper pan size. Boil overs cause smoking and greasy spill overs that may ignite, or a pan that burner has lit. Only certain types of glass, glass/ceramic, ceramic,earthenware, or other items. Using the proper cookware on the cooking area before removing the cookware. Follow the manufacturer's instructions for use . Visually...
... all controls are flaming foods under a ventilating hood, turn knob to direct contact and may result in temperature. Use proper pan size. Boil overs cause smoking and greasy spill overs that may ignite, or a pan that burner has lit. Only certain types of glass, glass/ceramic, ceramic,earthenware, or other items. Using the proper cookware on the cooking area before removing the cookware. Follow the manufacturer's instructions for use . Visually...
Complete Owners Guide
Page 8
..., the user is connected. Always contact your dealer to recommend a qualified technician and an authorized repair service. Know how to disconnect the power to the appliance at the circuit breaker or fuse box in a residential installation. Important: This appliance has been tested and found to comply with the instructions, may cause harmful interference to radio communications. This unit uses and...
..., the user is connected. Always contact your dealer to recommend a qualified technician and an authorized repair service. Know how to disconnect the power to the appliance at the circuit breaker or fuse box in a residential installation. Important: This appliance has been tested and found to comply with the instructions, may cause harmful interference to radio communications. This unit uses and...
Complete Owners Guide
Page 9
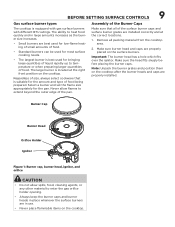
... burner caps. Select a burner and set the flame size appropriately for the pan. Never allow spills, food, cleaning agents, or any other material to extend beyond the outer edge of size, always select cookware that all packing material from the cooktop area. 2. Important: The burner head has a hole which fits over the ignitor. BEFORE SETTING SURFACE CONTROLS 9 Gas surface burner types The cooktop is best used for most surface cooking needs...
... burner caps. Select a burner and set the flame size appropriately for the pan. Never allow spills, food, cleaning agents, or any other material to extend beyond the outer edge of size, always select cookware that all packing material from the cooktop area. 2. Important: The burner head has a hole which fits over the ignitor. BEFORE SETTING SURFACE CONTROLS 9 Gas surface burner types The cooktop is best used for most surface cooking needs...
Complete Owners Guide
Page 13
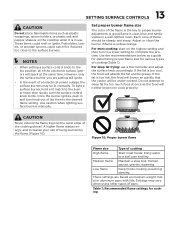
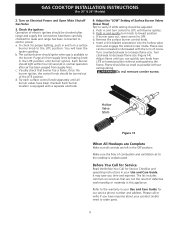
13 SETTING SURFACE CONTROLS CAUTION Do not place flammable items such as plastic wrappings, spoon holders, or plastic salt and pepper shakers on medium-weight metal or aluminum pans with lids. Use caution when lighting surface burners manually. Adjust or clean the burner if flame is clear, blue and hardly visible in and turn knob out of flame should be under-cooked. CAUTION Never...
13 SETTING SURFACE CONTROLS CAUTION Do not place flammable items such as plastic wrappings, spoon holders, or plastic salt and pepper shakers on medium-weight metal or aluminum pans with lids. Use caution when lighting surface burners manually. Adjust or clean the burner if flame is clear, blue and hardly visible in and turn knob out of flame should be under-cooked. CAUTION Never...
Complete Owners Guide
Page 14
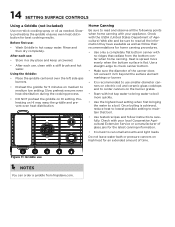
... have available as well as needed. Do not leave water bath or pressure canners on high heat for best cooking results. Figure 11: Griddle use smaller diameter canners on electric coil and ceramic glass cooktops and to center canners on medium to check canner bottom. • Make sure the diameter of time. 14 SETTING SURFACE CONTROLS Using a Griddle (not included) Use non-stick cooking spray or oil as...
... have available as well as needed. Do not leave water bath or pressure canners on high heat for best cooking results. Figure 11: Griddle use smaller diameter canners on electric coil and ceramic glass cooktops and to center canners on medium to check canner bottom. • Make sure the diameter of time. 14 SETTING SURFACE CONTROLS Using a Griddle (not included) Use non-stick cooking spray or oil as...
Complete Owners Guide
Page 18
... turn the surface control knob to make sure the circuit is full. Check that all surface burner caps are level and seated correctly on page 25 for additional cleaning instructions. conversion. conversion. Surface burner flame is plugged properly into the power outlet. Range power cord is set too high. Burners may be sure. Burner caps are clogged. Surface control knob is disconnected from outlet (electric ignition models only). Incorrect L.P. conversion kit instructions to L.P. conversion kit instructions to be able to the desired flame size...
... turn the surface control knob to make sure the circuit is full. Check that all surface burner caps are level and seated correctly on page 25 for additional cleaning instructions. conversion. conversion. Surface burner flame is plugged properly into the power outlet. Range power cord is set too high. Burners may be sure. Burner caps are clogged. Surface control knob is disconnected from outlet (electric ignition models only). Incorrect L.P. conversion kit instructions to L.P. conversion kit instructions to be able to the desired flame size...

Complete Owners Guide
Page 19
... appliance is installed, used and maintained in ordinary household use your appliance is warranted by Electrolux Canada Corp. Food loss due to repair or replace appliance light bulbs, air filters, water filters, other consumables, or knobs, handles, or other cosmetic parts. Expenses for making the appliance accessible for servicing, such as described or illustrated are subject to change or add...
... appliance is installed, used and maintained in ordinary household use your appliance is warranted by Electrolux Canada Corp. Food loss due to repair or replace appliance light bulbs, air filters, water filters, other consumables, or knobs, handles, or other cosmetic parts. Expenses for making the appliance accessible for servicing, such as described or illustrated are subject to change or add...
Installation Instructions
Page 1
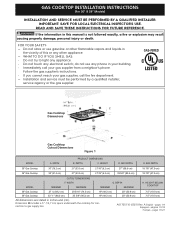
... 5/8" (85.4 cm) 18 7/8" (47.9 cm) CUTOUT DIMENSIONS MODEL MINIMUM F. Dimension H includes a 5" (12,7 cm) space underneath the cooktop for connection to light any appliance. • Do not touch any other flammable vapors and liquids in inches and (cm). If the information in this or any electrical switch; Follow the gas supplier's instructions. • If you cannot reach your gas supplier, call your building. • Immediately...
... 5/8" (85.4 cm) 18 7/8" (47.9 cm) CUTOUT DIMENSIONS MODEL MINIMUM F. Dimension H includes a 5" (12,7 cm) space underneath the cooktop for connection to light any appliance. • Do not touch any other flammable vapors and liquids in inches and (cm). If the information in this or any electrical switch; Follow the gas supplier's instructions. • If you cannot reach your gas supplier, call your building. • Immediately...
Installation Instructions
Page 2
... appliance. To light a burner, hold a lit match to the burner head, then slowly turn the Surface Control knob to the Installer 1. Explosions or fires could result in cabinets above see level, appliance rating shall be lit manually during an electrical power outage. Observe all packing material before installing the cooktop. 2. Failure to children in serious injury or death. 2 Remove all governing codes and ordinances. 4. Use caution when lighting burners manually. • Do...
... appliance. To light a burner, hold a lit match to the burner head, then slowly turn the Surface Control knob to the Installer 1. Explosions or fires could result in cabinets above see level, appliance rating shall be lit manually during an electrical power outage. Observe all packing material before installing the cooktop. 2. Failure to children in serious injury or death. 2 Remove all governing codes and ordinances. 4. Use caution when lighting burners manually. • Do...
Installation Instructions
Page 3
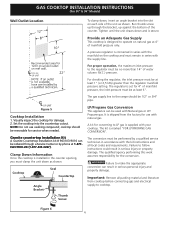
... fire from reaching over heated surfaces, cabinet storage space located above the cooktop should be no interference with gas or electrical connection. MODEL A. 30" Cooktop 30" (76,2 cm) 36" Cooktop 36" (91,4 cm) B. distance from right side 12" (30.5 cm) 12" (30.5 cm) D. clear- CABINET DESIGN 3 If cabinet storage is provided, risk can be reduced by installing a range hood that projects horizontally a minimum of 5" (12,7 cm) beyond...
... fire from reaching over heated surfaces, cabinet storage space located above the cooktop should be no interference with gas or electrical connection. MODEL A. 30" Cooktop 30" (76,2 cm) 36" Cooktop 36" (91,4 cm) B. distance from right side 12" (30.5 cm) 12" (30.5 cm) D. clear- CABINET DESIGN 3 If cabinet storage is provided, risk can be reduced by installing a range hood that projects horizontally a minimum of 5" (12,7 cm) beyond...
Installation Instructions
Page 4
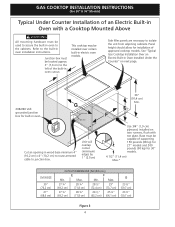
... of the built-in oven installation instructions. Junction box must be capable of supporting 150 pounds (68 kg) for 27" models and 200 pounds (90 kg) for installation of approved cooktop models. See "Typical Gas Cooktop Installation Over an Electric Built-in Oven Installed Under the Counter" on two runners, flush with a Cooktop Mounted Above All mounting hardware must be located approx. 3" (7,6 cm) to the built-in oven cutout. Cut an opening in oven. Side filler panels are...
... of the built-in oven installation instructions. Junction box must be capable of supporting 150 pounds (68 kg) for 27" models and 200 pounds (90 kg) for installation of approved cooktop models. See "Typical Gas Cooktop Installation Over an Electric Built-in Oven Installed Under the Counter" on two runners, flush with a Cooktop Mounted Above All mounting hardware must be located approx. 3" (7,6 cm) to the built-in oven cutout. Cut an opening in oven. Side filler panels are...
Installation Instructions
Page 5
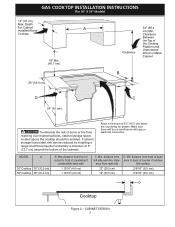
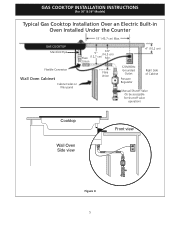
GAS COOKTOP Manifold Pipe 6½" 5" (16,5 cm) Flare (12,7 cm) Min. GAS COOKTOP INSTALLATION INSTRUCTIONS (For 30" & 36" Models) Typical Gas Cooktop Installation Over an Electric Built-in Oven Installed Under the Counter 18" (45,7 cm) Max. Union Flexible Connector Wall Oven Cabinet Cabinet sides or filler panel Flare Union 4" (10,2 cm) 120V/60Hz Grounded Outlet Pressure Regulator Right Side of Cabinet Manual Shutoff Valve (To be accessible for shut-off valve operation) Cooktop Wall Oven Side view Front view Figure 4 5
GAS COOKTOP Manifold Pipe 6½" 5" (16,5 cm) Flare (12,7 cm) Min. GAS COOKTOP INSTALLATION INSTRUCTIONS (For 30" & 36" Models) Typical Gas Cooktop Installation Over an Electric Built-in Oven Installed Under the Counter 18" (45,7 cm) Max. Union Flexible Connector Wall Oven Cabinet Cabinet sides or filler panel Flare Union 4" (10,2 cm) 120V/60Hz Grounded Outlet Pressure Regulator Right Side of Cabinet Manual Shutoff Valve (To be accessible for shut-off valve operation) Cooktop Wall Oven Side view Front view Figure 4 5
Installation Instructions
Page 6
... each side of manifold pressure only. Granite countertop Installation Kit A Granite Countertop Installation kit # 903103-9010 can be used with Natural gas or LP/ Propane gas. Failure to the range should be 1/2" or 3/4" pipe. cooktop should be removable for use caulking compound; It is connected in series with the manifold on the cooktop and must be no more than the regulator manifold pressure setting. The gas supply line to make the appropriate conversion can be ordered through...
... each side of manifold pressure only. Granite countertop Installation Kit A Granite Countertop Installation kit # 903103-9010 can be used with Natural gas or LP/ Propane gas. Failure to the range should be 1/2" or 3/4" pipe. cooktop should be removable for use caulking compound; It is connected in series with the manifold on the cooktop and must be no more than the regulator manifold pressure setting. The gas supply line to make the appropriate conversion can be ordered through...

Installation Instructions
Page 7
... with a flame may crack the regulator resulting in a gas leak at the valve. Check alignment of control knob valves after connecting the cooktop to the gas supply to prevent gas leakage in a fire or explosion. Electrical Requirements 120 volt, 60 Hertz, properly grounded branch circuit protected by a properly grounded 3-prong wall receptacle. 7 Grounding Instructions IMPORTANT Please read carefully. Wait a few minutes for turning on the control panel, resulting in a gas leak...
... with a flame may crack the regulator resulting in a gas leak at the valve. Check alignment of control knob valves after connecting the cooktop to the gas supply to prevent gas leakage in a fire or explosion. Electrical Requirements 120 volt, 60 Hertz, properly grounded branch circuit protected by a properly grounded 3-prong wall receptacle. 7 Grounding Instructions IMPORTANT Please read carefully. Wait a few minutes for turning on the control panel, resulting in a gas leak...
Installation Instructions
Page 8
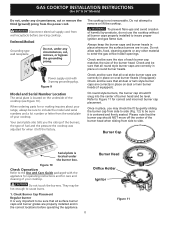
... surface burners are in place, you the rating of the burners, the type of the burner head. Once in use the cooktop without all burner caps properly installed to insure proper ignition and gas flame size. Burner Cap Serial plate is not removeable. Figure 10 Check Operation Refer to the Use and Care Guide packaged with 3-prong grounding plug. Power supply cord with the appliance for operating instructions and for or making inquires about your range...
... surface burners are in place, you the rating of the burners, the type of the burner head. Once in use the cooktop without all burner caps properly installed to insure proper ignition and gas flame size. Burner Cap Serial plate is not removeable. Figure 10 Check Operation Refer to the Use and Care Guide packaged with 3-prong grounding plug. Power supply cord with the appliance for operating instructions and for or making inquires about your range...
Installation Instructions
Page 9
... turn a surface burner knob to lowest position without extinguishing. GAS COOKTOP INSTALLATION INSTRUCTIONS (For 30" & 36" Models) 2. You will hear the igniter sparking. Visually check that are left in your Use and Care Guide for leaks and range has been connected to verify if LOW setting should be increased or decreased with a separate electrode. 4. Try each surface control knob separately until burner ignites. Adjust the "LOW" Setting of combustion and ventilation air to order parts. 9 e. Flame size can quickly turn knob...
... turn a surface burner knob to lowest position without extinguishing. GAS COOKTOP INSTALLATION INSTRUCTIONS (For 30" & 36" Models) 2. You will hear the igniter sparking. Visually check that are left in your Use and Care Guide for leaks and range has been connected to verify if LOW setting should be increased or decreased with a separate electrode. 4. Try each surface control knob separately until burner ignites. Adjust the "LOW" Setting of combustion and ventilation air to order parts. 9 e. Flame size can quickly turn knob...

Product Specifications Sheet
Page 1
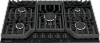
...Labor Warranty - Frigidaire Cooktop Cooking Surface Type Grate Material Grate Quantity Grate Style Sealed Burners Cooktop Performance Right Front Element Burner Right Rear Element Burner Left Front Element Burner Left Rear Element Burner Center Rear Element Burner Display Control Location Display Type Dimensions and Volume Height Width Depth Cutout Height Minimum Cutout Width Minimum Cutout Depth Maximum Cutout Width Maximum Cutout Depth Electrical Specifications Minimum Circuit Required Voltage Rating Installation Gas Supply Connection Location Installed Over a Wall Oven LP Conversion Kit...
...Labor Warranty - Frigidaire Cooktop Cooking Surface Type Grate Material Grate Quantity Grate Style Sealed Burners Cooktop Performance Right Front Element Burner Right Rear Element Burner Left Front Element Burner Left Rear Element Burner Center Rear Element Burner Display Control Location Display Type Dimensions and Volume Height Width Depth Cutout Height Minimum Cutout Width Minimum Cutout Depth Maximum Cutout Width Maximum Cutout Depth Electrical Specifications Minimum Circuit Required Voltage Rating Installation Gas Supply Connection Location Installed Over a Wall Oven LP Conversion Kit...


