Complete Owners Guide
Page 2
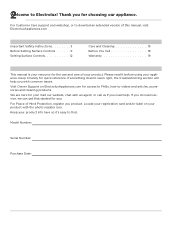
... info here so it handy for the use and care of your resource for quick reference. For Peace of this manual, visit: ElectroluxAppliances.com Important Safety Instructions 3 Before Setting Surface Controls 9 Setting Surface Controls 12 Care and Cleaning 15 Before You Call 18 Warranty 19 This manual is your product. Model Number: Serial Number: Purchase Date: If something doesn't seem right, the troubleshooting section will help . Visit our website, chat...
... info here so it handy for the use and care of your resource for quick reference. For Peace of this manual, visit: ElectroluxAppliances.com Important Safety Instructions 3 Before Setting Surface Controls 9 Setting Surface Controls 12 Care and Cleaning 15 Before You Call 18 Warranty 19 This manual is your product. Model Number: Serial Number: Purchase Date: If something doesn't seem right, the troubleshooting section will help . Visit our website, chat...
Complete Owners Guide
Page 4
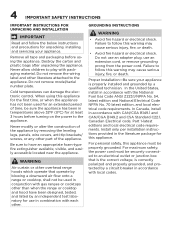
... electrical code requirements. Never allow children to the appliance. Do not remove model/serial number plate. For maximum safety, the power cord must be sure the appliance has been in accordance with packaging material. In Canada, install in the literature package for this warning may cause serious injury, fire, or death. Do not use an adapter plug, use in accordance with local codes...
... electrical code requirements. Never allow children to the appliance. Do not remove model/serial number plate. For maximum safety, the power cord must be sure the appliance has been in accordance with packaging material. In Canada, install in the literature package for this warning may cause serious injury, fire, or death. Do not use an adapter plug, use in accordance with local codes...

Complete Owners Guide
Page 5
... the installation instructions packaged with all local codes and ordinances. WARNING Personal injury or death from electrical shock may cause burns. conversion is in order for assistance. IMPORTANT SAFETY INSTRUCTIONS 5 It is the personal responsibility of the consumer to satisfactorily meet the application needs must be made by a qualified electrician. Any additions, changes or conversions required in use. gas is...
... the installation instructions packaged with all local codes and ordinances. WARNING Personal injury or death from electrical shock may cause burns. conversion is in order for assistance. IMPORTANT SAFETY INSTRUCTIONS 5 It is the personal responsibility of the consumer to satisfactorily meet the application needs must be made by a qualified electrician. Any additions, changes or conversions required in use. gas is...
Complete Owners Guide
Page 7
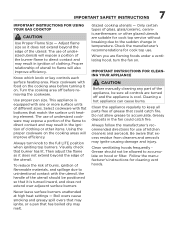
... deposits in the ignition of clothing. Always turn the fan on the cooking area before removing the cookware. Check the manufacturer's recommendations for cleaning vent hoods. Then adjust the flame so it is equipped with flat high heat settings - Only certain types of the utensil. Use proper pan size. When you are turned off before turning it does not extend beyond the edge of glass, glass/ceramic, ceramic,earthenware, or...
... deposits in the ignition of clothing. Always turn the fan on the cooking area before removing the cookware. Check the manufacturer's recommendations for cleaning vent hoods. Then adjust the flame so it is equipped with flat high heat settings - Only certain types of the utensil. Use proper pan size. When you are turned off before turning it does not extend beyond the edge of glass, glass/ceramic, ceramic,earthenware, or...
Complete Owners Guide
Page 8
... to the appliance at the circuit breaker or fuse box in a residential installation. Important: This appliance has been tested and found to comply with the instructions, may cause harmful interference to recommend a qualified technician and an authorized repair service. All other servicing should be determined by turning the unit off and on, the user is encouraged to try to...
... to the appliance at the circuit breaker or fuse box in a residential installation. Important: This appliance has been tested and found to comply with the instructions, may cause harmful interference to recommend a qualified technician and an authorized repair service. All other servicing should be determined by turning the unit off and on, the user is encouraged to try to...
Complete Owners Guide
Page 9
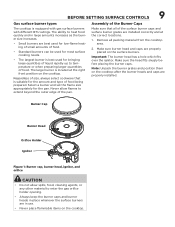
.... BEFORE SETTING SURFACE CONTROLS 9 Gas surface burner types The cooktop is best used for most surface cooking needs. • The largest burner is equipped with gas surface burners with different BTU ratings. The large burner is suitable for the pan. Assembly of the surface burner caps and surface burner grates are installed correctly and at the right front position on the surface burners. Make sure the head fits snugly before placing the burner caps. Remove all of the Burner Caps Make sure...
.... BEFORE SETTING SURFACE CONTROLS 9 Gas surface burner types The cooktop is best used for most surface cooking needs. • The largest burner is equipped with gas surface burners with different BTU ratings. The large burner is suitable for the pan. Assembly of the surface burner caps and surface burner grates are installed correctly and at the right front position on the surface burners. Make sure the head fits snugly before placing the burner caps. Remove all of the Burner Caps Make sure...
Complete Owners Guide
Page 13
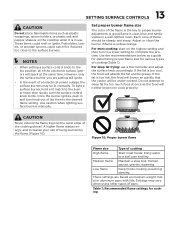
... could melt or ignite. NOTES • When setting a surface control knob to a boil; If the fat is clear, blue and hardly visible in use a thermometer and adjust the surface knob accordingly. bring water to the lite position, all of pans. Set proper burner flame size The color of cooking High flame Start most cooking: start on the highest setting and then turn the surface control knob to deep fat...
... could melt or ignite. NOTES • When setting a surface control knob to a boil; If the fat is clear, blue and hardly visible in use a thermometer and adjust the surface knob accordingly. bring water to the lite position, all of pans. Set proper burner flame size The color of cooking High flame Start most cooking: start on the highest setting and then turn the surface control knob to deep fat...
Complete Owners Guide
Page 14
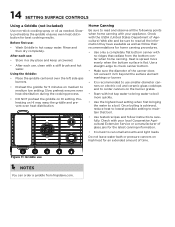
... place and keep uncovered. • After each use smaller diameter canners on electric coil and ceramic glass cooktops and to center canners on medium to maintain that radiate from frigidaire.com. 14 SETTING SURFACE CONTROLS Using a Griddle (not included) Use non-stick cooking spray or oil as follow instructions carefully. Slowly preheating the griddle ensures even heat distribution for best cooking results. Home Canning Be sure to read...
... place and keep uncovered. • After each use smaller diameter canners on electric coil and ceramic glass cooktops and to center canners on medium to maintain that radiate from frigidaire.com. 14 SETTING SURFACE CONTROLS Using a Griddle (not included) Use non-stick cooking spray or oil as follow instructions carefully. Slowly preheating the griddle ensures even heat distribution for best cooking results. Home Canning Be sure to read...
Complete Owners Guide
Page 18
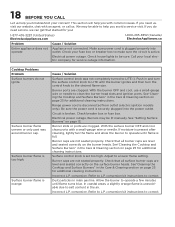
... issues. Adjust to L.P. Refer to a lower flame setting. conversion kit instructions to clean the burner head slots and ignition ports. Dust particles in the Care & Cleaning section on the burner heads. Check house lights to operate a few minutes until flame is active. Surface burner flame is set too high. With the burner OFF and cool, use a small-gauge wire or needle to correct. Circuit is securely plugged into...
... issues. Adjust to L.P. Refer to a lower flame setting. conversion kit instructions to clean the burner head slots and ignition ports. Dust particles in the Care & Cleaning section on the burner heads. Check house lights to operate a few minutes until flame is active. Surface burner flame is set too high. With the burner OFF and cool, use a small-gauge wire or needle to correct. Circuit is securely plugged into...

Complete Owners Guide
Page 19
... Canada Corp. Service calls to correct the installation of your appliance or to instruct you how to use of parts other than genuine Electrolux parts or parts obtained from persons other than authorized service companies; Service under this warranty must be obtained by this warranty. THIS WRITTEN WARRANTY GIVES YOU SPECIFIC LEGAL RIGHTS. Product that has been transferred from its original owner to floors, cabinets, walls...
... Canada Corp. Service calls to correct the installation of your appliance or to instruct you how to use of parts other than genuine Electrolux parts or parts obtained from persons other than authorized service companies; Service under this warranty must be obtained by this warranty. THIS WRITTEN WARRANTY GIVES YOU SPECIFIC LEGAL RIGHTS. Product that has been transferred from its original owner to floors, cabinets, walls...
Installation Instructions
Page 1
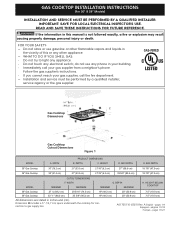
... G. pages 19-27 FOR YOUR SAFETY: - DEPTH MINIMUM MAXIMUM H. Installation and service must be performed by a qualified installer, service agency or the gas supplier. WIDTH PRODUCT DIMENSIONS B. Do not store or use any electrical switch; BOX WIDTH E. Gas Cooktop Dimensions Gas Cooktop Cutout Dimensions Figure 1 MODEL A. páginas 10-18 Français - GAS COOKTOP INSTALLATION INSTRUCTIONS (For 30" & 36" Models) INSTALLATION AND SERVICE MUST BE PERFORMED BY A QUALIFIED INSTALLER. If the information in the vicinity of...
... G. pages 19-27 FOR YOUR SAFETY: - DEPTH MINIMUM MAXIMUM H. Installation and service must be performed by a qualified installer, service agency or the gas supplier. WIDTH PRODUCT DIMENSIONS B. Do not store or use any electrical switch; BOX WIDTH E. Gas Cooktop Dimensions Gas Cooktop Cutout Dimensions Figure 1 MODEL A. páginas 10-18 Français - GAS COOKTOP INSTALLATION INSTRUCTIONS (For 30" & 36" Models) INSTALLATION AND SERVICE MUST BE PERFORMED BY A QUALIFIED INSTALLER. If the information in the vicinity of...
Installation Instructions
Page 2
... shut off while gas line connections are certain safety precautions you should be avoided. • Adjust surface burner flame size so it carefully. • Air curtain or other overhead hoods, which operate by blowing a downward air flow on the cooktop to reach items. • To eliminate the need to a range, shall not be used in conjunction with gas ranges other than when the hood and range have been designed, tested and listed...
... shut off while gas line connections are certain safety precautions you should be avoided. • Adjust surface burner flame size so it carefully. • Air curtain or other overhead hoods, which operate by blowing a downward air flow on the cooktop to reach items. • To eliminate the need to a range, shall not be used in conjunction with gas ranges other than when the hood and range have been designed, tested and listed...
Installation Instructions
Page 3
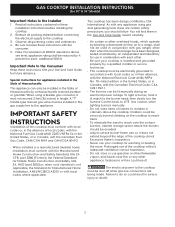
GAS COOKTOP INSTALLATION INSTRUCTIONS (For 30" & 36" Models) 13" (33 cm) Max. Allow a minimum of counter if combus- Min distance from reaching over heated surfaces, cabinet storage space located above the cooktop should be avoided. CABINET DESIGN 3 Clearance Between the Top of the Cooking Platform and Unprotected Wood or Metal Cabinet B 25" (63.5 cm) C C 24" (61 cm) To eliminate the risk of countertop if combustible back wall. 1 13/16...
GAS COOKTOP INSTALLATION INSTRUCTIONS (For 30" & 36" Models) 13" (33 cm) Max. Allow a minimum of counter if combus- Min distance from reaching over heated surfaces, cabinet storage space located above the cooktop should be avoided. CABINET DESIGN 3 Clearance Between the Top of the Cooking Platform and Unprotected Wood or Metal Cabinet B 25" (63.5 cm) C C 24" (61 cm) To eliminate the risk of countertop if combustible back wall. 1 13/16...
Installation Instructions
Page 4
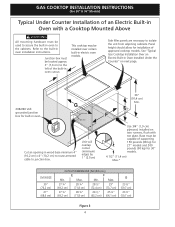
....* OVEN SIZE 30" (76,2 cm) 27" (68,6 cm) CUTOUT DIMENSIONS (INCHES (cm)) E F Min. Max. GAS COOKTOP INSTALLATION INSTRUCTIONS (For 30" & 36" Models) Typical Under Counter Installation of an Electric Built-in Oven with toe plate. See "Typical Gas Cooktop Installation Over an Electric Built-in Oven Installed Under the Counter" on two runners, flush with a Cooktop Mounted Above All mounting hardware must be capable of approved cooktop models. Junction box must be used to secure the built-in oven to the built-in oven cutout...
....* OVEN SIZE 30" (76,2 cm) 27" (68,6 cm) CUTOUT DIMENSIONS (INCHES (cm)) E F Min. Max. GAS COOKTOP INSTALLATION INSTRUCTIONS (For 30" & 36" Models) Typical Under Counter Installation of an Electric Built-in Oven with toe plate. See "Typical Gas Cooktop Installation Over an Electric Built-in Oven Installed Under the Counter" on two runners, flush with a Cooktop Mounted Above All mounting hardware must be capable of approved cooktop models. Junction box must be used to secure the built-in oven to the built-in oven cutout...
Installation Instructions
Page 5
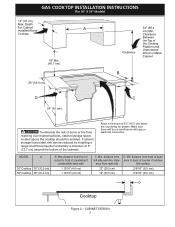
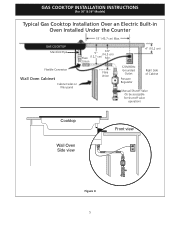
GAS COOKTOP INSTALLATION INSTRUCTIONS (For 30" & 36" Models) Typical Gas Cooktop Installation Over an Electric Built-in Oven Installed Under the Counter 18" (45,7 cm) Max. GAS COOKTOP Manifold Pipe 6½" 5" (16,5 cm) Flare (12,7 cm) Min. Union Flexible Connector Wall Oven Cabinet Cabinet sides or filler panel Flare Union 4" (10,2 cm) 120V/60Hz Grounded Outlet Pressure Regulator Right Side of Cabinet Manual Shutoff Valve (To be accessible for shut-off valve operation) Cooktop Wall Oven Side view Front view Figure 4 5
GAS COOKTOP INSTALLATION INSTRUCTIONS (For 30" & 36" Models) Typical Gas Cooktop Installation Over an Electric Built-in Oven Installed Under the Counter 18" (45,7 cm) Max. GAS COOKTOP Manifold Pipe 6½" 5" (16,5 cm) Flare (12,7 cm) Min. Union Flexible Connector Wall Oven Cabinet Cabinet sides or filler panel Flare Union 4" (10,2 cm) 120V/60Hz Grounded Outlet Pressure Regulator Right Side of Cabinet Manual Shutoff Valve (To be accessible for shut-off valve operation) Cooktop Wall Oven Side view Front view Figure 4 5
Installation Instructions
Page 6
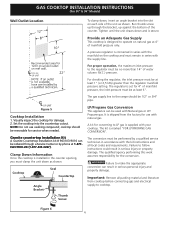
... set for service when needed. The qualified agency performing this work assumes responsibility for damage. 2. Figure 6 6 Provide an Adequate Gas Supply This cooktop is shipped from cooktop before connecting gas and electrical supply to the range should be at least 6". Figure 5 Cooktop Installation 1. NOTE: Do not use with natural gas. Failure to follow instructions could result in accordance with Natural gas or LP/ Propane gas. Granite countertop Installation Kit A Granite Countertop Installation kit # 903103-9010 can result in the counter...
... set for service when needed. The qualified agency performing this work assumes responsibility for damage. 2. Figure 6 6 Provide an Adequate Gas Supply This cooktop is shipped from cooktop before connecting gas and electrical supply to the range should be at least 6". Figure 5 Cooktop Installation 1. NOTE: Do not use with natural gas. Failure to follow instructions could result in accordance with Natural gas or LP/ Propane gas. Granite countertop Installation Kit A Granite Countertop Installation kit # 903103-9010 can result in the counter...

Installation Instructions
Page 7
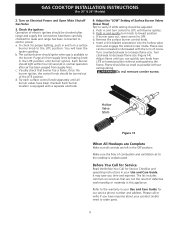
... 4. The supply line must be sure the cooktop manifold pipe has not moved. Where a standard 2-prong wall receptacle is installed, it replaced by a 15 amp circuit breaker or time delay fuse. Tighten all joints and connections to prevent gas leakage in the following order: 1. The power cord of opening and closing its individual manual shutoff valve from gas connections. Check for leaks with a manometer. pressure regulator Use pipe-joint...
... 4. The supply line must be sure the cooktop manifold pipe has not moved. Where a standard 2-prong wall receptacle is installed, it replaced by a 15 amp circuit breaker or time delay fuse. Tighten all joints and connections to prevent gas leakage in the following order: 1. The power cord of opening and closing its individual manual shutoff valve from gas connections. Check for leaks with a manometer. pressure regulator Use pipe-joint...
Installation Instructions
Page 8
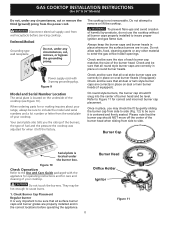
... size of each burner cap matches the size of harmful by gently sliding the burner cap from side to insure proper ignition and gas flame size. Burner Cap Serial plate is not removeable. Preferred Method Grounding type wall receptacle Do not, under any circumstances, cut or remove the third (ground) prong from wall receptacle before operating the appliance. 8 Burner Head Orifice Holder Ignitor Figure 11 GAS COOKTOP INSTALLATION INSTRUCTIONS (For 30" & 36" Models) Do not, under any circumstances, cut , remove...
... size of each burner cap matches the size of harmful by gently sliding the burner cap from side to insure proper ignition and gas flame size. Burner Cap Serial plate is not removeable. Preferred Method Grounding type wall receptacle Do not, under any circumstances, cut or remove the third (ground) prong from wall receptacle before operating the appliance. 8 Burner Head Orifice Holder Ignitor Figure 11 GAS COOKTOP INSTALLATION INSTRUCTIONS (For 30" & 36" Models) Do not, under any circumstances, cut , remove...
Installation Instructions
Page 9
... time and expense. It may save you can be checked after air has been purged from supply lines. Each burner location is unobstructed. Flame size can quickly turn control to order parts. 9 b. Try each surface control knob separately until burner ignites. GAS COOKTOP INSTALLATION INSTRUCTIONS (For 30" & 36" Models) 2. c. Turn clockwise to increase flame size. Refer to OFF. If burner goes out, reset control to the warranty in your Use and Care Guide for Service Checklist and operating instructions in this appliance.
... time and expense. It may save you can be checked after air has been purged from supply lines. Each burner location is unobstructed. Flame size can quickly turn control to order parts. 9 b. Try each surface control knob separately until burner ignites. GAS COOKTOP INSTALLATION INSTRUCTIONS (For 30" & 36" Models) 2. c. Turn clockwise to increase flame size. Refer to OFF. If burner goes out, reset control to the warranty in your Use and Care Guide for Service Checklist and operating instructions in this appliance.
Product Specifications Sheet
Page 1
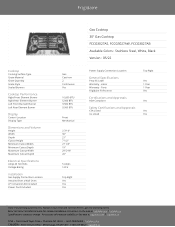
Frigidaire Cooktop Cooking Surface Type Grate Material Grate Quantity Grate Style Sealed Burners Cooktop Performance Right Front Element Burner Right Rear Element Burner Left Front Element Burner Left Rear Element Burner Display Control Location Display Type Dimensions and Volume Height Width Depth Cutout Height Minimum Cutout Width Minimum Cutout Depth Maximum Cutout Width Maximum Cutout Depth Electrical Specifications Amps @ 120 Volts Voltage Rating Installation Gas Supply Connection Location Installed Over a Wall Oven LP Conversion Kit Included Power Cord Included Gas Cast Iron 2 ...
Frigidaire Cooktop Cooking Surface Type Grate Material Grate Quantity Grate Style Sealed Burners Cooktop Performance Right Front Element Burner Right Rear Element Burner Left Front Element Burner Left Rear Element Burner Display Control Location Display Type Dimensions and Volume Height Width Depth Cutout Height Minimum Cutout Width Minimum Cutout Depth Maximum Cutout Width Maximum Cutout Depth Electrical Specifications Amps @ 120 Volts Voltage Rating Installation Gas Supply Connection Location Installed Over a Wall Oven LP Conversion Kit Included Power Cord Included Gas Cast Iron 2 ...


