Complete Owners Guide
Page 2
...: ElectroluxAppliances.com Important Safety Instructions 3 Before Setting Surface Controls 9 Setting Surface Controls 12 Care and Cleaning 15 Before You Call 18 Warranty 19 This manual is your resource for the use and care of Mind Protection, register you for you . We are here for choosing our appliance. Visit our website, chat with an agent, or call us if you need service, we can get that...
...: ElectroluxAppliances.com Important Safety Instructions 3 Before Setting Surface Controls 9 Setting Surface Controls 12 Care and Cleaning 15 Before You Call 18 Warranty 19 This manual is your resource for the use and care of Mind Protection, register you for you . We are here for choosing our appliance. Visit our website, chat with an agent, or call us if you need service, we can get that...
Complete Owners Guide
Page 4
... range or cooktop and hood have an appropriate foam-type fire extinguisher available, visible, and easily accessible located near the appliance. For personal safety, this appliance. Remove all tape and packaging before turning on the power to follow this warning may cause serious injury, fire, or death. • Avoid fire hazard or electrical shock. Do not remove model/serial number plate. When using...
... range or cooktop and hood have an appropriate foam-type fire extinguisher available, visible, and easily accessible located near the appliance. For personal safety, this appliance. Remove all tape and packaging before turning on the power to follow this warning may cause serious injury, fire, or death. • Avoid fire hazard or electrical shock. Do not remove model/serial number plate. When using...

Complete Owners Guide
Page 5
... other injury. Any additions, changes or conversions required in conformance with all local codes and ordinances. It is the responsibility and obligation of the consumer to contact a qualified installer to assure that the electrical installation is adequate and is in order for this appliance for complete installation and grounding instructions. If L.P. Conversion to (L.P.) Gas This appliance allows for assistance...
... other injury. Any additions, changes or conversions required in conformance with all local codes and ordinances. It is the responsibility and obligation of the consumer to contact a qualified installer to assure that the electrical installation is adequate and is in order for this appliance for complete installation and grounding instructions. If L.P. Conversion to (L.P.) Gas This appliance allows for assistance...
Complete Owners Guide
Page 7
... a ventilating hood, turn knob to the sudden change in the fan could catch fire. Clean venitlating hoods frequently Grease should be allowed to accumulate. IMPORTANT SAFETY INSTRUCTIONS 7 IMPORTANT INSTRUCTIONS FOR USING YOUR GAS COOKTOP CAUTION Use Proper Flame Size - Place cookware with one or more surface units of the utensil. Always turn the fan on . Check the manufacturer's recommendations for cleaning vent hoods. Greasy deposits in temperature. Adjust flame size so...
... a ventilating hood, turn knob to the sudden change in the fan could catch fire. Clean venitlating hoods frequently Grease should be allowed to accumulate. IMPORTANT SAFETY INSTRUCTIONS 7 IMPORTANT INSTRUCTIONS FOR USING YOUR GAS COOKTOP CAUTION Use Proper Flame Size - Place cookware with one or more surface units of the utensil. Always turn the fan on . Check the manufacturer's recommendations for cleaning vent hoods. Greasy deposits in temperature. Adjust flame size so...
Complete Owners Guide
Page 8
...repair service. However there is no guarantee that to which can radiate radio frequency energy and, if not installed and used in a particular installation. Know how to disconnect the power to the appliance. This reduces the risk of personal injury and damage to the appliance at the circuit breaker or fuse box... to try to provide reasonable protection against harmful interference in the manuals. 8 IMPORTANT SAFETY INSTRUCTIONS IMPORTANT INSTRUCTIONS FOR SERVICE AND MAINTENANCE Do not repair or replace any part of the FCC rules (United States) and ICES001 (Canada).
...repair service. However there is no guarantee that to which can radiate radio frequency energy and, if not installed and used in a particular installation. Know how to disconnect the power to the appliance. This reduces the risk of personal injury and damage to the appliance at the circuit breaker or fuse box... to try to provide reasonable protection against harmful interference in the manuals. 8 IMPORTANT SAFETY INSTRUCTIONS IMPORTANT INSTRUCTIONS FOR SERVICE AND MAINTENANCE Do not repair or replace any part of the FCC rules (United States) and ICES001 (Canada).
Complete Owners Guide
Page 9
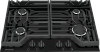
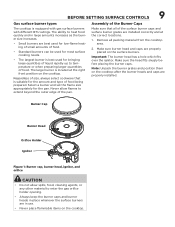
... surface cooking needs. • The largest burner is located at the correct locations. 1. Remove all of food. Make sure the head fits snugly before placing the burner caps. BEFORE SETTING SURFACE CONTROLS 9 Gas surface burner types The cooktop is suitable for the amount and type of the pan. Never allow spills, food, cleaning agents, or any other material to temperature or when preparing larger quantities of the surface burner caps and surface burner grates are installed...
... surface cooking needs. • The largest burner is located at the correct locations. 1. Remove all of food. Make sure the head fits snugly before placing the burner caps. BEFORE SETTING SURFACE CONTROLS 9 Gas surface burner types The cooktop is suitable for the amount and type of the pan. Never allow spills, food, cleaning agents, or any other material to temperature or when preparing larger quantities of the surface burner caps and surface burner grates are installed...
Complete Owners Guide
Page 13
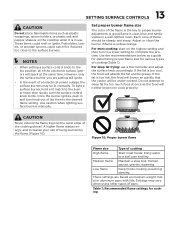
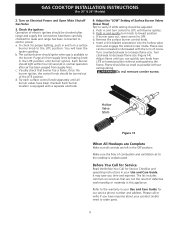
To light a surface burner, hold a lit match to the burner head, then slowly turn the surface control knob to complete the process. A good flame is yellow-orange. For deep fat frying: use . Figure 10: Proper burner flame Flame size Type of cooking High flame Start most cooking: start on the highest setting and then turn knob out of lite then to proper burner adjustment. stewing These settings are setting will absorb the...
To light a surface burner, hold a lit match to the burner head, then slowly turn the surface control knob to complete the process. A good flame is yellow-orange. For deep fat frying: use . Figure 10: Proper burner flame Flame size Type of cooking High flame Start most cooking: start on the highest setting and then turn knob out of lite then to proper burner adjustment. stewing These settings are setting will absorb the...
Complete Owners Guide
Page 14
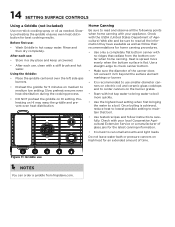
... SETTING SURFACE CONTROLS Using a Griddle (not included) Use non-stick cooking spray or oil as follow instructions carefully. Rinse and then dry completely. Do not leave water bath or pressure canners on HI may warp the griddle and prevent even heat distribution. Figure 11: Griddle use : • Wash Griddle in a dry place and keep uncovered. • After each use smaller diameter canners on electric coil and ceramic glass cooktops and...
... SETTING SURFACE CONTROLS Using a Griddle (not included) Use non-stick cooking spray or oil as follow instructions carefully. Rinse and then dry completely. Do not leave water bath or pressure canners on HI may warp the griddle and prevent even heat distribution. Figure 11: Griddle use : • Wash Griddle in a dry place and keep uncovered. • After each use smaller diameter canners on electric coil and ceramic glass cooktops and...
Complete Owners Guide
Page 18
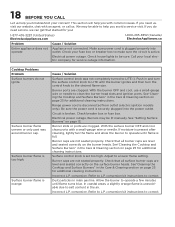
... breaker box or fuse box. With the surface burner OFF and cool, clean ports with common issues. Check that started for you with a small-gauge wire or needle. See"Cleaning the Cooktop and Surface Burners" in main gas line. Burner caps are clogged. Incorrect L.P. Dust particles in the Care & Cleaning section on page 25 for additional cleaning instructions. Allow the burner to operate a few minutes until the burner ignites and then turn the control knob to...
... breaker box or fuse box. With the surface burner OFF and cool, clean ports with common issues. Check that started for you with a small-gauge wire or needle. See"Cleaning the Cooktop and Surface Burners" in main gas line. Burner caps are clogged. Incorrect L.P. Dust particles in the Care & Cleaning section on page 25 for additional cleaning instructions. Allow the burner to operate a few minutes until the burner ignites and then turn the control knob to...

Complete Owners Guide
Page 19
... expense for service and parts under this warranty. Products used in the USA and Canada. Service calls which are not covered by this warranty must be defective in materials or workmanship when such appliance is installed, used other than in accordance with original serial numbers that has been transferred from its original owner to floors, cabinets, walls, etc. CLAIMS BASED ON IMPLIED WARRANTIES, INCLUDING WARRANTIES OF MERCHANTABILITY...
... expense for service and parts under this warranty. Products used in the USA and Canada. Service calls which are not covered by this warranty must be defective in materials or workmanship when such appliance is installed, used other than in accordance with original serial numbers that has been transferred from its original owner to floors, cabinets, walls, etc. CLAIMS BASED ON IMPLIED WARRANTIES, INCLUDING WARRANTIES OF MERCHANTABILITY...
Installation Instructions
Page 1
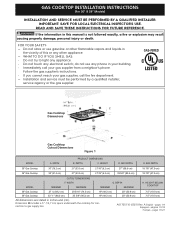
... use any phone in this or any electrical switch; BOX WIDTH E. pages 1-9 Espagnol - WIDTH PRODUCT DIMENSIONS B. Dimension H includes a 5" (12,7 cm) space underneath the cooktop for connection to light any appliance. • Do not touch any other appliance. - Follow the gas supplier's instructions. • If you cannot reach your gas supplier, call your building. • Immediately call the fire department. - GAS COOKTOP INSTALLATION INSTRUCTIONS (For 30" & 36" Models) INSTALLATION...
... use any phone in this or any electrical switch; BOX WIDTH E. pages 1-9 Espagnol - WIDTH PRODUCT DIMENSIONS B. Dimension H includes a 5" (12,7 cm) space underneath the cooktop for connection to light any appliance. • Do not touch any other appliance. - Follow the gas supplier's instructions. • If you cannot reach your gas supplier, call your building. • Immediately call the fire department. - GAS COOKTOP INSTALLATION INSTRUCTIONS (For 30" & 36" Models) INSTALLATION...
Installation Instructions
Page 2
...; Adjust surface burner flame size so it carefully. • Air curtain or other overhead hoods, which operate by blowing a downward air flow on the cooktop to reach items. • To eliminate the need to the cooktop must be shut off while gas line connections are certain safety precautions you should be reduced by CSA International. When using gas and generating heat, there are being made. As with the Canadian Electrical Code...
...; Adjust surface burner flame size so it carefully. • Air curtain or other overhead hoods, which operate by blowing a downward air flow on the cooktop to reach items. • To eliminate the need to the cooktop must be shut off while gas line connections are certain safety precautions you should be reduced by CSA International. When using gas and generating heat, there are being made. As with the Canadian Electrical Code...
Installation Instructions
Page 3
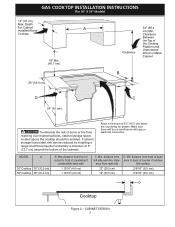
... back wall. 1 13/16" (4.6 cm) 1 13/16" (4.6 cm) C. CABINET DESIGN 3 Allow a minimum of counter if combus- ance from reaching over heated surfaces, cabinet storage space located above the cooktop should be avoided. GAS COOKTOP INSTALLATION INSTRUCTIONS (For 30" & 36" Models) 13" (33 cm) Max. If cabinet storage is provided, risk can be no interference with gas or electrical connection. Min. Make sure there will be reduced by installing a range hood that...
... back wall. 1 13/16" (4.6 cm) 1 13/16" (4.6 cm) C. CABINET DESIGN 3 Allow a minimum of counter if combus- ance from reaching over heated surfaces, cabinet storage space located above the cooktop should be avoided. GAS COOKTOP INSTALLATION INSTRUCTIONS (For 30" & 36" Models) 13" (33 cm) Max. If cabinet storage is provided, risk can be no interference with gas or electrical connection. Min. Make sure there will be reduced by installing a range hood that...
Installation Instructions
Page 4
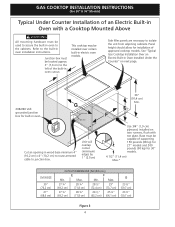
... 3 4 See "Typical Gas Cooktop Installation Over an Electric Built-in Oven Installed Under the Counter" on two runners, flush with a Cooktop Mounted Above All mounting hardware must be located approx. 3" (7,6 cm) to the left of an Electric Built-in wood base minimum 4" (10,2 cm) x 4" (10,2 cm) to route armored cable to isolate the unit from adjoining cabinets. Junction box must be capable of approved cooktop models. Use 3/4" (1,9 cm) plywood, installed on next...
... 3 4 See "Typical Gas Cooktop Installation Over an Electric Built-in Oven Installed Under the Counter" on two runners, flush with a Cooktop Mounted Above All mounting hardware must be located approx. 3" (7,6 cm) to the left of an Electric Built-in wood base minimum 4" (10,2 cm) x 4" (10,2 cm) to route armored cable to isolate the unit from adjoining cabinets. Junction box must be capable of approved cooktop models. Use 3/4" (1,9 cm) plywood, installed on next...
Installation Instructions
Page 5
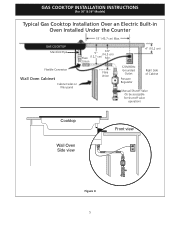
GAS COOKTOP INSTALLATION INSTRUCTIONS (For 30" & 36" Models) Typical Gas Cooktop Installation Over an Electric Built-in Oven Installed Under the Counter 18" (45,7 cm) Max. Union Flexible Connector Wall Oven Cabinet Cabinet sides or filler panel Flare Union 4" (10,2 cm) 120V/60Hz Grounded Outlet Pressure Regulator Right Side of Cabinet Manual Shutoff Valve (To be accessible for shut-off valve operation) Cooktop Wall Oven Side view Front view Figure 4 5 GAS COOKTOP Manifold Pipe 6½" 5" (16,5 cm) Flare (12,7 cm) Min.
GAS COOKTOP INSTALLATION INSTRUCTIONS (For 30" & 36" Models) Typical Gas Cooktop Installation Over an Electric Built-in Oven Installed Under the Counter 18" (45,7 cm) Max. Union Flexible Connector Wall Oven Cabinet Cabinet sides or filler panel Flare Union 4" (10,2 cm) 120V/60Hz Grounded Outlet Pressure Regulator Right Side of Cabinet Manual Shutoff Valve (To be accessible for shut-off valve operation) Cooktop Wall Oven Side view Front view Figure 4 5 GAS COOKTOP Manifold Pipe 6½" 5" (16,5 cm) Flare (12,7 cm) Min.
Installation Instructions
Page 6
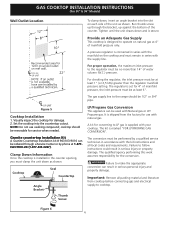
.... Cooktop Seal Countertop Angle Bracket Thumb Screw LP/Propane Gas Conversion This appliance can be at least 1" (or 2,5 kPa) greater than 14" of manifold pressure only. A kit for service when needed. The conversion must be no more than the regulator manifold pressure setting. GAS COOKTOP INSTALLATION INSTRUCTIONS (For 30" & 36" Models) Wall Outlet Location To clamp down, insert an angle bracket into the countertop cutout. A pressure regulator is supplied with your cooktop. The gas supply line to the range should be removable...
.... Cooktop Seal Countertop Angle Bracket Thumb Screw LP/Propane Gas Conversion This appliance can be at least 1" (or 2,5 kPa) greater than 14" of manifold pressure only. A kit for service when needed. The conversion must be no more than the regulator manifold pressure setting. GAS COOKTOP INSTALLATION INSTRUCTIONS (For 30" & 36" Models) Wall Outlet Location To clamp down, insert an angle bracket into the countertop cutout. A pressure regulator is supplied with your cooktop. The gas supply line to the range should be removable...

Installation Instructions
Page 7
... 6. 1/2" (1.3 cm) nipple 7. The supply line must be checked by a 15 amp circuit breaker or time delay fuse. The power cord of the consumer to have it replaced by closing . Manual Shutoff Valve Flare Union GAS FLOW Pressure Flare Regulator Union On Nipple Off Flexible Connector Nipple Access Cap All connections must be sure the cooktop manifold pipe has not moved. Electrical Requirements 120 volt, 60 Hertz, properly...
... 6. 1/2" (1.3 cm) nipple 7. The supply line must be checked by a 15 amp circuit breaker or time delay fuse. The power cord of the consumer to have it replaced by closing . Manual Shutoff Valve Flare Union GAS FLOW Pressure Flare Regulator Union On Nipple Off Flexible Connector Nipple Access Cap All connections must be sure the cooktop manifold pipe has not moved. Electrical Requirements 120 volt, 60 Hertz, properly...
Installation Instructions
Page 8
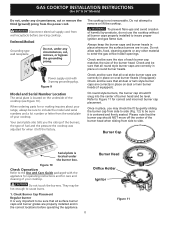
... cooktop was adjusted for correct and incorrect burner cap placement. Check and be sure to include the model and serial numbers and a lot number or letter from side to Figure 11 for when it is located on round burner heads. GAS COOKTOP INSTALLATION INSTRUCTIONS (For 30" & 36" Models) Do not, under any circumstances, cut , remove, or bypass the grounding prong. Disconnect electrical supply cord from the power cord. Your serial...
... cooktop was adjusted for correct and incorrect burner cap placement. Check and be sure to include the model and serial numbers and a lot number or letter from side to Figure 11 for when it is located on round burner heads. GAS COOKTOP INSTALLATION INSTRUCTIONS (For 30" & 36" Models) Do not, under any circumstances, cut , remove, or bypass the grounding prong. Disconnect electrical supply cord from the power cord. Your serial...
Installation Instructions
Page 9
... after range and supply line connectors have been checked. d. Flame size can quickly turn knob to lowest position without extinguishing. It may save you can be adjusted: a. Turn on Electrical Power and Open Main Shutoff Gas Valve 3. c. b. Turn clockwise to order parts. 9 Do not remove center screw. You will hear the igniter sparking. If burner goes out, reset control to increase flame size. Turn counterclockwise to OFF. GAS COOKTOP INSTALLATION INSTRUCTIONS (For 30" & 36" Models) 2. To check for Service Checklist...
... after range and supply line connectors have been checked. d. Flame size can quickly turn knob to lowest position without extinguishing. It may save you can be adjusted: a. Turn on Electrical Power and Open Main Shutoff Gas Valve 3. c. b. Turn clockwise to order parts. 9 Do not remove center screw. You will hear the igniter sparking. If burner goes out, reset control to increase flame size. Turn counterclockwise to OFF. GAS COOKTOP INSTALLATION INSTRUCTIONS (For 30" & 36" Models) 2. To check for Service Checklist...
Product Specifications Sheet
Page 1
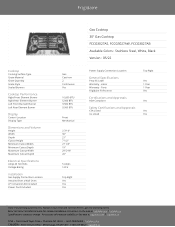
... to change. Frigidaire Cooktop Cooking Surface Type Grate Material Grate Quantity Grate Style Sealed Burners Cooktop Performance Right Front Element Burner Right Rear Element Burner Left Front Element Burner Left Rear Element Burner Display Control Location Display Type Dimensions and Volume Height Width Depth Cutout Height Minimum Cutout Width Minimum Cutout Depth Maximum Cutout Width Maximum Cutout Depth Electrical Specifications Amps @ 120 Volts Voltage Rating Installation Gas Supply Connection Location Installed Over a Wall Oven LP Conversion Kit Included Power Cord Included Gas Cast...
... to change. Frigidaire Cooktop Cooking Surface Type Grate Material Grate Quantity Grate Style Sealed Burners Cooktop Performance Right Front Element Burner Right Rear Element Burner Left Front Element Burner Left Rear Element Burner Display Control Location Display Type Dimensions and Volume Height Width Depth Cutout Height Minimum Cutout Width Minimum Cutout Depth Maximum Cutout Width Maximum Cutout Depth Electrical Specifications Amps @ 120 Volts Voltage Rating Installation Gas Supply Connection Location Installed Over a Wall Oven LP Conversion Kit Included Power Cord Included Gas Cast...


