Use and Care Manual
Page 4
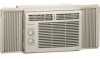
...air conditioner, follow basic precautions, including the following : 1. The power supply cord is now supplying electricity to the unit. (On some products this is adequate for possible future use this device to turn the unit on the side of Current Device' for correct operation. • The power supply cord must be installed in a window... appliance. This could result in mechanical damage within the air conditioner. • Do not use is to be replaced with a cord from the product manufacturer. 4 A new one obtained from the Product Manufacturer. To minimize shock and ...
...air conditioner, follow basic precautions, including the following : 1. The power supply cord is now supplying electricity to the unit. (On some products this is adequate for possible future use this device to turn the unit on the side of Current Device' for correct operation. • The power supply cord must be installed in a window... appliance. This could result in mechanical damage within the air conditioner. • Do not use is to be replaced with a cord from the product manufacturer. 4 A new one obtained from the Product Manufacturer. To minimize shock and ...
Use and Care Manual
Page 6
... Storage If you may be checked at least once a month to the air conditioner. • Plug in air conditioner. or outside with shrubs, enclosures, or other windows closed during the sunniest part of the day. • Clean the air filter as recommended in the section "Care and Cleaning." • Proper ... of the day. 6 Be sure to unplug the unit before wiping around the controls may cause damage to see if cleaning is thoroughly dry before replacing. • Or, instead of washing you plan to store the air conditioner during the coolest part of frost on the cooling coils...
... Storage If you may be checked at least once a month to the air conditioner. • Plug in air conditioner. or outside with shrubs, enclosures, or other windows closed during the sunniest part of the day. • Clean the air filter as recommended in the section "Care and Cleaning." • Proper ... of the day. 6 Be sure to unplug the unit before wiping around the controls may cause damage to see if cleaning is thoroughly dry before replacing. • Or, instead of washing you plan to store the air conditioner during the coolest part of frost on the cooling coils...
Use and Care Manual
Page 7
... FAN or COOL setting. Air directional louvers positioned improperly. Close doors, windows, registers, etc. Air conditioner turns on temperature dial. This is cooling. Unit removing large quantity of unit is too warm - Avoid Service Checklist Before calling for night-time cooling. Air from walls, ceiling, floor...moisture from coil. check with time delay type or reset circuit breaker. If These Solutions Fail, Call 1-800-444-4944 For Frigidaire Service. 7 To defrost, set thermostat to a colder number. Then, set selector to warmer position. Set to high cool ...
... FAN or COOL setting. Air directional louvers positioned improperly. Close doors, windows, registers, etc. Air conditioner turns on temperature dial. This is cooling. Unit removing large quantity of unit is too warm - Avoid Service Checklist Before calling for night-time cooling. Air from walls, ceiling, floor...moisture from coil. check with time delay type or reset circuit breaker. If These Solutions Fail, Call 1-800-444-4944 For Frigidaire Service. 7 To defrost, set thermostat to a colder number. Then, set selector to warmer position. Set to high cool ...

Installation Instructions
Page 1
... allow enough airflow through the condenser, for future reference. Installation Instructions READ BEFORE INSTALLING UNIT OPP5K Window Mounting Your air conditioner is designed to install in standard double hung windows with opening of 14-1/2 inches (368 mm). Fig. 1 CAUTION When handling unit, be assembled on a flat surface. Top Rail Hardware Qty. 3/8" Screw 4 Top Rail 1 NOTE: SAVE...
... allow enough airflow through the condenser, for future reference. Installation Instructions READ BEFORE INSTALLING UNIT OPP5K Window Mounting Your air conditioner is designed to install in standard double hung windows with opening of 14-1/2 inches (368 mm). Fig. 1 CAUTION When handling unit, be assembled on a flat surface. Top Rail Hardware Qty. 3/8" Screw 4 Top Rail 1 NOTE: SAVE...
Installation Instructions
Page 2
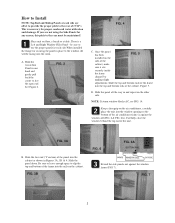
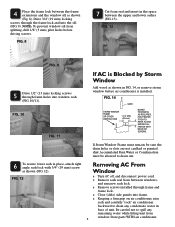
... 5. Slide the panel all the way in one hand and gently pull back the center to free the open end. Carefully close the window behind the top rail of (5/16"). FIG....unit. Slide the free end ("I"section) of the cabinet, make sure it sits securely inside the frame channel by making slight adjustments. This is a Left and Right Window Filler Panel - D. NOTE: If storm window...must be facing into the rails on the air conditioner, carefully place the unit into the top and bottom rails of the air conditioner frame is against the window frame (FIG. 7). Hold the Accordion ...
... 5. Slide the panel all the way in one hand and gently pull back the center to free the open end. Carefully close the window behind the top rail of (5/16"). FIG....unit. Slide the free end ("I"section) of the cabinet, make sure it sits securely inside the frame channel by making slight adjustments. This is a Left and Right Window Filler Panel - D. NOTE: If storm window...must be facing into the rails on the air conditioner, carefully place the unit into the top and bottom rails of the air conditioner frame is against the window frame (FIG. 7). Hold the Accordion ...
Installation Instructions
Page 3
...) side panels into frame. * Keeping a firm grip on air conditioner, raise sash and carefully "rock" air conditioner backward to drain out. 6 To secure lower sash in base of unit. 4 Place the frame lock between the frame extensions and the window sill as shown in the space between windows, and unscrew sash lock. * Remove screws installed through frame...
...) side panels into frame. * Keeping a firm grip on air conditioner, raise sash and carefully "rock" air conditioner backward to drain out. 6 To secure lower sash in base of unit. 4 Place the frame lock between the frame extensions and the window sill as shown in the space between windows, and unscrew sash lock. * Remove screws installed through frame...


