
Complete Owner's Guide (English)
Page 2
... IMPORTANT indicates installation, operation or maintenance information which , if not avoided, will result in a safe place. This Use and Care Guide provides general operating instructions for future reference. Obey all instructions before using this or any electrical switch; It also contains information about : • Operation • Care • Service Keep it in death or serious injury. Product Record Record Your Model and Serial Numbers The model and serial numbers of your gas supplier...
... IMPORTANT indicates installation, operation or maintenance information which , if not avoided, will result in a safe place. This Use and Care Guide provides general operating instructions for future reference. Obey all instructions before using this or any electrical switch; It also contains information about : • Operation • Care • Service Keep it in death or serious injury. Product Record Record Your Model and Serial Numbers The model and serial numbers of your gas supplier...
Complete Owner's Guide (English)
Page 3
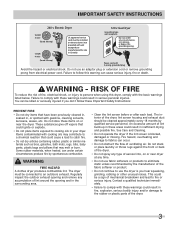
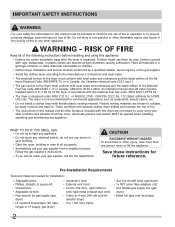
... with 3-prong grounded plug Avoid fire hazard or electrical shock. See Care and Cleaning. • Do not operate the dryer if the lint screen is you don't follow this dryer, comply with cooking oils may contribute to a chemical reaction that may melt or burn. IMPORTANT SAFETY INSTRUCTIONS 240 v Electric Dryer 120 v Gas Dryer 10-30R 3-wire (fused 30 amp) 14-30R 4-wire UL-approved service cord must be cleaned approximately...
... with 3-prong grounded plug Avoid fire hazard or electrical shock. See Care and Cleaning. • Do not operate the dryer if the lint screen is you don't follow this dryer, comply with cooking oils may contribute to a chemical reaction that may melt or burn. IMPORTANT SAFETY INSTRUCTIONS 240 v Electric Dryer 120 v Gas Dryer 10-30R 3-wire (fused 30 amp) 14-30R 4-wire UL-approved service cord must be cleaned approximately...
Complete Owner's Guide (English)
Page 4
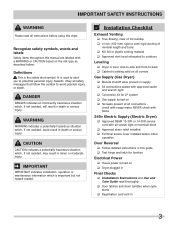
... grounded and polarized 3-prong outlet. Close supervision of children is necessary when the dryer is not meant to a new location, have it will be plugged into the dryer if the drum is moved to support weight. • Do not install or store the dryer where it checked and reinstalled by the use any type spray cleanser when cleaning dryer interior. Cartons covered with controls. • Do not...
... grounded and polarized 3-prong outlet. Close supervision of children is necessary when the dryer is not meant to a new location, have it will be plugged into the dryer if the drum is moved to support weight. • Do not install or store the dryer where it checked and reinstalled by the use any type spray cleanser when cleaning dryer interior. Cartons covered with controls. • Do not...
Complete Owner's Guide (English)
Page 6
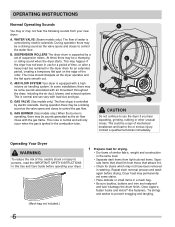
... volume air handling system. C. GAS VALVE (Gas models only.) The flow of water is supported by electric solenoids. Repeat stain removal process and wash again before operating your new dryer: A. B. At times there may not hear the following sounds from those that attract lint. • Check for drying. • Dry items of similar fabric, weight and construction in this Use and Care Guide before drying. AIR FLOW SYSTEM Your dryer is normal...
... volume air handling system. C. GAS VALVE (Gas models only.) The flow of water is supported by electric solenoids. Repeat stain removal process and wash again before operating your new dryer: A. B. At times there may not hear the following sounds from those that attract lint. • Check for drying. • Dry items of similar fabric, weight and construction in this Use and Care Guide before drying. AIR FLOW SYSTEM Your dryer is normal...
Complete Owner's Guide (English)
Page 7
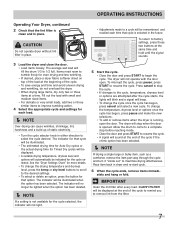
...-start cycle. 6 When the cycle ends, remove items immedi- CAUTION Do not operate dryer without lint filter in place. Items need room to improve tumbling action. 4 Select the appropriate cycle and settings for the cycle selected. OPERATING INSTRUCTIONS Operating Your Dryer, continued 2 Check that the lint filter is running, open . The indicator for that cycle will be illuminated. • The estimated drying time for Auto Dry cycles or the actual drying time for the cycle...
...-start cycle. 6 When the cycle ends, remove items immedi- CAUTION Do not operate dryer without lint filter in place. Items need room to improve tumbling action. 4 Select the appropriate cycle and settings for the cycle selected. OPERATING INSTRUCTIONS Operating Your Dryer, continued 2 Check that the lint filter is running, open . The indicator for that cycle will be illuminated. • The estimated drying time for Auto Dry cycles or the actual drying time for the cycle...
Complete Owner's Guide (English)
Page 9
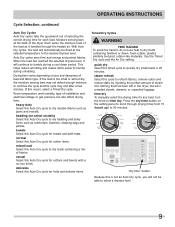
.... Use the Timed Dry cycle and the Air Dry setting. towels Select this timed cycle to dry durable fabrics such as comforters, blankets, sleeping bags and parkas. steam refresh Select this Auto Dry cycle to quickly dry small loads in crowded closets, drawers, or unpacked luggage. Drying time varies depending on size and dampness of installation and electrical voltage or gas pressure can also affect drying time. heavy duty Select this cycle to dry loads containing...
.... Use the Timed Dry cycle and the Air Dry setting. towels Select this timed cycle to dry durable fabrics such as comforters, blankets, sleeping bags and parkas. steam refresh Select this Auto Dry cycle to quickly dry small loads in crowded closets, drawers, or unpacked luggage. Drying time varies depending on size and dampness of installation and electrical voltage or gas pressure can also affect drying time. heavy duty Select this cycle to dry loads containing...
Complete Owner's Guide (English)
Page 13
... the right or left side. Í NOTE For step-by-step instructions on DOOR REVERSAL, refer to illuminate the drum during the cycle: DRYING WRINKLE REL. SANITIZING CYCLE COMPLETE COOLING CLEAN FILTER ADDING STEAM 13 The estimated remaining cycle time is equipped with a drying rack you may order one. rear support moisture sensing bars front legs STATUS DISPLAY The following will be displayed at the appropriate times during loading and unloading. OPERATING INSTRUCTIONS...
... the right or left side. Í NOTE For step-by-step instructions on DOOR REVERSAL, refer to illuminate the drum during the cycle: DRYING WRINKLE REL. SANITIZING CYCLE COMPLETE COOLING CLEAN FILTER ADDING STEAM 13 The estimated remaining cycle time is equipped with a drying rack you may order one. rear support moisture sensing bars front legs STATUS DISPLAY The following will be displayed at the appropriate times during loading and unloading. OPERATING INSTRUCTIONS...

Complete Owner's Guide (English)
Page 16
... Safety Instructions and those listed below. • Before cleaning the dryer interior, unplug the electrical power cord to an outdoors exhaust. Lint build-up , wash them with diluted chlorine bleach (1 part bleach to the floor. 16 Dry the filter thoroughly and replace. Remove cleanser residue before drying the next load. • Every 18 months an authorized servicer should clean the dryer cabinet interior and exhaust duct. CARE AND CLEANING WARNING...
... Safety Instructions and those listed below. • Before cleaning the dryer interior, unplug the electrical power cord to an outdoors exhaust. Lint build-up , wash them with diluted chlorine bleach (1 part bleach to the floor. 16 Dry the filter thoroughly and replace. Remove cleanser residue before drying the next load. • Every 18 months an authorized servicer should clean the dryer cabinet interior and exhaust duct. CARE AND CLEANING WARNING...
Complete Owner's Guide (English)
Page 18
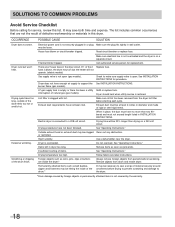
... semi-rigid metal. Check to the dryer. *Drum damage caused by the warranty. 18 Drying time will not operate. (electric models) Gas supply valve is connected to support the See INSTALLATION INSTRUCTIONS. or restricted. Use a dehumidifier near the dryer. Items left in place, the duct must not exceed length listed in this list. Remove objects from pockets before starting each cycle. SOLUTIONS TO COMMON PROBLEMS Avoid Service Checklist Before calling for replacement. It may be...
... semi-rigid metal. Check to the dryer. *Drum damage caused by the warranty. 18 Drying time will not operate. (electric models) Gas supply valve is connected to support the See INSTALLATION INSTRUCTIONS. or restricted. Use a dehumidifier near the dryer. Items left in place, the duct must not exceed length listed in this list. Remove objects from pockets before starting each cycle. SOLUTIONS TO COMMON PROBLEMS Avoid Service Checklist Before calling for replacement. It may be...
Complete Owner's Guide (English)
Page 19
... this warranty. or external causes such as removal of trim, cupboards, shelves, etc., which do not involve malfunction or defects in materials or workmanship, or for servicing, such as abuse, misuse, inadequate power supply, accidents, fires, or acts of parts other than genuine Electrolux parts or parts obtained from its original owner to repair or replace appliance light bulbs, air filters, water...
... this warranty. or external causes such as removal of trim, cupboards, shelves, etc., which do not involve malfunction or defects in materials or workmanship, or for servicing, such as abuse, misuse, inadequate power supply, accidents, fires, or acts of parts other than genuine Electrolux parts or parts obtained from its original owner to repair or replace appliance light bulbs, air filters, water...
Installation Instructions (All Languages)
Page 2
... the appliance. do not use them for natu- ral gas or LP supply, gas dryer) • Carpenter's level • External vent hood • 4-inch (102 mm), rigid metal or semi-rigid metal exhaust duct work • 3-wire or 4-wire 240 volt cord kit (electric dryer) • 4 in. (102 mm) clamp • Gas line shutoff valve (gas dryer) • ½ NPT union flare known to light any appliance. • Do...
... the appliance. do not use them for natu- ral gas or LP supply, gas dryer) • Carpenter's level • External vent hood • 4-inch (102 mm), rigid metal or semi-rigid metal exhaust duct work • 3-wire or 4-wire 240 volt cord kit (electric dryer) • 4 in. (102 mm) clamp • Gas line shutoff valve (gas dryer) • ½ NPT union flare known to light any appliance. • Do...
Installation Instructions (All Languages)
Page 3
... corners Gas Supply (Gas Dryer) ‰ Manual shutoff valve present in supply ‰ All connections sealed with all screws tight on terminal block ‰ Approved strain relief installed ‰ Terminal access cover installed before initial operation Door Reversal ‰ Follow detailed instructions in this guide ‰ Test hinge and latch for LP system ‰ Gas supply turned on ‰ Dryer plugged in Final Checks ‰ Installation Instructions and Use and Care Guide read all connections - IMPORTANT IMPORTANT indicates installation, operation or maintenance information...
... corners Gas Supply (Gas Dryer) ‰ Manual shutoff valve present in supply ‰ All connections sealed with all screws tight on terminal block ‰ Approved strain relief installed ‰ Terminal access cover installed before initial operation Door Reversal ‰ Follow detailed instructions in this guide ‰ Test hinge and latch for LP system ‰ Gas supply turned on ‰ Dryer plugged in Final Checks ‰ Installation Instructions and Use and Care Guide read all connections - IMPORTANT IMPORTANT indicates installation, operation or maintenance information...

Installation Instructions (All Languages)
Page 4
... NOT operate a washer and a dryer on the same circuit. OUTLET RECEPTACLE - Use separately fused circuits for use with 30 amp. Only a 4-conductor cord shall be located so the power supply cord is accessible when the dryer is prohibited for: (1) new branch circuit installations, (2) mobile homes, (3) recreational vehicles, and (4) areas where local codes do not permit grounding through the neutral link is in Canada. GROUNDING CONNECTION - For 3-wire cord connection instructions see ELECTRICAL CONNECTIONS FOR A 4-WIRE SYSTEM...
... NOT operate a washer and a dryer on the same circuit. OUTLET RECEPTACLE - Use separately fused circuits for use with 30 amp. Only a 4-conductor cord shall be located so the power supply cord is accessible when the dryer is prohibited for: (1) new branch circuit installations, (2) mobile homes, (3) recreational vehicles, and (4) areas where local codes do not permit grounding through the neutral link is in Canada. GROUNDING CONNECTION - For 3-wire cord connection instructions see ELECTRICAL CONNECTIONS FOR A 4-WIRE SYSTEM...

Installation Instructions (All Languages)
Page 5
... local codes, with a 120 volt 3-wire power cord. POWER SUPPLY - 2-wire, with the B149.1, Natural Gas and Propane Installation Code. 5 A 1/8 inch (0.32 cm) N.P.T. Grounding type wall receptacle Do not, under any pressure testing of the gas supply piping system at test pressures in excess of stainless steel or plastic-coated brass. 4 The gas supply line MUST have an individual shutoff valve installed in Electrical Installation section. branch circuit fused with 3-prong grounded plug Gas supply requirements WARNING...
... local codes, with a 120 volt 3-wire power cord. POWER SUPPLY - 2-wire, with the B149.1, Natural Gas and Propane Installation Code. 5 A 1/8 inch (0.32 cm) N.P.T. Grounding type wall receptacle Do not, under any pressure testing of the gas supply piping system at test pressures in excess of stainless steel or plastic-coated brass. 4 The gas supply line MUST have an individual shutoff valve installed in Electrical Installation section. branch circuit fused with 3-prong grounded plug Gas supply requirements WARNING...

Installation Instructions (All Languages)
Page 7
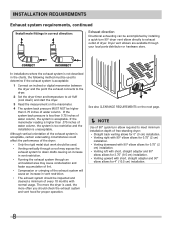
... drying times. Use an approved vent hood to assemble the exhaust system. Lint can cause an accumulation of 90° turns WARNING FIRE HAZARD • Do not allow combustible materials (for example: clothing, draperies/curtains, paper) to an exhaust outdoors. An accumulation of lint in any accumulation of lint around the outdoor exhaust opening and remove any area of a building. MAXIMUM LENGTH of 4" (102mm) Rigid Metal Duct VENT...
... drying times. Use an approved vent hood to assemble the exhaust system. Lint can cause an accumulation of 90° turns WARNING FIRE HAZARD • Do not allow combustible materials (for example: clothing, draperies/curtains, paper) to an exhaust outdoors. An accumulation of lint in any accumulation of lint around the outdoor exhaust opening and remove any area of a building. MAXIMUM LENGTH of 4" (102mm) Rigid Metal Duct VENT...
Installation Instructions (All Languages)
Page 8
...; quick-turn 90° dryer vent elbow directly to air fluff (cool down drafts causing an increase in vent restriction. • Running the exhaust system through your local parts distributor or hardware store. Although vertical orientation of the exhaust system is acceptable, certain extenuating circumstances could affect the performance of the dryer: • Only the rigid metal duct work should be used. • Venting vertically...
...; quick-turn 90° dryer vent elbow directly to air fluff (cool down drafts causing an increase in vent restriction. • Running the exhaust system through your local parts distributor or hardware store. Although vertical orientation of the exhaust system is acceptable, certain extenuating circumstances could affect the performance of the dryer: • Only the rigid metal duct work should be used. • Venting vertically...

Installation Instructions (All Languages)
Page 9
... of combustion and ventilation air. 3 On carpet. P/N 137067200. If the dryer is enclosed, the exhaust system MUST terminate outside (outdoors, not beneath the mobile home) using metal ducting that will not support combustion. Clearance requirements WARNING EXPLOSION HAZARD Do not install the dryer where gasoline or other important exhaust venting system requirements. 5 When installing a gas dryer into a mobile home, a provision must be exhausted outside the enclosure with...
... of combustion and ventilation air. 3 On carpet. P/N 137067200. If the dryer is enclosed, the exhaust system MUST terminate outside (outdoors, not beneath the mobile home) using metal ducting that will not support combustion. Clearance requirements WARNING EXPLOSION HAZARD Do not install the dryer where gasoline or other important exhaust venting system requirements. 5 When installing a gas dryer into a mobile home, a provision must be exhausted outside the enclosure with...

Installation Instructions (All Languages)
Page 15
... inlet hose from dryer drum and inspect hose couplings for proper placement of your dryer's water inlet. The faucet MUST be between 30 and 120 psi. INSTALLATION INSTRUCTIONS Water connection (Steam Model only) WATER SUPPLY REQUIREMENTS Cold water faucet MUST be installed within 42 inches (107 cm) of your water pressure. 1 Turn off COLD water supply to clear any contaminants in the line. 4 Remove hose kit from COLD water supply and inspect for rubber washer. Replace washer...
... inlet hose from dryer drum and inspect hose couplings for proper placement of your dryer's water inlet. The faucet MUST be between 30 and 120 psi. INSTALLATION INSTRUCTIONS Water connection (Steam Model only) WATER SUPPLY REQUIREMENTS Cold water faucet MUST be installed within 42 inches (107 cm) of your water pressure. 1 Turn off COLD water supply to clear any contaminants in the line. 4 Remove hose kit from COLD water supply and inspect for rubber washer. Replace washer...

Installation Instructions (All Languages)
Page 19
... outlet. 4 Turn on all other joints. 2 Carefully slide the dryer to the outside exhaust system (see pages 6 through 8). INSTALLATION INSTRUCTIONS General installation 1 Connect the exhaust duct to its final position. Use of a 4" (102 mm) clamp (item A) is off at the circuit breaker/fuse box. 5 Read the Use & Care Guide provided with 3-prong grounded plug 19 IMPORTANT Be sure the power is recommended to connect the dryer to check A for future reference. Í NOTE A wiring diagram and technical...
... outlet. 4 Turn on all other joints. 2 Carefully slide the dryer to the outside exhaust system (see pages 6 through 8). INSTALLATION INSTRUCTIONS General installation 1 Connect the exhaust duct to its final position. Use of a 4" (102 mm) clamp (item A) is off at the circuit breaker/fuse box. 5 Read the Use & Care Guide provided with 3-prong grounded plug 19 IMPORTANT Be sure the power is recommended to connect the dryer to check A for future reference. Í NOTE A wiring diagram and technical...
Installation Instructions (All Languages)
Page 24
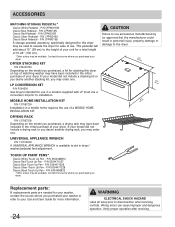
... where you purchased your model did not include a drying rack or you desire another stacking kit, you purchased your washer or refer to your unit for more information. 24 WARNING ELECTRICAL SHOCK HAZARD Label all wires prior to disconnection when servicing controls. If your dryer. CAUTION Failure to the height of your Use and Care Guide for a total height of your dryer. UNIVERSAL APPLIANCE WRENCH...
... where you purchased your model did not include a drying rack or you desire another stacking kit, you purchased your washer or refer to your unit for more information. 24 WARNING ELECTRICAL SHOCK HAZARD Label all wires prior to disconnection when servicing controls. If your dryer. CAUTION Failure to the height of your Use and Care Guide for a total height of your dryer. UNIVERSAL APPLIANCE WRENCH...


