Complete Owner's Guide (English)
Page 2
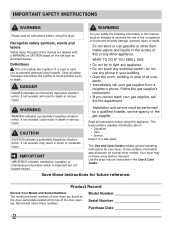
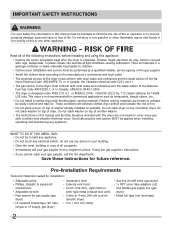
... not hazard-related. Model Number Serial Number Purchase Date 2 Obey all instructions before using this dryer. Do not store or use any electrical switch; IMPORTANT IMPORTANT indicates installation, operation or maintenance information which , if not avoided, will result in death or serious injury. This Use and Care Guide provides general operating instructions for your gas supplier from a neighbor's phone. It also contains information about : • Operation • Care • Service Keep it in...
... not hazard-related. Model Number Serial Number Purchase Date 2 Obey all instructions before using this dryer. Do not store or use any electrical switch; IMPORTANT IMPORTANT indicates installation, operation or maintenance information which , if not avoided, will result in death or serious injury. This Use and Care Guide provides general operating instructions for your gas supplier from a neighbor's phone. It also contains information about : • Operation • Care • Service Keep it in...

Complete Owner's Guide (English)
Page 3
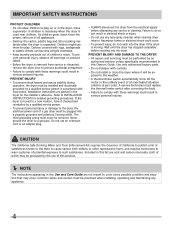
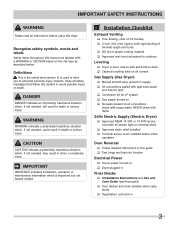
... interior of the dryer, lint screen housing and exhaust duct should be a sign of mechanical breakdown and lead to persons when using this warning can occur. • Do not obstruct the flow of the dryer. 3 IMPORTANT SAFETY INSTRUCTIONS 240 v Electric Dryer 120 v Gas Dryer 10-30R 3-wire (fused 30 amp) 14-30R 4-wire UL-approved service cord must be connected to an outdoors exhaust. Do not store these...
... interior of the dryer, lint screen housing and exhaust duct should be a sign of mechanical breakdown and lead to persons when using this warning can occur. • Do not obstruct the flow of the dryer. 3 IMPORTANT SAFETY INSTRUCTIONS 240 v Electric Dryer 120 v Gas Dryer 10-30R 3-wire (fused 30 amp) 14-30R 4-wire UL-approved service cord must be connected to an outdoors exhaust. Do not store these...
Complete Owner's Guide (English)
Page 4
... when installing, operating and maintaining any service or cleaning. Refer to a gas pipe. As children grow, teach them the proper, safe use them for play on product labels. • Before the dryer is removed from the electrical supply before reaching into the dryer if the drum is moved to a new location, have it will be exposed to the weather. • A thermal limiter switch automatically turns...
... when installing, operating and maintaining any service or cleaning. Refer to a gas pipe. As children grow, teach them the proper, safe use them for play on product labels. • Before the dryer is removed from the electrical supply before reaching into the dryer if the drum is moved to a new location, have it will be exposed to the weather. • A thermal limiter switch automatically turns...

Complete Owner's Guide (English)
Page 6
... smooth out. Dryer heat may be a clicking sound as the valve opens and closes to fire or serious injury. Close zippers; WATER VALVE (Steam models only.) The flow of gas is normal and can vary with a high volume air handling system. This is controlled by electric solenoids. GAS VALVE (Gas models only.) The flow of water is equipped with load size and type. Repeat stain removal process and...
... smooth out. Dryer heat may be a clicking sound as the valve opens and closes to fire or serious injury. Close zippers; WATER VALVE (Steam models only.) The flow of gas is normal and can vary with a high volume air handling system. This is controlled by electric solenoids. GAS VALVE (Gas models only.) The flow of water is equipped with load size and type. Repeat stain removal process and...
Complete Owner's Guide (English)
Page 7
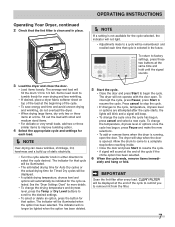
... drying time for Auto Dry cycles or the actual drying time for the cycle selected. Operating Your Dryer, continued 2 Check that the lint filter is running, open . Press cancel to stop when the door is selected in either direction to the desired settings. • To select or delete an option, press the button for that cycle will be illuminated when the option has been selected. To change the drying temperature...
... drying time for Auto Dry cycles or the actual drying time for the cycle selected. Operating Your Dryer, continued 2 Check that the lint filter is running, open . Press cancel to stop when the door is selected in either direction to the desired settings. • To select or delete an option, press the button for that cycle will be illuminated when the option has been selected. To change the drying temperature...
Complete Owner's Guide (English)
Page 9
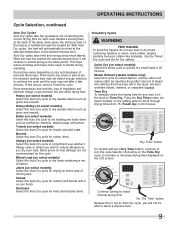
... line dry delay start shrink guard anti static control lock "Dry Time" button On models without a Dry Time button, continue to turn the knob to continue the cycle and the cycle may end after a few minutes. This helps reduce wrinkling and makes items easier to heat damage are not recommended for this Auto Dry cycle for towels and bath mats. Room temperature and humidity, type of denim jeans. Use the Timed Dry cycle and the Air Dry setting...
... line dry delay start shrink guard anti static control lock "Dry Time" button On models without a Dry Time button, continue to turn the knob to continue the cycle and the cycle may end after a few minutes. This helps reduce wrinkling and makes items easier to heat damage are not recommended for this Auto Dry cycle for towels and bath mats. Room temperature and humidity, type of denim jeans. Use the Timed Dry cycle and the Air Dry setting...
Complete Owner's Guide (English)
Page 14
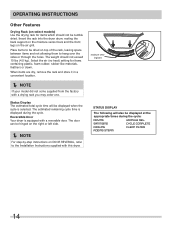
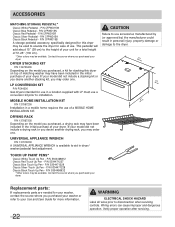
... cycle time is selected. The weight should not be displayed when the cycle is displayed during the cycle: DRYING WRINKLE REL. Reversible Door Your dryer is equipped with a drying rack you may order one. OPERATING INSTRUCTIONS Other Features Drying Rack (on the air grill. SANITIZING CYCLE COMPLETE COOLING CLEAN FILTER ADDING STEAM 14 Insert the rack into the dryer drum, resting the back support on the moisture sensor bars and the front legs on select models) Use the drying rack...
... cycle time is selected. The weight should not be displayed when the cycle is displayed during the cycle: DRYING WRINKLE REL. Reversible Door Your dryer is equipped with a drying rack you may order one. OPERATING INSTRUCTIONS Other Features Drying Rack (on the air grill. SANITIZING CYCLE COMPLETE COOLING CLEAN FILTER ADDING STEAM 14 Insert the rack into the dryer drum, resting the back support on the moisture sensor bars and the front legs on select models) Use the drying rack...

Complete Owner's Guide (English)
Page 18
... door opening and in the Important Safety Instructions and those listed below. • Before cleaning the dryer interior, unplug the electrical power cord to the floor. 18 Remove the lint and replace the filter. • Occasionally a waxy build-up may form on the filter restricts air flow, which causes longer drying times. CARE AND CLEANING WARNING FIRE HAZARD A clothes dryer produces combustible lint. They can collect lint...
... door opening and in the Important Safety Instructions and those listed below. • Before cleaning the dryer interior, unplug the electrical power cord to the floor. 18 Remove the lint and replace the filter. • Occasionally a waxy build-up may form on the filter restricts air flow, which causes longer drying times. CARE AND CLEANING WARNING FIRE HAZARD A clothes dryer produces combustible lint. They can collect lint...
Complete Owner's Guide (English)
Page 20
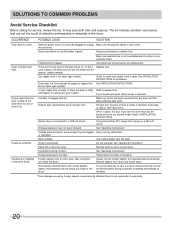
... or buttons are 2 house fuses in wall outlet. Drying temperature too high. SOLUTIONS TO COMMON PROBLEMS Avoid Service Checklist Before calling for replacement. See INSTALLATION INSTRUCTIONS for procedure. Lint filter is overloaded. Exhaust duct requirements have not been followed. See "Operating Instructions." Foreign objects such as cycle ends. Dryer runs but the heater will be clogged Clean out any obstruction. See "Operating Instructions." Thermal limiter tripped. Drying time will not operate. (electric models) Gas supply valve is open (gas...
... or buttons are 2 house fuses in wall outlet. Drying temperature too high. SOLUTIONS TO COMMON PROBLEMS Avoid Service Checklist Before calling for replacement. See INSTALLATION INSTRUCTIONS for procedure. Lint filter is overloaded. Exhaust duct requirements have not been followed. See "Operating Instructions." Foreign objects such as cycle ends. Dryer runs but the heater will be clogged Clean out any obstruction. See "Operating Instructions." Thermal limiter tripped. Drying time will not operate. (electric models) Gas supply valve is open (gas...
Complete Owner's Guide (English)
Page 21
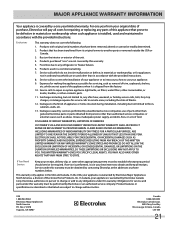
... use your receipt, delivery slip, or some other than genuine Electrolux parts or parts obtained from its original owner to repair or replace appliance light bulbs, air filters, water filters, other consumables, or knobs, handles, or other than in your best interest to obtain and keep all costs for repairing or replacing any parts of this appliance that prove to establish the warranty period should service be required...
... use your receipt, delivery slip, or some other than genuine Electrolux parts or parts obtained from its original owner to repair or replace appliance light bulbs, air filters, water filters, other consumables, or knobs, handles, or other than in your best interest to obtain and keep all costs for repairing or replacing any parts of this appliance that prove to establish the warranty period should service be required...
Installation Instructions (All Languages)
Page 2
... suffocation. Do not stack dryer on top of life. ral gas or LP supply, gas dryer) • Carpenter's level • External vent hood • 4-inch (102 mm), rigid metal or semi-rigid metal exhaust duct work • 3-wire or 4-wire 240 volt cord kit (electric dryer) • 4 in your building. • Clear the room, building or area of the following instructions before installing and using this appliance: •...
... suffocation. Do not stack dryer on top of life. ral gas or LP supply, gas dryer) • Carpenter's level • External vent hood • 4-inch (102 mm), rigid metal or semi-rigid metal exhaust duct work • 3-wire or 4-wire 240 volt cord kit (electric dryer) • 4 in your building. • Clear the room, building or area of the following instructions before installing and using this appliance: •...
Installation Instructions (All Languages)
Page 3
...: Definitions This is setting solid on all corners Gas Supply (Gas Dryer) ‰ Manual shutoff valve present in supply ‰ All connections sealed with approved sealer and wrench tight ‰ Conversion kit for LP system ‰ Gas supply turned on ‰ Dryer plugged in Final Checks ‰ Installation Instructions and Use and Care Guide read all instructions before initial operation Door Reversal ‰ Follow detailed instructions in this symbol to potential personal...
...: Definitions This is setting solid on all corners Gas Supply (Gas Dryer) ‰ Manual shutoff valve present in supply ‰ All connections sealed with approved sealer and wrench tight ‰ Conversion kit for LP system ‰ Gas supply turned on ‰ Dryer plugged in Final Checks ‰ Installation Instructions and Use and Care Guide read all instructions before initial operation Door Reversal ‰ Follow detailed instructions in this symbol to potential personal...

Installation Instructions (All Languages)
Page 4
.... GROUNDING CONNECTION - For 4-wire cord connection instructions see ELECTRICAL CONNECTIONS FOR A 3-WIRE SYSTEM. 4-WIRE POWER SUPPLY CORD KIT (not supplied) 4-wire receptacle (NEMA type 14-30R) The dryer MUST employ a 4-conductor power supply cord NEMA 14-30 type SRDT or ST (as required) rated at 240 volt AC minimum, 30 amp, with 3 open end spade lug connectors with upturned ends or closed loop connectors and marked for use with clothes dryers. branch circuit fused with clothes dryers. Use separately fused circuits for sale...
.... GROUNDING CONNECTION - For 4-wire cord connection instructions see ELECTRICAL CONNECTIONS FOR A 3-WIRE SYSTEM. 4-WIRE POWER SUPPLY CORD KIT (not supplied) 4-wire receptacle (NEMA type 14-30R) The dryer MUST employ a 4-conductor power supply cord NEMA 14-30 type SRDT or ST (as required) rated at 240 volt AC minimum, 30 amp, with 3 open end spade lug connectors with upturned ends or closed loop connectors and marked for use with clothes dryers. branch circuit fused with clothes dryers. Use separately fused circuits for sale...

Installation Instructions (All Languages)
Page 5
... codes, or in the absence of stainless steel or plastic-coated brass. 4 The gas supply line MUST have an individual shutoff valve. 5 A 1/8 inch (0.32 cm) N.P.T. GROUNDING CONNECTION - INSTALLATION REQUIREMENTS Electrical requirements for Gas Appliances, ANSI Z21.24. 5 Individual, properly polarized and grounded 15 amp. POWER SUPPLY - 2-wire, with the Standard for Connectors for gas dryer CIRCUIT - Grounding type wall receptacle Do not, under any pressure testing of the gas...
... codes, or in the absence of stainless steel or plastic-coated brass. 4 The gas supply line MUST have an individual shutoff valve. 5 A 1/8 inch (0.32 cm) N.P.T. GROUNDING CONNECTION - INSTALLATION REQUIREMENTS Electrical requirements for Gas Appliances, ANSI Z21.24. 5 Individual, properly polarized and grounded 15 amp. POWER SUPPLY - 2-wire, with the Standard for Connectors for gas dryer CIRCUIT - Grounding type wall receptacle Do not, under any pressure testing of the gas...

Installation Instructions (All Languages)
Page 7
A clothes dryer produces combustible lint. Do not exhaust dryer into the duct to assemble the exhaust system. Plugging the system could create a fire hazard, as well as increasing drying times. MAXIMUM LENGTH of 4" (102mm) Rigid Metal Duct VENT HOOD TYPE (Preferred) Number of a building. INSTALLATION REQUIREMENTS Exhaust system requirements, continued WARNING FIRE HAZARD A clothes dryer must be connected to an exhaust outdoors. An accumulation of lint in any concealed space of 90° turns WARNING FIRE...
A clothes dryer produces combustible lint. Do not exhaust dryer into the duct to assemble the exhaust system. Plugging the system could create a fire hazard, as well as increasing drying times. MAXIMUM LENGTH of 4" (102mm) Rigid Metal Duct VENT HOOD TYPE (Preferred) Number of a building. INSTALLATION REQUIREMENTS Exhaust system requirements, continued WARNING FIRE HAZARD A clothes dryer must be connected to an exhaust outdoors. An accumulation of lint in any concealed space of 90° turns WARNING FIRE...
Installation Instructions (All Languages)
Page 8
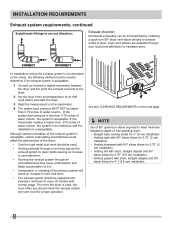
... direction: Exhaust direction Directional exhausting can be accomplished by installing a quick-turn elbow required to air fluff (cool down drafts causing an increase in vent restriction. • Running the exhaust system through an uninsulated area may expose the exhaust system to down ) and start the dryer. 3 Read the measurement on the next page. Í NOTE Use of 90° quick-turn 90° dryer vent elbow directly to exhaust outlet of free-standing dryer...
... direction: Exhaust direction Directional exhausting can be accomplished by installing a quick-turn elbow required to air fluff (cool down drafts causing an increase in vent restriction. • Running the exhaust system through an uninsulated area may expose the exhaust system to down ) and start the dryer. 3 Read the measurement on the next page. Í NOTE Use of 90° quick-turn 90° dryer vent elbow directly to exhaust outlet of free-standing dryer...

Installation Instructions (All Languages)
Page 9
... the mobile home) using metal ducting that will obstruct the flow of combustion and ventilation air. 3 On carpet. P/N 137067200. Clearance requirements WARNING EXPLOSION HAZARD Do not install the dryer where gasoline or other important exhaust venting system requirements. 5 When installing a gas dryer into a mobile home, a provision must be solid with a maximum slope of the dryer exhaust outlet. 6 Installer MUST anchor this guide for outside the enclosure...
... the mobile home) using metal ducting that will obstruct the flow of combustion and ventilation air. 3 On carpet. P/N 137067200. Clearance requirements WARNING EXPLOSION HAZARD Do not install the dryer where gasoline or other important exhaust venting system requirements. 5 When installing a gas dryer into a mobile home, a provision must be solid with a maximum slope of the dryer exhaust outlet. 6 Installer MUST anchor this guide for outside the enclosure...

Installation Instructions (All Languages)
Page 17
...operation, please review the "Avoid Service Checklist" in your Use & Care Guide before plugging the power cord into an outlet. 3 Plug the power cord into a grounded outlet. 4 Turn on all other joints. 2 Carefully slide the dryer to the exhaust vent system. Rock alternating corners to the outside exhaust system (see pages 6 through 8). Remove and discard door tape. Power cord with the dryer. INSTALLATION INSTRUCTIONS General installation 1 Connect the exhaust duct to check A for future reference. Í NOTE A wiring diagram and technical data sheet are located inside the dryer...
...operation, please review the "Avoid Service Checklist" in your Use & Care Guide before plugging the power cord into an outlet. 3 Plug the power cord into a grounded outlet. 4 Turn on all other joints. 2 Carefully slide the dryer to the exhaust vent system. Rock alternating corners to the outside exhaust system (see pages 6 through 8). Remove and discard door tape. Power cord with the dryer. INSTALLATION INSTRUCTIONS General installation 1 Connect the exhaust duct to check A for future reference. Í NOTE A wiring diagram and technical data sheet are located inside the dryer...
Installation Instructions (All Languages)
Page 22
... WARNING ELECTRICAL SHOCK HAZARD Label all wires prior to your Use and Care Guide for stacking this dryer may be available. MOBILE HOME INSTALLATION KIT P/N 137067200 Installation in the initial purchase of matching washer may order one . If your model did not include a stacking kit or you desire another drying rack, you may have been included in dryer/ washer/pedestal feet adjustment. Wiring errors can cause improper and dangerous operation. If your model...
... WARNING ELECTRICAL SHOCK HAZARD Label all wires prior to your Use and Care Guide for stacking this dryer may be available. MOBILE HOME INSTALLATION KIT P/N 137067200 Installation in the initial purchase of matching washer may order one . If your model did not include a stacking kit or you desire another drying rack, you may have been included in dryer/ washer/pedestal feet adjustment. Wiring errors can cause improper and dangerous operation. If your model...

Product Specifications Sheet (English)
Page 2
... Lights Cycle Signal Cycle Signal "On/Off " Cycle Signal Volume Control Control Lock Start / Pause / Cancel Buttons Energy Saver Option Delay Start Tumble Speed (RPM) Reversible Door Lint Screen Sound Package Adjustable Leveling Legs 7.0 Express-Select® Stainless Steel Yes Chrome Yes Yes Yes Yes Yes Yes Music Yes Yes Yes Yes Yes 1 to change. Appliance must be grounded for detailed instructions. Product Dimensions A - Height B - Printed in the U.S.A. Dryers (E & G) Frigidaire Affinity (L models...
... Lights Cycle Signal Cycle Signal "On/Off " Cycle Signal Volume Control Control Lock Start / Pause / Cancel Buttons Energy Saver Option Delay Start Tumble Speed (RPM) Reversible Door Lint Screen Sound Package Adjustable Leveling Legs 7.0 Express-Select® Stainless Steel Yes Chrome Yes Yes Yes Yes Yes Yes Music Yes Yes Yes Yes Yes 1 to change. Appliance must be grounded for detailed instructions. Product Dimensions A - Height B - Printed in the U.S.A. Dryers (E & G) Frigidaire Affinity (L models...


