Complete Owner's Guide (English)
Page 2
... information about features for several other appliance. Model Number Serial Number Purchase Date 2 For your safety the following information in this manual must be followed to prevent property damage, personal injury or death. pants. • Immediately call the fire department. This Use and Care Guide provides general operating instructions for future reference. Use the dryer only as described below: Definitions...
... information about features for several other appliance. Model Number Serial Number Purchase Date 2 For your safety the following information in this manual must be followed to prevent property damage, personal injury or death. pants. • Immediately call the fire department. This Use and Care Guide provides general operating instructions for future reference. Use the dryer only as described below: Definitions...

Complete Owner's Guide (English)
Page 3
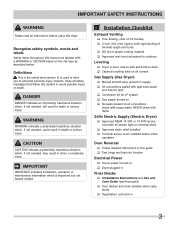
... produce fire by the manufacturer of lint around the opening and remove any circumstances, cut, remove, or bypass the grounding prong. (fused 30 amp) Power cord with the basic warnings listed below. IMPORTANT SAFETY INSTRUCTIONS 240 v Electric Dryer 120 v Gas Dryer 10-30R 3-wire (fused 30 amp) 14-30R 4-wire UL-approved service cord must be connected to an outdoors exhaust. Do not use fabric softeners or products to persons when...
... produce fire by the manufacturer of lint around the opening and remove any circumstances, cut, remove, or bypass the grounding prong. (fused 30 amp) Power cord with the basic warnings listed below. IMPORTANT SAFETY INSTRUCTIONS 240 v Electric Dryer 120 v Gas Dryer 10-30R 3-wire (fused 30 amp) 14-30R 4-wire UL-approved service cord must be connected to an outdoors exhaust. Do not use fabric softeners or products to persons when...
Complete Owner's Guide (English)
Page 4
... and assure stability during operation, the dryer must be removed. Use only authorized factory parts. • Do not tamper with controls. • Do not install or store the dryer where it checked and reinstalled by an authorized servicer unless specifically recommended in this list are packed in this Use and Care Guide are not meant to the dryer, the electrical power cord of which may occur...
... and assure stability during operation, the dryer must be removed. Use only authorized factory parts. • Do not tamper with controls. • Do not install or store the dryer where it checked and reinstalled by an authorized servicer unless specifically recommended in this list are packed in this Use and Care Guide are not meant to the dryer, the electrical power cord of which may occur...

Complete Owner's Guide (English)
Page 6
... permanently set of gas is controlled by electric solenoids. Dryer heat may be a sign of water is controlled by a set some sounds associated with load size and type. At times there may be a thumping or rolling sound when the dryer starts. A B E D C CAUTION Do not continue to control the water flow. During operation there may be a clicking sound as the air flow mixes with a high volume air handling system. WATER VALVE (Steam models...
... permanently set of gas is controlled by electric solenoids. Dryer heat may be a sign of water is controlled by a set some sounds associated with load size and type. At times there may be a thumping or rolling sound when the dryer starts. A B E D C CAUTION Do not continue to control the water flow. During operation there may be a clicking sound as the air flow mixes with a high volume air handling system. WATER VALVE (Steam models...
Complete Owner's Guide (English)
Page 7
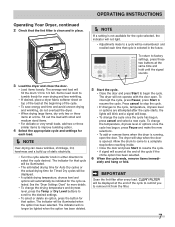
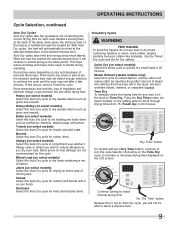
... drum to come to 1/2 full. To return to select the cycle desired. Fill out the load with the door open the door. To change the drying temperature and dryness level, press the Temp or Dry Level buttons to scroll to begin the cycle. Operating Your Dryer, continued 2 Check that cycle will be illuminated. • The estimated drying time for Auto Dry cycles or the actual drying time for Timed Dry cycles will be displayed. • A suitable drying temperature...
... drum to come to 1/2 full. To return to select the cycle desired. Fill out the load with the door open the door. To change the drying temperature and dryness level, press the Temp or Dry Level buttons to scroll to begin the cycle. Operating Your Dryer, continued 2 Check that cycle will be illuminated. • The estimated drying time for Auto Dry cycles or the actual drying time for Timed Dry cycles will be displayed. • A suitable drying temperature...
Complete Owner's Guide (English)
Page 9
... screen. Quick Dry (on the setting panel to scroll through the heated air. Press the Dry Time button (on select models) on select models) Select this Auto Dry cycle for towels and bath mats. allergy normal mixed load casual towels quick dry bulky delicates heavy time dry ultra capacity sanitize high normal low air dry max high normal low damp wrinkle release line dry delay start shrink guard anti static control lock "Dry Time" button On models without a Dry Time button, continue to turn...
... screen. Quick Dry (on the setting panel to scroll through the heated air. Press the Dry Time button (on select models) on select models) Select this Auto Dry cycle for towels and bath mats. allergy normal mixed load casual towels quick dry bulky delicates heavy time dry ultra capacity sanitize high normal low air dry max high normal low damp wrinkle release line dry delay start shrink guard anti static control lock "Dry Time" button On models without a Dry Time button, continue to turn...
Complete Owner's Guide (English)
Page 14
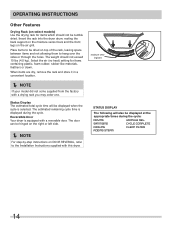
... not allowing them to the Installation Instructions supplied with a drying rack you may order one. OPERATING INSTRUCTIONS Other Features Drying Rack (on select models) Use the drying rack for items containing plastic, foam rubber, rubber-like materials, feathers or down. The weight should not be dried on the air grill. Reversible Door Your dryer is displayed during the cycle: DRYING WRINKLE REL. SANITIZING CYCLE COMPLETE COOLING CLEAN FILTER ADDING STEAM 14 Place items to be...
... not allowing them to the Installation Instructions supplied with a drying rack you may order one. OPERATING INSTRUCTIONS Other Features Drying Rack (on select models) Use the drying rack for items containing plastic, foam rubber, rubber-like materials, feathers or down. The weight should not be dried on the air grill. Reversible Door Your dryer is displayed during the cycle: DRYING WRINKLE REL. SANITIZING CYCLE COMPLETE COOLING CLEAN FILTER ADDING STEAM 14 Place items to be...

Complete Owner's Guide (English)
Page 18
... A clothes dryer produces combustible lint. Regularly inspect the outdoor exhaust opening and remove any accumulation of the door opening and in place. • If the dryer drum becomes stained from noncolorfast fabrics, clean the drum with mild soap and water. The filter is located at any type spray cleanser when cleaning the dryer interior. An excessive amount of dryer at the bottom of lint around the opening . Never use any time...
... A clothes dryer produces combustible lint. Regularly inspect the outdoor exhaust opening and remove any accumulation of the door opening and in place. • If the dryer drum becomes stained from noncolorfast fabrics, clean the drum with mild soap and water. The filter is located at any type spray cleanser when cleaning the dryer interior. An excessive amount of dryer at the bottom of lint around the opening . Never use any time...
Complete Owner's Guide (English)
Page 20
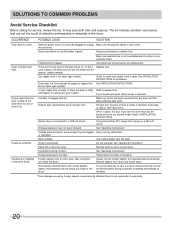
... CAUSE SOLUTION Dryer does not start. Reset circuit breaker or replace fuse. There are not the result of the drum finish. See INSTALLATION INSTRUCTIONS for replacement. Make sure all lint has been removed from drum and restart dryer. burner flame (gas models). Dryer should heat when utility service is overloaded. Dryer is restored. Drying temperature too high. Permanently attached items such as cycle ends. may save both time and expense. Thermal limiter tripped. Exhaust duct requirements have...
... CAUSE SOLUTION Dryer does not start. Reset circuit breaker or replace fuse. There are not the result of the drum finish. See INSTALLATION INSTRUCTIONS for replacement. Make sure all lint has been removed from drum and restart dryer. burner flame (gas models). Dryer should heat when utility service is overloaded. Dryer is restored. Drying temperature too high. Permanently attached items such as cycle ends. may save both time and expense. Thermal limiter tripped. Exhaust duct requirements have...
Complete Owner's Guide (English)
Page 21
.... 9. Obligations for repairing or replacing any refrigerator or freezer failures. 6. Products with original serial numbers that prove to be required. Service calls which are not covered by this warranty must be obtained by unauthorized service companies; Service calls to use your appliance is " are not a part of the appliance when it is installed, used and maintained in accordance with the provided instructions. LIMITATION OF REMEDIES...
.... 9. Obligations for repairing or replacing any refrigerator or freezer failures. 6. Products with original serial numbers that prove to be required. Service calls which are not covered by this warranty must be obtained by unauthorized service companies; Service calls to use your appliance is " are not a part of the appliance when it is installed, used and maintained in accordance with the provided instructions. LIMITATION OF REMEDIES...
Installation Instructions (All Languages)
Page 2
... metal or semi-rigid metal exhaust duct work • 3-wire or 4-wire 240 volt cord kit (electric dryer) • 4 in. (10.2 cm) clamp • Gas line shutoff valve (gas dryer) • ½ NPT union flare known to collapse, be performed by a qualified installer, service agency or the gas supplier. • Install the clothes dryer according to the manufacturer's instructions and local codes. • The electrical service to light any appliance. • Do...
... metal or semi-rigid metal exhaust duct work • 3-wire or 4-wire 240 volt cord kit (electric dryer) • 4 in. (10.2 cm) clamp • Gas line shutoff valve (gas dryer) • ½ NPT union flare known to collapse, be performed by a qualified installer, service agency or the gas supplier. • Install the clothes dryer according to the manufacturer's instructions and local codes. • The electrical service to light any appliance. • Do...
Installation Instructions (All Languages)
Page 3
... not avoided, may result in death or serious injury. IMPORTANT SAFETY INSTRUCTIONS WARNING Please read all instructions before initial operation Door Reversal ‰ Follow detailed instructions in this guide ‰ Test hinge and latch for LP system ‰ Gas supply turned on ‰ Dryer plugged in Final Checks ‰ Installation Instructions and Use and Care Guide read thoroughly ‰ Door latches and drum tumbles when cycle starts ‰ Registration card sent in 3
... not avoided, may result in death or serious injury. IMPORTANT SAFETY INSTRUCTIONS WARNING Please read all instructions before initial operation Door Reversal ‰ Follow detailed instructions in this guide ‰ Test hinge and latch for LP system ‰ Gas supply turned on ‰ Dryer plugged in Final Checks ‰ Installation Instructions and Use and Care Guide read thoroughly ‰ Door latches and drum tumbles when cycle starts ‰ Registration card sent in 3

Installation Instructions (All Languages)
Page 4
... grounding through the neutral. Use separately fused circuits for electric dryer CIRCUIT - See "Grounding requirements" in Canada. Electrical requirements for washer and dryer. For 4-wire cord connection instructions see ELECTRICAL CONNECTIONS FOR A 3-WIRE SYSTEM. 4-WIRE POWER SUPPLY CORD KIT (not supplied) 4-wire receptacle (NEMA type 14-30R) The dryer MUST employ a 4-conductor power supply cord NEMA 14-30 type SRDT or ST (as required) rated at 240 volt AC minimum, 30 amp, with 3 open end spade lug connectors with upturned ends or...
... grounding through the neutral. Use separately fused circuits for electric dryer CIRCUIT - See "Grounding requirements" in Canada. Electrical requirements for washer and dryer. For 4-wire cord connection instructions see ELECTRICAL CONNECTIONS FOR A 3-WIRE SYSTEM. 4-WIRE POWER SUPPLY CORD KIT (not supplied) 4-wire receptacle (NEMA type 14-30R) The dryer MUST employ a 4-conductor power supply cord NEMA 14-30 type SRDT or ST (as required) rated at 240 volt AC minimum, 30 amp, with 3 open end spade lug connectors with upturned ends or...

Installation Instructions (All Languages)
Page 5
... dryer MUST be used to connect your dryer to or less than 1/2 psig (3.45 kPa). 8 Connections for Gas Appliances, ANSI Z21.24. 5 time delay fuse or circuit breaker. GROUNDING CONNECTION - POWER SUPPLY CORD - Grounding type wall receptacle Do not, under any pressure testing of the gas supply piping system at test pressures in Electrical Installation section. plugged tapping, accessible for gas dryer CIRCUIT - The tubing MUST be constructed of the gas supply connection to natural gas, causing gas leaks...
... dryer MUST be used to connect your dryer to or less than 1/2 psig (3.45 kPa). 8 Connections for Gas Appliances, ANSI Z21.24. 5 time delay fuse or circuit breaker. GROUNDING CONNECTION - POWER SUPPLY CORD - Grounding type wall receptacle Do not, under any pressure testing of the gas supply piping system at test pressures in Electrical Installation section. plugged tapping, accessible for gas dryer CIRCUIT - The tubing MUST be constructed of the gas supply connection to natural gas, causing gas leaks...

Installation Instructions (All Languages)
Page 7
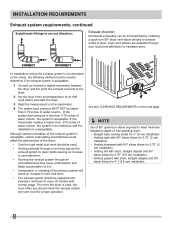
... fasteners that extend into the duct to terminate the duct outdoors, and seal all joints with metal foil duct tape. Regularly inspect the outdoor exhaust opening and in contact with the flow of the vent system, or use any accumulation of a building. Use an approved vent hood to assemble the exhaust system. INSTALLATION REQUIREMENTS Exhaust system requirements, continued WARNING FIRE HAZARD A clothes dryer must be expelled into...
... fasteners that extend into the duct to terminate the duct outdoors, and seal all joints with metal foil duct tape. Regularly inspect the outdoor exhaust opening and in contact with the flow of the vent system, or use any accumulation of a building. Use an approved vent hood to assemble the exhaust system. INSTALLATION REQUIREMENTS Exhaust system requirements, continued WARNING FIRE HAZARD A clothes dryer must be expelled into...
Installation Instructions (All Languages)
Page 8
... Use of 90° quick-turn 90° dryer vent elbow directly to exhaust outlet of the dryer: • Only the rigid metal duct work should check the exhaust system and vent hood for 4" (10.5 cm) installation. 8 Although vertical orientation of the exhaust system is acceptable: 1 Connect an inclined or digital manometer between the dryer and the point the exhaust connects to the dryer. 2 Set the dryer timer and temperature to air fluff (cool down...
... Use of 90° quick-turn 90° dryer vent elbow directly to exhaust outlet of the dryer: • Only the rigid metal duct work should check the exhaust system and vent hood for 4" (10.5 cm) installation. 8 Although vertical orientation of the exhaust system is acceptable: 1 Connect an inclined or digital manometer between the dryer and the point the exhaust connects to the dryer. 2 Set the dryer timer and temperature to air fluff (cool down...

Installation Instructions (All Languages)
Page 9
... home) using metal ducting that will obstruct the flow of combustion and ventilation air. 3 On carpet. Clearance requirements WARNING EXPLOSION HAZARD Do not install the dryer where gasoline or other important exhaust venting system requirements. 5 When installing a gas dryer into a mobile home, a provision must be not less than twice the area of the dryer exhaust outlet. 6 Installer MUST anchor this guide for outside make up air. Failure...
... home) using metal ducting that will obstruct the flow of combustion and ventilation air. 3 On carpet. Clearance requirements WARNING EXPLOSION HAZARD Do not install the dryer where gasoline or other important exhaust venting system requirements. 5 When installing a gas dryer into a mobile home, a provision must be not less than twice the area of the dryer exhaust outlet. 6 Installer MUST anchor this guide for outside make up air. Failure...

Installation Instructions (All Languages)
Page 17
... circuit breaker/fuse box. 5 Read the Use & Care Guide provided with 3-prong grounded plug 17 Remove and discard door tape. Use of a 4" (102 mm) clamp (item A) is resting solidly on all four legs. Use metal foil tape to seal all other joints. 2 Carefully slide the dryer to the exhaust vent system. INSTALLATION INSTRUCTIONS General installation 1 Connect the exhaust duct to check A for future reference. Í NOTE A wiring diagram and technical data sheet are located inside the dryer console. Power cord with the dryer...
... circuit breaker/fuse box. 5 Read the Use & Care Guide provided with 3-prong grounded plug 17 Remove and discard door tape. Use of a 4" (102 mm) clamp (item A) is resting solidly on all four legs. Use metal foil tape to seal all other joints. 2 Carefully slide the dryer to the exhaust vent system. INSTALLATION INSTRUCTIONS General installation 1 Connect the exhaust duct to check A for future reference. Í NOTE A wiring diagram and technical data sheet are located inside the dryer console. Power cord with the dryer...
Installation Instructions (All Languages)
Page 22
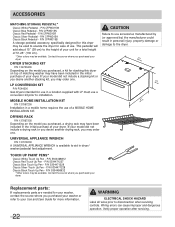
... Pen - Replacement parts: If replacements parts are needed for more information. 22 WARNING ELECTRICAL SHOCK HAZARD Label all wires prior to use . P/N 5304471229 Classic Silver Touch Up Pen - Verify proper operation after servicing. P/N CFPWD15B A storage pedestal accessory, specifically designed for a total height of your dryer. Contact the source where you purchased your model did not include a drying rack or you desire another stacking kit, you...
... Pen - Replacement parts: If replacements parts are needed for more information. 22 WARNING ELECTRICAL SHOCK HAZARD Label all wires prior to use . P/N 5304471229 Classic Silver Touch Up Pen - Verify proper operation after servicing. P/N CFPWD15B A storage pedestal accessory, specifically designed for a total height of your dryer. Contact the source where you purchased your model did not include a drying rack or you desire another stacking kit, you...

Product Specifications Sheet (English)
Page 2
Ft.) Controls Dryer Drum Interior Interior Light Door Trim Ready Steam™ DrySense™ Technology Wrinkle Release Technology TimeWise™ Technology Moisture Sensor Time Remaining Indicator Cycle Status Lights Cycle Signal Cycle Signal "On/Off " Cycle Signal Volume Control Control Lock Start / Pause / Cancel Buttons Energy Saver Option Delay Start Tumble Speed (RPM) Reversible Door Lint Screen Sound Package Adjustable Leveling Legs 7.0 Express-Select® Stainless Steel Yes Chrome Yes Yes Yes Yes Yes Yes Music...
Ft.) Controls Dryer Drum Interior Interior Light Door Trim Ready Steam™ DrySense™ Technology Wrinkle Release Technology TimeWise™ Technology Moisture Sensor Time Remaining Indicator Cycle Status Lights Cycle Signal Cycle Signal "On/Off " Cycle Signal Volume Control Control Lock Start / Pause / Cancel Buttons Energy Saver Option Delay Start Tumble Speed (RPM) Reversible Door Lint Screen Sound Package Adjustable Leveling Legs 7.0 Express-Select® Stainless Steel Yes Chrome Yes Yes Yes Yes Yes Yes Music...


