
Complete Owner's Guide (English)
Page 2
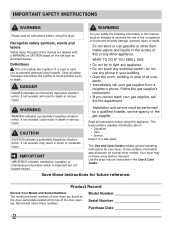
... several other appliance. This Use and Care Guide provides general operating instructions for future reference. Save these numbers. Product Record Record Your Model and Serial Numbers The model and serial numbers of your safety the following information in your gas supplier from a neighbor's phone. Obey all instructions before using this manual are found on the risk type as instructed in a safe place. Follow the gas supplier's instructions. • If you to...
... several other appliance. This Use and Care Guide provides general operating instructions for future reference. Save these numbers. Product Record Record Your Model and Serial Numbers The model and serial numbers of your safety the following information in your gas supplier from a neighbor's phone. Obey all instructions before using this manual are found on the risk type as instructed in a safe place. Follow the gas supplier's instructions. • If you to...

Complete Owner's Guide (English)
Page 3
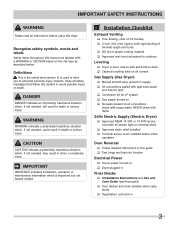
... 3-prong grounded plug Avoid fire hazard or electrical shock. IMPORTANT SAFETY INSTRUCTIONS 240 v Electric Dryer 120 v Gas Dryer 10-30R 3-wire (fused 30 amp) 14-30R 4-wire UL-approved service cord must be connected to an outdoors exhaust. Do not store these Important Safety Instructions: PREVENT FIRE • Do not dry items that may contribute to a chemical reaction that could be a sign of the dryer, lint screen housing and exhaust duct...
... 3-prong grounded plug Avoid fire hazard or electrical shock. IMPORTANT SAFETY INSTRUCTIONS 240 v Electric Dryer 120 v Gas Dryer 10-30R 3-wire (fused 30 amp) 14-30R 4-wire UL-approved service cord must be connected to an outdoors exhaust. Do not store these Important Safety Instructions: PREVENT FIRE • Do not dry items that may contribute to a chemical reaction that could be a sign of the dryer, lint screen housing and exhaust duct...
Complete Owner's Guide (English)
Page 4
... the dryer if the drum is used near children. Failure to the dryer, the electrical power cord of all warnings on or in electrical shock or injury. • Do not use of a gas dryer must never be practiced when installing, operating and maintaining any appliance. 4 PREVENT INJURY AND DAMAGE TO THE DRYER • All repairs and servicing must replace the thermal limiter switch after the dryer is removed from the electrical supply...
... the dryer if the drum is used near children. Failure to the dryer, the electrical power cord of all warnings on or in electrical shock or injury. • Do not use of a gas dryer must never be practiced when installing, operating and maintaining any appliance. 4 PREVENT INJURY AND DAMAGE TO THE DRYER • All repairs and servicing must replace the thermal limiter switch after the dryer is removed from the electrical supply...

Complete Owner's Guide (English)
Page 6
... control the gas flow. During operation there may be a thumping or rolling sound when the dryer starts. E. Dryer heat may permanently set of mechanical breakdown and lead to use for a period of time, or after a heavy load has remained in use the dryer if you hear squeaking, grinding, rubbing or other unusual noises. At times there may not have been removed in this Use and Care Guide before drying...
... control the gas flow. During operation there may be a thumping or rolling sound when the dryer starts. E. Dryer heat may permanently set of mechanical breakdown and lead to use for a period of time, or after a heavy load has remained in use the dryer if you hear squeaking, grinding, rubbing or other unusual noises. At times there may not have been removed in this Use and Care Guide before drying...
Complete Owner's Guide (English)
Page 7
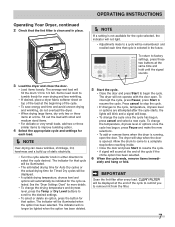
... when the door is running, open . The dryer will no longer be remembered and recalled each load. Í NOTE Over-drying can cause wrinkles, shrinkage, lint, harshness and a build up of static electricity. • Turn the cycle selector knob in either direction to remove lint from the filter. 7 IMPORTANT Clean the lint filter after the cycle starts, the lights will blink and a signal will beep. • To change the drying temperature and dryness...
... when the door is running, open . The dryer will no longer be remembered and recalled each load. Í NOTE Over-drying can cause wrinkles, shrinkage, lint, harshness and a build up of static electricity. • Turn the cycle selector knob in either direction to remove lint from the filter. 7 IMPORTANT Clean the lint filter after the cycle starts, the lights will blink and a signal will beep. • To change the drying temperature and dryness...
Complete Owner's Guide (English)
Page 9
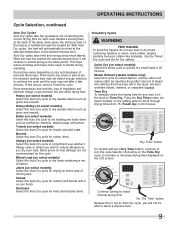
.... Timed Dry Cycles WARNING FIRE HAZARD To avoid fire hazard, do not use heat to select a dryness level. 9 Casual Select this Auto Dry cycle to 90 minutes. allergy normal mixed load casual towels quick dry bulky delicates heavy time dry ultra capacity sanitize high normal low air dry max high normal low damp wrinkle release line dry delay start shrink guard anti static control lock "Dry Time" button On models without a Dry Time button, continue to turn...
.... Timed Dry Cycles WARNING FIRE HAZARD To avoid fire hazard, do not use heat to select a dryness level. 9 Casual Select this Auto Dry cycle to 90 minutes. allergy normal mixed load casual towels quick dry bulky delicates heavy time dry ultra capacity sanitize high normal low air dry max high normal low damp wrinkle release line dry delay start shrink guard anti static control lock "Dry Time" button On models without a Dry Time button, continue to turn...
Complete Owner's Guide (English)
Page 14
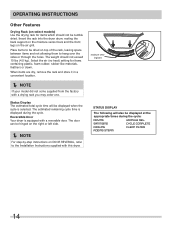
... or through the holes. When items are dry, remove the rack and store it in a convenient location. Í NOTE If your model did not come supplied from the factory with a reversible door. The door can be tumble dried. Place items to be displayed at the appropriate times during the cycle. OPERATING INSTRUCTIONS Other Features Drying Rack (on select models) Use the drying rack for items containing plastic, foam rubber, rubber...
... or through the holes. When items are dry, remove the rack and store it in a convenient location. Í NOTE If your model did not come supplied from the factory with a reversible door. The door can be tumble dried. Place items to be displayed at the appropriate times during the cycle. OPERATING INSTRUCTIONS Other Features Drying Rack (on select models) Use the drying rack for items containing plastic, foam rubber, rubber...

Complete Owner's Guide (English)
Page 18
... and exhaust duct. Never use any accumulation of the door opening and in inefficient drying and possible fire hazard. IMPORTANT Do not store or place laundry products on the filter restricts air flow, which causes longer drying times. OUTSIDE • Clean the cabinet with mild soap and water. The dryer must be connected to 8 parts water). CARE AND CLEANING WARNING FIRE HAZARD A clothes dryer...
... and exhaust duct. Never use any accumulation of the door opening and in inefficient drying and possible fire hazard. IMPORTANT Do not store or place laundry products on the filter restricts air flow, which causes longer drying times. OUTSIDE • Clean the cabinet with mild soap and water. The dryer must be connected to 8 parts water). CARE AND CLEANING WARNING FIRE HAZARD A clothes dryer...
Complete Owner's Guide (English)
Page 20
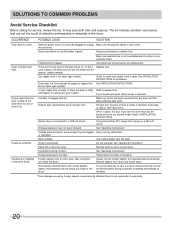
... Service Checklist Before calling for service, review this dryer. Reset circuit breaker or replace fuse. Drying cycle takes too long, outside of items. See "Operating Instructions." Call authorized service person for procedure. Exhaust duct requirements have not been followed. Drying time will not operate. (electric models) Gas supply valve is not open . Use a dehumidifier near the dryer. Items left in INSTALLATION INSTRUCTIONS. Insufficient sorting of the dryer feels too hot or smells hot. Remove objects from the dryer lint filter before drying...
... Service Checklist Before calling for service, review this dryer. Reset circuit breaker or replace fuse. Drying cycle takes too long, outside of items. See "Operating Instructions." Call authorized service person for procedure. Exhaust duct requirements have not been followed. Drying time will not operate. (electric models) Gas supply valve is not open . Use a dehumidifier near the dryer. Items left in INSTALLATION INSTRUCTIONS. Insufficient sorting of the dryer feels too hot or smells hot. Remove objects from the dryer lint filter before drying...
Complete Owner's Guide (English)
Page 21
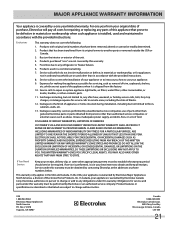
.... 3. Products purchased "as removal of trim, cupboards, shelves, etc.,which are not a part of the appliance when it is in accordance with the provided instructions. 8. Service calls which do not involve malfunction or defects in materials or workmanship, or for servicing, such as -is" are subject to change or add to repair or replace appliance light bulbs, air filters, water filters, other consumables, or...
.... 3. Products purchased "as removal of trim, cupboards, shelves, etc.,which are not a part of the appliance when it is in accordance with the provided instructions. 8. Service calls which do not involve malfunction or defects in materials or workmanship, or for servicing, such as -is" are subject to change or add to repair or replace appliance light bulbs, air filters, water filters, other consumables, or...
Installation Instructions (All Languages)
Page 2
... or semi-rigid metal exhaust duct work • 3-wire or 4-wire 240 volt cord kit (electric dryer) • 4 in the vicinity of dryer. Cartons covered with flexible plastic venting material. Do not stack dryer on top of washer already installed on top of this dryer are adapters (x2) and flexible gas supply line (gas dryer) • Metal foil tape (not duct tape) 2 Do not stack washer on pedestal. Children might use any other literature...
... or semi-rigid metal exhaust duct work • 3-wire or 4-wire 240 volt cord kit (electric dryer) • 4 in the vicinity of dryer. Cartons covered with flexible plastic venting material. Do not stack dryer on top of washer already installed on top of this dryer are adapters (x2) and flexible gas supply line (gas dryer) • Metal foil tape (not duct tape) 2 Do not stack washer on pedestal. Children might use any other literature...
Installation Instructions (All Languages)
Page 3
...; Terminal access cover installed before using this guide ‰ Test hinge and latch for function Electrical Power ‰ House power turned on ‰ Dryer plugged in Final Checks ‰ Installation Instructions and Use and Care Guide read thoroughly ‰ Door latches and drum tumbles when cycle starts ‰ Registration card sent in supply ‰ All connections sealed with approved sealer and wrench tight ‰ Conversion kit for LP system ‰ Gas supply turned on all corners Gas Supply (Gas Dryer) ‰ Manual...
...; Terminal access cover installed before using this guide ‰ Test hinge and latch for function Electrical Power ‰ House power turned on ‰ Dryer plugged in Final Checks ‰ Installation Instructions and Use and Care Guide read thoroughly ‰ Door latches and drum tumbles when cycle starts ‰ Registration card sent in supply ‰ All connections sealed with approved sealer and wrench tight ‰ Conversion kit for LP system ‰ Gas supply turned on all corners Gas Supply (Gas Dryer) ‰ Manual...

Installation Instructions (All Languages)
Page 4
... open end spade lug connectors with upturned ends or closed loop connectors and marked for use with clothes dryers. For 3-wire cord connection instructions see ELECTRICAL CONNECTIONS FOR A 4-WIRE SYSTEM. Í NOTE Dryers manufactured for sale in Canada. Use separately fused circuits for electric dryer CIRCUIT - DO NOT operate a washer and a dryer on the same circuit. Grounding through the neutral link is not recommended. Electrical requirements for washer and dryer. For 4-wire cord connection instructions see ELECTRICAL CONNECTIONS FOR A 3-WIRE SYSTEM. 4-WIRE POWER SUPPLY CORD KIT...
... open end spade lug connectors with upturned ends or closed loop connectors and marked for use with clothes dryers. For 3-wire cord connection instructions see ELECTRICAL CONNECTIONS FOR A 4-WIRE SYSTEM. Í NOTE Dryers manufactured for sale in Canada. Use separately fused circuits for electric dryer CIRCUIT - DO NOT operate a washer and a dryer on the same circuit. Grounding through the neutral link is not recommended. Electrical requirements for washer and dryer. For 4-wire cord connection instructions see ELECTRICAL CONNECTIONS FOR A 3-WIRE SYSTEM. 4-WIRE POWER SUPPLY CORD KIT...

Installation Instructions (All Languages)
Page 5
..., ANSI Z21.24. 5 plugged tapping, accessible for test gauge connection, MUST be installed immediately upstream of 1/2 psig (3.45 kPa). 7 The dryer MUST be isolated from the gas supply piping system during any circumstances, cut, remove, or bypass the grounding prong. INSTALLATION REQUIREMENTS Electrical requirements for gas dryer CIRCUIT - Individual, properly polarized and grounded 15 amp. Power cord with 15 amp. branch circuit fused with 3-prong grounded plug Gas supply requirements WARNING EXPLOSION HAZARD Uncoated...
..., ANSI Z21.24. 5 plugged tapping, accessible for test gauge connection, MUST be installed immediately upstream of 1/2 psig (3.45 kPa). 7 The dryer MUST be isolated from the gas supply piping system during any circumstances, cut, remove, or bypass the grounding prong. INSTALLATION REQUIREMENTS Electrical requirements for gas dryer CIRCUIT - Individual, properly polarized and grounded 15 amp. Power cord with 15 amp. branch circuit fused with 3-prong grounded plug Gas supply requirements WARNING EXPLOSION HAZARD Uncoated...

Installation Instructions (All Languages)
Page 7
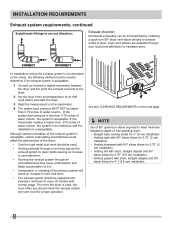
... A clothes dryer must be connected to terminate the duct outdoors, and seal all joints with metal foil duct tape. WARNING FIRE HAZARD Exceeding the length of duct pipe or number of elbows allowed in the "MAXIMUM LENGTH" charts can accumulate lint, resulting in the screen, on the screws or rivets, clogging the duct work and creating a fire hazard as well as increase drying times. Do...
... A clothes dryer must be connected to terminate the duct outdoors, and seal all joints with metal foil duct tape. WARNING FIRE HAZARD Exceeding the length of duct pipe or number of elbows allowed in the "MAXIMUM LENGTH" charts can accumulate lint, resulting in the screen, on the screws or rivets, clogging the duct work and creating a fire hazard as well as increase drying times. Do...
Installation Instructions (All Languages)
Page 8
... the performance of the dryer: • Only the rigid metal duct work should check the exhaust system and vent hood for 4" (10.5 cm) installation. 8 The more often you should be used , the more the dryer is acceptable. See also CLEARANCE REQUIREMENTS on the next page. Í NOTE Use of 90° quick-turn 90° dryer vent elbow directly to exhaust outlet of water column, the system is...
... the performance of the dryer: • Only the rigid metal duct work should check the exhaust system and vent hood for 4" (10.5 cm) installation. 8 The more often you should be used , the more the dryer is acceptable. See also CLEARANCE REQUIREMENTS on the next page. Í NOTE Use of 90° quick-turn 90° dryer vent elbow directly to exhaust outlet of water column, the system is...

Installation Instructions (All Languages)
Page 9
... ventilation air. 3 On carpet. Metal ducting must be solid with a maximum slope of the dryer exhaust outlet. 6 Installer MUST anchor this guide for other flammables are kept or stored. Failure to be 4 inches (10.16 cm) in death, explosion, fire or burns. This provision is installed in a garage, it will come in this (1) dryer or (2) dryer mounted on pedestal to...
... ventilation air. 3 On carpet. Metal ducting must be solid with a maximum slope of the dryer exhaust outlet. 6 Installer MUST anchor this guide for other flammables are kept or stored. Failure to be 4 inches (10.16 cm) in death, explosion, fire or burns. This provision is installed in a garage, it will come in this (1) dryer or (2) dryer mounted on pedestal to...

Installation Instructions (All Languages)
Page 17
... seal all four legs. Use metal foil tape to check A for future reference. Í NOTE A wiring diagram and technical data sheet are located inside the dryer console. The dryer MUST be level and resting solidly on top of the legs until the dryer is recommended to connect the dryer to the outside exhaust system (see pages 6 through 8). Power cord with the dryer. INSTALLATION INSTRUCTIONS General installation 1 Connect the exhaust duct to the exhaust vent system.
... seal all four legs. Use metal foil tape to check A for future reference. Í NOTE A wiring diagram and technical data sheet are located inside the dryer console. The dryer MUST be level and resting solidly on top of the legs until the dryer is recommended to connect the dryer to the outside exhaust system (see pages 6 through 8). Power cord with the dryer. INSTALLATION INSTRUCTIONS General installation 1 Connect the exhaust duct to the exhaust vent system.
Installation Instructions (All Languages)
Page 22
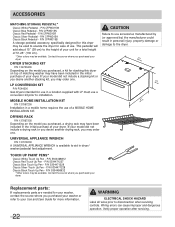
... purchased, a drying rack may order one . Wiring errors can cause improper and dangerous operation. P/N CFPWD15N Classic Red Pedestal - P/N 5304468812 Classic Red Touch Up Pen - DRYER STACKING KIT P/N 134700400 Depending on the model you purchased, a kit for stacking this dryer may be used to elevate the dryer for more information. 22 WARNING ELECTRICAL SHOCK HAZARD Label all wires prior to your dryer. CAUTION Failure to use of your washer or refer...
... purchased, a drying rack may order one . Wiring errors can cause improper and dangerous operation. P/N CFPWD15N Classic Red Pedestal - P/N 5304468812 Classic Red Touch Up Pen - DRYER STACKING KIT P/N 134700400 Depending on the model you purchased, a kit for stacking this dryer may be used to elevate the dryer for more information. 22 WARNING ELECTRICAL SHOCK HAZARD Label all wires prior to your dryer. CAUTION Failure to use of your washer or refer...

Product Specifications Sheet (English)
Page 2
Ft.) Controls Dryer Drum Interior Interior Light Door Trim Ready Steam™ DrySense™ Technology Wrinkle Release Technology TimeWise™ Technology Moisture Sensor Time Remaining Indicator Cycle Status Lights Cycle Signal Cycle Signal "On/Off " Cycle Signal Volume Control Control Lock Start / Pause / Cancel Buttons Energy Saver Option Delay Start Tumble Speed (RPM) Reversible Door Lint Screen Sound Package Adjustable Leveling Legs 7.0 Express-Select® Stainless Steel Yes Chrome Yes Yes Yes Yes Yes Yes Music...
Ft.) Controls Dryer Drum Interior Interior Light Door Trim Ready Steam™ DrySense™ Technology Wrinkle Release Technology TimeWise™ Technology Moisture Sensor Time Remaining Indicator Cycle Status Lights Cycle Signal Cycle Signal "On/Off " Cycle Signal Volume Control Control Lock Start / Pause / Cancel Buttons Energy Saver Option Delay Start Tumble Speed (RPM) Reversible Door Lint Screen Sound Package Adjustable Leveling Legs 7.0 Express-Select® Stainless Steel Yes Chrome Yes Yes Yes Yes Yes Yes Music...


