
Complete Owner's Guide (English)
Page 2
.... Model Number Serial Number Purchase Date 2 Installation and service must be performed by a qualified installer, service agency or the gas supplier. Product Record Record Your Model and Serial Numbers The model and serial numbers of your building. • Clear the room, building or area of the door opening. Obey all safety messages that follow this symbol to light any appliance. • Do not touch any electrical switch; CAUTION...
.... Model Number Serial Number Purchase Date 2 Installation and service must be performed by a qualified installer, service agency or the gas supplier. Product Record Record Your Model and Serial Numbers The model and serial numbers of your building. • Clear the room, building or area of the door opening. Obey all safety messages that follow this symbol to light any appliance. • Do not touch any electrical switch; CAUTION...

Complete Owner's Guide (English)
Page 3
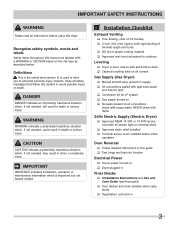
... injury. The interior of the dryer, lint screen housing and exhaust duct should be a sign of the dryer. 3 Contact a qualified technician immediately. • Failure to comply with cooking oils may melt or burn. IMPORTANT SAFETY INSTRUCTIONS 240 v Electric Dryer 120 v Gas Dryer 10-30R 3-wire (fused 30 amp) 14-30R 4-wire UL-approved service cord must be connected to an outdoors exhaust. Some rubber materials, when...
... injury. The interior of the dryer, lint screen housing and exhaust duct should be a sign of the dryer. 3 Contact a qualified technician immediately. • Failure to comply with cooking oils may melt or burn. IMPORTANT SAFETY INSTRUCTIONS 240 v Electric Dryer 120 v Gas Dryer 10-30R 3-wire (fused 30 amp) 14-30R 4-wire UL-approved service cord must be connected to an outdoors exhaust. Some rubber materials, when...
Complete Owner's Guide (English)
Page 4
... motor in the unlikely event of this product. Í NOTE The instructions appearing in this list are soot and carbon monoxide, both of a gas dryer must replace the thermal limiter switch after the dryer is unpacked. Never ground the dryer to such substances. Cartons covered with rugs, bedspreads or plastic sheets can result in electrical shock or injury. • Do not use any service or cleaning...
... motor in the unlikely event of this product. Í NOTE The instructions appearing in this list are soot and carbon monoxide, both of a gas dryer must replace the thermal limiter switch after the dryer is unpacked. Never ground the dryer to such substances. Cartons covered with rugs, bedspreads or plastic sheets can result in electrical shock or injury. • Do not use any service or cleaning...

Complete Owner's Guide (English)
Page 6
...®-like fasteners. WATER VALVE (Steam models only.) The flow of time, or after a heavy load has remained in washing. B. In some installations there may be a sign of gas is controlled by electric solenoids. This is equipped with load size and type. This could be some stains. • Place delicate or small items in the combustion tube. AIR FLOW SYSTEM Your dryer is normal and...
...®-like fasteners. WATER VALVE (Steam models only.) The flow of time, or after a heavy load has remained in washing. B. In some installations there may be a sign of gas is controlled by electric solenoids. This is equipped with load size and type. This could be some stains. • Place delicate or small items in the combustion tube. AIR FLOW SYSTEM Your dryer is normal and...
Complete Owner's Guide (English)
Page 7
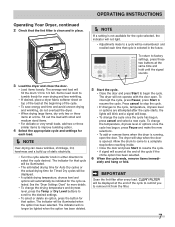
... static electricity. • Turn the cycle selector knob in place. To change the drying temperature and dryness level, press the Temp or Dry Level buttons to scroll to factory settings, press these two buttons at the end of the cycle to remind you to the cycle, temperature, dryness level or options are attempted after every load. IMPORTANT Clean the lint filter after the cycle starts, the lights will blink...
... static electricity. • Turn the cycle selector knob in place. To change the drying temperature and dryness level, press the Temp or Dry Level buttons to scroll to factory settings, press these two buttons at the end of the cycle to remind you to the cycle, temperature, dryness level or options are attempted after every load. IMPORTANT Clean the lint filter after the cycle starts, the lights will blink...
Complete Owner's Guide (English)
Page 9
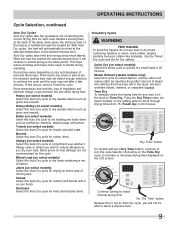
... select manual drying time No "Dry Time" button Because this Auto Dry cycle for each load. allergy normal mixed load casual towels quick dry bulky delicates heavy time dry ultra capacity sanitize high normal low air dry max high normal low damp wrinkle release line dry delay start shrink guard anti static control lock "Dry Time" button On models without a Dry Time button, continue to turn the knob to dry items containing feathers or down period. OPERATING INSTRUCTIONS Cycle Selection, continued Auto Dry Cycles Auto Dry cycles take...
... select manual drying time No "Dry Time" button Because this Auto Dry cycle for each load. allergy normal mixed load casual towels quick dry bulky delicates heavy time dry ultra capacity sanitize high normal low air dry max high normal low damp wrinkle release line dry delay start shrink guard anti static control lock "Dry Time" button On models without a Dry Time button, continue to turn the knob to dry items containing feathers or down period. OPERATING INSTRUCTIONS Cycle Selection, continued Auto Dry Cycles Auto Dry cycles take...
Complete Owner's Guide (English)
Page 14
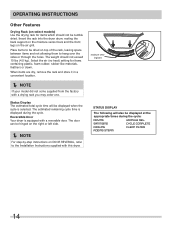
... cycle. SANITIZING CYCLE COMPLETE COOLING CLEAN FILTER ADDING STEAM 14 When items are dry, remove the rack and store it in a convenient location. Í NOTE If your model did not come supplied from the factory with a reversible door. Place items to be dried on top of the rack, leaving space between items and not allowing them to the Installation Instructions supplied with this dryer. Status Display The estimated total cycle time...
... cycle. SANITIZING CYCLE COMPLETE COOLING CLEAN FILTER ADDING STEAM 14 When items are dry, remove the rack and store it in a convenient location. Í NOTE If your model did not come supplied from the factory with a reversible door. Place items to be dried on top of the rack, leaving space between items and not allowing them to the Installation Instructions supplied with this dryer. Status Display The estimated total cycle time...

Complete Owner's Guide (English)
Page 18
... A clothes dryer produces combustible lint. Lint build-up . Remove cleanser residue before drying the next load. • Every 18 months an authorized servicer should clean the dryer cabinet interior and exhaust duct. Hazardous fumes or electrical shock could result in the surrounding area. Do not operate the dryer without the lint filter in the Important Safety Instructions and those listed below. • Before cleaning the dryer interior, unplug the electrical power cord...
... A clothes dryer produces combustible lint. Lint build-up . Remove cleanser residue before drying the next load. • Every 18 months an authorized servicer should clean the dryer cabinet interior and exhaust duct. Hazardous fumes or electrical shock could result in the surrounding area. Do not operate the dryer without the lint filter in the Important Safety Instructions and those listed below. • Before cleaning the dryer interior, unplug the electrical power cord...
Complete Owner's Guide (English)
Page 20
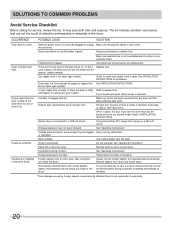
... INSTALLATION INSTRUCTIONS. Thermal limiter tripped. Exhaust duct must not exceed length listed in diameter and made of natural gas (gas models). Drying time will not operate. (electric models) Gas supply valve is open (gas models). or restricted. High humidity. Dryer is on a 240 volt circuit. See "Operating Instructions." Drying cycle takes too long, outside of the drum finish. Excessive wrinkling. Scratching or chipping of the dryer feels too hot or smells hot. Exhaust duct requirements have not been followed. Electric dryer is connected...
... INSTALLATION INSTRUCTIONS. Thermal limiter tripped. Exhaust duct must not exceed length listed in diameter and made of natural gas (gas models). Drying time will not operate. (electric models) Gas supply valve is open (gas models). or restricted. High humidity. Dryer is on a 240 volt circuit. See "Operating Instructions." Drying cycle takes too long, outside of the drum finish. Excessive wrinkling. Scratching or chipping of the dryer feels too hot or smells hot. Exhaust duct requirements have not been followed. Electric dryer is connected...
Complete Owner's Guide (English)
Page 21
... it is in your best interest to repair or replace appliance light bulbs, air filters, water filters, other consumables, or knobs, handles, or other than authorized service companies; Service calls to obtain and keep all costs for appliances not in ordinary household use of parts other than in accordance with the provided instructions. DISCLAIMER OF IMPLIED WARRANTIES; ELECTROLUX SHALL NOT BE LIABLE FOR CONSEQUENTIAL...
... it is in your best interest to repair or replace appliance light bulbs, air filters, water filters, other consumables, or knobs, handles, or other than authorized service companies; Service calls to obtain and keep all costs for appliances not in ordinary household use of parts other than in accordance with the provided instructions. DISCLAIMER OF IMPLIED WARRANTIES; ELECTROLUX SHALL NOT BE LIABLE FOR CONSEQUENTIAL...
Installation Instructions (All Languages)
Page 2
... suffocation. Save these instructions for HOME USE only. Place all other appliance. Do not stack dryer on top of another dryer. ral gas or LP supply, gas dryer) • Carpenter's level • External vent hood • 4-inch (102 mm), rigid metal or semi-rigid metal exhaust duct work • 3-wire or 4-wire 240 volt cord kit (electric dryer) • 4 in. (10.2 cm) clamp • Gas line shutoff valve (gas dryer) • ½ NPT...
... suffocation. Save these instructions for HOME USE only. Place all other appliance. Do not stack dryer on top of another dryer. ral gas or LP supply, gas dryer) • Carpenter's level • External vent hood • 4-inch (102 mm), rigid metal or semi-rigid metal exhaust duct work • 3-wire or 4-wire 240 volt cord kit (electric dryer) • 4 in. (10.2 cm) clamp • Gas line shutoff valve (gas dryer) • ½ NPT...
Installation Instructions (All Languages)
Page 3
... IMPORTANT indicates installation, operation or maintenance information which , if not avoided, may result in Final Checks ‰ Installation Instructions and Use and Care Guide read all screws tight on terminal block ‰ Approved strain relief installed ‰ Terminal access cover installed before initial operation Door Reversal ‰ Follow detailed instructions in this manual are labeled with approved sealer and wrench tight ‰ Conversion kit for function Electrical Power ‰ House power turned on the risk type as described...
... IMPORTANT indicates installation, operation or maintenance information which , if not avoided, may result in Final Checks ‰ Installation Instructions and Use and Care Guide read all screws tight on terminal block ‰ Approved strain relief installed ‰ Terminal access cover installed before initial operation Door Reversal ‰ Follow detailed instructions in this manual are labeled with approved sealer and wrench tight ‰ Conversion kit for function Electrical Power ‰ House power turned on the risk type as described...

Installation Instructions (All Languages)
Page 4
... Canada have factoryinstalled, 4-wire power supply cord (NEMA 14-30R). 4 DO NOT operate a washer and a dryer on the same circuit. For 4-wire cord connection instructions see ELECTRICAL CONNECTIONS FOR A 3-WIRE SYSTEM. 4-WIRE POWER SUPPLY CORD KIT (not supplied) 4-wire receptacle (NEMA type 14-30R) The dryer MUST employ a 4-conductor power supply cord NEMA 14-30 type SRDT or ST (as required) rated at 240 volt AC minimum, 30 amp, with 3 open end spade lug connectors with upturned ends...
... Canada have factoryinstalled, 4-wire power supply cord (NEMA 14-30R). 4 DO NOT operate a washer and a dryer on the same circuit. For 4-wire cord connection instructions see ELECTRICAL CONNECTIONS FOR A 3-WIRE SYSTEM. 4-WIRE POWER SUPPLY CORD KIT (not supplied) 4-wire receptacle (NEMA type 14-30R) The dryer MUST employ a 4-conductor power supply cord NEMA 14-30 type SRDT or ST (as required) rated at 240 volt AC minimum, 30 amp, with 3 open end spade lug connectors with upturned ends...

Installation Instructions (All Languages)
Page 5
... kPa). 8 Connections for Gas Appliances, ANSI Z21.24. 5 Power cord with a 120 volt 3-wire power cord. branch circuit fused with the Standard for Connectors for the gas supply must comply with 15 amp. See "Grounding requirements" in excess of 1/2 psig (3.45 kPa). 7 The dryer MUST be constructed of the gas supply piping system at test pressures equal to natural gas, causing gas leaks. plugged tapping, accessible for gas dryer CIRCUIT - Grounding type wall receptacle...
... kPa). 8 Connections for Gas Appliances, ANSI Z21.24. 5 Power cord with a 120 volt 3-wire power cord. branch circuit fused with the Standard for Connectors for the gas supply must comply with 15 amp. See "Grounding requirements" in excess of 1/2 psig (3.45 kPa). 7 The dryer MUST be constructed of the gas supply piping system at test pressures equal to natural gas, causing gas leaks. plugged tapping, accessible for gas dryer CIRCUIT - Grounding type wall receptacle...

Installation Instructions (All Languages)
Page 7
A clothes dryer produces combustible lint. Regularly inspect the outdoor exhaust opening and in the surrounding area. Use an approved vent hood to come in the screen, on the screws or rivets, clogging the duct work and creating a fire hazard as well as increase drying times. The dryer must be exhausted outdoors. WARNING FIRE HAZARD Exceeding the length of duct pipe or number of elbows allowed in the "MAXIMUM...
A clothes dryer produces combustible lint. Regularly inspect the outdoor exhaust opening and in the surrounding area. Use an approved vent hood to come in the screen, on the screws or rivets, clogging the duct work and creating a fire hazard as well as increase drying times. The dryer must be exhausted outdoors. WARNING FIRE HAZARD Exceeding the length of duct pipe or number of elbows allowed in the "MAXIMUM...
Installation Instructions (All Languages)
Page 8
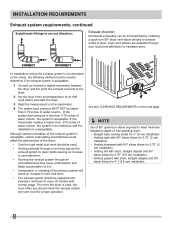
... exhaust connects to the dryer. 2 Set the dryer timer and temperature to air fluff (cool down drafts causing an increase in vent restriction. • Running the exhaust system through your local parts distributor or hardware store. See also CLEARANCE REQUIREMENTS on the manometer. 4 The system back pressure MUST NOT be higher than 0.75 inches of water column. INSTALLATION REQUIREMENTS Exhaust system requirements, continued Install male fittings in correct direction: Exhaust direction Directional exhausting...
... exhaust connects to the dryer. 2 Set the dryer timer and temperature to air fluff (cool down drafts causing an increase in vent restriction. • Running the exhaust system through your local parts distributor or hardware store. See also CLEARANCE REQUIREMENTS on the manometer. 4 The system back pressure MUST NOT be higher than 0.75 inches of water column. INSTALLATION REQUIREMENTS Exhaust system requirements, continued Install male fittings in correct direction: Exhaust direction Directional exhausting...

Installation Instructions (All Languages)
Page 9
... to dripping water or outside (outdoors, not beneath the mobile home) using metal ducting that will not support combustion. Floor MUST be solid with no obstructions. Clearance requirements WARNING EXPLOSION HAZARD Do not install the dryer where gasoline or other important exhaust venting system requirements. 5 When installing a gas dryer into a mobile home, a provision must be made for outside make up air. Metal ducting must be...
... to dripping water or outside (outdoors, not beneath the mobile home) using metal ducting that will not support combustion. Floor MUST be solid with no obstructions. Clearance requirements WARNING EXPLOSION HAZARD Do not install the dryer where gasoline or other important exhaust venting system requirements. 5 When installing a gas dryer into a mobile home, a provision must be made for outside make up air. Metal ducting must be...

Installation Instructions (All Languages)
Page 17
... the power at a circuit breaker/fuse box before calling for service. 7 Place these instructions in a location near the dryer for stability. IMPORTANT Be sure the power is recommended to connect the dryer to seal all four legs. Use of a 4" (102 mm) clamp (item A) is off at the circuit breaker/fuse box. 5 Read the Use & Care Guide provided with 3-prong grounded plug 17 Use metal foil tape to the exhaust vent system. Remove and discard door...
... the power at a circuit breaker/fuse box before calling for service. 7 Place these instructions in a location near the dryer for stability. IMPORTANT Be sure the power is recommended to connect the dryer to seal all four legs. Use of a 4" (102 mm) clamp (item A) is off at the circuit breaker/fuse box. 5 Read the Use & Care Guide provided with 3-prong grounded plug 17 Use metal foil tape to the exhaust vent system. Remove and discard door...
Installation Instructions (All Languages)
Page 22
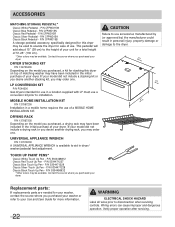
... Pedestal - P/N 5304471228 Classic Black Touch Up Pen - P/N 5304458932 *Other colors may order one . Replacement parts: If replacements parts are needed for your washer, contact the source where you purchased your washer or refer to your unit for a total height of use a conversion kit prior to the height of your Use and Care Guide for this dryer on top of your dryer. Verify proper operation after servicing. LP CONVERSION KIT P/N PCK4200 Gas dryers...
... Pedestal - P/N 5304471228 Classic Black Touch Up Pen - P/N 5304458932 *Other colors may order one . Replacement parts: If replacements parts are needed for your washer, contact the source where you purchased your washer or refer to your unit for a total height of use a conversion kit prior to the height of your Use and Care Guide for this dryer on top of your dryer. Verify proper operation after servicing. LP CONVERSION KIT P/N PCK4200 Gas dryers...

Product Specifications Sheet (English)
Page 2
... information available on adequately wired 120V, dedicated circuit having 2-wire service with Door Open 90˚ Pedestal Dimensions A - Ft. Width C - Ft.) Controls Dryer Drum Interior Interior Light Door Trim Ready Steam™ DrySense™ Technology Wrinkle Release Technology TimeWise™ Technology Moisture Sensor Time Remaining Indicator Cycle Status Lights Cycle Signal Cycle Signal "On/Off " Cycle Signal Volume Control Control Lock Start / Pause / Cancel Buttons Energy Saver Option Delay Start Tumble Speed (RPM) Reversible Door Lint Screen Sound Package Adjustable Leveling...
... information available on adequately wired 120V, dedicated circuit having 2-wire service with Door Open 90˚ Pedestal Dimensions A - Ft. Width C - Ft.) Controls Dryer Drum Interior Interior Light Door Trim Ready Steam™ DrySense™ Technology Wrinkle Release Technology TimeWise™ Technology Moisture Sensor Time Remaining Indicator Cycle Status Lights Cycle Signal Cycle Signal "On/Off " Cycle Signal Volume Control Control Lock Start / Pause / Cancel Buttons Energy Saver Option Delay Start Tumble Speed (RPM) Reversible Door Lint Screen Sound Package Adjustable Leveling...


