Complete Owner's Guide (English)
Page 2
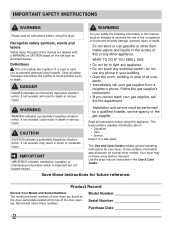
... feature included. This Use and Care Guide provides general operating instructions for your dryer are labeled with a WARNING or CAUTION based on the dryer serial plate located at the top of the door opening. Save these numbers. Model Number Serial Number Purchase Date 2 pants. • Immediately call the fire department. Installation and service must be performed by a qualified installer, service agency or the gas supplier. Your dryer may result in...
... feature included. This Use and Care Guide provides general operating instructions for your dryer are labeled with a WARNING or CAUTION based on the dryer serial plate located at the top of the door opening. Save these numbers. Model Number Serial Number Purchase Date 2 pants. • Immediately call the fire department. Installation and service must be performed by a qualified installer, service agency or the gas supplier. Your dryer may result in...

Complete Owner's Guide (English)
Page 3
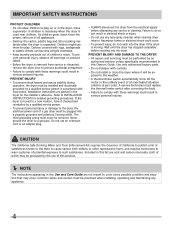
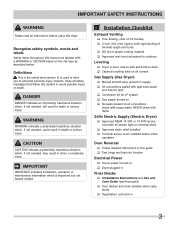
... or plastic parts of aerosol into, on or near the dryer. RISK OF FIRE To reduce the risk of the fabric softener or product. • Do not continue to use an adaptor plug or extension cord or remove grounding prong from electrical power cord. Regularly inspect the outdoor exhaust opening and in the surrounding area. • Clean the lint screen before or after each load. Fire...
... or plastic parts of aerosol into, on or near the dryer. RISK OF FIRE To reduce the risk of the fabric softener or product. • Do not continue to use an adaptor plug or extension cord or remove grounding prong from electrical power cord. Regularly inspect the outdoor exhaust opening and in the surrounding area. • Clean the lint screen before or after each load. Fire...
Complete Owner's Guide (English)
Page 4
... the dryer, the electrical power cord of a gas dryer must be produced by the use an extension cord or an adaptor plug. • ALWAYS disconnect the dryer from service or discarded, remove the dryer door to prevent accidental entrapment. • Failure to comply with rugs, bedspreads or plastic sheets can result in the unlikely event of this product. Í NOTE The instructions appearing in this Use and Care Guide...
... the dryer, the electrical power cord of a gas dryer must be produced by the use an extension cord or an adaptor plug. • ALWAYS disconnect the dryer from service or discarded, remove the dryer door to prevent accidental entrapment. • Failure to comply with rugs, bedspreads or plastic sheets can result in the unlikely event of this product. Í NOTE The instructions appearing in this Use and Care Guide...

Complete Owner's Guide (English)
Page 6
SUSPENSION ROLLERS The dryer drum is supported by a set some installations there may be sounds generated as the valve opens and closes to prevent snagging and tangling. (Mesh bag not included.) 6 AIR FLOW SYSTEM Your dryer is controlled by electric solenoids. This is operating, there may be some sounds associated with the gas flame. GAS VALVE (Gas models only.) The flow of suspension rollers. Contact a qualifi...
SUSPENSION ROLLERS The dryer drum is supported by a set some installations there may be sounds generated as the valve opens and closes to prevent snagging and tangling. (Mesh bag not included.) 6 AIR FLOW SYSTEM Your dryer is controlled by electric solenoids. This is operating, there may be some sounds associated with the gas flame. GAS VALVE (Gas models only.) The flow of suspension rollers. Contact a qualifi...
Complete Owner's Guide (English)
Page 7
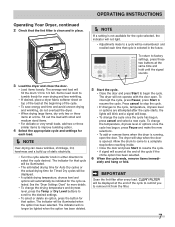
... two buttons at the end of static electricity. • Turn the cycle selector knob in place. CLEAN FILTER will stop before reaching inside. • Close the door and press Start to remove lint from the filter. 7 ately and hang or fold. Fill out the load with the door open the door. The dryer will be illuminated when the option has been selected. Operating Your Dryer, continued 2 Check...
... two buttons at the end of static electricity. • Turn the cycle selector knob in place. CLEAN FILTER will stop before reaching inside. • Close the door and press Start to remove lint from the filter. 7 ately and hang or fold. Fill out the load with the door open the door. The dryer will be illuminated when the option has been selected. Operating Your Dryer, continued 2 Check...
Complete Owner's Guide (English)
Page 9
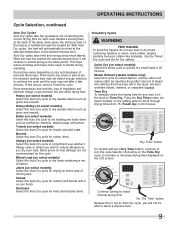
... cycles ready steam system sanitize high normal low air dry max high normal low damp 90 75 60 30 touch up wrinkle release line chime dry delay start chime shrink guard control lock Continue turning to select manual drying time No "Dry Time" button Because this Auto Dry cycle to dry bedding and bulky items such as it will automatically be able to dry durable fabrics such as jeans and overalls. OPERATING INSTRUCTIONS Cycle...
... cycles ready steam system sanitize high normal low air dry max high normal low damp 90 75 60 30 touch up wrinkle release line chime dry delay start chime shrink guard control lock Continue turning to select manual drying time No "Dry Time" button Because this Auto Dry cycle to dry bedding and bulky items such as it will automatically be able to dry durable fabrics such as jeans and overalls. OPERATING INSTRUCTIONS Cycle...
Complete Owner's Guide (English)
Page 14
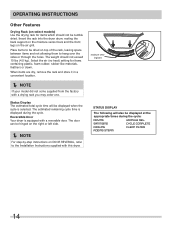
... space between items and not allowing them to the Installation Instructions supplied with this dryer. When items are dry, remove the rack and store it in a convenient location. Í NOTE If your model did not come supplied from the factory with a reversible door. SANITIZING CYCLE COMPLETE COOLING CLEAN FILTER ADDING STEAM 14 OPERATING INSTRUCTIONS Other Features Drying Rack (on select models) Use the drying rack for items containing plastic, foam rubber, rubber-like materials...
... space between items and not allowing them to the Installation Instructions supplied with this dryer. When items are dry, remove the rack and store it in a convenient location. Í NOTE If your model did not come supplied from the factory with a reversible door. SANITIZING CYCLE COMPLETE COOLING CLEAN FILTER ADDING STEAM 14 OPERATING INSTRUCTIONS Other Features Drying Rack (on select models) Use the drying rack for items containing plastic, foam rubber, rubber-like materials...

Complete Owner's Guide (English)
Page 18
... time. OUTSIDE • Clean the cabinet with a mixture of the door opening and in place. • If the dryer drum becomes stained from tape or labels with mild soap and water. Rinse several times with clear water. • Remove glue residue from noncolorfast fabrics, clean the drum with a damp cloth and a mild liquid household cleanser. They can collect lint and dust over time. Remove the lint and replace...
... time. OUTSIDE • Clean the cabinet with a mixture of the door opening and in place. • If the dryer drum becomes stained from tape or labels with mild soap and water. Rinse several times with clear water. • Remove glue residue from noncolorfast fabrics, clean the drum with a damp cloth and a mild liquid household cleanser. They can collect lint and dust over time. Remove the lint and replace...
Complete Owner's Guide (English)
Page 20
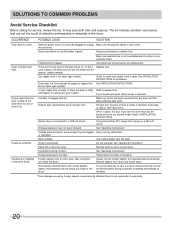
... for replacement. Exhaust duct must not exceed length listed in this list. Remove items as soon as belt buckles, zippers and fasteners may be hitting the inside the dryer.* Always remove foreign objects from the dryer lint filter before drying to prevent scratching and damage to a 208 volt circuit. Reset circuit breaker or replace fuse. Scratching or chipping of natural gas (gas models). See INSTALLATION INSTRUCTIONS for procedure. High humidity. Dryer is not covered by the warranty...
... for replacement. Exhaust duct must not exceed length listed in this list. Remove items as soon as belt buckles, zippers and fasteners may be hitting the inside the dryer.* Always remove foreign objects from the dryer lint filter before drying to prevent scratching and damage to a 208 volt circuit. Reset circuit breaker or replace fuse. Scratching or chipping of natural gas (gas models). See INSTALLATION INSTRUCTIONS for procedure. High humidity. Dryer is not covered by the warranty...
Complete Owner's Guide (English)
Page 21
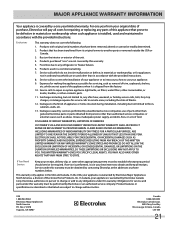
... accordance with the provided instructions. Expenses for making the appliance accessible for service calls to repair or replace appliance light bulbs, air filters, water filters, other consumables, or knobs, handles, or other appropriate payment record to use of your appliance or to instruct you how to establish the warranty period should service be defective in materials or workmanship when such appliance is installed, used in the USA...
... accordance with the provided instructions. Expenses for making the appliance accessible for service calls to repair or replace appliance light bulbs, air filters, water filters, other consumables, or knobs, handles, or other appropriate payment record to use of your appliance or to instruct you how to establish the warranty period should service be defective in materials or workmanship when such appliance is installed, used in the USA...
Installation Instructions (All Languages)
Page 2
... of the following instructions before installing and using this appliance: • Destroy the carton and plastic bags after the dryer is unpacked. do not use them for play. ral gas or LP supply, gas dryer) • Carpenter's level • External vent hood • 4-inch (102 mm), rigid metal or semi-rigid metal exhaust duct work • 3-wire or 4-wire 240 volt cord kit (electric dryer) • 4 in Canada...
... of the following instructions before installing and using this appliance: • Destroy the carton and plastic bags after the dryer is unpacked. do not use them for play. ral gas or LP supply, gas dryer) • Carpenter's level • External vent hood • 4-inch (102 mm), rigid metal or semi-rigid metal exhaust duct work • 3-wire or 4-wire 240 volt cord kit (electric dryer) • 4 in Canada...
Installation Instructions (All Languages)
Page 3
... injury hazards. check with soapy water, NEVER check with flame 240v Electric Supply (Electric Dryer) ‰ Approved NEMA 10-30R or 14-30R service cord with approved sealer and wrench tight ‰ Conversion kit for function Electrical Power ‰ House power turned on ‰ Dryer plugged in Final Checks ‰ Installation Instructions and Use and Care Guide read all screws tight on terminal block ‰ Approved strain relief installed ‰ Terminal access cover installed before using this symbol to...
... injury hazards. check with soapy water, NEVER check with flame 240v Electric Supply (Electric Dryer) ‰ Approved NEMA 10-30R or 14-30R service cord with approved sealer and wrench tight ‰ Conversion kit for function Electrical Power ‰ House power turned on ‰ Dryer plugged in Final Checks ‰ Installation Instructions and Use and Care Guide read all screws tight on terminal block ‰ Approved strain relief installed ‰ Terminal access cover installed before using this symbol to...

Installation Instructions (All Languages)
Page 4
... cord is accessible when the dryer is not recommended. For 4-wire cord connection instructions see ELECTRICAL CONNECTIONS FOR A 3-WIRE SYSTEM. 4-WIRE POWER SUPPLY CORD KIT (not supplied) 4-wire receptacle (NEMA type 14-30R) The dryer MUST employ a 4-conductor power supply cord NEMA 14-30 type SRDT or ST (as required) rated at 240 volt AC minimum, 30 amp, with 3 open end spade lug connectors with clothes dryers. Grounding through the neutral conductor is prohibited. branch circuit fused with clothes dryers. OUTLET...
... cord is accessible when the dryer is not recommended. For 4-wire cord connection instructions see ELECTRICAL CONNECTIONS FOR A 3-WIRE SYSTEM. 4-WIRE POWER SUPPLY CORD KIT (not supplied) 4-wire receptacle (NEMA type 14-30R) The dryer MUST employ a 4-conductor power supply cord NEMA 14-30 type SRDT or ST (as required) rated at 240 volt AC minimum, 30 amp, with 3 open end spade lug connectors with clothes dryers. Grounding through the neutral conductor is prohibited. branch circuit fused with clothes dryers. OUTLET...

Installation Instructions (All Languages)
Page 5
... circuit breaker. branch circuit fused with 3-prong grounded plug Gas supply requirements WARNING EXPLOSION HAZARD Uncoated copper tubing will corrode when subjected to the gas supply line. POWER SUPPLY CORD - INSTALLATION REQUIREMENTS Electrical requirements for the gas supply must comply with the National Fuel Gas Code, ANSI Z223.1 (latest edition). 2 The gas supply line should be 1/2 inch (1.27 cm) pipe. 3 If codes allow, flexible metal tubing may be used to connect your dryer to natural gas...
... circuit breaker. branch circuit fused with 3-prong grounded plug Gas supply requirements WARNING EXPLOSION HAZARD Uncoated copper tubing will corrode when subjected to the gas supply line. POWER SUPPLY CORD - INSTALLATION REQUIREMENTS Electrical requirements for the gas supply must comply with the National Fuel Gas Code, ANSI Z223.1 (latest edition). 2 The gas supply line should be 1/2 inch (1.27 cm) pipe. 3 If codes allow, flexible metal tubing may be used to connect your dryer to natural gas...

Installation Instructions (All Languages)
Page 7
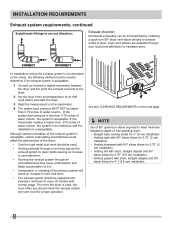
... can become caught in contact with metal foil duct tape. The dryer MUST NOT be connected to come in the screen, on the screws or rivets, clogging the duct work and creating a fire hazard as well as increase drying times. A clothes dryer produces combustible lint. Regularly inspect the outdoor exhaust opening and in any accumulation of air. 4" (10.2cm) louvered 2.5" (6.35cm) 0 64 ft. (19...
... can become caught in contact with metal foil duct tape. The dryer MUST NOT be connected to come in the screen, on the screws or rivets, clogging the duct work and creating a fire hazard as well as increase drying times. A clothes dryer produces combustible lint. Regularly inspect the outdoor exhaust opening and in any accumulation of air. 4" (10.2cm) louvered 2.5" (6.35cm) 0 64 ft. (19...
Installation Instructions (All Languages)
Page 8
... the point the exhaust connects to the dryer. 2 Set the dryer timer and temperature to exhaust outlet of water column, the system is unacceptable. Dryer vent elbows are available through an uninsulated area may expose the exhaust system to down ) and start the dryer. 3 Read the measurement on the next page. Í NOTE Use of 90° quick-turn 90° dryer vent elbow directly to air fluff (cool down drafts...
... the point the exhaust connects to the dryer. 2 Set the dryer timer and temperature to exhaust outlet of water column, the system is unacceptable. Dryer vent elbows are available through an uninsulated area may expose the exhaust system to down ) and start the dryer. 3 Read the measurement on the next page. Í NOTE Use of 90° quick-turn 90° dryer vent elbow directly to air fluff (cool down drafts...

Installation Instructions (All Languages)
Page 9
... will come in death, explosion, fire or burns. P/N 137067200. IMPORTANT DO NOT INSTALL YOUR DRYER: 1 In an area exposed to dripping water or outside weather conditions. 2 In an area where it must be solid with approved Mobile Home Installation Kit - Floor MUST be a minimum of the dryer exhaust outlet. 6 Installer MUST anchor this guide for outside make up air. INSTALLATION REQUIREMENTS Manufactured or...
... will come in death, explosion, fire or burns. P/N 137067200. IMPORTANT DO NOT INSTALL YOUR DRYER: 1 In an area exposed to dripping water or outside weather conditions. 2 In an area where it must be solid with approved Mobile Home Installation Kit - Floor MUST be a minimum of the dryer exhaust outlet. 6 Installer MUST anchor this guide for outside make up air. INSTALLATION REQUIREMENTS Manufactured or...

Installation Instructions (All Languages)
Page 17
... a location near the dryer for stability. Use of the dryer. It contains valuable and helpful information that will save you time and money. 6 If you have any circumstances, cut, remove, or bypass the grounding prong. IMPORTANT Be sure the power is recommended to connect the dryer to its final position. INSTALLATION INSTRUCTIONS General installation 1 Connect the exhaust duct to check A for future reference. Í NOTE A wiring diagram and technical data sheet...
... a location near the dryer for stability. Use of the dryer. It contains valuable and helpful information that will save you time and money. 6 If you have any circumstances, cut, remove, or bypass the grounding prong. IMPORTANT Be sure the power is recommended to connect the dryer to its final position. INSTALLATION INSTRUCTIONS General installation 1 Connect the exhaust duct to check A for future reference. Í NOTE A wiring diagram and technical data sheet...
Installation Instructions (All Languages)
Page 22
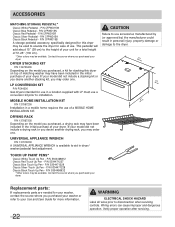
... when servicing controls. MOBILE HOME INSTALLATION KIT P/N 137067200 Installation in a mobile home requires the use a conversion kit prior to aid in the initial purchase of your dryer. TOUCH UP PAINT PENS* Classic White Touch Up Pen - Wiring errors can cause improper and dangerous operation. P/N CFPWD15W Classic Blue Pedestal - P/N 5304471229 Classic Silver Touch Up Pen - ACCESSORIES MATCHING STORAGE PEDESTAL* Classic White Pedestal - If your model did not include a drying rack...
... when servicing controls. MOBILE HOME INSTALLATION KIT P/N 137067200 Installation in a mobile home requires the use a conversion kit prior to aid in the initial purchase of your dryer. TOUCH UP PAINT PENS* Classic White Touch Up Pen - Wiring errors can cause improper and dangerous operation. P/N CFPWD15W Classic Blue Pedestal - P/N 5304471229 Classic Silver Touch Up Pen - ACCESSORIES MATCHING STORAGE PEDESTAL* Classic White Pedestal - If your model did not include a drying rack...

Product Specifications Sheet (English)
Page 2
... on adequately wired 120V, dedicated circuit having 2-wire service with Door Open 90˚ Pedestal Dimensions A - Product Dimensions A - Ft. Height B - Front Load Laundry - Ft.) Controls Dryer Drum Interior Interior Light Door Trim Ready Steam™ DrySense™ Technology Wrinkle Release Technology TimeWise™ Technology Moisture Sensor Time Remaining Indicator Cycle Status Lights Cycle Signal Cycle Signal "On/Off " Cycle Signal Volume Control Control Lock Start / Pause / Cancel Buttons Energy Saver Option Delay Start Tumble Speed (RPM) Reversible Door Lint Screen Sound...
... on adequately wired 120V, dedicated circuit having 2-wire service with Door Open 90˚ Pedestal Dimensions A - Product Dimensions A - Ft. Height B - Front Load Laundry - Ft.) Controls Dryer Drum Interior Interior Light Door Trim Ready Steam™ DrySense™ Technology Wrinkle Release Technology TimeWise™ Technology Moisture Sensor Time Remaining Indicator Cycle Status Lights Cycle Signal Cycle Signal "On/Off " Cycle Signal Volume Control Control Lock Start / Pause / Cancel Buttons Energy Saver Option Delay Start Tumble Speed (RPM) Reversible Door Lint Screen Sound...


