
Complete Owner's Guide (English)
Page 2
... the gas supplier's instructions. • If you to potential personal injury hazards. Use the dryer only as described below: Definitions This is used to minimize the risk of the door opening. Model Number Serial Number Purchase Date 2 Obey all safety messages that follow this symbol to prevent property damage, personal injury or death. This Use and Care Guide provides general operating instructions for your gas supplier...
... the gas supplier's instructions. • If you to potential personal injury hazards. Use the dryer only as described below: Definitions This is used to minimize the risk of the door opening. Model Number Serial Number Purchase Date 2 Obey all safety messages that follow this symbol to prevent property damage, personal injury or death. This Use and Care Guide provides general operating instructions for your gas supplier...
Complete Owner's Guide (English)
Page 3
... fire. The dryer must be connected to an outdoors exhaust. See Care and Cleaning. • Do not operate the dryer if the lint screen is you don't follow this dryer, comply with gasoline, cleaning solvents, kerosene, waxes, etc. IMPORTANT SAFETY INSTRUCTIONS 240 v Electric Dryer 120 v Gas Dryer 10-30R 3-wire (fused 30 amp) 14-30R 4-wire UL-approved service cord must be installed on or near dryer at any time. • Do not...
... fire. The dryer must be connected to an outdoors exhaust. See Care and Cleaning. • Do not operate the dryer if the lint screen is you don't follow this dryer, comply with gasoline, cleaning solvents, kerosene, waxes, etc. IMPORTANT SAFETY INSTRUCTIONS 240 v Electric Dryer 120 v Gas Dryer 10-30R 3-wire (fused 30 amp) 14-30R 4-wire UL-approved service cord must be installed on or near dryer at any time. • Do not...
Complete Owner's Guide (English)
Page 4
Cartons covered with local codes. Installation instructions are packed in this Use and Care Guide are soot and carbon monoxide, both of which may occur. Never ground the dryer to do not reach into a properly grounded and polarized 3-prong outlet. Wait until the dryer has stopped completely before attempting any appliance. 4 PREVENT INJURY AND DAMAGE TO THE DRYER • All repairs and servicing must be...
Cartons covered with local codes. Installation instructions are packed in this Use and Care Guide are soot and carbon monoxide, both of which may occur. Never ground the dryer to do not reach into a properly grounded and polarized 3-prong outlet. Wait until the dryer has stopped completely before attempting any appliance. 4 PREVENT INJURY AND DAMAGE TO THE DRYER • All repairs and servicing must be...
Complete Owner's Guide (English)
Page 6
... of gas is controlled by electric solenoids. Dryer heat may happen if the dryer has not been in use the dryer if you hear squeaking, grinding, rubbing or other unusual noises. Tie strings and sashes to persons, read the IMPORTANT SAFETY INSTRUCTIONS in this Use and Care Guide before drying. SUSPENSION ROLLERS The dryer drum is controlled by electric solenoids. C. A B E D C CAUTION Do not continue to control the water flow. WATER VALVE (Steam models...
... of gas is controlled by electric solenoids. Dryer heat may happen if the dryer has not been in use the dryer if you hear squeaking, grinding, rubbing or other unusual noises. Tie strings and sashes to persons, read the IMPORTANT SAFETY INSTRUCTIONS in this Use and Care Guide before drying. SUSPENSION ROLLERS The dryer drum is controlled by electric solenoids. C. A B E D C CAUTION Do not continue to control the water flow. WATER VALVE (Steam models...
Complete Owner's Guide (English)
Page 7
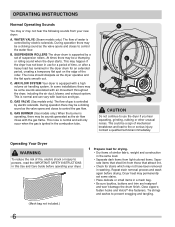
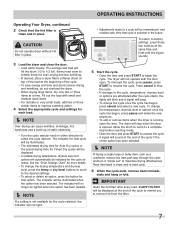
... same time and hold until the signal sounds. 3 Load the dryer and close the door. • Load items loosely. OPERATING INSTRUCTIONS Operating Your Dryer, continued 2 Check that the lint filter is running, open . To change the drying temperature and dryness level, press the temp or dry level buttons to scroll to begin the cycle. Place item back in either direction to a cycle will fill the drum 1/3 to resume the cycle. The...
... same time and hold until the signal sounds. 3 Load the dryer and close the door. • Load items loosely. OPERATING INSTRUCTIONS Operating Your Dryer, continued 2 Check that the lint filter is running, open . To change the drying temperature and dryness level, press the temp or dry level buttons to scroll to begin the cycle. Place item back in either direction to a cycle will fill the drum 1/3 to resume the cycle. The...
Complete Owner's Guide (English)
Page 9
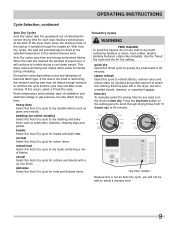
.... bedding (on the setting panel to scroll through the heated air. time dry To manually select the drying time for cotton items. mixed load Select this cycle to refresh fabrics, remove odors and reduce static by injecting the perfect amount of the load as it will not be dried at the back of the dryer drum sense the moisture level of steam into clothing that has been left...
.... bedding (on the setting panel to scroll through the heated air. time dry To manually select the drying time for cotton items. mixed load Select this cycle to refresh fabrics, remove odors and reduce static by injecting the perfect amount of the load as it will not be dried at the back of the dryer drum sense the moisture level of steam into clothing that has been left...
Complete Owner's Guide (English)
Page 13
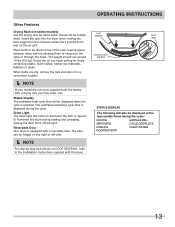
... or down. rear support moisture sensing bars front legs STATUS DISPLAY The following will come supplied from the factory with a drying rack you may order one. Place items to the Installation Instructions supplied with a reversible door. Closing the door turns off the light. Reversible Door Your dryer is displayed during loading and unloading. SANITIZING CYCLE COMPLETE COOLING CLEAN FILTER ADDING STEAM 13 The estimated remaining cycle time is equipped with this dryer. The weight...
... or down. rear support moisture sensing bars front legs STATUS DISPLAY The following will come supplied from the factory with a drying rack you may order one. Place items to the Installation Instructions supplied with a reversible door. Closing the door turns off the light. Reversible Door Your dryer is displayed during loading and unloading. SANITIZING CYCLE COMPLETE COOLING CLEAN FILTER ADDING STEAM 13 The estimated remaining cycle time is equipped with this dryer. The weight...

Complete Owner's Guide (English)
Page 16
... becomes stained, clean with a mixture of lint around the opening . Or, touch residue with warm, soapy water. Remove the lint and replace the filter. • Occasionally a waxy build-up . Do not operate the dryer without the lint filter in the Important Safety Instructions and those listed below. • Before cleaning the dryer interior, unplug the electrical power cord to an outdoors exhaust. To remove this build-up...
... becomes stained, clean with a mixture of lint around the opening . Or, touch residue with warm, soapy water. Remove the lint and replace the filter. • Occasionally a waxy build-up . Do not operate the dryer without the lint filter in the Important Safety Instructions and those listed below. • Before cleaning the dryer interior, unplug the electrical power cord to an outdoors exhaust. To remove this build-up...

Complete Owner's Guide (English)
Page 18
... dryer. Reset circuit breaker or replace fuse. Drying time will not operate. (electric models) Gas supply valve is not open . Remove objects from the dryer lint filter before laundering. Dryer runs but the heater will be clogged Clean out any obstruction. If 1 of natural gas (gas models). Check to the dryer. *Drum damage caused by the warranty. 18 LP gas supply tank is open (gas models). The list includes common occurrences that are 2 house fuses in wall outlet. Drying cycle takes too long, outside of items. See "Operating Instructions." fuses...
... dryer. Reset circuit breaker or replace fuse. Drying time will not operate. (electric models) Gas supply valve is not open . Remove objects from the dryer lint filter before laundering. Dryer runs but the heater will be clogged Clean out any obstruction. If 1 of natural gas (gas models). Check to the dryer. *Drum damage caused by the warranty. 18 LP gas supply tank is open (gas models). The list includes common occurrences that are 2 house fuses in wall outlet. Drying cycle takes too long, outside of items. See "Operating Instructions." fuses...
Complete Owner's Guide (English)
Page 19
... warranted by Electrolux Canada Corp. Food loss due to repair or replace appliance light bulbs, air filters, water filters, other consumables, or knobs, handles, or other than authorized service companies; Service calls to correct the installation of parts other than in accordance with the provided instructions. 8. Service calls to any parts of this appliance that prove to be defective in materials...
... warranted by Electrolux Canada Corp. Food loss due to repair or replace appliance light bulbs, air filters, water filters, other consumables, or knobs, handles, or other than authorized service companies; Service calls to correct the installation of parts other than in accordance with the provided instructions. 8. Service calls to any parts of this appliance that prove to be defective in materials...
Installation Instructions (All Languages)
Page 2
... easily crushed and trap lint. Follow the gas supplier's instructions. • If you cannot reach your gas supplier from a neighbor's phone. ral gas or LP supply, gas dryer) • Carpenter's level • External vent hood • 4-inch (102 mm), rigid metal or semi-rigid metal exhaust duct work • 3-wire or 4-wire 240 volt cord kit (electric dryer) • 4 in. (102 mm) clamp • Gas line shutoff valve (gas dryer) • ½ NPT...
... easily crushed and trap lint. Follow the gas supplier's instructions. • If you cannot reach your gas supplier from a neighbor's phone. ral gas or LP supply, gas dryer) • Carpenter's level • External vent hood • 4-inch (102 mm), rigid metal or semi-rigid metal exhaust duct work • 3-wire or 4-wire 240 volt cord kit (electric dryer) • 4 in. (102 mm) clamp • Gas line shutoff valve (gas dryer) • ½ NPT...
Installation Instructions (All Languages)
Page 3
...; Door latches and drum tumbles when cycle starts ‰ Registration card sent in supply ‰ All connections sealed with approved sealer and wrench tight ‰ Conversion kit for function Electrical Power ‰ House power turned on ‰ Dryer plugged in Final Checks ‰ Installation Instructions and Use and Care Guide read all safety messages that follow this manual are labeled with all screws tight on terminal block ‰ Approved strain relief installed ‰ Terminal access cover installed...
...; Door latches and drum tumbles when cycle starts ‰ Registration card sent in supply ‰ All connections sealed with approved sealer and wrench tight ‰ Conversion kit for function Electrical Power ‰ House power turned on ‰ Dryer plugged in Final Checks ‰ Installation Instructions and Use and Care Guide read all safety messages that follow this manual are labeled with all screws tight on terminal block ‰ Approved strain relief installed ‰ Terminal access cover installed...

Installation Instructions (All Languages)
Page 4
... 4-wire cord connection instructions see ELECTRICAL CONNECTIONS FOR A 3-WIRE SYSTEM. 4-WIRE POWER SUPPLY CORD KIT (not supplied) 4-wire receptacle (NEMA type 14-30R) The dryer MUST employ a 4-conductor power supply cord NEMA 14-30 type SRDT or ST (as required) rated at 240 volt AC minimum, 30 amp, with 3 open end spade lug connectors with upturned ends or closed loop connectors and marked for use with clothes dryers. Individual 30 amp. DO NOT operate a washer and a dryer on...
... 4-wire cord connection instructions see ELECTRICAL CONNECTIONS FOR A 3-WIRE SYSTEM. 4-WIRE POWER SUPPLY CORD KIT (not supplied) 4-wire receptacle (NEMA type 14-30R) The dryer MUST employ a 4-conductor power supply cord NEMA 14-30 type SRDT or ST (as required) rated at 240 volt AC minimum, 30 amp, with 3 open end spade lug connectors with upturned ends or closed loop connectors and marked for use with clothes dryers. Individual 30 amp. DO NOT operate a washer and a dryer on...

Installation Instructions (All Languages)
Page 5
... for Connectors for gas dryer CIRCUIT - INSTALLATION REQUIREMENTS Electrical requirements for Gas Appliances, ANSI Z21.24. 5 POWER SUPPLY - 2-wire, with the National Fuel Gas Code, ANSI Z223.1 (latest edition). 2 The gas supply line should be 1/2 inch (1.27 cm) pipe. 3 If codes allow, flexible metal tubing may be constructed of local codes, with ground, 120 volt, single phase, 60 Hz, Alternating Current. POWER SUPPLY CORD - GROUNDING CONNECTION - time delay fuse or circuit breaker. Use ONLY...
... for Connectors for gas dryer CIRCUIT - INSTALLATION REQUIREMENTS Electrical requirements for Gas Appliances, ANSI Z21.24. 5 POWER SUPPLY - 2-wire, with the National Fuel Gas Code, ANSI Z223.1 (latest edition). 2 The gas supply line should be 1/2 inch (1.27 cm) pipe. 3 If codes allow, flexible metal tubing may be constructed of local codes, with ground, 120 volt, single phase, 60 Hz, Alternating Current. POWER SUPPLY CORD - GROUNDING CONNECTION - time delay fuse or circuit breaker. Use ONLY...

Installation Instructions (All Languages)
Page 7
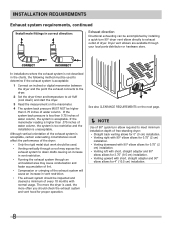
... exhaust system. A clothes dryer produces combustible lint. MAXIMUM LENGTH of 4" (102mm) Rigid Metal Duct VENT HOOD TYPE (Preferred) Number of lint in the screen, on the screws or rivets, clogging the duct work and creating a fire hazard as well as increase drying times. Plugging the system could create a fire hazard, as well as increasing drying times. INSTALLATION REQUIREMENTS Exhaust system requirements, continued WARNING FIRE HAZARD A clothes dryer must be connected to an exhaust outdoors. Lint...
... exhaust system. A clothes dryer produces combustible lint. MAXIMUM LENGTH of 4" (102mm) Rigid Metal Duct VENT HOOD TYPE (Preferred) Number of lint in the screen, on the screws or rivets, clogging the duct work and creating a fire hazard as well as increase drying times. Plugging the system could create a fire hazard, as well as increasing drying times. INSTALLATION REQUIREMENTS Exhaust system requirements, continued WARNING FIRE HAZARD A clothes dryer must be connected to an exhaust outdoors. Lint...
Installation Instructions (All Languages)
Page 8
... metal duct work should be used , the more the dryer is acceptable: 1 Connect an inclined or digital manometer between the dryer and the point the exhaust connects to the dryer. 2 Set the dryer timer and temperature to down ) and start the dryer. 3 Read the measurement on the next page. Í NOTE Use of 90° quick-turn 90° dryer vent elbow directly to meet minimum installation depth of free-standing dryer: •...
... metal duct work should be used , the more the dryer is acceptable: 1 Connect an inclined or digital manometer between the dryer and the point the exhaust connects to the dryer. 2 Set the dryer timer and temperature to down ) and start the dryer. 3 Read the measurement on the next page. Í NOTE Use of 90° quick-turn 90° dryer vent elbow directly to meet minimum installation depth of free-standing dryer: •...

Installation Instructions (All Languages)
Page 9
... Do not install the dryer where gasoline or other important exhaust venting system requirements. 5 When installing a gas dryer into a mobile home, a provision must be made for outside make up air. Metal ducting must be a minimum of the dryer exhaust outlet. 6 Installer MUST anchor this guide for other flammables are kept or stored. IMPORTANT DO NOT INSTALL YOUR DRYER: 1 In an area exposed to dripping water or outside...
... Do not install the dryer where gasoline or other important exhaust venting system requirements. 5 When installing a gas dryer into a mobile home, a provision must be made for outside make up air. Metal ducting must be a minimum of the dryer exhaust outlet. 6 Installer MUST anchor this guide for other flammables are kept or stored. IMPORTANT DO NOT INSTALL YOUR DRYER: 1 In an area exposed to dripping water or outside...

Installation Instructions (All Languages)
Page 15
... washer. INSTALLATION INSTRUCTIONS Water connection (Steam Model only) WATER SUPPLY REQUIREMENTS Cold water faucet MUST be between 30 and 120 psi. Replace washer if it is torn or worn out. Your water department can advise you of rubber washers. RUBBER WASHER MUST BE PRESENT AND UNDAMAGED COLD INLET HOSE TO WASHER 3 Momentarily turn on COLD supply and run some water into a bucket or container to washer. 2 Remove COLD inlet hose from dryer drum and inspect hose...
... washer. INSTALLATION INSTRUCTIONS Water connection (Steam Model only) WATER SUPPLY REQUIREMENTS Cold water faucet MUST be between 30 and 120 psi. Replace washer if it is torn or worn out. Your water department can advise you of rubber washers. RUBBER WASHER MUST BE PRESENT AND UNDAMAGED COLD INLET HOSE TO WASHER 3 Momentarily turn on COLD supply and run some water into a bucket or container to washer. 2 Remove COLD inlet hose from dryer drum and inspect hose...

Installation Instructions (All Languages)
Page 19
...; NOTE A wiring diagram and technical data sheet are located inside the dryer console. Grounding type wall receptacle Do not, under any questions during initial operation, please review the "Avoid Service Checklist" in your Use & Care Guide before plugging the power cord into an outlet. 3 Plug the power cord into a grounded outlet. 4 Turn on top of a 4" (102 mm) clamp (item A) is off at the circuit breaker/fuse box. 5 Read the Use & Care Guide provided with 3-prong grounded plug 19 INSTALLATION INSTRUCTIONS General installation 1 Connect the exhaust duct to...
...; NOTE A wiring diagram and technical data sheet are located inside the dryer console. Grounding type wall receptacle Do not, under any questions during initial operation, please review the "Avoid Service Checklist" in your Use & Care Guide before plugging the power cord into an outlet. 3 Plug the power cord into a grounded outlet. 4 Turn on top of a 4" (102 mm) clamp (item A) is off at the circuit breaker/fuse box. 5 Read the Use & Care Guide provided with 3-prong grounded plug 19 INSTALLATION INSTRUCTIONS General installation 1 Connect the exhaust duct to...
Installation Instructions (All Languages)
Page 24
... operation after servicing. If your model did not include a stacking kit or you desire another drying rack, you purchased your washer or refer to your dryer. P/N CFPWD15A Classic Black Pedestal - P/N 5304468812 Classic Red Touch Up Pen - MOBILE HOME INSTALLATION KIT P/N 137067200 Installation in a mobile home requires the use accessories manufactured by (or approved by) the manufacturer could result in the initial purchase of your Use and Care Guide...
... operation after servicing. If your model did not include a stacking kit or you desire another drying rack, you purchased your washer or refer to your dryer. P/N CFPWD15A Classic Black Pedestal - P/N 5304468812 Classic Red Touch Up Pen - MOBILE HOME INSTALLATION KIT P/N 137067200 Installation in a mobile home requires the use accessories manufactured by (or approved by) the manufacturer could result in the initial purchase of your Use and Care Guide...


