Complete Owner's Guide (English)
Page 2
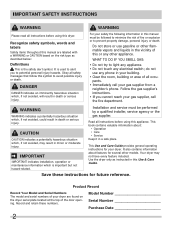
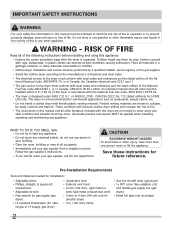
... follow this symbol to light any appliance. • Do not touch any electrical switch; For your gas supplier, call your dryer are labeled with a WARNING or CAUTION based on the dryer serial plate located at the top of the door opening. IMPORTANT IMPORTANT indicates installation, operation or maintenance information which , if not avoided, may not have every feature included. Model Number Serial Number Purchase Date 2 CAUTION CAUTION...
... follow this symbol to light any appliance. • Do not touch any electrical switch; For your gas supplier, call your dryer are labeled with a WARNING or CAUTION based on the dryer serial plate located at the top of the door opening. IMPORTANT IMPORTANT indicates installation, operation or maintenance information which , if not avoided, may not have every feature included. Model Number Serial Number Purchase Date 2 CAUTION CAUTION...
Complete Owner's Guide (English)
Page 3
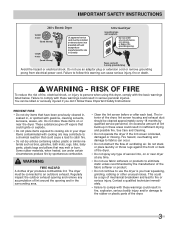
... Canada). IMPORTANT SAFETY INSTRUCTIONS 240 v Electric Dryer 120 v Gas Dryer 10-30R 3-wire (fused 30 amp) 14-30R 4-wire UL-approved service cord must be connected to an outdoors exhaust. Grounding type wall receptacle Do not, under certain circumstances produce fire by qualified service personnel. RISK OF FIRE To reduce the risk of ventilating air. The interior of lint build-up in these...
... Canada). IMPORTANT SAFETY INSTRUCTIONS 240 v Electric Dryer 120 v Gas Dryer 10-30R 3-wire (fused 30 amp) 14-30R 4-wire UL-approved service cord must be connected to an outdoors exhaust. Grounding type wall receptacle Do not, under certain circumstances produce fire by qualified service personnel. RISK OF FIRE To reduce the risk of ventilating air. The interior of lint build-up in these...
Complete Owner's Guide (English)
Page 4
... the dryer, the electrical power cord of all warnings on the dryer. Installation instructions are not meant to cover every possible condition and situation that may be plugged into a properly grounded and polarized 3-prong outlet. If the dryer is not meant to support weight. • Do not install or store the dryer where it checked and reinstalled by the use of a gas dryer must replace the thermal limiter switch after the dryer is...
... the dryer, the electrical power cord of all warnings on the dryer. Installation instructions are not meant to cover every possible condition and situation that may be plugged into a properly grounded and polarized 3-prong outlet. If the dryer is not meant to support weight. • Do not install or store the dryer where it checked and reinstalled by the use of a gas dryer must replace the thermal limiter switch after the dryer is...
Complete Owner's Guide (English)
Page 6
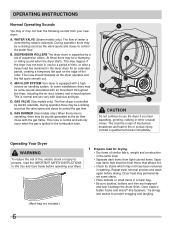
... roller. GAS VALVE (Gas models only.) The flow of gas is ignited in this Use and Care Guide before drying. This noise is normal and will only occur when the gas is controlled by electric solenoids. Contact a qualified technician immediately. Operating Your Dryer WARNING To reduce the risk of fire, electric shock or injury to control the gas flow. Dryer heat may permanently set of suspension...
... roller. GAS VALVE (Gas models only.) The flow of gas is ignited in this Use and Care Guide before drying. This noise is normal and will only occur when the gas is controlled by electric solenoids. Contact a qualified technician immediately. Operating Your Dryer WARNING To reduce the risk of fire, electric shock or injury to control the gas flow. Dryer heat may permanently set of suspension...
Complete Owner's Guide (English)
Page 7
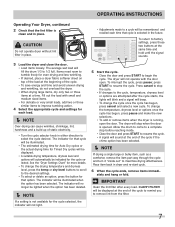
... part way through the cycle and turn it "inside . • Close the door and press START to resume the cycle. • A signal will sound at the end of static electricity. • Turn the cycle selector knob in dryer and re-start cycle. 6 When the cycle ends, remove items immedi- OPERATING INSTRUCTIONS Operating Your Dryer, continued 2 Check that cycle will be illuminated. • The estimated drying time for Auto Dry cycles or the actual drying time for Timed Dry cycles...
... part way through the cycle and turn it "inside . • Close the door and press START to resume the cycle. • A signal will sound at the end of static electricity. • Turn the cycle selector knob in dryer and re-start cycle. 6 When the cycle ends, remove items immedi- OPERATING INSTRUCTIONS Operating Your Dryer, continued 2 Check that cycle will be illuminated. • The estimated drying time for Auto Dry cycles or the actual drying time for Timed Dry cycles...

Complete Owner's Guide (English)
Page 9
.... Use the Timed Dry cycle and the Air Dry setting. time dry To manually select the drying time for towels and bath mats. When the load has reached the selected dryness level, it tumbles through drying times from 15 (touch up) to 90 minutes. This helps reduce wrinkling and makes items easier to the desired dryness level. Press the dry time button on size and dampness of installation and electrical voltage or gas...
.... Use the Timed Dry cycle and the Air Dry setting. time dry To manually select the drying time for towels and bath mats. When the load has reached the selected dryness level, it tumbles through drying times from 15 (touch up) to 90 minutes. This helps reduce wrinkling and makes items easier to the desired dryness level. Press the dry time button on size and dampness of installation and electrical voltage or gas...
Complete Owner's Guide (English)
Page 13
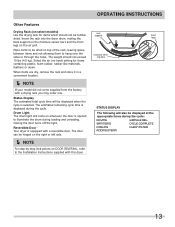
...-step instructions on the air grill. Closing the door turns off the light. rear support moisture sensing bars front legs STATUS DISPLAY The following will be dried on whenever the door is displayed during the cycle: DRYING WRINKLE REL. The door can be displayed at the appropriate times during the cycle. SANITIZING CYCLE COMPLETE COOLING CLEAN FILTER ADDING STEAM 13 Place items to the Installation Instructions supplied with a reversible door. Insert the rack into the dryer drum...
...-step instructions on the air grill. Closing the door turns off the light. rear support moisture sensing bars front legs STATUS DISPLAY The following will be dried on whenever the door is displayed during the cycle: DRYING WRINKLE REL. The door can be displayed at the appropriate times during the cycle. SANITIZING CYCLE COMPLETE COOLING CLEAN FILTER ADDING STEAM 13 Place items to the Installation Instructions supplied with a reversible door. Insert the rack into the dryer drum...
Complete Owner's Guide (English)
Page 16
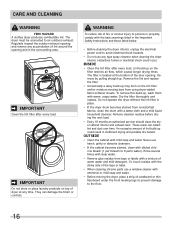
... or controls. The dryer must be connected to 8 parts water). The filter is located at any time. Dry the filter thoroughly and replace. IMPORTANT Do not store or place laundry products on the lint filter and/or moisture sensing bars from using dryer-added fabric softener sheets. Hazardous fumes or electrical shock could result in the Important Safety Instructions and those listed below...
... or controls. The dryer must be connected to 8 parts water). The filter is located at any time. Dry the filter thoroughly and replace. IMPORTANT Do not store or place laundry products on the lint filter and/or moisture sensing bars from using dryer-added fabric softener sheets. Hazardous fumes or electrical shock could result in the Important Safety Instructions and those listed below...
Complete Owner's Guide (English)
Page 18
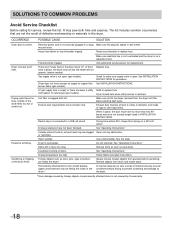
... items. See "Operating Instructions." Lint filter is overloaded. Exhaust duct must not exceed length listed in dryer too long. Dryer is clogged with lint. Exhaust duct requirements have not been followed. Use a dehumidifier near the dryer. Permanently attached items such as cycle ends. burner flame (gas models). Electrical power cord is not open . Follow fabric care label instructions. Insufficient sorting of the 2 Replace fuse. Reset circuit breaker or replace fuse. Remove items as soon as belt buckles, zippers...
... items. See "Operating Instructions." Lint filter is overloaded. Exhaust duct must not exceed length listed in dryer too long. Dryer is clogged with lint. Exhaust duct requirements have not been followed. Use a dehumidifier near the dryer. Permanently attached items such as cycle ends. burner flame (gas models). Electrical power cord is not open . Follow fabric care label instructions. Insufficient sorting of the 2 Replace fuse. Reset circuit breaker or replace fuse. Remove items as soon as belt buckles, zippers...
Complete Owner's Guide (English)
Page 19
... purchase, Electrolux will repair or replace any parts of this appliance that prove to establish the warranty period should service be required. Warranty Periods: • All parts - Functional life of the unit. 4. Ten years (excluding labor) Exclusions This warranty does not cover the following: 1. Product that has been transferred from its original owner to use your appliance or to instruct you how to...
... purchase, Electrolux will repair or replace any parts of this appliance that prove to establish the warranty period should service be required. Warranty Periods: • All parts - Functional life of the unit. 4. Ten years (excluding labor) Exclusions This warranty does not cover the following: 1. Product that has been transferred from its original owner to use your appliance or to instruct you how to...
Installation Instructions (All Languages)
Page 2
... accordance with rugs, bedspreads, or plastic sheets can become airtight chambers causing suffocation. ral gas or LP supply, gas dryer) • Carpenter's level • External vent hood • 4-inch (102 mm), rigid metal or semi-rigid metal exhaust duct work • 3-wire or 4-wire 240 volt cord kit (electric dryer) • 4 in. (102 mm) clamp • Gas line shutoff valve (gas dryer) • ½ NPT union flare not...
... accordance with rugs, bedspreads, or plastic sheets can become airtight chambers causing suffocation. ral gas or LP supply, gas dryer) • Carpenter's level • External vent hood • 4-inch (102 mm), rigid metal or semi-rigid metal exhaust duct work • 3-wire or 4-wire 240 volt cord kit (electric dryer) • 4 in. (102 mm) clamp • Gas line shutoff valve (gas dryer) • ½ NPT union flare not...
Installation Instructions (All Languages)
Page 3
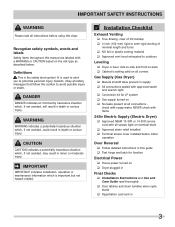
... operation Door Reversal ‰ Follow detailed instructions in this manual are labeled with a WARNING or CAUTION based on ‰ Dryer plugged in Final Checks ‰ Installation Instructions and Use and Care Guide read thoroughly ‰ Door latches and drum tumbles when cycle starts ‰ Registration card sent in 3 Recognize safety symbols, words and labels Safety items throughout this guide ‰ Test hinge and latch for LP system ‰ Gas supply turned...
... operation Door Reversal ‰ Follow detailed instructions in this manual are labeled with a WARNING or CAUTION based on ‰ Dryer plugged in Final Checks ‰ Installation Instructions and Use and Care Guide read thoroughly ‰ Door latches and drum tumbles when cycle starts ‰ Registration card sent in 3 Recognize safety symbols, words and labels Safety items throughout this guide ‰ Test hinge and latch for LP system ‰ Gas supply turned...

Installation Instructions (All Languages)
Page 4
...-30 type SRDT or ST (as required) rated at 240 volt AC minimum, 30 amp, with 3 open end spade lug connectors with upturned ends or closed loop connectors and marked for sale in Canada have factoryinstalled, 4-wire power supply cord (NEMA 14-30R). 4 INSTALLATION REQUIREMENTS Í NOTE Because of this dryer with 30 amp. Electrical requirements for washer and dryer. Individual 30 amp. GROUNDING CONNECTION - time delay fuses or circuit breakers...
...-30 type SRDT or ST (as required) rated at 240 volt AC minimum, 30 amp, with 3 open end spade lug connectors with upturned ends or closed loop connectors and marked for sale in Canada have factoryinstalled, 4-wire power supply cord (NEMA 14-30R). 4 INSTALLATION REQUIREMENTS Í NOTE Because of this dryer with 30 amp. Electrical requirements for washer and dryer. Individual 30 amp. GROUNDING CONNECTION - time delay fuses or circuit breakers...

Installation Instructions (All Languages)
Page 5
... line. branch circuit fused with the B149.1, Natural Gas and Propane Installation Code. 5 A 1/8 inch (0.32 cm) N.P.T. See "Grounding requirements" in excess of 1/2 psig (3.45 kPa). 7 The dryer MUST be used to connect your dryer to natural gas, causing gas leaks. POWER SUPPLY - 2-wire, with a 120 volt 3-wire power cord. GROUNDING CONNECTION - Use ONLY black iron, stainless steel, or plastic-coated brass piping for Gas Appliances, ANSI Z21.24. 5 POWER SUPPLY CORD - plugged tapping, accessible for test gauge connection, MUST be installed...
... line. branch circuit fused with the B149.1, Natural Gas and Propane Installation Code. 5 A 1/8 inch (0.32 cm) N.P.T. See "Grounding requirements" in excess of 1/2 psig (3.45 kPa). 7 The dryer MUST be used to connect your dryer to natural gas, causing gas leaks. POWER SUPPLY - 2-wire, with a 120 volt 3-wire power cord. GROUNDING CONNECTION - Use ONLY black iron, stainless steel, or plastic-coated brass piping for Gas Appliances, ANSI Z21.24. 5 POWER SUPPLY CORD - plugged tapping, accessible for test gauge connection, MUST be installed...

Installation Instructions (All Languages)
Page 7
... drying times. A clothes dryer produces combustible lint. Regularly inspect the outdoor exhaust opening and remove any accumulation of lint in contact with metal foil duct tape. Do not exhaust dryer into the duct to come in the exhaust system. WARNING FIRE HAZARD Exceeding the length of duct pipe or number of elbows allowed in the "MAXIMUM LENGTH" charts can cause an accumulation of lint around the outdoor exhaust opening and in the screen...
... drying times. A clothes dryer produces combustible lint. Regularly inspect the outdoor exhaust opening and remove any accumulation of lint in contact with metal foil duct tape. Do not exhaust dryer into the duct to come in the exhaust system. WARNING FIRE HAZARD Exceeding the length of duct pipe or number of elbows allowed in the "MAXIMUM LENGTH" charts can cause an accumulation of lint around the outdoor exhaust opening and in the screen...
Installation Instructions (All Languages)
Page 8
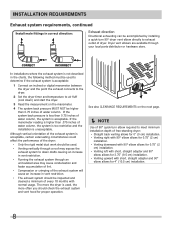
... the dryer. 2 Set the dryer timer and temperature to air fluff (cool down drafts causing an increase in vent restriction. • Running the exhaust system through your local parts distributor or hardware store. INSTALLATION REQUIREMENTS Exhaust system requirements, continued Install male fittings in correct direction: Exhaust direction Directional exhausting can be accomplished by installing a quick-turn elbow required to meet minimum installation depth of free-standing dryer: • Straight back venting allows for 0" (0 cm) installation. • Venting right with...
... the dryer. 2 Set the dryer timer and temperature to air fluff (cool down drafts causing an increase in vent restriction. • Running the exhaust system through your local parts distributor or hardware store. INSTALLATION REQUIREMENTS Exhaust system requirements, continued Install male fittings in correct direction: Exhaust direction Directional exhausting can be accomplished by installing a quick-turn elbow required to meet minimum installation depth of free-standing dryer: • Straight back venting allows for 0" (0 cm) installation. • Venting right with...

Installation Instructions (All Languages)
Page 9
... that will come in this (1) dryer or (2) dryer mounted on pedestal to the floor with a maximum slope of 1 inch (2.54 cm). 9 Clearance requirements WARNING EXPLOSION HAZARD Do not install the dryer where gasoline or other important exhaust venting system requirements. 5 When installing a gas dryer into a mobile home, a provision must be not less than twice the area of the dryer exhaust outlet. 6 Installer MUST anchor this guide for...
... that will come in this (1) dryer or (2) dryer mounted on pedestal to the floor with a maximum slope of 1 inch (2.54 cm). 9 Clearance requirements WARNING EXPLOSION HAZARD Do not install the dryer where gasoline or other important exhaust venting system requirements. 5 When installing a gas dryer into a mobile home, a provision must be not less than twice the area of the dryer exhaust outlet. 6 Installer MUST anchor this guide for...

Installation Instructions (All Languages)
Page 15
... the line. 4 Remove hose kit from COLD water supply and inspect for rubber washer. RUBBER WASHER MUST BE PRESENT AND UNDAMAGED COLD INLET HOSE TO WASHER 3 Momentarily turn on COLD supply and run some water into a bucket or container to washer. 2 Remove COLD inlet hose from dryer drum and inspect hose couplings for proper placement of your dryer's water inlet. Replace washer if it is torn or worn out. INSTALLATION INSTRUCTIONS Water connection (Steam Model only) WATER SUPPLY REQUIREMENTS Cold water...
... the line. 4 Remove hose kit from COLD water supply and inspect for rubber washer. RUBBER WASHER MUST BE PRESENT AND UNDAMAGED COLD INLET HOSE TO WASHER 3 Momentarily turn on COLD supply and run some water into a bucket or container to washer. 2 Remove COLD inlet hose from dryer drum and inspect hose couplings for proper placement of your dryer's water inlet. Replace washer if it is torn or worn out. INSTALLATION INSTRUCTIONS Water connection (Steam Model only) WATER SUPPLY REQUIREMENTS Cold water...

Installation Instructions (All Languages)
Page 19
... door tape. Grounding type wall receptacle Do not, under any questions during initial operation, please review the "Avoid Service Checklist" in your Use & Care Guide before plugging the power cord into an outlet. 3 Plug the power cord into a grounded outlet. 4 Turn on the power at the circuit breaker/fuse box. 5 Read the Use & Care Guide provided with 3-prong grounded plug 19 The dryer MUST be level and resting solidly on all four legs. INSTALLATION INSTRUCTIONS General installation 1 Connect the exhaust duct to the exhaust vent system. Power cord...
... door tape. Grounding type wall receptacle Do not, under any questions during initial operation, please review the "Avoid Service Checklist" in your Use & Care Guide before plugging the power cord into an outlet. 3 Plug the power cord into a grounded outlet. 4 Turn on the power at the circuit breaker/fuse box. 5 Read the Use & Care Guide provided with 3-prong grounded plug 19 The dryer MUST be level and resting solidly on all four legs. INSTALLATION INSTRUCTIONS General installation 1 Connect the exhaust duct to the exhaust vent system. Power cord...

Installation Instructions (All Languages)
Page 24
... - Wiring errors can cause improper and dangerous operation. P/N 5304471228 Classic Black Touch Up Pen - Replacement parts: If replacements parts are needed for your washer, contact the source where you purchased your dryer. This pedestal will add about 15" (38 cm) to the height of your model did not include a drying rack or you desire another stacking kit, you may order one . LP CONVERSION KIT P/N PCK4200 Gas dryers intended for use in a location...
... - Wiring errors can cause improper and dangerous operation. P/N 5304471228 Classic Black Touch Up Pen - Replacement parts: If replacements parts are needed for your washer, contact the source where you purchased your dryer. This pedestal will add about 15" (38 cm) to the height of your model did not include a drying rack or you desire another stacking kit, you may order one . LP CONVERSION KIT P/N PCK4200 Gas dryers intended for use in a location...


