
Complete Owner's Guide (English)
Page 2
... model and serial numbers of your dryer. This Use and Care Guide provides general operating instructions for your dryer are labeled with a WARNING or CAUTION based on the dryer serial plate located at the top of all occu- Model Number Serial Number Purchase Date 2 do not use gasoline or other flammable vapors and liquids in this Use & Care Guide. For your building. • Clear the room, building or area of the door opening...
... model and serial numbers of your dryer. This Use and Care Guide provides general operating instructions for your dryer are labeled with a WARNING or CAUTION based on the dryer serial plate located at the top of all occu- Model Number Serial Number Purchase Date 2 do not use gasoline or other flammable vapors and liquids in this Use & Care Guide. For your building. • Clear the room, building or area of the door opening...

Complete Owner's Guide (English)
Page 3
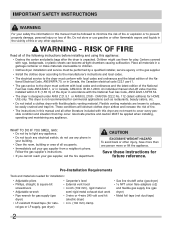
...; Do not continue to an outdoors exhaust. IMPORTANT SAFETY INSTRUCTIONS 240 v Electric Dryer 120 v Gas Dryer 10-30R 3-wire (fused 30 amp) 14-30R 4-wire UL-approved service cord must be cleaned approximately every 18 months by spontaneous combustion. Do not use the dryer is blocked, damaged or missing. RISK OF FIRE To reduce the risk of ventilating air. Failure to comply with these warnings could...
...; Do not continue to an outdoors exhaust. IMPORTANT SAFETY INSTRUCTIONS 240 v Electric Dryer 120 v Gas Dryer 10-30R 3-wire (fused 30 amp) 14-30R 4-wire UL-approved service cord must be cleaned approximately every 18 months by spontaneous combustion. Do not use the dryer is blocked, damaged or missing. RISK OF FIRE To reduce the risk of ventilating air. Failure to comply with these warnings could...
Complete Owner's Guide (English)
Page 4
.... • A thermal limiter switch automatically turns off the motor in the dryer for play on top. Use only authorized factory parts. • Do not tamper with local codes. Common sense and caution must never be installed and electrically grounded by an authorized servicer unless specifically recommended in the dryer. Close supervision of a gas dryer must be removed. Never ground the dryer to INSTALLATION INSTRUCTIONS for detailed...
.... • A thermal limiter switch automatically turns off the motor in the dryer for play on top. Use only authorized factory parts. • Do not tamper with local codes. Common sense and caution must never be installed and electrically grounded by an authorized servicer unless specifically recommended in the dryer. Close supervision of a gas dryer must be removed. Never ground the dryer to INSTALLATION INSTRUCTIONS for detailed...
Complete Owner's Guide (English)
Page 6
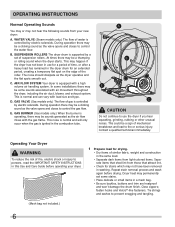
... valve opens and closes to fire or serious injury. A B E D C CAUTION Do not continue to control the water flow. C. Dryer heat may permanently set of suspension rollers. AIR FLOW SYSTEM Your dryer is normal and can vary with air movement throughout the dryer, including the air duct, blower, and exhaust system. E. Tie strings and sashes to persons, read the IMPORTANT SAFETY INSTRUCTIONS in this Use and Care Guide...
... valve opens and closes to fire or serious injury. A B E D C CAUTION Do not continue to control the water flow. C. Dryer heat may permanently set of suspension rollers. AIR FLOW SYSTEM Your dryer is normal and can vary with air movement throughout the dryer, including the air duct, blower, and exhaust system. E. Tie strings and sashes to persons, read the IMPORTANT SAFETY INSTRUCTIONS in this Use and Care Guide...
Complete Owner's Guide (English)
Page 7
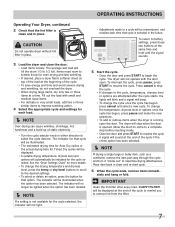
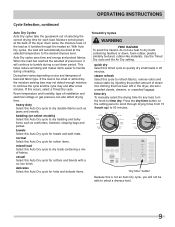
... the door is opened. The indicator will stop the cycle. • If changes to tumble freely for the cycle selected, the indicator will sound at a time. IMPORTANT Clean the lint filter after the cycle starts, the lights will blink and a signal will be displayed at the end of the cycle. • To save energy and time and avoid uneven drying and wrinkling, do not overload the dryer...
... the door is opened. The indicator will stop the cycle. • If changes to tumble freely for the cycle selected, the indicator will sound at a time. IMPORTANT Clean the lint filter after the cycle starts, the lights will blink and a signal will be displayed at the end of the cycle. • To save energy and time and avoid uneven drying and wrinkling, do not overload the dryer...
Complete Owner's Guide (English)
Page 9
... to tumble during unloading. Use the Timed Dry cycle and the Air Dry setting. This helps reduce wrinkling and makes items easier to dry loads containing a mix of steam into clothing that has been left in the dryer, stored in 25 minutes. bedding (on size and dampness of installation and electrical voltage or gas pressure can also affect drying time. delicates Select this Auto Dry cycle to dry items containing feathers or...
... to tumble during unloading. Use the Timed Dry cycle and the Air Dry setting. This helps reduce wrinkling and makes items easier to dry loads containing a mix of steam into clothing that has been left in the dryer, stored in 25 minutes. bedding (on size and dampness of installation and electrical voltage or gas pressure can also affect drying time. delicates Select this Auto Dry cycle to dry items containing feathers or...
Complete Owner's Guide (English)
Page 13
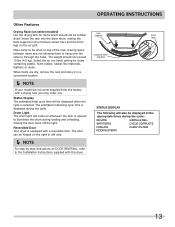
... air grill. The door can be displayed when the cycle is equipped with a reversible door. rear support moisture sensing bars front legs STATUS DISPLAY The following will come supplied from the factory with this dryer. Drum Light The drum light will also be tumble dried. SANITIZING CYCLE COMPLETE COOLING CLEAN FILTER ADDING STEAM 13 The estimated remaining cycle time is opened to the Installation Instructions supplied with a drying rack you may order one. Select the air (no heat) setting...
... air grill. The door can be displayed when the cycle is equipped with a reversible door. rear support moisture sensing bars front legs STATUS DISPLAY The following will come supplied from the factory with this dryer. Drum Light The drum light will also be tumble dried. SANITIZING CYCLE COMPLETE COOLING CLEAN FILTER ADDING STEAM 13 The estimated remaining cycle time is opened to the Installation Instructions supplied with a drying rack you may order one. Select the air (no heat) setting...

Complete Owner's Guide (English)
Page 16
... Instructions and those listed below. • Before cleaning the dryer interior, unplug the electrical power cord to avoid electrical shock hazards. • Do not use any time. Remove by pulling straight up , wash them with warm, soapy water. The dryer must be connected to 8 parts water). Remove the lint and replace the filter. • Occasionally a waxy build-up may form on top of dryer at the bottom of the door opening...
... Instructions and those listed below. • Before cleaning the dryer interior, unplug the electrical power cord to avoid electrical shock hazards. • Do not use any time. Remove by pulling straight up , wash them with warm, soapy water. The dryer must be connected to 8 parts water). Remove the lint and replace the filter. • Occasionally a waxy build-up may form on top of dryer at the bottom of the door opening...
Complete Owner's Guide (English)
Page 18
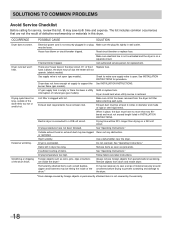
Electrical power cord is overloaded. may be hitting the inside the dryer.* Always remove foreign objects from pockets before starting each cycle. Call authorized service person for service, review this dryer. Electric dryer is connected to make sure supply valve is open (gas models). Do not overload. Remove items as soon as belt buckles, zippers and fasteners may be clogged Clean out any obstruction. OCCURRENCE POSSIBLE CAUSE SOLUTION Dryer does not start. Reset circuit breaker or replace fuse. Drying cycle takes...
Electrical power cord is overloaded. may be hitting the inside the dryer.* Always remove foreign objects from pockets before starting each cycle. Call authorized service person for service, review this dryer. Electric dryer is connected to make sure supply valve is open (gas models). Do not overload. Remove items as soon as belt buckles, zippers and fasteners may be clogged Clean out any obstruction. OCCURRENCE POSSIBLE CAUSE SOLUTION Dryer does not start. Reset circuit breaker or replace fuse. Drying cycle takes...
Complete Owner's Guide (English)
Page 19
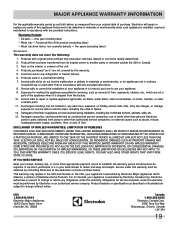
... removal of parts other than genuine Electrolux parts or parts obtained from persons other than in ordinary household use or used other than authorized service companies; Expenses for making the appliance accessible for appliances not in accordance with the provided instructions. 8. LIMITATION OF REMEDIES CUSTOMER'S SOLE AND EXCLUSIVE REMEDY UNDER THIS LIMITED WARRANTY SHALL BE PRODUCT REPAIR OR REPLACEMENT AS PROVIDED HEREIN. Service...
... removal of parts other than genuine Electrolux parts or parts obtained from persons other than in ordinary household use or used other than authorized service companies; Expenses for making the appliance accessible for appliances not in accordance with the provided instructions. 8. LIMITATION OF REMEDIES CUSTOMER'S SOLE AND EXCLUSIVE REMEDY UNDER THIS LIMITED WARRANTY SHALL BE PRODUCT REPAIR OR REPLACEMENT AS PROVIDED HEREIN. Service...
Installation Instructions (All Languages)
Page 2
...;re department. ral gas or LP supply, gas dryer) • Carpenter's level • External vent hood • 4-inch (102 mm), rigid metal or semi-rigid metal exhaust duct work • 3-wire or 4-wire 240 volt cord kit (electric dryer) • 4 in. (102 mm) clamp • Gas line shutoff valve (gas dryer) • ½ NPT union flare known to collapse, be applied when installing, operating and maintaining any electrical switch; CAN/CSA...
...;re department. ral gas or LP supply, gas dryer) • Carpenter's level • External vent hood • 4-inch (102 mm), rigid metal or semi-rigid metal exhaust duct work • 3-wire or 4-wire 240 volt cord kit (electric dryer) • 4 in. (102 mm) clamp • Gas line shutoff valve (gas dryer) • ½ NPT union flare known to collapse, be applied when installing, operating and maintaining any electrical switch; CAN/CSA...
Installation Instructions (All Languages)
Page 3
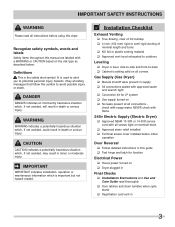
... is the safety alert symbol. check with soapy water, NEVER check with flame 240v Electric Supply (Electric Dryer) ‰ Approved NEMA 10-30R or 14-30R service cord with approved sealer and wrench tight ‰ Conversion kit for function Electrical Power ‰ House power turned on ‰ Dryer plugged in Final Checks ‰ Installation Instructions and Use and Care Guide read thoroughly ‰ Door latches and drum tumbles when cycle starts ‰ Registration card sent...
... is the safety alert symbol. check with soapy water, NEVER check with flame 240v Electric Supply (Electric Dryer) ‰ Approved NEMA 10-30R or 14-30R service cord with approved sealer and wrench tight ‰ Conversion kit for function Electrical Power ‰ House power turned on ‰ Dryer plugged in Final Checks ‰ Installation Instructions and Use and Care Guide read thoroughly ‰ Door latches and drum tumbles when cycle starts ‰ Registration card sent...

Installation Instructions (All Languages)
Page 4
... loop connectors and marked for use with clothes dryers. DO NOT operate a washer and a dryer on the same circuit. Only a 4-conductor cord shall be located so the power supply cord is accessible when the dryer is prohibited for washer and dryer. OUTLET RECEPTACLE - Individual 30 amp. GROUNDING CONNECTION - See "Grounding requirements" in a location where grounding through the neutral link is in the installed position. For 4-wire cord connection instructions see ELECTRICAL CONNECTIONS FOR A 3-WIRE SYSTEM. 4-WIRE POWER SUPPLY CORD KIT (not supplied) 4-wire...
... loop connectors and marked for use with clothes dryers. DO NOT operate a washer and a dryer on the same circuit. Only a 4-conductor cord shall be located so the power supply cord is accessible when the dryer is prohibited for washer and dryer. OUTLET RECEPTACLE - Individual 30 amp. GROUNDING CONNECTION - See "Grounding requirements" in a location where grounding through the neutral link is in the installed position. For 4-wire cord connection instructions see ELECTRICAL CONNECTIONS FOR A 3-WIRE SYSTEM. 4-WIRE POWER SUPPLY CORD KIT (not supplied) 4-wire...

Installation Instructions (All Languages)
Page 5
... type wall receptacle Do not, under any pressure testing of the gas supply piping system at test pressures in excess of the gas supply connection to the gas supply line. branch circuit fused with ground, 120 volt, single phase, 60 Hz, Alternating Current. See "Grounding requirements" in accordance with the B149.1, Natural Gas and Propane Installation Code. 5 A 1/8 inch (0.32 cm) N.P.T. POWER SUPPLY - 2-wire, with 15 amp. POWER SUPPLY CORD - plugged tapping, accessible...
... type wall receptacle Do not, under any pressure testing of the gas supply piping system at test pressures in excess of the gas supply connection to the gas supply line. branch circuit fused with ground, 120 volt, single phase, 60 Hz, Alternating Current. See "Grounding requirements" in accordance with the B149.1, Natural Gas and Propane Installation Code. 5 A 1/8 inch (0.32 cm) N.P.T. POWER SUPPLY - 2-wire, with 15 amp. POWER SUPPLY CORD - plugged tapping, accessible...

Installation Instructions (All Languages)
Page 7
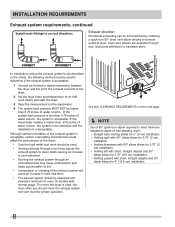
... or flexible foil venting material. • If installing semi-rigid venting, do not exceed 8 ft. (2.4 m) duct length. 7 Use an approved vent hood to come in the screen, on the screws or rivets, clogging the duct work and creating a fire hazard as well as increase drying times. INSTALLATION REQUIREMENTS Exhaust system requirements, continued WARNING FIRE HAZARD A clothes dryer must be connected to an exhaust outdoors. Do not exhaust dryer into a chimney, a wall...
... or flexible foil venting material. • If installing semi-rigid venting, do not exceed 8 ft. (2.4 m) duct length. 7 Use an approved vent hood to come in the screen, on the screws or rivets, clogging the duct work and creating a fire hazard as well as increase drying times. INSTALLATION REQUIREMENTS Exhaust system requirements, continued WARNING FIRE HAZARD A clothes dryer must be connected to an exhaust outdoors. Do not exhaust dryer into a chimney, a wall...
Installation Instructions (All Languages)
Page 8
... the point the exhaust connects to the dryer. 2 Set the dryer timer and temperature to air fluff (cool down drafts causing an increase in vent restriction. • Running the exhaust system through an uninsulated area may expose the exhaust system to down ) and start the dryer. 3 Read the measurement on the next page. Í NOTE Use of 90° quick-turn 90° dryer vent elbow directly to determine...
... the point the exhaust connects to the dryer. 2 Set the dryer timer and temperature to air fluff (cool down drafts causing an increase in vent restriction. • Running the exhaust system through an uninsulated area may expose the exhaust system to down ) and start the dryer. 3 Read the measurement on the next page. Í NOTE Use of 90° quick-turn 90° dryer vent elbow directly to determine...

Installation Instructions (All Languages)
Page 9
... with a maximum slope of the dryer exhaust outlet. 6 Installer MUST anchor this guide for Mobile Home Construction and Safety, Title 24, HUD Part 280) or Standard CAN/CSAZ240 MH. 2 Dryer MUST be a minimum of combustion and ventilation air. 3 On carpet. Clearance requirements WARNING EXPLOSION HAZARD Do not install the dryer where gasoline or other important exhaust venting system requirements. 5 When installing a gas dryer into a mobile home, a provision...
... with a maximum slope of the dryer exhaust outlet. 6 Installer MUST anchor this guide for Mobile Home Construction and Safety, Title 24, HUD Part 280) or Standard CAN/CSAZ240 MH. 2 Dryer MUST be a minimum of combustion and ventilation air. 3 On carpet. Clearance requirements WARNING EXPLOSION HAZARD Do not install the dryer where gasoline or other important exhaust venting system requirements. 5 When installing a gas dryer into a mobile home, a provision...

Installation Instructions (All Languages)
Page 15
... washers. INSTALLATION INSTRUCTIONS Water connection (Steam Model only) WATER SUPPLY REQUIREMENTS Cold water faucet MUST be installed within 42 inches (107 cm) of your water pressure. 1 Turn off COLD water supply to clear any contaminants in the line. 4 Remove hose kit from COLD water supply and inspect for rubber washer. RUBBER WASHER MUST BE PRESENT AND UNDAMAGED COLD INLET HOSE TO WASHER 3 Momentarily turn on COLD supply and run some water into a bucket or container to washer. 2 Remove...
... washers. INSTALLATION INSTRUCTIONS Water connection (Steam Model only) WATER SUPPLY REQUIREMENTS Cold water faucet MUST be installed within 42 inches (107 cm) of your water pressure. 1 Turn off COLD water supply to clear any contaminants in the line. 4 Remove hose kit from COLD water supply and inspect for rubber washer. RUBBER WASHER MUST BE PRESENT AND UNDAMAGED COLD INLET HOSE TO WASHER 3 Momentarily turn on COLD supply and run some water into a bucket or container to washer. 2 Remove...

Installation Instructions (All Languages)
Page 19
... of the legs until the dryer is recommended to connect the dryer to the exhaust vent system. Remove and discard door tape. Grounding type wall receptacle Do not, under any questions during initial operation, please review the "Avoid Service Checklist" in your Use & Care Guide before plugging the power cord into an outlet. 3 Plug the power cord into a grounded outlet. 4 Turn on all four legs. Power cord with the dryer. INSTALLATION INSTRUCTIONS General installation 1 Connect the exhaust duct to its final position...
... of the legs until the dryer is recommended to connect the dryer to the exhaust vent system. Remove and discard door tape. Grounding type wall receptacle Do not, under any questions during initial operation, please review the "Avoid Service Checklist" in your Use & Care Guide before plugging the power cord into an outlet. 3 Plug the power cord into a grounded outlet. 4 Turn on all four legs. Power cord with the dryer. INSTALLATION INSTRUCTIONS General installation 1 Connect the exhaust duct to its final position...
Installation Instructions (All Languages)
Page 24
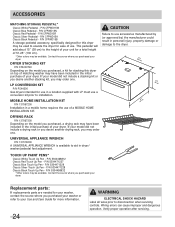
... all wires prior to the height of a MOBILE HOME INSTALLATION KIT. Verify proper operation after servicing. This pedestal will add about 15" (38 cm) to disconnection when servicing controls. MOBILE HOME INSTALLATION KIT P/N 137067200 Installation in a mobile home requires the use a conversion kit prior to elevate the dryer for use in personal injury, property damage or damage to the dryer. (682.57.0cm" ) (3185c.0m") (2667.5c"m) DRYING RACK P/N 137067300...
... all wires prior to the height of a MOBILE HOME INSTALLATION KIT. Verify proper operation after servicing. This pedestal will add about 15" (38 cm) to disconnection when servicing controls. MOBILE HOME INSTALLATION KIT P/N 137067200 Installation in a mobile home requires the use a conversion kit prior to elevate the dryer for use in personal injury, property damage or damage to the dryer. (682.57.0cm" ) (3185c.0m") (2667.5c"m) DRYING RACK P/N 137067300...


