Use and Care Manual
Page 1
... that may occur. READ AND SAVE THESE INSTRUCTIONS MEDIAN and HEAVY DUTY ELECTRONIC CONTROL AIR CONDITIONERS P/N 66121617 Common sense and caution must be practiced when installing, operating, and maintaining any appliance. USE & CARE MANUAL Contents 2 3 3 3 4 4 5-10 11 11 12 Warranty Product Registration Packaging Normal Sounds Important Safety Instructions Operation of Current Device Air Conditioner Features Care and Cleaning Energy Saving Ideas Avoid Service Checklist NOTE: This USE & CARE MANUAL provides specific operating instructions for your model.
... that may occur. READ AND SAVE THESE INSTRUCTIONS MEDIAN and HEAVY DUTY ELECTRONIC CONTROL AIR CONDITIONERS P/N 66121617 Common sense and caution must be practiced when installing, operating, and maintaining any appliance. USE & CARE MANUAL Contents 2 3 3 3 4 4 5-10 11 11 12 Warranty Product Registration Packaging Normal Sounds Important Safety Instructions Operation of Current Device Air Conditioner Features Care and Cleaning Energy Saving Ideas Avoid Service Checklist NOTE: This USE & CARE MANUAL provides specific operating instructions for your model.
Use and Care Manual
Page 2
... Frigidaire servicer. Any obligations for service and parts under this limitation or exclusion may also have been removed or altered and cannot be defective in NOR- Repair or replace any parts in the Sealed Refrigeration System (compressor, condenser, evaporator and tubing) proves to change without notice. Costs for servicing, such as to where to obtain and keep all local plumbing, electrical and/or gas codes...
... Frigidaire servicer. Any obligations for service and parts under this limitation or exclusion may also have been removed or altered and cannot be defective in NOR- Repair or replace any parts in the Sealed Refrigeration System (compressor, condenser, evaporator and tubing) proves to change without notice. Costs for servicing, such as to where to obtain and keep all local plumbing, electrical and/or gas codes...
Use and Care Manual
Page 3
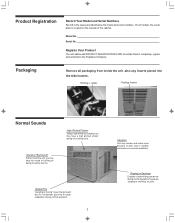
... serial numbers. Pinging or Swishing Droplets of poor wall or window construction or incorrect installation. On all packaging from inside the unit ,also any inserts placed into the side louvers. Packaging Remove all models, the serial plate is located on the outside of rushing air being moved by the fan. Register Your Product The self-addressed PRODUCT REGISTRATION CARD should be heard due to the Frigidaire...
... serial numbers. Pinging or Swishing Droplets of poor wall or window construction or incorrect installation. On all packaging from inside the unit ,also any inserts placed into the side louvers. Packaging Remove all models, the serial plate is located on the outside of rushing air being moved by the fan. Register Your Product The self-addressed PRODUCT REGISTRATION CARD should be heard due to the Frigidaire...
Use and Care Manual
Page 4
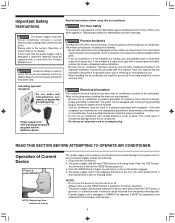
... air conditioner must be reset. The power supply cord is now supplying electricity to be installed in a properly grounded wall receptacle. For Your Safety Do not store or use is not adequately grounded or protected by a time delay fuse or circuit breaker, have buttons on the top. Refer to the rating when checking the electrical requirements. • Be sure the air conditioner is to the unit. (On some products...
... air conditioner must be reset. The power supply cord is now supplying electricity to be installed in a properly grounded wall receptacle. For Your Safety Do not store or use is not adequately grounded or protected by a time delay fuse or circuit breaker, have buttons on the top. Refer to the rating when checking the electrical requirements. • Be sure the air conditioner is to the unit. (On some products...
Use and Care Manual
Page 5
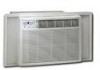
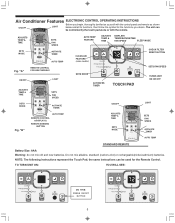
... Remote Control. TO TURN UNIT ON: YOU WILL SEE: DO THIS: PRESS ON/OFF BUTTON 5 ADJUSTS TEMP & TIME Fan S l o w e r Temp/Timer T emp/Timer F an Faster SETS FAN SPEED AUTO TEMP FEATURE ADJUSTS TEMP & TIME DISPLAYS TEMPERATURE/TIME FAN SPEED SLEEP MODE SETS MODE Cool Energy Saver Fan Only Sleep Au t o T emp Timer Heater ACTIVATE TIMER AUTO TEMP CLEAN AIR FEATURE (some models) CHECK FILTER RESET BUTTON Fig. Do not mix alkaline, standard (carbon-zinc),or rechargeable(nickel-cadmium) batteries. Air Conditioner Features ELECTRONIC CONTROL OPERATING INSTRUCTIONS Before...
... Remote Control. TO TURN UNIT ON: YOU WILL SEE: DO THIS: PRESS ON/OFF BUTTON 5 ADJUSTS TEMP & TIME Fan S l o w e r Temp/Timer T emp/Timer F an Faster SETS FAN SPEED AUTO TEMP FEATURE ADJUSTS TEMP & TIME DISPLAYS TEMPERATURE/TIME FAN SPEED SLEEP MODE SETS MODE Cool Energy Saver Fan Only Sleep Au t o T emp Timer Heater ACTIVATE TIMER AUTO TEMP CLEAN AIR FEATURE (some models) CHECK FILTER RESET BUTTON Fig. Do not mix alkaline, standard (carbon-zinc),or rechargeable(nickel-cadmium) batteries. Air Conditioner Features ELECTRONIC CONTROL OPERATING INSTRUCTIONS Before...
Use and Care Manual
Page 6
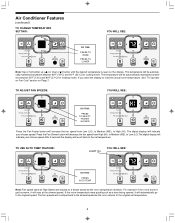
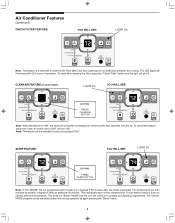
... chosen speed. Press the Fan Slower button will decrease the fan speed from Low (LO), to Medium (ME), to read the actual room temperature. TO USE AUTO TEMP FEATURE: LIGHT On YOU WILL SEE: DO THIS: PRESS AUTO TEMP Note: Fan speed starts at the slowest speed. The temperature will revert back to the original set temperature. The digital display will increase the fan speed from High (HI...
... chosen speed. Press the Fan Slower button will decrease the fan speed from Low (LO), to Medium (ME), to read the actual room temperature. TO USE AUTO TEMP FEATURE: LIGHT On YOU WILL SEE: DO THIS: PRESS AUTO TEMP Note: Fan speed starts at the slowest speed. The temperature will revert back to the original set temperature. The digital display will increase the fan speed from High (HI...
Use and Care Manual
Page 7
... set temperature, at any fan speed you prefer. (Except "Auto Temp"). To change the display back to be the same as in the 'Remote Sensing' Mode. (On those units with maximum Fan Speed. After 5 seconds, the control will start (8, 7.5, 7, etc.). The control will cancel the Delay Start/Stop function. TO USE THE ENERGY SAVER FEATURE: LIGHT On YOU WILL SEE: DO THIS: PRESS MODE BUTTON CHOOSE ENERGY SAVER Note: In this function, the display will work...
... set temperature, at any fan speed you prefer. (Except "Auto Temp"). To change the display back to be the same as in the 'Remote Sensing' Mode. (On those units with maximum Fan Speed. After 5 seconds, the control will start (8, 7.5, 7, etc.). The control will cancel the Delay Start/Stop function. TO USE THE ENERGY SAVER FEATURE: LIGHT On YOU WILL SEE: DO THIS: PRESS MODE BUTTON CHOOSE ENERGY SAVER Note: In this function, the display will work...
Use and Care Manual
Page 8
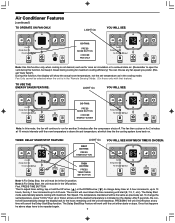
... efficient operation and cooling. SLEEP FEATURE: YOU WILL SEE: LIGHT On DO THIS: PRESS SLEEP BUTTON Note: In this feature, press the Clean Air button (the LIGHT will continue to remove pollen and impurities from the air. This ends the "Sleep" MODE and the unit will turn off . To reset after an additional 30 minutes. The temperature will then increase by another 2 degrees F after cleaning the filter, press the "Check Filter" button...
... efficient operation and cooling. SLEEP FEATURE: YOU WILL SEE: LIGHT On DO THIS: PRESS SLEEP BUTTON Note: In this feature, press the Clean Air button (the LIGHT will continue to remove pollen and impurities from the air. This ends the "Sleep" MODE and the unit will turn off . To reset after an additional 30 minutes. The temperature will then increase by another 2 degrees F after cleaning the filter, press the "Check Filter" button...
Use and Care Manual
Page 9
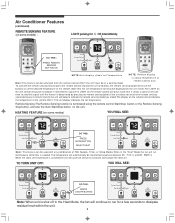
... Timer Staorpt R emote Sensing NOTE:Unit display shows"set temperature. Remote Sensing:The Remote Sensing function is shut off and on the remote control indicates the temperature at the remote.(Note that the set temperature is needed. The temperature will automatically be in the Heat Mode, the fan will cycle off in a cooling mode. TO TURN UNIT OFF: YOU WILL SEE: DO THIS: PRESS ON/OFF BUTTON Note: When unit is terminated using the remote control Start/Stop button or...
... Timer Staorpt R emote Sensing NOTE:Unit display shows"set temperature. Remote Sensing:The Remote Sensing function is shut off and on the remote control indicates the temperature at the remote.(Note that the set temperature is needed. The temperature will automatically be in the Heat Mode, the fan will cycle off in a cooling mode. TO TURN UNIT OFF: YOU WILL SEE: DO THIS: PRESS ON/OFF BUTTON Note: When unit is terminated using the remote control Start/Stop button or...
Use and Care Manual
Page 10
...) FAULT CODES If the display reads"HS", a sensor has failed. If the display reads"AS", a sensor has failed. Vent Closed (see Fig. 2) 3. Draw fresh air into the room - Vent Open (see Fig. 1) 2. The control will allow you should become familiar with: The "Cool" circuit has an automatic 3 minute time delayed start if the unit is turned off and on quickly.This prevents overheating of displaying temperature in your Authorized Frigidaire Service...
...) FAULT CODES If the display reads"HS", a sensor has failed. If the display reads"AS", a sensor has failed. Vent Closed (see Fig. 2) 3. Draw fresh air into the room - Vent Open (see Fig. 1) 2. The control will allow you should become familiar with: The "Cool" circuit has an automatic 3 minute time delayed start if the unit is turned off and on quickly.This prevents overheating of displaying temperature in your Authorized Frigidaire Service...
Use and Care Manual
Page 11
.... • The capacity of the room air conditioner must fit the room size for efficient and satisfactory operation. • Install the room air conditioner on the cooling coils. • Push the vent handle to keep warm air out and cool air in air conditioner. Air Filter Cleaning The air filter should be dusted with an oil-free cloth or washed with trees, plants or awnings will help reduce the air conditioner's work load. • Operate heat producing appliances such as recommended...
.... • The capacity of the room air conditioner must fit the room size for efficient and satisfactory operation. • Install the room air conditioner on the cooling coils. • Push the vent handle to keep warm air out and cool air in air conditioner. Air Filter Cleaning The air filter should be dusted with an oil-free cloth or washed with trees, plants or awnings will help reduce the air conditioner's work load. • Operate heat producing appliances such as recommended...
Use and Care Manual
Page 12
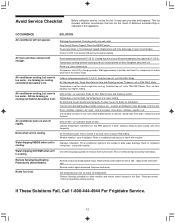
... front. Reset to allow water drainage. Clean filter. To defrost the coil, set Temperature to desired setting. Front of unit is too warm - Close doors, windows, registers, etc. Clean air filter. Tilt air conditioner slightly to the outside to a Lower temperature. Unit removing large quantity of defective workman-ship or materials in Hot Spot - Remote control signal obstructed. Air conditioner cooling, but room is blocked by changing modes. Water dripping INSIDE when unit is normal. Push plug firmly into wall outlet. Compressor shut...
... front. Reset to allow water drainage. Clean filter. To defrost the coil, set Temperature to desired setting. Front of unit is too warm - Close doors, windows, registers, etc. Clean air filter. Tilt air conditioner slightly to the outside to a Lower temperature. Unit removing large quantity of defective workman-ship or materials in Hot Spot - Remote control signal obstructed. Air conditioner cooling, but room is blocked by changing modes. Water dripping INSIDE when unit is normal. Push plug firmly into wall outlet. Compressor shut...

Installation Instructions
Page 1
... firmly hold the needed screws.If not, make repairs before starting to determine model type: Heavy duty (FAS) Median (FAM) Unit Height: 18.5/8" 17.5/8" Unit Width: 26 1/2" 23 1/2" Min. See#5 in Preliminary Instructions following before installing unit. Check dimensions of your unit to install unit.See illustrations below. the mounting parts furnished with this product.If a new electrical outlet is required,have the outlet installed by removing storm window while room air conditioner is being installed. (continued) FIG...
... firmly hold the needed screws.If not, make repairs before starting to determine model type: Heavy duty (FAS) Median (FAM) Unit Height: 18.5/8" 17.5/8" Unit Width: 26 1/2" 23 1/2" Min. See#5 in Preliminary Instructions following before installing unit. Check dimensions of your unit to install unit.See illustrations below. the mounting parts furnished with this product.If a new electrical outlet is required,have the outlet installed by removing storm window while room air conditioner is being installed. (continued) FIG...
Installation Instructions
Page 2
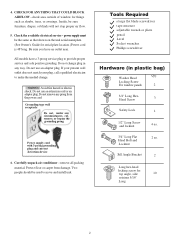
... Bracket 2 Long hex-head locking screw for serial plate location.)Power cord is 48"long. All models have an outlet near. Do not use an adapter plug. Carefully unpack air conditioner - check area outside of window for things such as that shown on the unit serial nameplate. (See Owner's Guide for top angle, side 10 retainer 5/16" Long 2 If your present wall outlet does not match your plug...
... Bracket 2 Long hex-head locking screw for serial plate location.)Power cord is 48"long. All models have an outlet near. Do not use an adapter plug. Carefully unpack air conditioner - check area outside of window for things such as that shown on the unit serial nameplate. (See Owner's Guide for top angle, side 10 retainer 5/16" Long 2 If your present wall outlet does not match your plug...
Installation Instructions
Page 3
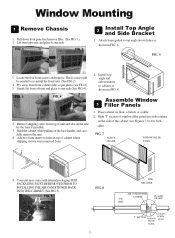
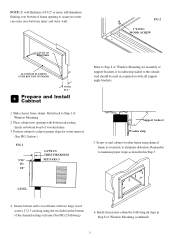
... unit. 8. Window Mounting 1 Remove Chassis 1. Pry away front from . Pull down front panel and remove filter. (See FIG. 1). 2. FIG. 3 FIG. 4 6. Attach foam gasket to cabinet as per photo (see Figures 7-8). FIG. 1 FIG. 2 2 Install Top Angle and Side Bracket 1. Add two foam inserts to re-install the front later. (See FIG.2) 4. Internal Packaging FIG. 5 FIG. 8 3 SIDE RETAINER TOP VIEW AIR CONDITIONER CABINET PLASTIC FRAME...
... unit. 8. Window Mounting 1 Remove Chassis 1. Pry away front from . Pull down front panel and remove filter. (See FIG. 1). 2. FIG. 3 FIG. 4 6. Attach foam gasket to cabinet as per photo (see Figures 7-8). FIG. 1 FIG. 2 2 Install Top Angle and Side Bracket 1. Add two foam inserts to re-install the front later. (See FIG.2) 4. Internal Packaging FIG. 5 FIG. 8 3 SIDE RETAINER TOP VIEW AIR CONDITIONER CABINET PLASTIC FRAME...
Installation Instructions
Page 4
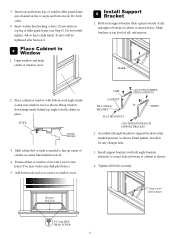
...needed to line up center of cabinet as shown. Install support brackets (with sill angle brackets attached) to angle and bottom rail. Insert top and bottom legs of filler panel frame (see Step 6). Do both sides. 4. Screws will be tightened after Section 6. 4 Place Cabinet in place. Bring window...Hand tighten, but allow for any changes later. 3. Open window and mark center of sill, and remove. Add bottom rail seal over window stool as shown. 4. Asscmble sill angle bracket to pre-drill pilot holes.) 5. Fasten cabinet to window stool with bottom stool angle firmly ...
...needed to line up center of cabinet as shown. Install support brackets (with sill angle brackets attached) to angle and bottom rail. Insert top and bottom legs of filler panel frame (see Step 6). Do both sides. 4. Screws will be tightened after Section 6. 4 Place Cabinet in place. Bring window...Hand tighten, but allow for any changes later. 3. Open window and mark center of sill, and remove. Add bottom rail seal over window stool as shown. 4. Asscmble sill angle bracket to pre-drill pilot holes.) 5. Fasten cabinet to window stool with bottom stool angle firmly ...
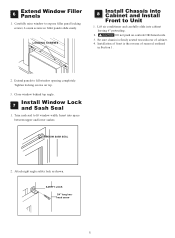
Installation Instructions
Page 5
... into Cabinet and Install Front to expose filler panel locking screws. Close window behind top angle. 7 Install Window Lock and Sash Seal 1. Insert into cabinet leaving 6" protruding. 2. Carefully raise window to Unit 1. Lift air conditioner and carefully slide into space between upper and lower sashes. Installation of front is firmly seated towards rear of removal outlined in Section 1. 2. WINDOW SASH SEAL 2. Attach...
... into Cabinet and Install Front to expose filler panel locking screws. Close window behind top angle. 7 Install Window Lock and Sash Seal 1. Insert into cabinet leaving 6" protruding. 2. Carefully raise window to Unit 1. Lift air conditioner and carefully slide into space between upper and lower sashes. Installation of front is firmly seated towards rear of removal outlined in Section 1. 2. WINDOW SASH SEAL 2. Attach...
Installation Instructions
Page 6
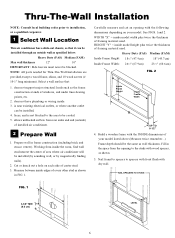
... with the following dimensions depending on each side of windows, and under truss-bearing points, etc. 2. Thru-The-Wall Installation NOTE: Consult local building codes prior to be cooled. 5. Cut or knock out a hole on your model listed above.(Measure twice remember...) Frame depth should be installed, 4. is not blocked to the area to installation, or a qualified carpenter. 1 Select Wall Location This air conditioner has a slide...
... with the following dimensions depending on each side of windows, and under truss-bearing points, etc. 2. Thru-The-Wall Installation NOTE: Consult local building codes prior to be cooled. 5. Cut or knock out a hole on your model listed above.(Measure twice remember...) Frame depth should be installed, 4. is not blocked to the area to installation, or a qualified carpenter. 1 Select Wall Location This air conditioner has a slide...
Installation Instructions
Page 7
... of support brackets.A wooden strip nailed to the outside wall should be used in Step 8 of Window Mounting for water removal. (See FIG.1 below.) FIG.1 5/16" TO 3/8" 3/4"PLUS TRIM THICKNESS SEE PARA 5 Support brakcet Wooden strip 5. Slide chassis from cabinet. Install chassis into opening to assure no water can enter area between inner and outer wall. Screw or nail cabinet wooden frame using the two holes in...
... of support brackets.A wooden strip nailed to the outside wall should be used in Step 8 of Window Mounting for water removal. (See FIG.1 below.) FIG.1 5/16" TO 3/8" 3/4"PLUS TRIM THICKNESS SEE PARA 5 Support brakcet Wooden strip 5. Slide chassis from cabinet. Install chassis into opening to assure no water can enter area between inner and outer wall. Screw or nail cabinet wooden frame using the two holes in...

Installation Instructions
Page 8
... be used and/or additions holes can buy wood from your local lumber or hardware supply. To complete installation, apply wood trim molding around top and sides of cabinet, and all sides of wood sleeve to the opening. You can be done. On the outside, caulk openings around room side projection of cabinet. 8 Cut or build a wall opening and cabinet. Frame...
... be used and/or additions holes can buy wood from your local lumber or hardware supply. To complete installation, apply wood trim molding around top and sides of cabinet, and all sides of wood sleeve to the opening. You can be done. On the outside, caulk openings around room side projection of cabinet. 8 Cut or build a wall opening and cabinet. Frame...


