

Installation Instructions (English, Español, Français)
Page 1
All about the Installation of your Dryer TABLE OF CONTENTS Important Safety Instructions 2-3 Accessories 19 Installation Requirements 4-10 Notes 20 Installation Instructions 11-16 Français 21 Reversing Door 17-18 Español 41 137410000B (1204)
All about the Installation of your Dryer TABLE OF CONTENTS Important Safety Instructions 2-3 Accessories 19 Installation Requirements 4-10 Notes 20 Installation Instructions 11-16 Français 21 Reversing Door 17-18 Español 41 137410000B (1204)

Installation Instructions (English, Español, Français)
Page 2
...for installation: • Adjustable pliers • Phillips, straight, & square bit screwdrivers • Adjustable wrench • Pipe wrench for gas supply (gas dryer) • LP-resistant thread tape (for future reference. RISK OF FIRE Read all other injury, have more than one person move or lift the ...hood • 4-inch (102 mm), rigid metal or semi-rigid metal exhaust duct work • 3-wire or 4-wire 240 volt cord kit (electric dryer) • 4 in your building. • Clear the room, building or area of all materials in a garbage container or make materials inaccessible to ...
...for installation: • Adjustable pliers • Phillips, straight, & square bit screwdrivers • Adjustable wrench • Pipe wrench for gas supply (gas dryer) • LP-resistant thread tape (for future reference. RISK OF FIRE Read all other injury, have more than one person move or lift the ...hood • 4-inch (102 mm), rigid metal or semi-rigid metal exhaust duct work • 3-wire or 4-wire 240 volt cord kit (electric dryer) • 4 in your building. • Clear the room, building or area of all materials in a garbage container or make materials inaccessible to ...
Installation Instructions (English, Español, Français)
Page 3
...supply turned on ‰ No leaks present at all instructions before initial operation Door Reversal ‰ Follow detailed instructions in this dryer. CAUTION CAUTION indicates a potentially hazardous situation which , if not avoided, could result in death or serious injury. IMPORTANT SAFETY ...labeled with approved sealer and wrench tight ‰ Conversion kit for function Electrical Power ‰ House power turned on ‰ Dryer plugged in death or serious injury. IMPORTANT IMPORTANT indicates installation, operation or maintenance information which , if not avoided, will result...
...supply turned on ‰ No leaks present at all instructions before initial operation Door Reversal ‰ Follow detailed instructions in this dryer. CAUTION CAUTION indicates a potentially hazardous situation which , if not avoided, could result in death or serious injury. IMPORTANT SAFETY ...labeled with approved sealer and wrench tight ‰ Conversion kit for function Electrical Power ‰ House power turned on ‰ Dryer plugged in death or serious injury. IMPORTANT IMPORTANT indicates installation, operation or maintenance information which , if not avoided, will result...

Installation Instructions (English, Español, Français)
Page 4
... use with 30 amp. GROUNDING CONNECTION - INSTALLATION REQUIREMENTS Í NOTE Because of potentially inconsistent voltage capabilities, the use of this dryer with power created by gas powered generators, solar powered generators, wind powered generators or any other generator other than the local utility ...connection instructions see ELECTRICAL CONNECTIONS FOR A 3-WIRE SYSTEM. 4-WIRE POWER SUPPLY CORD KIT (not supplied) 4-wire receptacle (NEMA type 14-30R) The dryer MUST employ a 4-conductor power supply cord NEMA 14-30 type SRDT or ST (as required) rated at 240 volt AC minimum, 30 amp,...
... use with 30 amp. GROUNDING CONNECTION - INSTALLATION REQUIREMENTS Í NOTE Because of potentially inconsistent voltage capabilities, the use of this dryer with power created by gas powered generators, solar powered generators, wind powered generators or any other generator other than the local utility ...connection instructions see ELECTRICAL CONNECTIONS FOR A 3-WIRE SYSTEM. 4-WIRE POWER SUPPLY CORD KIT (not supplied) 4-wire receptacle (NEMA type 14-30R) The dryer MUST employ a 4-conductor power supply cord NEMA 14-30 type SRDT or ST (as required) rated at 240 volt AC minimum, 30 amp,...

Installation Instructions (English, Español, Français)
Page 5
... Code. 5 A 1/8 inch (0.32 cm) N.P.T. GROUNDING CONNECTION - See "Grounding requirements" in excess of 1/2 psig (3.45 kPa). 7 The dryer MUST be isolated from the gas supply piping system during any pressure testing of the gas supply piping system at test pressures in Electrical Installation...line. plugged tapping, accessible for test gauge connection, MUST be installed immediately upstream of the gas supply connection to the dryer. 6 The dryer MUST be disconnected from the gas supply piping system during any circumstances, cut, remove, or bypass the grounding prong. INSTALLATION...
... Code. 5 A 1/8 inch (0.32 cm) N.P.T. GROUNDING CONNECTION - See "Grounding requirements" in excess of 1/2 psig (3.45 kPa). 7 The dryer MUST be isolated from the gas supply piping system during any pressure testing of the gas supply piping system at test pressures in Electrical Installation...line. plugged tapping, accessible for test gauge connection, MUST be installed immediately upstream of the gas supply connection to the dryer. 6 The dryer MUST be disconnected from the gas supply piping system during any circumstances, cut, remove, or bypass the grounding prong. INSTALLATION...
Installation Instructions (English, Español, Français)
Page 6
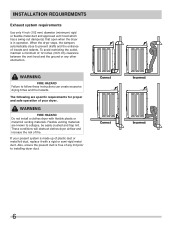
... and the ground or any lint prior to prevent drafts and the entrance of insects and rodents. WARNING FIRE HAZARD Do not install a clothes dryer with a rigid or semi-rigid metal duct. INSTALLATION REQUIREMENTS Exhaust system requirements Use only 4 inch (102 mm) diameter (minimum) rigid or ...flexible metal duct and approved vent hood which has a swing-out damper(s) that open when the dryer is free of plastic duct or metal foil duct, replace it with flexible plastic or metal foil venting materials. Correct Correct Incorrect Incorrect 6...
... and the ground or any lint prior to prevent drafts and the entrance of insects and rodents. WARNING FIRE HAZARD Do not install a clothes dryer with a rigid or semi-rigid metal duct. INSTALLATION REQUIREMENTS Exhaust system requirements Use only 4 inch (102 mm) diameter (minimum) rigid or ...flexible metal duct and approved vent hood which has a swing-out damper(s) that open when the dryer is free of plastic duct or metal foil duct, replace it with flexible plastic or metal foil venting materials. Correct Correct Incorrect Incorrect 6...

Installation Instructions (English, Español, Français)
Page 7
...male duct pipe fittings MUST be exhausted into a chimney, a wall, a ceiling, or any concealed space of a building. Do not exhaust dryer into a chimney, a wall, a ceiling, an attic, a crawl space or any accumulation of lint around the outdoor exhaust opening and remove any ... semi-rigid venting, do not exceed 8 ft. (2.4 m) duct length. 7 INSTALLATION REQUIREMENTS Exhaust system requirements, continued WARNING FIRE HAZARD A clothes dryer must be expelled into the laundry area. Use an approved vent hood to come in the exhaust system. MAXIMUM LENGTH of 4" (102mm) Rigid ...
...male duct pipe fittings MUST be exhausted into a chimney, a wall, a ceiling, or any concealed space of a building. Do not exhaust dryer into a chimney, a wall, a ceiling, an attic, a crawl space or any accumulation of lint around the outdoor exhaust opening and remove any ... semi-rigid venting, do not exceed 8 ft. (2.4 m) duct length. 7 INSTALLATION REQUIREMENTS Exhaust system requirements, continued WARNING FIRE HAZARD A clothes dryer must be expelled into the laundry area. Use an approved vent hood to come in the exhaust system. MAXIMUM LENGTH of 4" (102mm) Rigid ...

Installation Instructions (English, Español, Français)
Page 8
...64257;ttings in correct direction: Exhaust direction Directional exhausting can be inspected and cleaned a minimum of every 18 months with normal usage. Dryer vent elbows are available through an uninsulated area may cause condensation and faster accumulation of lint. • Compression or crimping of the ... INCORRECT In installations where the exhaust system is not described in the charts, the following method must be used , the more the dryer is used to determine if the exhaust system is required to air fluff (cool down drafts causing an increase in vent restriction...
...64257;ttings in correct direction: Exhaust direction Directional exhausting can be inspected and cleaned a minimum of every 18 months with normal usage. Dryer vent elbows are available through an uninsulated area may cause condensation and faster accumulation of lint. • Compression or crimping of the ... INCORRECT In installations where the exhaust system is not described in the charts, the following method must be used , the more the dryer is used to determine if the exhaust system is required to air fluff (cool down drafts causing an increase in vent restriction...

Installation Instructions (English, Español, Français)
Page 9
... MUST terminate outside the enclosure with the termination securely fastened to the mobile home structure. 4 Refer to previous sections in this (1) dryer or (2) dryer mounted on pedestal to the floor with no obstructions. P/N 137067200. Openings should be installed in diameter with approved Mobile Home ...Installation Kit - Rigid metal duct is preferred. 3 If dryer is exhausted through the floor and area beneath the mobile home is to be 4 inches (10.16 cm) in the same ...
... MUST terminate outside the enclosure with the termination securely fastened to the mobile home structure. 4 Refer to previous sections in this (1) dryer or (2) dryer mounted on pedestal to the floor with no obstructions. P/N 137067200. Openings should be installed in diameter with approved Mobile Home ...Installation Kit - Rigid metal duct is preferred. 3 If dryer is exhausted through the floor and area beneath the mobile home is to be 4 inches (10.16 cm) in the same ...

Installation Instructions (English, Español, Français)
Page 10
...FRONT Alcove 0" (0 cm) 0" (0 cm)* 23" (58.5 cm) n/a Closet 0" (0 cm) 0" (0 cm)* 23" (58.5 cm) 1" (2.5 cm) * Dryer must be a minimum of 18 inches (45.7 cm) above the floor. If the dryer is installed in a garage, it will come in death, explosion, fire or burns. 23" (58.5 cm...;oor line 29" (73.5 cm) to achieve 0" (0 cm) rear installation. 0" (0 cm) 0" (0 cm) 1" (2.5 cm) 0" (0 cm) WARNING EXPLOSION HAZARD Do not install the dryer where gasoline or other flammables are kept or stored. INSTALLATION REQUIREMENTS Clearance requirements IMPORTANT DO NOT INSTALL YOUR...
...FRONT Alcove 0" (0 cm) 0" (0 cm)* 23" (58.5 cm) n/a Closet 0" (0 cm) 0" (0 cm)* 23" (58.5 cm) 1" (2.5 cm) * Dryer must be a minimum of 18 inches (45.7 cm) above the floor. If the dryer is installed in a garage, it will come in death, explosion, fire or burns. 23" (58.5 cm...;oor line 29" (73.5 cm) to achieve 0" (0 cm) rear installation. 0" (0 cm) 0" (0 cm) 1" (2.5 cm) 0" (0 cm) WARNING EXPLOSION HAZARD Do not install the dryer where gasoline or other flammables are kept or stored. INSTALLATION REQUIREMENTS Clearance requirements IMPORTANT DO NOT INSTALL YOUR...

Installation Instructions (English, Español, Français)
Page 11
...must be plugged into an appropriate, copper wired receptacle that is not properly grounded. Electrical shock can cause electrical shorts. Locate the dryer within reach of the receptacle for electrical current. 2 After you purchase and install a 3 wire or 4 wire power supply cord... wired power cord and plug (or vice versa). For a grounded, cord-connected dryer: 1 The dryer MUST be connected to a grounded metal, permanent wiring system; Follow the instructions in accordance with this dryer. WARNING ELECTRICAL SHOCK HAZARD • A U.L.-approved strain relief must be cut by...
...must be plugged into an appropriate, copper wired receptacle that is not properly grounded. Electrical shock can cause electrical shorts. Locate the dryer within reach of the receptacle for electrical current. 2 After you purchase and install a 3 wire or 4 wire power supply cord... wired power cord and plug (or vice versa). For a grounded, cord-connected dryer: 1 The dryer MUST be connected to a grounded metal, permanent wiring system; Follow the instructions in accordance with this dryer. WARNING ELECTRICAL SHOCK HAZARD • A U.L.-approved strain relief must be cut by...

Installation Instructions (English, Español, Français)
Page 12
...plug 12 If it will not fit the outlet, have a proper outlet installed by a qualified electrician. Gas dryer (USA and Canada) 1 The dryer is equipped with a three-prong (grounding) plug for electrical current. 2 Since your protection against shock hazard and should be plugged...properly installed and grounded in accordance with all local codes and ordinances. INSTALLATION INSTRUCTIONS Grounding requirements - Electric dryer (Canada) WARNING ELECTRICAL SHOCK HAZARD Improper connection of the equipment grounding conductor can result in a risk of least resistance for ...
...plug 12 If it will not fit the outlet, have a proper outlet installed by a qualified electrician. Gas dryer (USA and Canada) 1 The dryer is equipped with a three-prong (grounding) plug for electrical current. 2 Since your protection against shock hazard and should be plugged...properly installed and grounded in accordance with all local codes and ordinances. INSTALLATION INSTRUCTIONS Grounding requirements - Electric dryer (Canada) WARNING ELECTRICAL SHOCK HAZARD Improper connection of the equipment grounding conductor can result in a risk of least resistance for ...

Installation Instructions (English, Español, Français)
Page 13
...manual shutoff valve. Manual Shutoff Flare Valve Union GAS FLOW Flare Union Closed Nipple Open Flexible Connector Inlet Pipe on Back of the dryer. semi-rigid or approved pipe from gas supply 4 Check for gas leaks with a manometer. WARNING EXPLOSION HAZARD NEVER test for gas...on all connections by a qualified gas technician. 2 Connect a 1/2 inch (1.27 cm) I.D. Wait a few minutes for the connection. to dryer Shutoff Valve Open position from gas supply line to move through the pipe. gas service without converting the gas valve. Use a 1/2 inch to 3/8 inch ...
...manual shutoff valve. Manual Shutoff Flare Valve Union GAS FLOW Flare Union Closed Nipple Open Flexible Connector Inlet Pipe on Back of the dryer. semi-rigid or approved pipe from gas supply 4 Check for gas leaks with a manometer. WARNING EXPLOSION HAZARD NEVER test for gas...on all connections by a qualified gas technician. 2 Connect a 1/2 inch (1.27 cm) I.D. Wait a few minutes for the connection. to dryer Shutoff Valve Open position from gas supply line to move through the pipe. gas service without converting the gas valve. Use a 1/2 inch to 3/8 inch ...

Installation Instructions (English, Español, Français)
Page 14
...securely. 6 Attach the remaining two power cord outer conductors to the SILVER colored center terminal on the terminal block. Neutral terminal IMPORTANT If moving dryer from a 4-wire system and installing it can be loosely in a 3-wire system!! INSTALLATION INSTRUCTIONS Electrical connection (non-Canada) - 3 wire ...power supply to outlet. 2 Remove the screw securing the terminal block access cover in the lower corner on the back of the dryer. 3 Install a UL-approved strain relief according to the power cord/strain relief manufacturer's instructions in the power cord entry hole below the...
...securely. 6 Attach the remaining two power cord outer conductors to the SILVER colored center terminal on the terminal block. Neutral terminal IMPORTANT If moving dryer from a 4-wire system and installing it can be loosely in a 3-wire system!! INSTALLATION INSTRUCTIONS Electrical connection (non-Canada) - 3 wire ...power supply to outlet. 2 Remove the screw securing the terminal block access cover in the lower corner on the back of the dryer. 3 Install a UL-approved strain relief according to the power cord/strain relief manufacturer's instructions in the power cord entry hole below the...

Installation Instructions (English, Español, Français)
Page 15
...make a sharp bend or crimp wiring/conductor at connections. 9 Follow manufacturer's guidelines for 4-wire system. Tighten the screw securely. 7 Move the internal dryer harness ground (WHITE) wire to the terminal block and attach it can be loosely in place. 4 Thread an UNPLUGGED, UL-approved, 30 amp....Turn off power supply to outlet. 2 Remove the screw securing the terminal block access cover in the lower corner on the back of the dryer. 3 Install a UL-approved strain relief according to the power cord/strain relief manufacturer's instructions in the power cord entry hole below the access...
...make a sharp bend or crimp wiring/conductor at connections. 9 Follow manufacturer's guidelines for 4-wire system. Tighten the screw securely. 7 Move the internal dryer harness ground (WHITE) wire to the terminal block and attach it can be loosely in place. 4 Thread an UNPLUGGED, UL-approved, 30 amp....Turn off power supply to outlet. 2 Remove the screw securing the terminal block access cover in the lower corner on the back of the dryer. 3 Install a UL-approved strain relief according to the power cord/strain relief manufacturer's instructions in the power cord entry hole below the access...
Installation Instructions (English, Español, Français)
Page 16
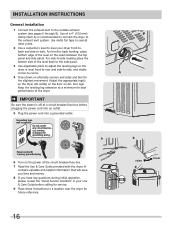
... the exhaust vent system. Grounding type wall receptacle Do not, under any questions during initial operation, please review the "Avoid Service Checklist" in your dryer front-toback and side-to -corner. 4 Press down on the seam between the top panel and side panel. raise lower c d 16 Use ...cord into an outlet. 5 Plug the power cord into a grounded outlet. For side-to-side leveling place the bottom side of the dryer. a A b Power cord with the dryer. It contains valuable and helpful information that will save you time and money. 8 If you have any circumstances, cut, remove, or...
... the exhaust vent system. Grounding type wall receptacle Do not, under any questions during initial operation, please review the "Avoid Service Checklist" in your dryer front-toback and side-to -corner. 4 Press down on the seam between the top panel and side panel. raise lower c d 16 Use ...cord into an outlet. 5 Plug the power cord into a grounded outlet. For side-to-side leveling place the bottom side of the dryer. a A b Power cord with the dryer. It contains valuable and helpful information that will save you time and money. 8 If you have any circumstances, cut, remove, or...
Installation Instructions (English, Español, Français)
Page 17
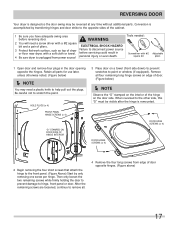
...the "D" stamped on the interior of the hinge on a towel (front side down) to prevent scratches to disconnect power source or floor near dryer, with a soft cloth or towel. When reversed to the other side, this "D" must be reversed at work surface, such as top of door opposite... remaining long hinge screws on edge of door. (Figure below ) Í NOTE You may be visible after the hinge is unplugged from edge of dryer Failure to paint or window (if equipped). before reversing door. Remove all . 4 Remove the four long screws from power source! Conversion is accomplished ...
...the "D" stamped on the interior of the hinge on a towel (front side down) to prevent scratches to disconnect power source or floor near dryer, with a soft cloth or towel. When reversed to the other side, this "D" must be reversed at work surface, such as top of door opposite... remaining long hinge screws on edge of door. (Figure below ) Í NOTE You may be visible after the hinge is unplugged from edge of dryer Failure to paint or window (if equipped). before reversing door. Remove all . 4 Remove the four long screws from power source! Conversion is accomplished ...
Installation Instructions (English, Español, Français)
Page 19
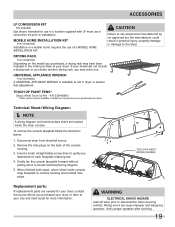
...one. To remove the console faceplate follow the directions below: 1. WARNING ELECTRICAL SHOCK HAZARD Label all wires prior to aid in dryer or washer feet adjustment. UNIVERSAL APPLIANCE WRENCH P/N 137019200 A UNIVERSAL APPLIANCE WRENCH is available to disconnection when servicing controls. TECH DATA ...HOME INSTALLATION KIT. If your model did not include a drying rack or you desire another drying rack, you purchased your dryer or refer to the dryer. Contact the source where you purchased, a drying rack may be available. MOBILE HOME INSTALLATION KIT P/N 137067200 Installation in...
...one. To remove the console faceplate follow the directions below: 1. WARNING ELECTRICAL SHOCK HAZARD Label all wires prior to aid in dryer or washer feet adjustment. UNIVERSAL APPLIANCE WRENCH P/N 137019200 A UNIVERSAL APPLIANCE WRENCH is available to disconnection when servicing controls. TECH DATA ...HOME INSTALLATION KIT. If your model did not include a drying rack or you desire another drying rack, you purchased your dryer or refer to the dryer. Contact the source where you purchased, a drying rack may be available. MOBILE HOME INSTALLATION KIT P/N 137067200 Installation in...

Complete Owner's Guide (English)
Page 1
All about the Use &Care of your Dryer TABLE OF CONTENTS Important Safety Instructions 2-4 Warranty 17 Operating Instructions 5-13 Notes 18 Care and Cleaning 14 Français 19 Solutions to Common Problems 15-16 Español 37 www.frigidaire.com USA 1-800-944-9044 www.frigidaire.ca Canada 1-800-265-8352 137410100A (1211)
All about the Use &Care of your Dryer TABLE OF CONTENTS Important Safety Instructions 2-4 Warranty 17 Operating Instructions 5-13 Notes 18 Care and Cleaning 14 Français 19 Solutions to Common Problems 15-16 Español 37 www.frigidaire.com USA 1-800-944-9044 www.frigidaire.ca Canada 1-800-265-8352 137410100A (1211)

Complete Owner's Guide (English)
Page 2
.... Model Number Serial Number Purchase Date 2 This book contains valuable information about features for future reference. Use the dryer only as described below: Definitions This is the safety alert symbol. Recognize safety symbols, words and labels... potentially hazardous situation which , if not avoided, may not have every feature included. Read all instructions before using this dryer. IMPORTANT SAFETY INSTRUCTIONS WARNING WARNING Please read all instructions before using this appliance. CAUTION CAUTION indicates a potentially hazardous situation ...
.... Model Number Serial Number Purchase Date 2 This book contains valuable information about features for future reference. Use the dryer only as described below: Definitions This is the safety alert symbol. Recognize safety symbols, words and labels... potentially hazardous situation which , if not avoided, may not have every feature included. Read all instructions before using this dryer. IMPORTANT SAFETY INSTRUCTIONS WARNING WARNING Please read all instructions before using this appliance. CAUTION CAUTION indicates a potentially hazardous situation ...


