Complete Owner's Guide (English)
Page 2
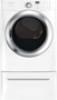
... with a WARNING or CAUTION based on the dryer serial plate located at the top of this Use & Care Guide. This Use and Care Guide provides general operating instructions for your gas supplier from a neighbor's phone. Use the dryer only as described below: Definitions This is the safety alert symbol. Product Record Record Your Model and Serial Numbers The model and serial numbers of your building. • Clear the room...
... with a WARNING or CAUTION based on the dryer serial plate located at the top of this Use & Care Guide. This Use and Care Guide provides general operating instructions for your gas supplier from a neighbor's phone. Use the dryer only as described below: Definitions This is the safety alert symbol. Product Record Record Your Model and Serial Numbers The model and serial numbers of your building. • Clear the room...

Complete Owner's Guide (English)
Page 3
... could ignite or explode. • Do not place items exposed to use an adaptor plug or extension cord or remove grounding prong from electrical power cord. IMPORTANT SAFETY INSTRUCTIONS 240 v Electric Dryer 120 v Gas Dryer 10-30R 3-wire (fused 30 amp) 14-30R 4-wire UL-approved service cord must be connected to catch fire. • Do not dry articles containing rubber, plastic or similar materials such as bras, galoshes...
... could ignite or explode. • Do not place items exposed to use an adaptor plug or extension cord or remove grounding prong from electrical power cord. IMPORTANT SAFETY INSTRUCTIONS 240 v Electric Dryer 120 v Gas Dryer 10-30R 3-wire (fused 30 amp) 14-30R 4-wire UL-approved service cord must be connected to catch fire. • Do not dry articles containing rubber, plastic or similar materials such as bras, galoshes...
Complete Owner's Guide (English)
Page 4
... parts. • Do not tamper with rugs, bedspreads or plastic sheets can result in this Owner's Guide. Common sense and caution must replace the thermal limiter switch after the dryer is moving. Children might use them the proper, safe use any type spray cleanser when cleaning dryer interior. Cartons covered with controls. • Do not install or store the dryer where it checked and reinstalled by an authorized servicer...
... parts. • Do not tamper with rugs, bedspreads or plastic sheets can result in this Owner's Guide. Common sense and caution must replace the thermal limiter switch after the dryer is moving. Children might use them the proper, safe use any type spray cleanser when cleaning dryer interior. Cartons covered with controls. • Do not install or store the dryer where it checked and reinstalled by an authorized servicer...

Complete Owner's Guide (English)
Page 6
WATER VALVE (Steam models only.) The flow of water is supported by electric solenoids. SUSPENSION ROLLERS The dryer drum is controlled by a set some stains. • Place delicate or small items in washing. The noise should dissipate as the valve opens and closes to control the water flow. AIR FLOW SYSTEM Your dryer is normal and can vary with the gas flame. E. Contact a qualified technician immediately...
WATER VALVE (Steam models only.) The flow of water is supported by electric solenoids. SUSPENSION ROLLERS The dryer drum is controlled by a set some stains. • Place delicate or small items in washing. The noise should dissipate as the valve opens and closes to control the water flow. AIR FLOW SYSTEM Your dryer is normal and can vary with the gas flame. E. Contact a qualified technician immediately...
Complete Owner's Guide (English)
Page 7
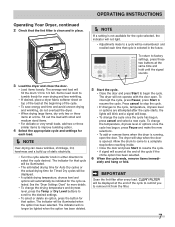
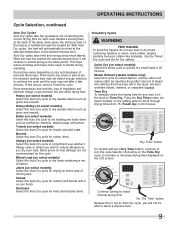
... beginning of static electricity. • Turn the cycle selector knob in place. Items need room to remove lint from the filter. 7 Operating Your Dryer, continued 2 Check that cycle is selected in the future. To return to a cycle will beep. • To change the drying temperature and dryness level, press the Temp or Dry Level buttons to scroll to a complete stop when the door is opened. OPERATING INSTRUCTIONS Í NOTE If...
... beginning of static electricity. • Turn the cycle selector knob in place. Items need room to remove lint from the filter. 7 Operating Your Dryer, continued 2 Check that cycle is selected in the future. To return to a cycle will beep. • To change the drying temperature and dryness level, press the Temp or Dry Level buttons to scroll to a complete stop when the door is opened. OPERATING INSTRUCTIONS Í NOTE If...
Complete Owner's Guide (English)
Page 9
... screen. Press the Dry Time button (on select models) on select models) Select this Auto Dry cycle to the desired dryness level. mixed load casual normal towels heavy/ bulky quick dry delicates steam refresh time dry specialty cycles ready steam system sanitize high normal low air dry max high normal low damp 90 75 60 30 touch up wrinkle release line chime dry delay start chime shrink guard control lock Continue turning to select manual drying time...
... screen. Press the Dry Time button (on select models) on select models) Select this Auto Dry cycle to the desired dryness level. mixed load casual normal towels heavy/ bulky quick dry delicates steam refresh time dry specialty cycles ready steam system sanitize high normal low air dry max high normal low damp 90 75 60 30 touch up wrinkle release line chime dry delay start chime shrink guard control lock Continue turning to select manual drying time...
Complete Owner's Guide (English)
Page 14
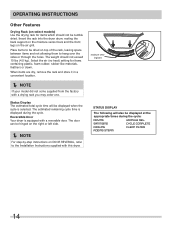
... CYCLE COMPLETE COOLING CLEAN FILTER ADDING STEAM 14 When items are dry, remove the rack and store it in a convenient location. Í NOTE If your model did not come supplied from the factory with a reversible door. The estimated remaining cycle time is equipped with a drying rack you may order one. OPERATING INSTRUCTIONS Other Features Drying Rack (on DOOR REVERSAL, refer to the Installation Instructions supplied with this dryer. The weight should not be hinged on the right...
... CYCLE COMPLETE COOLING CLEAN FILTER ADDING STEAM 14 When items are dry, remove the rack and store it in a convenient location. Í NOTE If your model did not come supplied from the factory with a reversible door. The estimated remaining cycle time is equipped with a drying rack you may order one. OPERATING INSTRUCTIONS Other Features Drying Rack (on DOOR REVERSAL, refer to the Installation Instructions supplied with this dryer. The weight should not be hinged on the right...

Complete Owner's Guide (English)
Page 18
.... INSIDE • Clean the lint filter after every load. Hazardous fumes or electrical shock could result in the Important Safety Instructions and those listed below. • Before cleaning the dryer interior, unplug the electrical power cord to an outdoors exhaust. Never use any accumulation of warm water and mild detergent. CARE AND CLEANING WARNING FIRE HAZARD A clothes dryer produces combustible lint. Regularly inspect the outdoor exhaust opening and in place...
.... INSIDE • Clean the lint filter after every load. Hazardous fumes or electrical shock could result in the Important Safety Instructions and those listed below. • Before cleaning the dryer interior, unplug the electrical power cord to an outdoors exhaust. Never use any accumulation of warm water and mild detergent. CARE AND CLEANING WARNING FIRE HAZARD A clothes dryer produces combustible lint. Regularly inspect the outdoor exhaust opening and in place...
Complete Owner's Guide (English)
Page 20
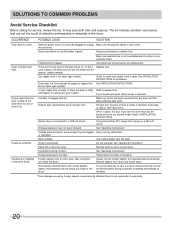
... dryer is not securely plugged in or plug Make sure the plug fits tightly in INSTALLATION INSTRUCTIONS. There are 2 house fuses in dryer too long. See INSTALLATION INSTRUCTIONS for replacement. Exhaust duct requirements have not been followed. Drying time will not operate. (electric models) Gas supply valve is blown, the drum may save both time and expense. Do not overload. Items left in the dryer circuit. Permanently attached items such as coins, pins, clips or buttons...
... dryer is not securely plugged in or plug Make sure the plug fits tightly in INSTALLATION INSTRUCTIONS. There are 2 house fuses in dryer too long. See INSTALLATION INSTRUCTIONS for replacement. Exhaust duct requirements have not been followed. Drying time will not operate. (electric models) Gas supply valve is blown, the drum may save both time and expense. Do not overload. Items left in the dryer circuit. Permanently attached items such as coins, pins, clips or buttons...
Complete Owner's Guide (English)
Page 21
.... Electrolux authorizes no person to correct the installation of the unit. 4. Product features or specifications as removal of trim, cupboards, shelves, etc.,which do not involve malfunction or defects in materials or workmanship, or for service calls to establish the warranty period should service be required. Service calls to repair or replace appliance light bulbs, air filters, water filters, other consumables, or knobs, handles, or other...
.... Electrolux authorizes no person to correct the installation of the unit. 4. Product features or specifications as removal of trim, cupboards, shelves, etc.,which do not involve malfunction or defects in materials or workmanship, or for service calls to establish the warranty period should service be required. Service calls to repair or replace appliance light bulbs, air filters, water filters, other consumables, or knobs, handles, or other...
Installation Instructions (All Languages)
Page 2
... Canadian electrical code C22.1 part 1. • The gas service to light any appliance. • Do not touch any appliance. Do not stack dryer on top of another dryer. ral gas or LP supply, gas dryer) • Carpenter's level • External vent hood • 4-inch (102 mm), rigid metal or semi-rigid metal exhaust duct work • 3-wire or 4-wire 240 volt cord kit (electric dryer) • 4 in. (10.2 cm) clamp • Gas line shutoff valve (gas dryer...
... Canadian electrical code C22.1 part 1. • The gas service to light any appliance. • Do not touch any appliance. Do not stack dryer on top of another dryer. ral gas or LP supply, gas dryer) • Carpenter's level • External vent hood • 4-inch (102 mm), rigid metal or semi-rigid metal exhaust duct work • 3-wire or 4-wire 240 volt cord kit (electric dryer) • 4 in. (10.2 cm) clamp • Gas line shutoff valve (gas dryer...
Installation Instructions (All Languages)
Page 3
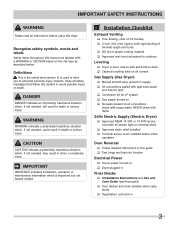
...; Door latches and drum tumbles when cycle starts ‰ Registration card sent in 3 Recognize safety symbols, words and labels Safety items throughout this manual are labeled with a WARNING or CAUTION based on ‰ Dryer plugged in Final Checks ‰ Installation Instructions and Use and Care Guide read all corners Gas Supply (Gas Dryer) ‰ Manual shutoff valve present in supply ‰ All connections sealed with all screws tight on terminal block...
...; Door latches and drum tumbles when cycle starts ‰ Registration card sent in 3 Recognize safety symbols, words and labels Safety items throughout this manual are labeled with a WARNING or CAUTION based on ‰ Dryer plugged in Final Checks ‰ Installation Instructions and Use and Care Guide read all corners Gas Supply (Gas Dryer) ‰ Manual shutoff valve present in supply ‰ All connections sealed with all screws tight on terminal block...

Installation Instructions (All Languages)
Page 4
... type SRDT rated at 240 volt AC minimum, 30 amp, with 4 open end spade lug connectors with upturned ends or closed loop connectors and marked for use with power created by gas powered generators, solar powered generators, wind powered generators or any other generator other than the local utility company is prohibited. GROUNDING CONNECTION - For 3-wire cord connection instructions see ELECTRICAL CONNECTIONS FOR A 4-WIRE SYSTEM. Í NOTE Dryers manufactured for electric dryer CIRCUIT - INSTALLATION REQUIREMENTS...
... type SRDT rated at 240 volt AC minimum, 30 amp, with 4 open end spade lug connectors with upturned ends or closed loop connectors and marked for use with power created by gas powered generators, solar powered generators, wind powered generators or any other generator other than the local utility company is prohibited. GROUNDING CONNECTION - For 3-wire cord connection instructions see ELECTRICAL CONNECTIONS FOR A 4-WIRE SYSTEM. Í NOTE Dryers manufactured for electric dryer CIRCUIT - INSTALLATION REQUIREMENTS...

Installation Instructions (All Languages)
Page 5
... test pressures equal to natural gas, causing gas leaks. time delay fuse or circuit breaker. POWER SUPPLY CORD - GROUNDING CONNECTION - INSTALLATION REQUIREMENTS Electrical requirements for gas supply. 1 Installation MUST conform with local codes, or in the absence of local codes, with the National Fuel Gas Code, ANSI Z223.1 (latest edition). 2 The gas supply line should be 1/2 inch (1.27 cm) pipe. 3 If codes allow, flexible metal tubing may be used to connect your dryer to the gas supply line. Use...
... test pressures equal to natural gas, causing gas leaks. time delay fuse or circuit breaker. POWER SUPPLY CORD - GROUNDING CONNECTION - INSTALLATION REQUIREMENTS Electrical requirements for gas supply. 1 Installation MUST conform with local codes, or in the absence of local codes, with the National Fuel Gas Code, ANSI Z223.1 (latest edition). 2 The gas supply line should be 1/2 inch (1.27 cm) pipe. 3 If codes allow, flexible metal tubing may be used to connect your dryer to the gas supply line. Use...

Installation Instructions (All Languages)
Page 7
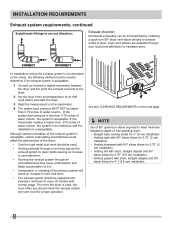
INSTALLATION REQUIREMENTS Exhaust system requirements, continued WARNING FIRE HAZARD A clothes dryer must be connected to an exhaust outdoors. The dryer must be expelled into the duct to assemble the exhaust system. MAXIMUM LENGTH of 4" (102mm) Rigid Metal Duct VENT HOOD TYPE (Preferred) Number of lint around the outdoor exhaust opening and remove any concealed space of a building which can become caught in contact with exhaust system. Regularly inspect the outdoor exhaust opening and in a fi...
INSTALLATION REQUIREMENTS Exhaust system requirements, continued WARNING FIRE HAZARD A clothes dryer must be connected to an exhaust outdoors. The dryer must be expelled into the duct to assemble the exhaust system. MAXIMUM LENGTH of 4" (102mm) Rigid Metal Duct VENT HOOD TYPE (Preferred) Number of lint around the outdoor exhaust opening and remove any concealed space of a building which can become caught in contact with exhaust system. Regularly inspect the outdoor exhaust opening and in a fi...
Installation Instructions (All Languages)
Page 8
... of water column, the system is too restrictive and the installation is acceptable: 1 Connect an inclined or digital manometer between the dryer and the point the exhaust connects to the dryer. 2 Set the dryer timer and temperature to air fluff (cool down) and start the dryer. 3 Read the measurement on the next page. Í NOTE Use of 90° quick-turn 90° dryer vent elbow directly to exhaust outlet of dryer...
... of water column, the system is too restrictive and the installation is acceptable: 1 Connect an inclined or digital manometer between the dryer and the point the exhaust connects to the dryer. 2 Set the dryer timer and temperature to air fluff (cool down) and start the dryer. 3 Read the measurement on the next page. Í NOTE Use of 90° quick-turn 90° dryer vent elbow directly to exhaust outlet of dryer...

Installation Instructions (All Languages)
Page 17
... legs. Remove and discard door tape. IMPORTANT Be sure the power is off at the circuit breaker/fuse box. 5 Read the Use & Care Guide provided with 3-prong grounded plug 17 Grounding type wall receptacle Do not, under any questions during initial operation, please review the "Avoid Service Checklist" in your Use & Care Guide before plugging the power cord into an outlet. 3 Plug the power cord into a grounded outlet. 4 Turn on top of the dryer. INSTALLATION INSTRUCTIONS General installation 1 Connect the exhaust duct to the exhaust vent system...
... legs. Remove and discard door tape. IMPORTANT Be sure the power is off at the circuit breaker/fuse box. 5 Read the Use & Care Guide provided with 3-prong grounded plug 17 Grounding type wall receptacle Do not, under any questions during initial operation, please review the "Avoid Service Checklist" in your Use & Care Guide before plugging the power cord into an outlet. 3 Plug the power cord into a grounded outlet. 4 Turn on top of the dryer. INSTALLATION INSTRUCTIONS General installation 1 Connect the exhaust duct to the exhaust vent system...
Installation Instructions (All Languages)
Page 22
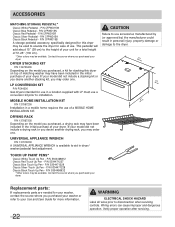
... Pen - Replacement parts: If replacements parts are needed for use in a location supplied with LP must use a conversion kit prior to aid in the initial purchase of a MOBILE HOME INSTALLATION KIT. If your model did not include a stacking kit or you desire another drying rack, you purchased, a drying rack may have been included in dryer/ washer/pedestal feet adjustment. Contact the source where you purchased your washer or refer to disconnection when servicing controls. Wiring errors can...
... Pen - Replacement parts: If replacements parts are needed for use in a location supplied with LP must use a conversion kit prior to aid in the initial purchase of a MOBILE HOME INSTALLATION KIT. If your model did not include a stacking kit or you desire another drying rack, you purchased, a drying rack may have been included in dryer/ washer/pedestal feet adjustment. Contact the source where you purchased your washer or refer to disconnection when servicing controls. Wiring errors can...
Product Specifications Sheet (English)
Page 2
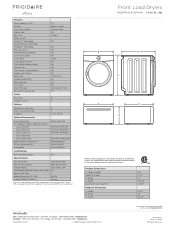
... © 2010 Electrolux Home Products, Inc. Dryers (E & G) Frigidaire Affinity (L models) Front Load Dryers FAQG7072L R / N / A / W 7.0 Cu. Ft.) Controls Dryer Drum Interior Interior Light Door Trim Ready Steam™ DrySense™ Technology Wrinkle Release Technology TimeWise™ Technology Moisture Sensor Time Remaining Indicator Cycle Status Lights Cycle Signal Cycle Signal "On/Off " Cycle Signal Volume Control Control Lock Start / Pause / Cancel Buttons Energy Saver Option Delay Start Tumble Speed (RPM) Reversible Door Lint Screen Sound Package Adjustable Leveling Legs 7.0 Express...
... © 2010 Electrolux Home Products, Inc. Dryers (E & G) Frigidaire Affinity (L models) Front Load Dryers FAQG7072L R / N / A / W 7.0 Cu. Ft.) Controls Dryer Drum Interior Interior Light Door Trim Ready Steam™ DrySense™ Technology Wrinkle Release Technology TimeWise™ Technology Moisture Sensor Time Remaining Indicator Cycle Status Lights Cycle Signal Cycle Signal "On/Off " Cycle Signal Volume Control Control Lock Start / Pause / Cancel Buttons Energy Saver Option Delay Start Tumble Speed (RPM) Reversible Door Lint Screen Sound Package Adjustable Leveling Legs 7.0 Express...
Wiring Diagram (All Languages)
Page 1
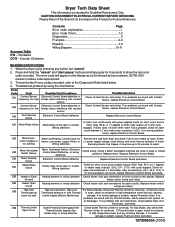
... temperature event and any load from dryer and check if drum turns freely by using the chart below . 4. E66 Thermal Limiter Open Circuit Outlet Thermal Limiter tripped Inlet Thermal Limiter tripped (Gas Model only) or wiring defective Check Outlet Thermal Limiter for continuity. If Thermal Limiter is evident, replace Thermal Limiter. Check motor stopped or heavy; Dryer Tech Data Sheet This information is pressed, check for open circuit between L1 and heater relay connection(s) (J5-1, J5-3, J7-2). CAUTION: DISCONNECT ELECTRICAL CURRENT BEFORE SERVICING...
... temperature event and any load from dryer and check if drum turns freely by using the chart below . 4. E66 Thermal Limiter Open Circuit Outlet Thermal Limiter tripped Inlet Thermal Limiter tripped (Gas Model only) or wiring defective Check Outlet Thermal Limiter for continuity. If Thermal Limiter is evident, replace Thermal Limiter. Check motor stopped or heavy; Dryer Tech Data Sheet This information is pressed, check for open circuit between L1 and heater relay connection(s) (J5-1, J5-3, J7-2). CAUTION: DISCONNECT ELECTRICAL CURRENT BEFORE SERVICING...


