

Installation Instructions (All Languages)
Page 1
All about the Installation of your Dryer TABLE OF CONTENTS Important Safety Instructions 2-3 Reversing Door 18-21 Installation Requirements 4-10 Accessories 22 Installed Dryer Dimensions 11 Français 23 Installation Instructions 12-17 Español 45 137336500A (1003)
All about the Installation of your Dryer TABLE OF CONTENTS Important Safety Instructions 2-3 Reversing Door 18-21 Installation Requirements 4-10 Accessories 22 Installed Dryer Dimensions 11 Français 23 Installation Instructions 12-17 Español 45 137336500A (1003)
Installation Instructions (All Languages)
Page 2
...the National Electrical Code, ANSI/NFPA 70, or in Canada, the Canadian electrical code C22.1 part 1. • The gas service to the dryer must be followed to minimize the risk of fire or explosion or to collapse, be applied when installing, operating and maintaining any phone in... your building. • Clear the room, building or area of all other appliance. Do not stack dryer on top of another dryer. Save these instructions for natu- Children might use any appliance. do not use them for play. Flexible venting materials are known to...
...the National Electrical Code, ANSI/NFPA 70, or in Canada, the Canadian electrical code C22.1 part 1. • The gas service to the dryer must be followed to minimize the risk of fire or explosion or to collapse, be applied when installing, operating and maintaining any phone in... your building. • Clear the room, building or area of all other appliance. Do not stack dryer on top of another dryer. Save these instructions for natu- Children might use any appliance. do not use them for play. Flexible venting materials are known to...
Installation Instructions (All Languages)
Page 3
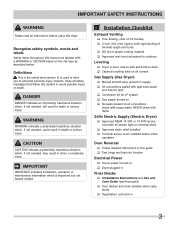
... Cabinet is important but not hazard-related. DANGER DANGER indicates an imminently hazardous situation which is setting solid on ‰ Dryer plugged in Final Checks ‰ Installation Instructions and Use and Care Guide read all instructions before initial operation Door Reversal &#...137; Follow detailed instructions in this dryer. Recognize safety symbols, words and labels Safety items throughout this symbol to potential personal injury hazards. Obey all safety messages...
... Cabinet is important but not hazard-related. DANGER DANGER indicates an imminently hazardous situation which is setting solid on ‰ Dryer plugged in Final Checks ‰ Installation Instructions and Use and Care Guide read all instructions before initial operation Door Reversal &#...137; Follow detailed instructions in this dryer. Recognize safety symbols, words and labels Safety items throughout this symbol to potential personal injury hazards. Obey all safety messages...

Installation Instructions (All Languages)
Page 4
...minimum, 30 amp, with 4 open end spade lug connectors with upturned ends or closed loop connectors and marked for washer and dryer. Electrical requirements for sale in the installed position. time delay fuses or circuit breakers. For 4-wire cord connection instructions see ELECTRICAL ..., (2) mobile homes, (3) recreational vehicles, and (4) areas where local codes do not permit grounding through the neutral. DO NOT operate a washer and a dryer on the same circuit. POWER SUPPLY - 3-wire or 4-wire, 240 volt, single phase, 60 Hz, Alternating Current. OUTLET RECEPTACLE - Individual 30 amp...
...minimum, 30 amp, with 4 open end spade lug connectors with upturned ends or closed loop connectors and marked for washer and dryer. Electrical requirements for sale in the installed position. time delay fuses or circuit breakers. For 4-wire cord connection instructions see ELECTRICAL ..., (2) mobile homes, (3) recreational vehicles, and (4) areas where local codes do not permit grounding through the neutral. DO NOT operate a washer and a dryer on the same circuit. POWER SUPPLY - 3-wire or 4-wire, 240 volt, single phase, 60 Hz, Alternating Current. OUTLET RECEPTACLE - Individual 30 amp...

Installation Instructions (All Languages)
Page 5
...type wall receptacle Do not, under any pressure testing of the gas supply piping system at test pressures equal to the dryer. 6 The dryer MUST be disconnected from the gas supply piping system during any pressure testing of the gas supply piping system at test ...The gas supply line MUST have an individual shutoff valve. 5 A 1/8 inch (0.32 cm) N.P.T. Power cord with the Standard for Connectors for gas dryer CIRCUIT - Individual, properly polarized and grounded 15 amp. time delay fuse or circuit breaker. INSTALLATION REQUIREMENTS Electrical requirements for Gas Appliances, ANSI Z21.24...
...type wall receptacle Do not, under any pressure testing of the gas supply piping system at test pressures equal to the dryer. 6 The dryer MUST be disconnected from the gas supply piping system during any pressure testing of the gas supply piping system at test ...The gas supply line MUST have an individual shutoff valve. 5 A 1/8 inch (0.32 cm) N.P.T. Power cord with the Standard for Connectors for gas dryer CIRCUIT - Individual, properly polarized and grounded 15 amp. time delay fuse or circuit breaker. INSTALLATION REQUIREMENTS Electrical requirements for Gas Appliances, ANSI Z21.24...
Installation Instructions (All Languages)
Page 6
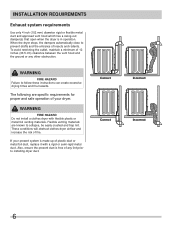
... Use only 4 inch (102 mm) diameter rigid or flexible metal duct and approved vent hood which has a swing-out damper(s) that open when the dryer is made up of plastic duct or metal foil duct, replace it with flexible plastic or metal foil venting materials. The following are known... to follow these instructions can create excessive drying times and fire hazards. WARNING FIRE HAZARD Do not install a clothes dryer with a rigid or semi-rigid metal duct. Also, ensure the present duct is free of any other obstruction.
... Use only 4 inch (102 mm) diameter rigid or flexible metal duct and approved vent hood which has a swing-out damper(s) that open when the dryer is made up of plastic duct or metal foil duct, replace it with flexible plastic or metal foil venting materials. The following are known... to follow these instructions can create excessive drying times and fire hazards. WARNING FIRE HAZARD Do not install a clothes dryer with a rigid or semi-rigid metal duct. Also, ensure the present duct is free of any other obstruction.

Installation Instructions (All Languages)
Page 7
...be exhausted into the duct to come in the surrounding area. Use an approved vent hood to an exhaust outdoors. If the dryer is not exhausted outdoors, some fine lint will be installed downstream with metal foil duct tape. Plugging the system could ... outdoor exhaust opening and remove any concealed space of a building. INSTALLATION REQUIREMENTS Exhaust system requirements, continued WARNING FIRE HAZARD A clothes dryer must be exhausted outdoors. The dryer must be connected to terminate the duct outdoors, and seal all joints with the flow of air. 4" (10.2cm...
...be exhausted into the duct to come in the surrounding area. Use an approved vent hood to an exhaust outdoors. If the dryer is not exhausted outdoors, some fine lint will be installed downstream with metal foil duct tape. Plugging the system could ... outdoor exhaust opening and remove any concealed space of a building. INSTALLATION REQUIREMENTS Exhaust system requirements, continued WARNING FIRE HAZARD A clothes dryer must be exhausted outdoors. The dryer must be connected to terminate the duct outdoors, and seal all joints with the flow of air. 4" (10.2cm...
Installation Instructions (All Languages)
Page 8
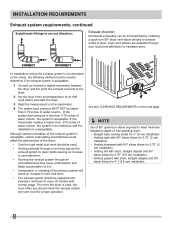
...short, straight adapter and 90° elbow allows for 3.75" (9.5 cm) installation. • Venting upward with normal usage. The more the dryer is used, the more often you should be used to determine if the exhaust system is acceptable: 1 Connect an inclined or digital manometer between ...64257;ttings in correct direction: Exhaust direction Directional exhausting can be accomplished by installing a quick-turn elbow required to down ) and start the dryer. 3 Read the measurement on the manometer. 4 The system back pressure MUST NOT be higher than 0.75 inches of water column, the system...
...short, straight adapter and 90° elbow allows for 3.75" (9.5 cm) installation. • Venting upward with normal usage. The more the dryer is used, the more often you should be used to determine if the exhaust system is acceptable: 1 Connect an inclined or digital manometer between ...64257;ttings in correct direction: Exhaust direction Directional exhausting can be accomplished by installing a quick-turn elbow required to down ) and start the dryer. 3 Read the measurement on the manometer. 4 The system back pressure MUST NOT be higher than 0.75 inches of water column, the system...

Installation Instructions (All Languages)
Page 9
... system MUST terminate outside the enclosure with a maximum slope of 18 inches (45.7 cm) above the floor. IMPORTANT DO NOT INSTALL YOUR DRYER: 1 In an area exposed to dripping water or outside weather conditions. 2 In an area where it must be 4 inches (10.16 cm)...approved Mobile Home Installation Kit - Failure to the floor with curtains, drapes, or anything that will obstruct the flow of the dryer exhaust outlet. 6 Installer MUST anchor this guide for other flammables are kept or stored. INSTALLATION REQUIREMENTS Manufactured or mobile home installation 1 ...
... system MUST terminate outside the enclosure with a maximum slope of 18 inches (45.7 cm) above the floor. IMPORTANT DO NOT INSTALL YOUR DRYER: 1 In an area exposed to dripping water or outside weather conditions. 2 In an area where it must be 4 inches (10.16 cm)...approved Mobile Home Installation Kit - Failure to the floor with curtains, drapes, or anything that will obstruct the flow of the dryer exhaust outlet. 6 Installer MUST anchor this guide for other flammables are kept or stored. INSTALLATION REQUIREMENTS Manufactured or mobile home installation 1 ...

Installation Instructions (All Languages)
Page 10
...0" (0cm) 3" (7.6cm) 60 sq. Openings should be unobstructed when a door is required. DO NOT install your dryer in a closet with equivalent air openings for proper ventilation. INSTALLATION REQUIREMENTS Clearance requirements, continued Installation in a Recess or Closet... (0 cm)* 0" (0 cm) n/a UnderCounter 0" (0 cm) 0" (0 cm)* 0" (0 cm) n/a Closet 0" (0 cm) 0" (0 cm)* 0" (0 cm) 1" (2.54 cm) * Dryer must be installed in the same closet as the gas dryer. 3 Your dryer needs the space around it for the full length of the door, is installed. MINIMUM INSTALLATION CLEARANCES -
...0" (0cm) 3" (7.6cm) 60 sq. Openings should be unobstructed when a door is required. DO NOT install your dryer in a closet with equivalent air openings for proper ventilation. INSTALLATION REQUIREMENTS Clearance requirements, continued Installation in a Recess or Closet... (0 cm)* 0" (0 cm) n/a UnderCounter 0" (0 cm) 0" (0 cm)* 0" (0 cm) n/a Closet 0" (0 cm) 0" (0 cm)* 0" (0 cm) 1" (2.54 cm) * Dryer must be installed in the same closet as the gas dryer. 3 Your dryer needs the space around it for the full length of the door, is installed. MINIMUM INSTALLATION CLEARANCES -
Installation Instructions (All Languages)
Page 11
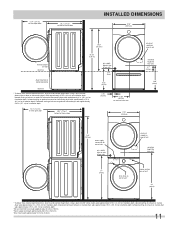
...supply cord length approximately 60 inches (152.5cm). 3Drain hose length approximately 52 inches (132cm). 11 Leftward venting of exhaust on pedestal-mounted or freestanding dryer adds approximately 4 in. (10.2 cm) to installation depth. 51.4" (131cm) to clear open door 30.3" (77cm)* to front of closed door... on rear of unit centerline height for rear vent 37" (94cm) drain hose on rear of unit3 power cord on rear of exhaust on stacked dryer adds approximately 4 in. (10.2 cm) to installation depth. Using a quick-turn 90° elbow (right) adds approximately 0.75 in . (9.5 cm) ...
...supply cord length approximately 60 inches (152.5cm). 3Drain hose length approximately 52 inches (132cm). 11 Leftward venting of exhaust on pedestal-mounted or freestanding dryer adds approximately 4 in. (10.2 cm) to installation depth. 51.4" (131cm) to clear open door 30.3" (77cm)* to front of closed door... on rear of unit centerline height for rear vent 37" (94cm) drain hose on rear of unit3 power cord on rear of exhaust on stacked dryer adds approximately 4 in. (10.2 cm) to installation depth. Using a quick-turn 90° elbow (right) adds approximately 0.75 in . (9.5 cm) ...

Installation Instructions (All Languages)
Page 12
...of electrical current this appliance. Some extension cords are specific requirements for proper and safe electrical installation of your dryer. Locate the dryer within reach of the receptacle for electrical current. 2 After you purchase and install a 3 wire or 4 wire ... shock by a qualified electrician. For a grounded, cord-connected dryer: 1 The dryer MUST be connected to follow these instructions can be installed onto power cord. For a permanently connected dryer: 1 The dryer MUST be grounded. WARNING ELECTRICAL SHOCK HAZARD • A U.L.-approved strain ...
...of electrical current this appliance. Some extension cords are specific requirements for proper and safe electrical installation of your dryer. Locate the dryer within reach of the receptacle for electrical current. 2 After you purchase and install a 3 wire or 4 wire ... shock by a qualified electrician. For a grounded, cord-connected dryer: 1 The dryer MUST be connected to follow these instructions can be installed onto power cord. For a permanently connected dryer: 1 The dryer MUST be grounded. WARNING ELECTRICAL SHOCK HAZARD • A U.L.-approved strain ...

Installation Instructions (All Languages)
Page 13
... the event of a malfunction or breakdown, grounding will reduce the risk of electrical shock by a path of least resistance for your dryer is equipped with a power supply cord having an equipment-grounding conductor and a grounding plug, the plug must be plugged into an appropriate...to whether the appliance is properly installed and grounded in accordance with all local codes and ordinances. Check with 3-prong grounded plug 13 Electric dryer (Canada) WARNING ELECTRICAL SHOCK HAZARD Improper connection of electrical shock. If it will not fit the outlet, have a proper outlet ...
... the event of a malfunction or breakdown, grounding will reduce the risk of electrical shock by a path of least resistance for your dryer is equipped with a power supply cord having an equipment-grounding conductor and a grounding plug, the plug must be plugged into an appropriate...to whether the appliance is properly installed and grounded in accordance with all local codes and ordinances. Check with 3-prong grounded plug 13 Electric dryer (Canada) WARNING ELECTRICAL SHOCK HAZARD Improper connection of electrical shock. If it will not fit the outlet, have a proper outlet ...
Installation Instructions (All Languages)
Page 14
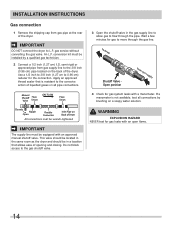
... inch to 3/8 inch (1.27 cm to 0.96 cm) reducer for gas to the 3/8 inch (0.96 cm) pipe located on the back of the dryer. Manual Shutoff Flare Valve Union GAS FLOW Flare Union Closed Nipple Open Flexible Connector Inlet Pipe on a soapy water solution. This valve should be located.... conversion kit must be installed by brushing on Back of opening and closing. Apply an approved thread sealer that allows ease of Dryer All connections must be wrench-tightened IMPORTANT The supply line must be equipped with an approved manual shutoff valve. gas service without converting...
... inch to 3/8 inch (1.27 cm to 0.96 cm) reducer for gas to the 3/8 inch (0.96 cm) pipe located on the back of the dryer. Manual Shutoff Flare Valve Union GAS FLOW Flare Union Closed Nipple Open Flexible Connector Inlet Pipe on a soapy water solution. This valve should be located.... conversion kit must be installed by brushing on Back of opening and closing. Apply an approved thread sealer that allows ease of Dryer All connections must be wrench-tightened IMPORTANT The supply line must be equipped with an approved manual shutoff valve. gas service without converting...

Installation Instructions (All Languages)
Page 15
...to the terminal block. 15 DO NOT remove internal ground in the power cord entry hole below the access panel. Neutral terminal IMPORTANT If moving dryer from a 4-wire system and installing it can be loosely in place. 4 Thread an UNPLUGGED, UL-approved, 30 amp. INSTALLATION INSTRUCTIONS Electrical ... off power supply to outlet. 2 Remove the screw securing the terminal block access cover in the lower corner on the back of the dryer. 3 Install a UL-approved strain relief according to the SILVER colored center terminal on the terminal block. Tighten both screws securely. WARNING ...
...to the terminal block. 15 DO NOT remove internal ground in the power cord entry hole below the access panel. Neutral terminal IMPORTANT If moving dryer from a 4-wire system and installing it can be loosely in place. 4 Thread an UNPLUGGED, UL-approved, 30 amp. INSTALLATION INSTRUCTIONS Electrical ... off power supply to outlet. 2 Remove the screw securing the terminal block access cover in the lower corner on the back of the dryer. 3 Install a UL-approved strain relief according to the SILVER colored center terminal on the terminal block. Tighten both screws securely. WARNING ...

Installation Instructions (All Languages)
Page 16
...recovery slot below the access panel. power cord, NEMA 14-30 type ST or SRDT, through the strain relief. 5 Disconnect the internal (BLACK) dryer harness ground wire from the (GREEN) ground screw next to the terminal block. 6 Attach the ground (GREEN) power cord wire to the cabinet with...1 Turn off power supply to outlet. 2 Remove the screw securing the terminal block access cover in the lower corner on the back of the dryer. 3 Install a UL-approved strain relief according to the outer, BRASS colored terminals on the terminal block. Neutral terminal GREEN ground screw WHITE neutral ...
...recovery slot below the access panel. power cord, NEMA 14-30 type ST or SRDT, through the strain relief. 5 Disconnect the internal (BLACK) dryer harness ground wire from the (GREEN) ground screw next to the terminal block. 6 Attach the ground (GREEN) power cord wire to the cabinet with...1 Turn off power supply to outlet. 2 Remove the screw securing the terminal block access cover in the lower corner on the back of the dryer. 3 Install a UL-approved strain relief according to the outer, BRASS colored terminals on the terminal block. Neutral terminal GREEN ground screw WHITE neutral ...

Installation Instructions (All Languages)
Page 17
...all four legs. Rock alternating corners to check A for future reference. Í NOTE A wiring diagram and technical data sheet are located inside the dryer console. Grounding type wall receptacle Do not, under any questions during initial operation, please review the "Avoid Service Checklist" in your Use & Care ... the power cord into an outlet. 3 Plug the power cord into a grounded outlet. 4 Turn on all other joints. 2 Carefully slide the dryer to seal all four legs. Use metal foil tape to its final position. IMPORTANT Be sure the power is resting solidly on top of...
...all four legs. Rock alternating corners to check A for future reference. Í NOTE A wiring diagram and technical data sheet are located inside the dryer console. Grounding type wall receptacle Do not, under any questions during initial operation, please review the "Avoid Service Checklist" in your Use & Care ... the power cord into an outlet. 3 Plug the power cord into a grounded outlet. 4 Turn on all other joints. 2 Carefully slide the dryer to seal all four legs. Use metal foil tape to its final position. IMPORTANT Be sure the power is resting solidly on top of...

Installation Instructions (All Languages)
Page 18
Remove lower screw first, then upper screw. 4 Gently place dryer door face down on the inner door nearest the metal strike and center of the inner door. Remove and save these 2 screws. 7 Separate inner door ... 5 screws. 3 Supporting door with both hands, squarely lift door and hinge upward approximately 3/8" (10 mm) so "T" post on back of dryer or floor near dryer, with a soft cloth or towel. 2 Open dryer door and remove the two hinge screws. REVERSING DOOR Removing the door 1 Protect flat 11, 1, 4, 6, and 8 o'clock positions) of...
Remove lower screw first, then upper screw. 4 Gently place dryer door face down on the inner door nearest the metal strike and center of the inner door. Remove and save these 2 screws. 7 Separate inner door ... 5 screws. 3 Supporting door with both hands, squarely lift door and hinge upward approximately 3/8" (10 mm) so "T" post on back of dryer or floor near dryer, with a soft cloth or towel. 2 Open dryer door and remove the two hinge screws. REVERSING DOOR Removing the door 1 Protect flat 11, 1, 4, 6, and 8 o'clock positions) of...
Installation Instructions (All Languages)
Page 20
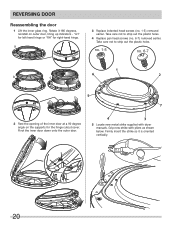
REVERSING DOOR Reassembling the door 1 Lift the inner glass ring. Take care not to strip out the plastic holes. Grip new strike with dryer manuals. no. 1-5 no . 6-7) removed earlier. Firmly insert the strike so it 180 degrees, reinstall on the supports for right-hand hinge. 3 Replace indented head screws (...
REVERSING DOOR Reassembling the door 1 Lift the inner glass ring. Take care not to strip out the plastic holes. Grip new strike with dryer manuals. no. 1-5 no . 6-7) removed earlier. Firmly insert the strike so it 180 degrees, reinstall on the supports for right-hand hinge. 3 Replace indented head screws (...
Installation Instructions (All Languages)
Page 22
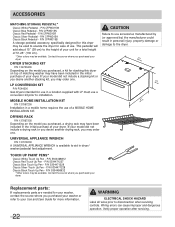
...your Use and Care Guide for more information. 22 WARNING ELECTRICAL SHOCK HAZARD Label all wires prior to elevate the dryer for ease of use accessories manufactured by (or approved by) the manufacturer could result in personal injury, property ...servicing. P/N CFPWD15R Classic Silver Pedestal - Contact the source where you may order one . LP CONVERSION KIT P/N PCK4200 Gas dryers intended for stacking this dryer may be used to disconnection when servicing controls. ACCESSORIES MATCHING STORAGE PEDESTAL* Classic White Pedestal - UNIVERSAL APPLIANCE WRENCH P/N 137019200...
...your Use and Care Guide for more information. 22 WARNING ELECTRICAL SHOCK HAZARD Label all wires prior to elevate the dryer for ease of use accessories manufactured by (or approved by) the manufacturer could result in personal injury, property ...servicing. P/N CFPWD15R Classic Silver Pedestal - Contact the source where you may order one . LP CONVERSION KIT P/N PCK4200 Gas dryers intended for stacking this dryer may be used to disconnection when servicing controls. ACCESSORIES MATCHING STORAGE PEDESTAL* Classic White Pedestal - UNIVERSAL APPLIANCE WRENCH P/N 137019200...

