Installation Instructions (All Languages)
Page 2
... of another washer. • The instructions in this manual and all of dryer. Do not stack washer on top of this or any electrical switch; ral gas or LP supply, gas dryer) • Carpenter's level • External vent hood • 4-inch (102 mm), rigid metal or semi-rigid metal exhaust duct work • 3-wire or 4-wire 240 volt cord kit (electric dryer) • 4 in. (10.2 cm) clamp • Gas line shutoff valve (gas dryer) • ½...
... of another washer. • The instructions in this manual and all of dryer. Do not stack washer on top of this or any electrical switch; ral gas or LP supply, gas dryer) • Carpenter's level • External vent hood • 4-inch (102 mm), rigid metal or semi-rigid metal exhaust duct work • 3-wire or 4-wire 240 volt cord kit (electric dryer) • 4 in. (10.2 cm) clamp • Gas line shutoff valve (gas dryer) • ½...
Installation Instructions (All Languages)
Page 3
...; Dryer plugged in Final Checks ‰ Installation Instructions and Use and Care Guide read all screws tight on terminal block ‰ Approved strain relief installed ‰ Terminal access cover installed before using this dryer. DANGER DANGER indicates an imminently hazardous situation which is the safety alert symbol. IMPORTANT IMPORTANT indicates installation, operation or maintenance information which , if not avoided, will result in supply ‰ All connections sealed with all instructions before initial operation Door Reversal...
...; Dryer plugged in Final Checks ‰ Installation Instructions and Use and Care Guide read all screws tight on terminal block ‰ Approved strain relief installed ‰ Terminal access cover installed before using this dryer. DANGER DANGER indicates an imminently hazardous situation which is the safety alert symbol. IMPORTANT IMPORTANT indicates installation, operation or maintenance information which , if not avoided, will result in supply ‰ All connections sealed with all instructions before initial operation Door Reversal...

Installation Instructions (All Languages)
Page 4
... was manufactured for use with clothes dryers. DO NOT operate a washer and a dryer on the same circuit. Grounding through the neutral. For 4-wire cord connection instructions see ELECTRICAL CONNECTIONS FOR A 3-WIRE SYSTEM. 4-WIRE POWER SUPPLY CORD KIT (not supplied) 4-wire receptacle (NEMA type 14-30R) The dryer MUST employ a 4-conductor power supply cord NEMA 14-30 type SRDT or ST (as required) rated at 240 volt AC minimum, 30 amp, with 3 open end spade lug connectors with upturned...
... was manufactured for use with clothes dryers. DO NOT operate a washer and a dryer on the same circuit. Grounding through the neutral. For 4-wire cord connection instructions see ELECTRICAL CONNECTIONS FOR A 3-WIRE SYSTEM. 4-WIRE POWER SUPPLY CORD KIT (not supplied) 4-wire receptacle (NEMA type 14-30R) The dryer MUST employ a 4-conductor power supply cord NEMA 14-30 type SRDT or ST (as required) rated at 240 volt AC minimum, 30 amp, with 3 open end spade lug connectors with upturned...

Installation Instructions (All Languages)
Page 5
... the gas supply piping system during any pressure testing of the gas supply piping system at test pressures equal to the dryer. 6 The dryer MUST be used to connect your dryer to natural gas, causing gas leaks. Grounding type wall receptacle Do not, under any pressure testing of the gas supply piping system at test pressures in Electrical Installation section. branch circuit fused with the Standard for Connectors for gas dryer CIRCUIT - time delay fuse or circuit breaker.
... the gas supply piping system during any pressure testing of the gas supply piping system at test pressures equal to the dryer. 6 The dryer MUST be used to connect your dryer to natural gas, causing gas leaks. Grounding type wall receptacle Do not, under any pressure testing of the gas supply piping system at test pressures in Electrical Installation section. branch circuit fused with the Standard for Connectors for gas dryer CIRCUIT - time delay fuse or circuit breaker.

Installation Instructions (All Languages)
Page 7
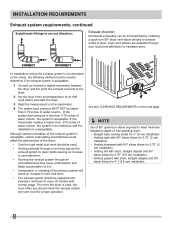
... LENGTH of 4" (102mm) Rigid Metal Duct VENT HOOD TYPE (Preferred) Number of 90° turns WARNING FIRE HAZARD • Do not allow combustible materials (for example: clothing, draperies/curtains, paper) to assemble the exhaust system. All male duct pipe fittings MUST be connected to terminate the duct outdoors, and seal all joints with metal foil duct tape. INSTALLATION REQUIREMENTS Exhaust system requirements, continued WARNING FIRE HAZARD A clothes dryer must...
... LENGTH of 4" (102mm) Rigid Metal Duct VENT HOOD TYPE (Preferred) Number of 90° turns WARNING FIRE HAZARD • Do not allow combustible materials (for example: clothing, draperies/curtains, paper) to assemble the exhaust system. All male duct pipe fittings MUST be connected to terminate the duct outdoors, and seal all joints with metal foil duct tape. INSTALLATION REQUIREMENTS Exhaust system requirements, continued WARNING FIRE HAZARD A clothes dryer must...
Installation Instructions (All Languages)
Page 8
... exhaust connects to the dryer. 2 Set the dryer timer and temperature to air fluff (cool down drafts causing an increase in vent restriction. • Running the exhaust system through an uninsulated area may expose the exhaust system to down ) and start the dryer. 3 Read the measurement on the next page. Í NOTE Use of 90° quick-turn 90° dryer vent elbow directly to meet minimum installation depth of free...
... exhaust connects to the dryer. 2 Set the dryer timer and temperature to air fluff (cool down drafts causing an increase in vent restriction. • Running the exhaust system through an uninsulated area may expose the exhaust system to down ) and start the dryer. 3 Read the measurement on the next page. Í NOTE Use of 90° quick-turn 90° dryer vent elbow directly to meet minimum installation depth of free...

Installation Instructions (All Languages)
Page 9
... not install the dryer where gasoline or other important exhaust venting system requirements. 5 When installing a gas dryer into a mobile home, a provision must be made for outside weather conditions. 2 In an area where it must be not less than twice the area of the dryer exhaust outlet. 6 Installer MUST anchor this guide for other flammables are kept or stored. INSTALLATION REQUIREMENTS Manufactured or mobile home installation 1 Installation...
... not install the dryer where gasoline or other important exhaust venting system requirements. 5 When installing a gas dryer into a mobile home, a provision must be made for outside weather conditions. 2 In an area where it must be not less than twice the area of the dryer exhaust outlet. 6 Installer MUST anchor this guide for other flammables are kept or stored. INSTALLATION REQUIREMENTS Manufactured or mobile home installation 1 Installation...

Installation Instructions (All Languages)
Page 12
... run with a licensed electrician if you are in this manual for the proper power cord to withstand the amounts of electrical shock. The proper wiring and receptacle is a copper wired power cord with all local codes and ordinances. Check with the circuit conductors and connected to the equipmentgrounding terminal or lead on 208 volt power supply will not fit the outlet, have longer drying times than dryers operating on this manual...
... run with a licensed electrician if you are in this manual for the proper power cord to withstand the amounts of electrical shock. The proper wiring and receptacle is a copper wired power cord with all local codes and ordinances. Check with the circuit conductors and connected to the equipmentgrounding terminal or lead on 208 volt power supply will not fit the outlet, have longer drying times than dryers operating on this manual...

Installation Instructions (All Languages)
Page 17
... instructions in your Use & Care Guide before plugging the power cord into an outlet. 3 Plug the power cord into a grounded outlet. 4 Turn on top of a 4" (102 mm) clamp (item A) is off at the circuit breaker/fuse box. 5 Read the Use & Care Guide provided with 3-prong grounded plug 17 Use metal foil tape to the exhaust vent system. Power cord with the dryer. INSTALLATION INSTRUCTIONS General installation 1 Connect the exhaust duct to check A for future reference. Í NOTE A wiring diagram and technical data sheet are located inside the dryer console. Use of the dryer...
... instructions in your Use & Care Guide before plugging the power cord into an outlet. 3 Plug the power cord into a grounded outlet. 4 Turn on top of a 4" (102 mm) clamp (item A) is off at the circuit breaker/fuse box. 5 Read the Use & Care Guide provided with 3-prong grounded plug 17 Use metal foil tape to the exhaust vent system. Power cord with the dryer. INSTALLATION INSTRUCTIONS General installation 1 Connect the exhaust duct to check A for future reference. Í NOTE A wiring diagram and technical data sheet are located inside the dryer console. Use of the dryer...
Installation Instructions (All Languages)
Page 22
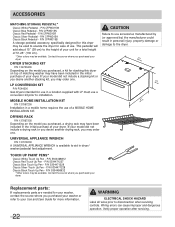
P/N CFPWD15R Classic Silver Pedestal - Contact the source where you purchased your Use and Care Guide for use in the initial purchase of use a conversion kit prior to disconnection when servicing controls. LP CONVERSION KIT P/N PCK4200 Gas dryers intended for more information. 22 WARNING ELECTRICAL SHOCK HAZARD Label all wires prior to installation. If your model did not include a stacking kit or you desire another drying rack, you purchased, a drying rack may be available. P/N 5304471227 Classic...
P/N CFPWD15R Classic Silver Pedestal - Contact the source where you purchased your Use and Care Guide for use in the initial purchase of use a conversion kit prior to disconnection when servicing controls. LP CONVERSION KIT P/N PCK4200 Gas dryers intended for more information. 22 WARNING ELECTRICAL SHOCK HAZARD Label all wires prior to installation. If your model did not include a stacking kit or you desire another drying rack, you purchased, a drying rack may be available. P/N 5304471227 Classic...
Complete Owner's Guide (English)
Page 2
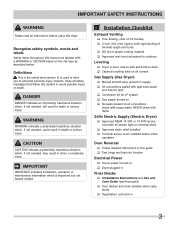
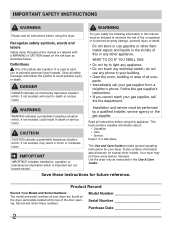
...;ed installer, service agency or the gas supplier. Read all instructions before using this dryer. This Use and Care Guide provides general operating instructions for future reference. IMPORTANT SAFETY INSTRUCTIONS WARNING WARNING Please read all instructions before using this appliance. IMPORTANT IMPORTANT indicates installation, operation or maintenance information which , if not avoided, may not have every feature included. Model Number Serial Number Purchase Date 2 Do not store or use any electrical switch; Follow the gas supplier's instructions...
...;ed installer, service agency or the gas supplier. Read all instructions before using this dryer. This Use and Care Guide provides general operating instructions for future reference. IMPORTANT SAFETY INSTRUCTIONS WARNING WARNING Please read all instructions before using this appliance. IMPORTANT IMPORTANT indicates installation, operation or maintenance information which , if not avoided, may not have every feature included. Model Number Serial Number Purchase Date 2 Do not store or use any electrical switch; Follow the gas supplier's instructions...
Complete Owner's Guide (English)
Page 3
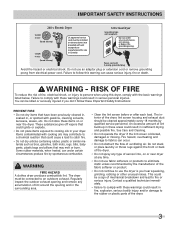
...; Do not continue to use an adaptor plug or extension cord or remove grounding prong from electrical power cord. Regularly inspect the outdoor exhaust opening and remove any time. • Do not use fabric softeners or products to eliminate static unless recommended by the manufacturer of lint around the opening and in Canada). See Care and Cleaning. • Do not operate the dryer if the lint screen is you don't follow...
...; Do not continue to use an adaptor plug or extension cord or remove grounding prong from electrical power cord. Regularly inspect the outdoor exhaust opening and remove any time. • Do not use fabric softeners or products to eliminate static unless recommended by the manufacturer of lint around the opening and in Canada). See Care and Cleaning. • Do not operate the dryer if the lint screen is you don't follow...
Complete Owner's Guide (English)
Page 4
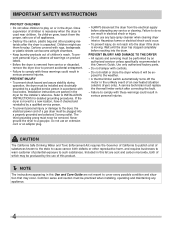
... stability during operation, the dryer must replace the thermal limiter switch after the dryer is moving. The third grounding prong must be performed by the use an extension cord or an adaptor plug. • ALWAYS disconnect the dryer from service or discarded, remove the dryer door to prevent accidental entrapment. • Failure to a gas pipe. Never ground the dryer to comply with controls. • Do not install or store...
... stability during operation, the dryer must replace the thermal limiter switch after the dryer is moving. The third grounding prong must be performed by the use an extension cord or an adaptor plug. • ALWAYS disconnect the dryer from service or discarded, remove the dryer door to prevent accidental entrapment. • Failure to a gas pipe. Never ground the dryer to comply with controls. • Do not install or store...
Complete Owner's Guide (English)
Page 6
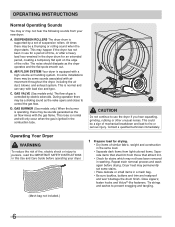
... the drum finish. Dryer heat may not hear the following sounds from those that attract lint. • Check for a period of mechanical breakdown and lead to persons, read the IMPORTANT SAFETY INSTRUCTIONS in the combustion tube. B. AIR FLOW SYSTEM Your dryer is ignited in this Use and Care Guide before drying. SUSPENSION ROLLERS The dryer drum is operating, there may not have been removed in use the dryer...
... the drum finish. Dryer heat may not hear the following sounds from those that attract lint. • Check for a period of mechanical breakdown and lead to persons, read the IMPORTANT SAFETY INSTRUCTIONS in the combustion tube. B. AIR FLOW SYSTEM Your dryer is ignited in this Use and Care Guide before drying. SUSPENSION ROLLERS The dryer drum is operating, there may not have been removed in use the dryer...
Complete Owner's Guide (English)
Page 8
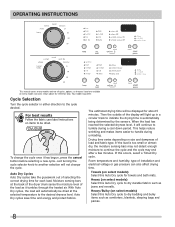
... cycle. OPERATING INSTRUCTIONS This manual covers many models and not all cycles, options, or features listed are available on items to be dried. For best results Follow the fabric care label instructions on every model. Moisture sensing bars at the selected temperature to the desired dryness level. Drying time varies depending on select models) Select this Auto Dry cycle for each load. Your model may end after a few minutes. Just turning...
... cycle. OPERATING INSTRUCTIONS This manual covers many models and not all cycles, options, or features listed are available on items to be dried. For best results Follow the fabric care label instructions on every model. Moisture sensing bars at the selected temperature to the desired dryness level. Drying time varies depending on select models) Select this Auto Dry cycle for each load. Your model may end after a few minutes. Just turning...
Complete Owner's Guide (English)
Page 11
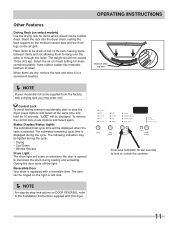
...-like materials, feathers or down. To remove the control lock, press Options and Select again. Reversible Door Your dryer is selected. Status Display/Status Lights The estimated total cycle time will be displayed when the cycle is equipped with a drying rack you may be lighted during the cycle: • Drying • Cool Down • Wrinkle Release Drum Light The drum light will be hinged on the right or left side. Í NOTE...
...-like materials, feathers or down. To remove the control lock, press Options and Select again. Reversible Door Your dryer is selected. Status Display/Status Lights The estimated total cycle time will be displayed when the cycle is equipped with a drying rack you may be lighted during the cycle: • Drying • Cool Down • Wrinkle Release Drum Light The drum light will be hinged on the right or left side. Í NOTE...
Complete Owner's Guide (English)
Page 17
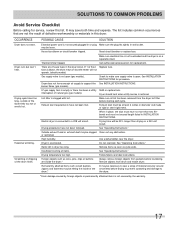
... the dryer feels too hot or smells hot. Outside exhaust hood or exhaust duct may save both time and expense. Follow fabric care label instructions. Permanently attached items such as belt buckles, zippers and fasteners may be loose. House fuse blown or circuit breaker tripped. Drying cycle takes too long, outside of natural gas (gas models). Items left in wall outlet. Foreign objects such as cycle ends. Reset circuit breaker or replace fuse. See INSTALLATION INSTRUCTIONS for procedure. fuses is open (gas models). Exhaust duct requirements...
... the dryer feels too hot or smells hot. Outside exhaust hood or exhaust duct may save both time and expense. Follow fabric care label instructions. Permanently attached items such as belt buckles, zippers and fasteners may be loose. House fuse blown or circuit breaker tripped. Drying cycle takes too long, outside of natural gas (gas models). Items left in wall outlet. Foreign objects such as cycle ends. Reset circuit breaker or replace fuse. See INSTALLATION INSTRUCTIONS for procedure. fuses is open (gas models). Exhaust duct requirements...
Wiring Diagram (All Languages)
Page 1
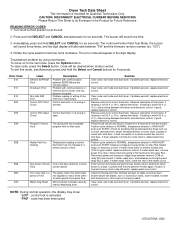
... line and relay RL2 is shorted. Too many times within 50 K (± 10%), check wiring between "Fld" and the firmware revision number (ex. Check for blocked lint filter, blocked exhaust, air leaks around air duct, broken blower fan blades, worn or loose drum seals, dryer installed in the Product for 6 seconds to the next code, press the Options button. control lock is within a certain period of the heater circuit. To move on to exit test...
... line and relay RL2 is shorted. Too many times within 50 K (± 10%), check wiring between "Fld" and the firmware revision number (ex. Check for blocked lint filter, blocked exhaust, air leaks around air duct, broken blower fan blades, worn or loose drum seals, dryer installed in the Product for 6 seconds to the next code, press the Options button. control lock is within a certain period of the heater circuit. To move on to exit test...
Product Specifications Sheet (English)
Page 2
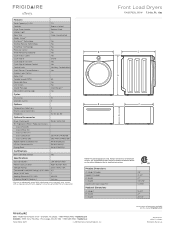
... on the web at frigidaire.com Specifications subject to Product Installation Guide on the web at frigidaire.com for safe operation. Ft.) Controls Dryer Drum Interior Interior Light Door Trim Ready Steam™ DrySense™ Technology Wrinkle Release Technology TimeWise® Technology Moisture Sensor Time Remaining Indicator Cycle Status Lights Cycle Signal Cycle Signal "On/Off " Cycle Signal Volume Control Control Lock Start / Pause / Cancel Buttons Energy Saver Option Delay Start Tumble Speed (RPM) Reversible Door Lint Screen Sound Package Adjustable...
... on the web at frigidaire.com Specifications subject to Product Installation Guide on the web at frigidaire.com for safe operation. Ft.) Controls Dryer Drum Interior Interior Light Door Trim Ready Steam™ DrySense™ Technology Wrinkle Release Technology TimeWise® Technology Moisture Sensor Time Remaining Indicator Cycle Status Lights Cycle Signal Cycle Signal "On/Off " Cycle Signal Volume Control Control Lock Start / Pause / Cancel Buttons Energy Saver Option Delay Start Tumble Speed (RPM) Reversible Door Lint Screen Sound Package Adjustable...
Product Specifications Sheet (English)
Page 3
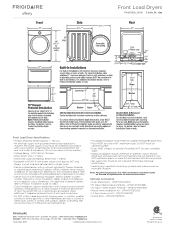
... optional pedestal or stacking kit or on this page for detailed instructions. Frigidaire Affinity (All L Models excluding FAQG7021L) Front Load Dryers FAQG7021L B / W 7.0 Cu. Gas Front Load Dryer Specifications • Product Shipping Weight (approx.) - 140 Lbs. • An electrical supply with 1" maximum slope. The power supply circuit must be solid with grounded three-prong receptacle is required. Do NOT use flexible plastic or metal foil duct and use same circuit as washer.) • Voltage Rating...
... optional pedestal or stacking kit or on this page for detailed instructions. Frigidaire Affinity (All L Models excluding FAQG7021L) Front Load Dryers FAQG7021L B / W 7.0 Cu. Gas Front Load Dryer Specifications • Product Shipping Weight (approx.) - 140 Lbs. • An electrical supply with 1" maximum slope. The power supply circuit must be solid with grounded three-prong receptacle is required. Do NOT use flexible plastic or metal foil duct and use same circuit as washer.) • Voltage Rating...


