
Installation Instructions (All Languages)
Page 2
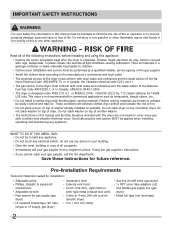
... or semi-rigid metal exhaust duct work • 3-wire or 4-wire 240 volt cord kit (electric dryer) • 4 in. (10.2 cm) clamp • Gas line shutoff valve (gas dryer) • ½ NPT union flare known to collapse, be easily crushed and trap lint. RISK OF FIRE Read all of another washer. • The instructions in this manual and all other appliance. These conditions will obstruct clothes dryer airflow and...
... or semi-rigid metal exhaust duct work • 3-wire or 4-wire 240 volt cord kit (electric dryer) • 4 in. (10.2 cm) clamp • Gas line shutoff valve (gas dryer) • ½ NPT union flare known to collapse, be easily crushed and trap lint. RISK OF FIRE Read all of another washer. • The instructions in this manual and all other appliance. These conditions will obstruct clothes dryer airflow and...
Installation Instructions (All Languages)
Page 3
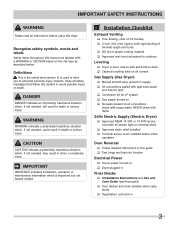
... soapy water, NEVER check with flame 240v Electric Supply (Electric Dryer) ‰ Approved NEMA 10-30R or 14-30R service cord with a WARNING or CAUTION based on ‰ Dryer plugged in Final Checks ‰ Installation Instructions and Use and Care Guide read all screws tight on terminal block ‰ Approved strain relief installed ‰ Terminal access cover installed before using this dryer. IMPORTANT SAFETY INSTRUCTIONS WARNING Please read thoroughly ‰ Door latches and drum tumbles when cycle starts...
... soapy water, NEVER check with flame 240v Electric Supply (Electric Dryer) ‰ Approved NEMA 10-30R or 14-30R service cord with a WARNING or CAUTION based on ‰ Dryer plugged in Final Checks ‰ Installation Instructions and Use and Care Guide read all screws tight on terminal block ‰ Approved strain relief installed ‰ Terminal access cover installed before using this dryer. IMPORTANT SAFETY INSTRUCTIONS WARNING Please read thoroughly ‰ Door latches and drum tumbles when cycle starts...

Installation Instructions (All Languages)
Page 4
... in the installed position. GROUNDING CONNECTION - DO NOT operate a washer and a dryer on the same circuit. Grounding through the neutral. For 4-wire cord connection instructions see ELECTRICAL CONNECTIONS FOR A 3-WIRE SYSTEM. 4-WIRE POWER SUPPLY CORD KIT (not supplied) 4-wire receptacle (NEMA type 14-30R) The dryer MUST employ a 4-conductor power supply cord NEMA 14-30 type SRDT or ST (as required) rated at 240 volt AC minimum, 30 amp, with 3 open end spade lug connectors with upturned...
... in the installed position. GROUNDING CONNECTION - DO NOT operate a washer and a dryer on the same circuit. Grounding through the neutral. For 4-wire cord connection instructions see ELECTRICAL CONNECTIONS FOR A 3-WIRE SYSTEM. 4-WIRE POWER SUPPLY CORD KIT (not supplied) 4-wire receptacle (NEMA type 14-30R) The dryer MUST employ a 4-conductor power supply cord NEMA 14-30 type SRDT or ST (as required) rated at 240 volt AC minimum, 30 amp, with 3 open end spade lug connectors with upturned...

Installation Instructions (All Languages)
Page 5
... of local codes, with the National Fuel Gas Code, ANSI Z223.1 (latest edition). 2 The gas supply line should be 1/2 inch (1.27 cm) pipe. 3 If codes allow, flexible metal tubing may be used to connect your dryer to the gas supply line. Individual, properly polarized and grounded 15 amp. time delay fuse or circuit breaker. GROUNDING CONNECTION - POWER SUPPLY CORD - branch circuit fused with 15 amp. plugged tapping, accessible for test gauge connection, MUST...
... of local codes, with the National Fuel Gas Code, ANSI Z223.1 (latest edition). 2 The gas supply line should be 1/2 inch (1.27 cm) pipe. 3 If codes allow, flexible metal tubing may be used to connect your dryer to the gas supply line. Individual, properly polarized and grounded 15 amp. time delay fuse or circuit breaker. GROUNDING CONNECTION - POWER SUPPLY CORD - branch circuit fused with 15 amp. plugged tapping, accessible for test gauge connection, MUST...

Installation Instructions (All Languages)
Page 7
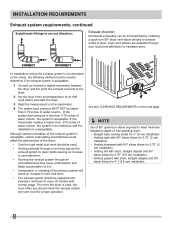
... venting, do not exceed 8 ft. (2.4 m) duct length. 7 INSTALLATION REQUIREMENTS Exhaust system requirements, continued WARNING FIRE HAZARD A clothes dryer must be connected to terminate the duct outdoors, and seal all joints with metal foil duct tape. An accumulation of lint in contact with exhaust system. Regularly inspect the outdoor exhaust opening and in the exhaust system. Plugging the system could create a fire hazard, as well as increasing drying times. A clothes dryer produces combustible lint. Lint...
... venting, do not exceed 8 ft. (2.4 m) duct length. 7 INSTALLATION REQUIREMENTS Exhaust system requirements, continued WARNING FIRE HAZARD A clothes dryer must be connected to terminate the duct outdoors, and seal all joints with metal foil duct tape. An accumulation of lint in contact with exhaust system. Regularly inspect the outdoor exhaust opening and in the exhaust system. Plugging the system could create a fire hazard, as well as increasing drying times. A clothes dryer produces combustible lint. Lint...
Installation Instructions (All Languages)
Page 8
... must be used to determine if the exhaust system is acceptable: 1 Connect an inclined or digital manometer between the dryer and the point the exhaust connects to the dryer. 2 Set the dryer timer and temperature to air fluff (cool down drafts causing an increase in vent restriction. • Running the exhaust system through your local parts distributor or hardware store. The more the dryer is used . • Venting vertically...
... must be used to determine if the exhaust system is acceptable: 1 Connect an inclined or digital manometer between the dryer and the point the exhaust connects to the dryer. 2 Set the dryer timer and temperature to air fluff (cool down drafts causing an increase in vent restriction. • Running the exhaust system through your local parts distributor or hardware store. The more the dryer is used . • Venting vertically...

Installation Instructions (All Languages)
Page 9
... exhaust venting system requirements. 5 When installing a gas dryer into a mobile home, a provision must be 4 inches (10.16 cm) in a garage, it will not support combustion. If the dryer is to be not less than twice the area of the dryer exhaust outlet. 6 Installer MUST anchor this guide for other flammables are kept or stored. Metal ducting must be made for outside make up air...
... exhaust venting system requirements. 5 When installing a gas dryer into a mobile home, a provision must be 4 inches (10.16 cm) in a garage, it will not support combustion. If the dryer is to be not less than twice the area of the dryer exhaust outlet. 6 Installer MUST anchor this guide for other flammables are kept or stored. Metal ducting must be made for outside make up air...

Installation Instructions (All Languages)
Page 12
... use an aluminum wired receptacle with a copper wired power cord and plug (or vice versa). Refer to the pre-installation requirements in doubt as to whether the appliance is properly grounded. Electric dryer (USA) WARNING ELECTRICAL SHOCK HAZARD Improper connection of the equipment grounding conductor can result in a risk of electrical current this manual for the proper power cord to be purchased. Check with the circuit conductors and connected...
... use an aluminum wired receptacle with a copper wired power cord and plug (or vice versa). Refer to the pre-installation requirements in doubt as to whether the appliance is properly grounded. Electric dryer (USA) WARNING ELECTRICAL SHOCK HAZARD Improper connection of the equipment grounding conductor can result in a risk of electrical current this manual for the proper power cord to be purchased. Check with the circuit conductors and connected...

Installation Instructions (All Languages)
Page 17
... initial operation, please review the "Avoid Service Checklist" in your Use & Care Guide before plugging the power cord into an outlet. 3 Plug the power cord into a grounded outlet. 4 Turn on all four legs. Remove and discard door tape. The dryer MUST be level and resting solidly on top of the legs until the dryer is off at a circuit breaker/fuse box before calling for service. 7 Place these instructions in a location near the dryer for stability. Use metal...
... initial operation, please review the "Avoid Service Checklist" in your Use & Care Guide before plugging the power cord into an outlet. 3 Plug the power cord into a grounded outlet. 4 Turn on all four legs. Remove and discard door tape. The dryer MUST be level and resting solidly on top of the legs until the dryer is off at a circuit breaker/fuse box before calling for service. 7 Place these instructions in a location near the dryer for stability. Use metal...
Installation Instructions (All Languages)
Page 22
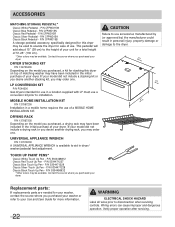
... your dryer. CAUTION Failure to use a conversion kit prior to disconnection when servicing controls. If your dryer. LP CONVERSION KIT P/N PCK4200 Gas dryers intended for your washer, contact the source where you purchased, a drying rack may order one . P/N 5304471229 Classic Silver Touch Up Pen - P/N 5304471228 Classic Black Touch Up Pen - P/N 5304468812 Classic Red Touch Up Pen - P/N CFPWD15A Classic Black Pedestal - Replacement parts: If replacements parts are needed for use in a location supplied...
... your dryer. CAUTION Failure to use a conversion kit prior to disconnection when servicing controls. If your dryer. LP CONVERSION KIT P/N PCK4200 Gas dryers intended for your washer, contact the source where you purchased, a drying rack may order one . P/N 5304471229 Classic Silver Touch Up Pen - P/N 5304471228 Classic Black Touch Up Pen - P/N 5304468812 Classic Red Touch Up Pen - P/N CFPWD15A Classic Black Pedestal - Replacement parts: If replacements parts are needed for use in a location supplied...
Complete Owner's Guide (English)
Page 2
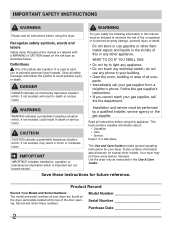
.... Model Number Serial Number Purchase Date 2 Recognize safety symbols, words and labels Safety items throughout this manual are found on the risk type as instructed in your dryer. IMPORTANT SAFETY INSTRUCTIONS WARNING WARNING Please read all instructions before using this dryer. Installation and service must be performed by a qualified installer, service agency or the gas supplier. Read all safety messages that follow this or any electrical switch...
.... Model Number Serial Number Purchase Date 2 Recognize safety symbols, words and labels Safety items throughout this manual are found on the risk type as instructed in your dryer. IMPORTANT SAFETY INSTRUCTIONS WARNING WARNING Please read all instructions before using this dryer. Installation and service must be performed by a qualified installer, service agency or the gas supplier. Read all safety messages that follow this or any electrical switch...
Complete Owner's Guide (English)
Page 3
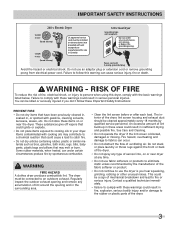
... A clothes dryer produces combustible lint. The interior of the dryer, lint screen housing and exhaust duct should be cleaned approximately every 18 months by the manufacturer of the fabric softener or product. • Do not continue to use an adaptor plug or extension cord or remove grounding prong from electrical power cord. IMPORTANT SAFETY INSTRUCTIONS 240 v Electric Dryer 120 v Gas Dryer 10-30R 3-wire (fused 30 amp) 14-30R 4-wire UL-approved service cord must be connected to...
... A clothes dryer produces combustible lint. The interior of the dryer, lint screen housing and exhaust duct should be cleaned approximately every 18 months by the manufacturer of the fabric softener or product. • Do not continue to use an adaptor plug or extension cord or remove grounding prong from electrical power cord. IMPORTANT SAFETY INSTRUCTIONS 240 v Electric Dryer 120 v Gas Dryer 10-30R 3-wire (fused 30 amp) 14-30R 4-wire UL-approved service cord must be connected to...
Complete Owner's Guide (English)
Page 4
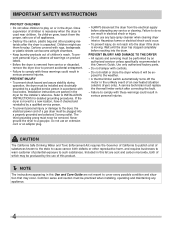
... this Use and Care Guide are not meant to cover every possible condition and situation that may be plugged into the drum. If the dryer is removed from the electrical supply before reaching into a properly grounded and polarized 3-prong outlet. PREVENT INJURY AND DAMAGE TO THE DRYER • All repairs and servicing must be exposed to the weather. • A thermal limiter switch automatically turns off the motor in...
... this Use and Care Guide are not meant to cover every possible condition and situation that may be plugged into the drum. If the dryer is removed from the electrical supply before reaching into a properly grounded and polarized 3-prong outlet. PREVENT INJURY AND DAMAGE TO THE DRYER • All repairs and servicing must be exposed to the weather. • A thermal limiter switch automatically turns off the motor in...
Complete Owner's Guide (English)
Page 6
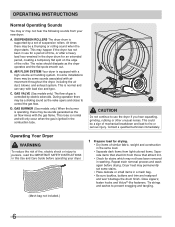
... sure buckles, buttons and trim are heatproof and won't damage the drum finish. AIR FLOW SYSTEM Your dryer is controlled by a set some stains. • Place delicate or small items in this Use and Care Guide before drying. During operation there may be a clicking sound as the valve opens and closes to prevent snagging and tangling. (Mesh bag not included.) 6 Dryer heat may be sounds...
... sure buckles, buttons and trim are heatproof and won't damage the drum finish. AIR FLOW SYSTEM Your dryer is controlled by a set some stains. • Place delicate or small items in this Use and Care Guide before drying. During operation there may be a clicking sound as the valve opens and closes to prevent snagging and tangling. (Mesh bag not included.) 6 Dryer heat may be sounds...
Complete Owner's Guide (English)
Page 7
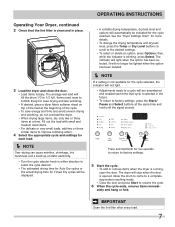
... or remove items when the dryer is opened. Allow the drum to come to a complete stop when the door is running, open the door. Fill out the load with small and medium sized items. • For delicate or very small loads, add two or three similar items to improve tumbling action. 4 Select the appropriate cycle and settings for each time that the lint filter is blinking...
... or remove items when the dryer is opened. Allow the drum to come to a complete stop when the door is running, open the door. Fill out the load with small and medium sized items. • For delicate or very small loads, add two or three similar items to improve tumbling action. 4 Select the appropriate cycle and settings for each time that the lint filter is blinking...
Complete Owner's Guide (English)
Page 8
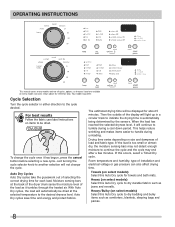
... change the cycle. The estimated drying time will continue to handle during a cool down period. Auto Dry Cycles Auto Dry cycles take the guesswork out of the load as it will be dried. Room temperature and humidity, type of load and fabric type. OPERATING INSTRUCTIONS This manual covers many models and not all cycles, options, or features listed are available on select models) Select this Auto Dry cycle for about 5 minutes. Auto Dry cycles save time and energy and...
... change the cycle. The estimated drying time will continue to handle during a cool down period. Auto Dry Cycles Auto Dry cycles take the guesswork out of the load as it will be dried. Room temperature and humidity, type of load and fabric type. OPERATING INSTRUCTIONS This manual covers many models and not all cycles, options, or features listed are available on select models) Select this Auto Dry cycle for about 5 minutes. Auto Dry cycles save time and energy and...
Complete Owner's Guide (English)
Page 11
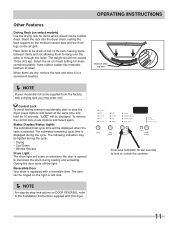
... controls. 11 Reversible Door Your dryer is opened to be tumble dried. Press and hold for 10 seconds. OPERATING INSTRUCTIONS Other Features Drying Rack (on select models) Use the drying rack for items which should not exceed 10 lbs (4.5 kg). The estimated remaining cycle time is selected. To remove the control lock, press Options and Select again. Place items to illuminate the drum during loading and unloading. Closing the door turns off the light...
... controls. 11 Reversible Door Your dryer is opened to be tumble dried. Press and hold for 10 seconds. OPERATING INSTRUCTIONS Other Features Drying Rack (on select models) Use the drying rack for items which should not exceed 10 lbs (4.5 kg). The estimated remaining cycle time is selected. To remove the control lock, press Options and Select again. Place items to illuminate the drum during loading and unloading. Closing the door turns off the light...
Complete Owner's Guide (English)
Page 17
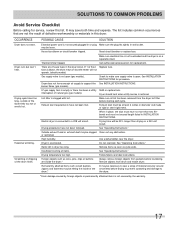
... the plug fits tightly in INSTALLATION INSTRUCTIONS. Dryer should heat when utility service is clogged with lint. Exhaust duct must not exceed length listed in wall outlet. Drying temperature too high. Remove objects from pockets before starting each cycle. Thermal limiter tripped. Check to the dryer. *Drum damage caused by the warranty. 17 Lint filter is restored. Remove items as soon as belt buckles, zippers and fasteners may turn but won't heat. Dryer runs but the heater will...
... the plug fits tightly in INSTALLATION INSTRUCTIONS. Dryer should heat when utility service is clogged with lint. Exhaust duct must not exceed length listed in wall outlet. Drying temperature too high. Remove objects from pockets before starting each cycle. Thermal limiter tripped. Check to the dryer. *Drum damage caused by the warranty. 17 Lint filter is restored. Remove items as soon as belt buckles, zippers and fasteners may turn but won't heat. Dryer runs but the heater will...
Product Specifications Sheet (English)
Page 2
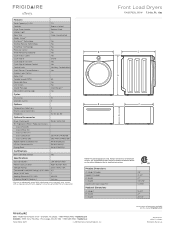
... national electric, gas and plumbing codes. Dryers (E & G) Frigidaire Affinity (L models) Front Load FAQG7021L B / W Dryers 7.0 Cu. Front Load Laundry - Product Dimensions A - Ft.) Controls Dryer Drum Interior Interior Light Door Trim Ready Steam™ DrySense™ Technology Wrinkle Release Technology TimeWise® Technology Moisture Sensor Time Remaining Indicator Cycle Status Lights Cycle Signal Cycle Signal "On/Off " Cycle Signal Volume Control Control Lock Start / Pause / Cancel Buttons Energy Saver Option Delay Start Tumble Speed (RPM) Reversible Door Lint Screen Sound...
... national electric, gas and plumbing codes. Dryers (E & G) Frigidaire Affinity (L models) Front Load FAQG7021L B / W Dryers 7.0 Cu. Front Load Laundry - Product Dimensions A - Ft.) Controls Dryer Drum Interior Interior Light Door Trim Ready Steam™ DrySense™ Technology Wrinkle Release Technology TimeWise® Technology Moisture Sensor Time Remaining Indicator Cycle Status Lights Cycle Signal Cycle Signal "On/Off " Cycle Signal Volume Control Control Lock Start / Pause / Cancel Buttons Energy Saver Option Delay Start Tumble Speed (RPM) Reversible Door Lint Screen Sound...
Product Specifications Sheet (English)
Page 3
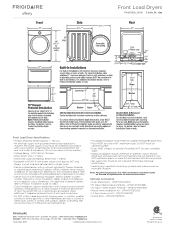
... Drawer Pedestal - (PN # CFPWD15W). • Mobile Home Installation Kit - (PN # 137067200). • LP Gas Conversion Kit - (PN # PCK4200). • Drying Rack - (PN # 137067300). Specifications subject to Product Installation Guide on this page for detailed instructions. Gas Front Load Dryer Specifications • Product Shipping Weight (approx.) - 140 Lbs. • An electrical supply with 1" maximum slope. each, located 3" from top and bottom of building, NOT into any concealed space. • Exhaust installation requires...
... Drawer Pedestal - (PN # CFPWD15W). • Mobile Home Installation Kit - (PN # 137067200). • LP Gas Conversion Kit - (PN # PCK4200). • Drying Rack - (PN # 137067300). Specifications subject to Product Installation Guide on this page for detailed instructions. Gas Front Load Dryer Specifications • Product Shipping Weight (approx.) - 140 Lbs. • An electrical supply with 1" maximum slope. each, located 3" from top and bottom of building, NOT into any concealed space. • Exhaust installation requires...


